[译]使用TensorFlow将对象检测添加到机器人项目
By robot-v1.0
本文链接 https://www.kyfws.com/ai/adding-object-detection-with-tensorflow-to-a-robot-zh/
版权声明 本博客所有文章除特别声明外,均采用 BY-NC-SA 许可协议。转载请注明出处!
- 23 分钟阅读 - 11321 个词 阅读量 0使用TensorFlow将对象检测添加到机器人项目(译文)
原文地址:https://www.codeproject.com/Articles/1268309/Adding-Object-Detection-with-TensorFlow-to-a-Robot
原文作者:Phil Hopley
译文由本站 robot-v1.0 翻译
前言
In this article, we will add AI to an existing ROS (Robot Operating System) House Bot.
在本文中,我们将AI添加到现有的ROS(机器人操作系统)House Bot中.
介绍(Introduction)
我目前正在本网站上的一系列名为""(I’m currently documenting the development of a hobbyist robotic project on this site under the series of articles called, “) Rodney-期待已久的自主机器人(Rodney - A long time coming autonomous robot) “.在我的书桌上,我有一堆便笺,上面写着乱七八糟的想法,以备将来使用.其中一个便笺已写在上面”(”. On my desk, I have a stack of post-it notes with scribbled ideas for future development. One of these notes has written upon it “)AI TensorFlow对象检测(AI TensorFlow object detection)".我不记得是什么时候或我在做什么,这促使我写这篇说明,但是由于Code Project当前正在运行”(". I can’t remember when or what I was doing that prompted me to write this note, but as Code Project is currently running the “)AI TensorFlow挑战(AI TensorFlow Challenge)",这似乎是一个理想的时机.(”, it seems like an ideal time to look at the subject.)
机器人的视野(A robot’s view)## 背景(Background)
我的机器人使用机器人操作系统(ROS).这是机器人编程的事实上的标准,在本文中,我们将TensorFlow集成到ROS包中.我会尽量减少ROS代码的详细信息,但是如果您想了解更多信息,我是否可以建议您访问(My robot uses the Robot Operating System (ROS). This is a de facto standard for robot programming and in this article, we will integrate TensorFlow into a ROS package. I’ll try and keep the details of the ROS code to a minimum but if you wish to know more, can I suggest you visit the) 机器人操作系统(Robot Operating System) 网站并阅读我在Rodney上的文章.(site and read my articles on Rodney.)
罗德尼已经能够动动脑袋,环顾四周,并向他认识的家人致以问候.为此,我们利用了OpenCV人脸检测和识别调用.我们将以类似的方式使用TensorFlow来检测房屋周围的物体,例如家庭宠物.(Rodney is already capable of moving his head and looking around and greeting family members that he recognizes. To do this, we make use of the OpenCV face detection and recognition calls. We will use TensorFlow in a similar manner to detect objects around the home, like for instance a family pet.)
最终,该机器人将能够在家庭中导航,以寻找向其发送消息的特定家庭成员.同样,假设您要晚回家,并希望检查家犬.通过使用Web界面,您可以指示机器人找到狗并向您显示它在做什么的视频提要.现在在我们家,我们要说我们的狗没有被宠坏,而是被爱着.这意味着她可以在任何房间睡觉,因此机器人将需要在整个房屋中导航.但是到目前为止,在本文中,我们将只检查机器人头部运动范围内的狗.(Eventually, the robot will be capable of navigating around the home looking for a particular family member to deliver a message to. Likewise, imagine you are running late returning home and wished to check on the family dog. With the use of a web interface, you could instruct the robot to locate the dog and show you a video feed of what it’s doing. Now in our house, we like to say our dog is not spoilt, she is loved. Which means she gets to sleep in any room, so the robot will need to navigate throughout the house. But for now in this article, we will just check for the dog within the robots head movement range.)
如果您对ROS或机器人技术不感兴趣,我会提供一个非ROS测试脚本,该脚本可用于仅运行对象检测库中包含的代码.(If you don’t have an interest in ROS or robotics, I have included a non ROS test script that can be used to run just the code contained in the object detection library.)
我最近读了一本书,建议将来所有软件工程师都需要深度学习的工作知识.随着您还需要关注的其他技术的迅速发展,这是一个大胆的声明.因此,如果您不了解"损失函数"中的"秩2张量",那么如何开始?(I recently read a book that suggested in the future all software engineers will need a working knowledge of deep learning. With the rapid development of other technologies that you also need to keep an eye on, that’s a bold statement. So if you don’t know your “rank-2 tensors” from your “loss function”, how do you get started?)
在本文中,我将展示如何在有限的时间和有限的TensorFlow知识下启动并运行完整的工作系统.(In this article, I’ll show how to get a complete working system up and running with limited time and with limited TensorFlow knowledge.)

站在巨人的肩膀上(Standing on the Shoulder of Giants)
好的,到目前为止,很明显,我们将使用Google的TensorFlow进行机器学习.但是,Google还提供了一些其他资源,这些资源将使我们的对象检测应用程序更易于启动和运行.(OK, so it’s obvious so far that we are going to use Google’s TensorFlow for our machine learning. However, Google also makes some other resources available that are going to make our object detection application easier to get up and running.)
首先是(The first of these is) Tensorflow对象检测API(Tensorflow Object Detection API) .如GitHub页面所述,此API" …是在TensorFlow之上构建的开源框架,可轻松构建,训练和部署对象检测模型".(. As the GitHub page states, this API “… is an open source framework built on top of TensorFlow that makes it easy to construct, train and deploy object detection models”.)
现在,稍等片刻,它会显示" …使构建,训练…变得容易"模型.当然,这仍然需要大量工作,并且需要对神经网络有一个很好的了解?(Now wait a minute it says “… makes it easy to construct, train …” a model. Surely, that’s still a lot of work and a good understanding of neural networks will be required?)
嗯,不是这样,因为我们要利用的第二个资源是Google的(Well, not really, since the second resource we are going to take advantage of is Google’s) Tensorflow检测模型动物园(Tensorflow detection model zoo) .它包含许多预训练的对象检测模型,我们只需下载一个模型即可识别90个不同的对象类,然后从我们的代码中访问它.(. This contains a number of pre-trained object detection models and we will simply download one, which can recognize 90 different object classes, and access it from our code.)
Raspberry Pi安装(Raspberry Pi Installation)
现在我必须说这有点棘手.尽管Internet上有很多视频和书面说明可用于在包括Raspberry Pi在内的各种设备上安装TensorFlow,但都没有一个完美地适合我的设置.(Now I must say this was a bit tricky. Although there are lots of videos and written instructions on the Internet for installing TensorFlow on all sorts of the devices, including the Raspberry Pi, none fitted my setup perfectly.)
为了进行机器人开发,我使用了免费的Raspberry Pi图片(For my robot development, I use a free Raspberry Pi image from the) 泛在机器人(Ubiquity Robotics) 网站.该映像已经包含ROS的Kinetic版本,OpenCV,并且基于Ubuntu的轻量级版本,(website. This image already includes the Kinetic version of ROS, OpenCV and is based on the lightweight version of Ubuntu,) lubuntu(lubuntu) .(.)
提供了在Rodney上复制我的设置的说明(Instructions to replicate my setup on Rodney are available) 在此GitHub网站上(on this GitHub site) .(.)
如果您希望运行非ros版本的代码,则需要以下内容.我安装的版本显示在括号中.即使没有ROS,您可能仍想查看GitHub网站,以获取有关设置和编译协议缓冲区以及设置Python路径的说明.(The following is required if you wish to run the non-ros version of the code. The versions I have installed are shown in parenthesis. Even without ROS, you may still want to take a look at the GitHub site for instructions on setting up and compiling Protocol Buffers and setting the Python path.)
- OpenCV2(3.3.1-dev)(OpenCV2 (3.3.1-dev))
- 巨蟒(2.7)(Python (2.7))
- TensorFlow(适用于Python 2.7的1.11.0)(TensorFlow (1.11.0 for Python 2.7))
- 协议缓冲区(3.6.1)(Protocol Buffers (3.6.1)) 您还需要下载(You will also need to download the) TensorFlow模型库(TensorFlow model repository) 和预先训练的模型由于我在Raspberry Pi上运行,因此我需要一个可以快速运行的模型,但缺点是检测精度较低.因此,我正在使用(and a pre-trained model. Since I’m running on a Raspberry Pi, I need a model which will run fast but the downside is it will have a lower accuracy of detection. I’m therefore using the) ssdlite_mobilenet_v2_coco(ssdlite_mobilenet_v2_coco) 模型.(model.)
如果您需要基于Raspberry Pi的机器人更高的精度,可以使用一些方法来使用速度较慢但更好的检测模型.由于ROS可以跨分布式网络运行.您可以使用专门用于运行模型的第二个Pi,甚至可以在具有更高计算能力的单独工作站上运行模型.(If you require higher accuracy in your Raspberry Pi based robot, there are ways to use a slower but better detection model. As ROS can run across a distributed network. You could use a second Pi which is just dedicated to running the model or even run the model on a separate workstation with more computing power.)
代码(The Code)
我将详细描述包含对象检测代码的ROS软件包,其余的机器人代码将使用图表进行描述.该代码在"(I’ll describe the ROS package containing the object detection code in detail, the remainder of the robot code will be described using diagrams. This code is described in detail in the “) Rodney-期待已久的自主机器人(Rodney - A long time coming autonomous robot) 文章和所有代码都可以在本文的下载zip文件中找到.(” articles and all the code is available in the download source zip file for this article.)
ROS代码可以用多种语言编写,Rodney项目使用C ++和Python.由于TensorFlow接口和Google的对象检测API示例代码均在Python中,因此我们将Python用于对象检测节点.(ROS code can be written in a number of languages and the Rodney project uses both C++ and Python. As the TensorFlow interface and Google’s example code for the Object Detection API are both in Python, we will use Python for the object detection node.)
对象检测包(Object Detection Package)
我们针对该节点的ROS包称为(Our ROS package for the node is called) tf_object_detection 并在(and is available in the)**tf object_detection(tf_object_detection)**夹.该程序包包含许多子文件夹.(folder. The package contains a number of sub folders.)
子文件夹(The sub folder)**配置(config)**包含一个配置文件(contains a configuration file)config.yaml(config.yaml).这通过提供Google的路径来配置节点(. This configures the node by supplying the path to Google’s)**object_detection(object_detection)**文件夹并设置置信度.当模型运行以及图像中检测到的对象的名称一样时,它会为模型提供置信度(folder and sets a confidence level. When the model runs as well as the name of objects detected in an image, it gives a confidence level for the) detect 目的.如果级别低于配置文件中指定的级别,则该对象将被我们的代码忽略.(object. If the level is below that given in the configuration file, the object will be ignored by our code.)
object_detection:
  confidence_level: 0.60
  path: '/home/ubuntu/git/models/research/object_detection'
子文件夹(The sub folder)**发射(launch)**包含一个文件(contains a file)**测试启动(test.launch)**可以使用最少的最少机器人代码和硬件在机器人环境中测试节点.它将配置文件加载到ROS参数服务器中,启动两个节点以从Pi Camera发布图像,并启动我们的对象检测节点.(that can be used to test the node in the robot environment using the bare minimum robot code and hardware. It loads the configuration file into the ROS parameter server, launches two nodes to publish images from the Pi Camera and launches our object detection node.)
<?xml version="1.0" ?>
<launch>
  <rosparam command="load" file="$(find tf_object_detection)/config/config.yaml" />
  <include file="$(find raspicam_node)/launch/camerav2_1280x960.launch" />
  <node name="republish" type="republish" pkg="image_transport"

  output="screen" args="compressed in:=/raspicam_node/image/ raw out:=/camera/image/raw" />
  <node pkg="tf_object_detection" type="tf_object_detection_node.py"

  name="tf_object_detection_node" output="screen" />
</launch>
子文件夹(The sub folder)**味精(msg)**包含一个文件(contains a file)detection_results.msg(detection_results.msg).该文件用于创建用户定义的ROS消息,该消息将用于返回包含在每个提供的图像中检测到的对象的列表.(. This file is used to create a user defined ROS message that will be used to return a list containing the objects detected in each supplied image.)
string[] names_detected
子文件夹(The sub folder)**剧本(scripts)**包含文件(contains the file)**非ros-test.py(non-ros-test.py)和测试图片(and a test image).(.)**该Python程序可用于测试机器人代码外部的对象检测库.(This Python program can be used to test the object detection library outside of the robot code.)
该代码导入了我们的对象检测库,并通过包含模型和置信度为0.5(50%)的路径创建了它的实例.然后将测试图像加载为OpenCV图像,并调用我们的(The code imports our object detection library and creates an instance of it passing the path which contains the model and a confidence level of 0.5 (50%). It then loads the test image as an OpenCV image and calls our) scan_for_objects 运行对象检测模型的函数.返回的列表包含检测到的置信度以上的对象.它还会在检测到的物体周围的方框处修改提供的图像.我们的测试代码继续打印检测到的对象的名称并显示结果图像.(function that runs the object detection model. The returned list contains the objects detected that were above the confidence level. It also modifies the supplied image with boxes around the detected objects. Our test code goes on to print the names of the objects detected and displays the resulting image.)
#!/usr/bin/env python
import sys
import os
import cv2

sys.path.append('/home/ubuntu/git/tf_object_detection/src')

import object_detection_lib

# Create the instance of ObjectDetection
odc = object_detection_lib.ObjectDetection
     ('/home/ubuntu/git/models/research/object_detection', 0.5)

cvimg = cv2.imread("1268309/test_image.jpg")

# Detect the objects
object_names = odc.scan_for_objects(cvimg)
print(object_names)

cv2.imshow('object detection', cvimg)
cv2.waitKey(0)
cv2.destroyAllWindows()

cv2.imwrite('adjusted_test_image.jpg', cvimg)
子文件夹(The sub folder)**src(src)**包含该节点的主要代码和我们的对象检测库.在继续进行ROS代码之前,我将从对库的描述开始.(contains the main code for the node and our object detection library. I’ll start with a description of the library before moving on to the ROS code.)
如上所述,该库可以在没有机器人代码的情况下使用,并且可以由(As stated above, this library can be used without the robot code and can be used by the)**非ros-test.py(non-ros-test.py)脚本(script).(.)**它基于Google的"对象检测API"教程,该教程可以找到(It is based on Google’s Object Detection API tutorial, which can be found) 这里(here) .我已将其转换为Python类,并移动了该调用以从中创建TensorFlow会话.(. I have converted it to a Python class and moved the call to create the TensorFlow session from the) run_inference_for_single_image 功能(function to the) __init__ 功能.如果您每次呼叫会话都重新创建会话(function. If you recreate the sessions each time calling session) run 导致模型在每次运行时都会自动调整.这会导致模型运行的大量延迟.这样,我们只有在第一次向代码提供图像时才获得延迟(大约45秒),随后的调用将在1秒内返回.(results in the model getting auto tuned each time it runs. This causes a considerable delay in running the model. This way, we only get the delay (around 45 seconds) the first time we supply the code with an image, subsequent calls return within 1 second.)
该代码首先导入所需的模块,(The code starts by importing the required modules,) numpy ,(,) tensorflow 和来自对象检测API的两个模块,(and two modules from the Object Detection API,) label_map_util 和(and) visualization_utils .(.) label_map_util 用于将模型返回的对象编号转换为命名对象.例如,当模型返回与狗有关的ID 18时.的(is used to convert the object number returned by the model to a named object. For example, when the model returns the ID 18, which relates to a dog. The) visualization_utils 用于将盒子,对象标签和置信度百分比绘制到图像上.(is used to draw the boxes, object labels and percentage confidence levels on to an image.)
import numpy as np
import tensorflow as tf
from utils import label_map_util
from utils import visualization_utils as vis_util
类初始化函数从提供的路径加载模型并打开TensorFlow会话.它还会加载标签映射文件并存储提供的置信度触发级别.(The class initialisation function loads the model from the supplied path and opens the TensorFlow session. It also loads the label map file and stores the supplied confidence trigger level.)
def __init__(self, path, confidence): # path will be to the
                                     # models/research/object_detection directory
    # Pre-trained model name
    MODEL_NAME = 'ssdlite_mobilenet_v2_coco_2018_05_09'
    PATH_TO_FROZEN_GRAPH = path + '/' + MODEL_NAME + '/frozen_inference_graph.pb'
    PATH_TO_LABELS = path + '/data/' + 'mscoco_label_map.pbtxt'

    # Load a frozen Tensorflow model into memory
    self.__detection_graph = tf.Graph()

    with self.__detection_graph.as_default():
        od_graph_def = tf.GraphDef()
        with tf.gfile.GFile(PATH_TO_FROZEN_GRAPH, 'rb') as fid:
            serialized_graph = fid.read()
            od_graph_def.ParseFromString(serialized_graph)
            tf.import_graph_def(od_graph_def, name='')

        # Open a session here. The first time we run the session it will take
        # a time to run as it autotunes, after that it will run faster
        self.__sess = tf.Session(graph=self.__detection_graph)

    # Load the label map. Label maps map indices to category names
    self.__category_index = label_map_util.create_category_index_from_labelmap
                                          (PATH_TO_LABELS, use_display_name=True)

    # Store the confidence level
    self.__confidence = confidence
的(The) run_inference_for_single_image 函数是使用TensorFlow的大多数地方.第一部分获得一个列表,其中包含张量图中的所有运算.使用该列表,它创建一个字典来保存执行图形时我们感兴趣的张量.您可以将它们视为我们希望通过运行图形获得的输出.我们感兴趣的可能张量被命名为:(function is where most work with TensorFlow occurs. The first part obtains a list holding all the operations in the tensor graph. Using the list, it creates a dictionary to hold the tensors that we will be interested in when we execute the graph. You can think of these as the output we want from running the graph. Possible tensors we are interested in are named:)
num_detections-这将是一个值,通知我们在图像中检测到了多少个对象.(- This will be a value informing us how many objects were detected in the image.)detection_boxes-对于检测到的每个对象,这将包含用于框的四个坐标以绑定对象图像.我们不需要担心坐标系,因为我们将使用API绘制框.(- For each object detected, this will contain four co-ordinates for the box to bound the object image. We don’t need to worry about the coordinate system as we will use the API to draw the boxes.)detection_scores-对于检测到的每个物体,都会有一个评分,使系统确信它已正确识别了该物体.将该值乘以100可得出一个百分比.(- For each object detected, there will be a score giving the confidence of the system that it has identified the object correctly. Multiply this value by 100 to give a percentage.)detection_classes-对于检测到的每个物体,将有一个数字标识该物体.同样,实际数字对我们而言并不重要,因为API将用于将数字转换为对象名称.(- For each object detected, there will be a number identifying the object. Again, the actual number is not important to us as the API will be used to convert the number to an object name.)detection_mask-我们使用的模型没有此操作.基本上,对于具有此功能并绘制边界框的模型,可以在对象上覆盖蒙版.(- The model we are using does not have this operation. Basically with a model that does have this operation as well as drawing a bounding box, you can overlay a mask over the object.)
def run_inference_for_single_image(self, image):
    with self.__detection_graph.as_default():
        # Get handles to input and output tensors
        ops = tf.get_default_graph().get_operations()
        all_tensor_names = {output.name for op in ops for output in op.outputs}
        tensor_dict = {}
        for key in [
            'num_detections', 'detection_boxes', 'detection_scores',
            'detection_classes', 'detection_masks'
        ]:
            tensor_name = key + ':0'
            if tensor_name in all_tensor_names:
                tensor_dict[key] = tf.get_default_graph().get_tensor_by_name(tensor_name)
函数的下一部分仅在模型确实包含(The next part of the function is only applicable if the model does indeed contain the) detection_mask 操作.如果将来将来使用这样的模型,我会将代码留在我的库中.(operation. I have left the code in my library should we use such a model in the future.)
if 'detection_masks' in tensor_dict:
    # The following processing is only for single image
    detection_boxes = tf.squeeze(tensor_dict['detection_boxes'], [0])
    detection_masks = tf.squeeze(tensor_dict['detection_masks'], [0])
    # Reframe is required to translate mask from box coordinates
    # to image coordinates and fit the image size.
    real_num_detection = tf.cast(tensor_dict['num_detections'][0], tf.int32)
    detection_boxes = tf.slice(detection_boxes, [0, 0], [real_num_detection, -1])
    detection_masks = tf.slice(detection_masks, [0, 0, 0], [real_num_detection, -1, -1])
    detection_masks_reframed = utils_ops.reframe_box_masks_to_image_masks(
        detection_masks, detection_boxes, image.shape[0], image.shape[1])
    detection_masks_reframed = tf.cast(
        tf.greater(detection_masks_reframed, 0.5), tf.uint8)
    # Follow the convention by adding back the batch dimension
    tensor_dict['detection_masks'] = tf.expand_dims(detection_masks_reframed, 0)
在检测蒙版填充之后,代码获得名为’的张量.(Following the detection mask stuff the code obtains the tensor named ‘) image_tensor:0 ‘.如果其他操作被视为输出,则这是图形的输入,我们将在其中输入要处理的图像.创建图形时,很有可能将其创建为TensorFlow占位符.(’. If the other operations were considered to be the outputs, this is the input to the graph where we will feed in the image we want processing. When the graph was created, this was most likely created as a TensorFlow placeholder.)
image_tensor = tf.get_default_graph().get_tensor_by_name('image_tensor:0')
然后,我们最终运行图形进行对象检测.进入通话(Then we finally run the graph to do the object detection. Into the call to) run ,我们传递包含要获取的张量的字典,通过此调用将在包含numpy数组的Python字典中将所得的张量返回给我们.我们还传入一个字典,该字典指示我们要替换的张量值.就我们而言,这是(, we pass the dictionary containing the tensors we would like fetched, the resulting tensors will be returned to us by this call in a Python dictionary holding numpy arrays. We also pass in a dictionary which indicates which tensor values we want to substitute. In our case, this is the) image_tensor (如果愿意,则输入),我们必须首先更改其形状以适合模型的期望.((the input if you like) which we must first change the shape of to suit what the model is expecting.)
    # Run inference
    output_dict = self.__sess.run(tensor_dict,feed_dict={image_tensor: np.expand_dims(image, 0)})

    # all outputs are float32 numpy arrays, so convert types as appropriate
    output_dict['num_detections'] = int(output_dict['num_detections'][0])
    output_dict['detection_classes'] = output_dict['detection_classes'][0].astype(np.uint8)
    output_dict['detection_boxes'] = output_dict['detection_boxes'][0]
    output_dict['detection_scores'] = output_dict['detection_scores'][0]
    if 'detection_masks' in output_dict:
        output_dict['detection_masks'] = output_dict['detection_masks'][0]
return output_dict
当我们希望进行对象检测时,我们调用函数(When we wish to conduct object detection, we call the function) scan_for_objects 提供的图像是OpenCV图像.以张量而言,此图像将为张量形状,即图像像素高度乘以图像像素宽度乘以3(红色,绿色,蓝色值).然后,我们将(with the supplied image which is an OpenCV image. In tensor terms, this image will be a tensor of shape, image pixel height by the image pixel width by 3 (red, green, blue values). We then call the) run_inference_for_single_image 函数来运行模型.返回的字典包含检测到的对象的类,任何对象的边界框的坐标和置信度.该字典中的值被输入(function to run the model. The returned dictionary contains the objects detected classes, co-ordinates for bounding boxes of any objects and confidence levels. Values from this dictionary are fed into) visualize_boxes_and_labels_on_image_array 这将在对象周围绘制框,并为置信度超过提供的值的对象添加标签.然后,代码按名称创建置信度超过阈值的对象列表,并返回该列表.(which will draw the boxes around the objects and add labels for those whose confidence levels exceed the supplied value. The code then creates a list of objects by name whose confidence level exceeds the threshold and returns the list.)
# This class function will be called from outside to scan the supplied img.
# if objects are detected it will adjust the supplied image by drawing boxes around the objects
# The img parameter is an OpenCV image
def scan_for_objects(self, image_np):
    # The img is already a numpy array of size height,width, 3

    # Actual detection.
    output_dict = self.run_inference_for_single_image(image_np)

    #print output_dict

    vis_util.visualize_boxes_and_labels_on_image_array(
        image_np,
        output_dict['detection_boxes'],
        output_dict['detection_classes'],
        output_dict['detection_scores'],
        self.__category_index,
        instance_masks=output_dict.get('detection_masks'),
        use_normalized_coordinates=True,
        line_thickness=8,
        min_score_thresh=self.__confidence)

    # Return a list of object names detected
    detected_list = []
    total_detections = output_dict['num_detections']
    if total_detections > 0:
        for detection in range(0, total_detections):
            if output_dict['detection_scores'][detection] > self.__confidence:
                category = output_dict['detection_classes'][detection]
                detected_list.insert(0,self.__category_index[category]['name'])

    return detected_list
就TensorFlow而言,仅此而已.现在,我将简要描述该程序包的其余代码.如果您对机器人代码不感兴趣,则可以跳至"使用代码"部分,该部分将描述在ROS环境之外运行代码.(As far as TensorFlow goes, that’s all that is required. I’ll now briefly describe the rest of the code for this package. If you are not interested in the robotic code, you can skip ahead to the section “Using the code” which will describe running the code outside of the ROS environment.)
我们的目标检测节点的ROS代码包含在(The ROS code for our object detection node is contained in the)**tf_object_detection_node.py(tf_object_detection_node.py)**文件.(file.)
每个ROS节点都是一个正在运行的进程.在里面(Each ROS node is a running process. In the) main 函数,我们将节点注册到ROS,创建(function, we register our node with ROS, create an instance of the) ObjectDetectionNode 类,记录节点已启动并通过调用将控制权移交给ROS(class, log that the node has started and hand over control to ROS with a call to) rospy.spin .(.)
def main(args):
    rospy.init_node('tf_object_detection_node', anonymous=False)
    odn = ObjectDetectionNode()
    rospy.loginfo("Object detection node started")
    try:
        rospy.spin()
    except KeyboardInterrupt:
        print("Shutting down")

if __name__ == '__main__':
    main(sys.argv)
的(The) ObjectDetectionNode 包含该节点的其余代码.班级(contains the remainder of the code for the node. The class) __init__ 函数从创建一个实例开始(function starts by creating an instance of) CVBridge 用于将ROS图像消息转换为OpenCV图像并再次返回.然后,我们注册该节点将发布和订阅的ROS主题(消息).(that is used to convert ROS image messages to OpenCV images and back again. We then register the ROS topics (messages) that the node will publish and subscribe to.)
的(The) tf_object_detection_node /(/) adjusted_image 主题将包含包含检测到的对象周围的矩形边界的图像.的(topic will contain the image that includes the bounded rectangles around detected objects. The) tf_object_detection_node/result 主题将包含检测到的对象名称的列表.(topic will contain a list of the names of the detected objects.)
第一个订阅的主题是(The first subscribed topic is) tf_object_detection_node/start ,则收到后将导致呼叫(, that when received will result in a call to) StartCallback 在接收到的下一个摄像机图像上启动对象检测.(that kicks off the object detection on the next camera image received.)
我们订阅的第二个主题是(The second topic we subscribe to is)相机/图像/原始(camera/image/raw),其中将包含来自相机的图像并导致对(, which will contain the image from the camera and result in a call to) Imagecallback .(.)
其余的(The remainder of) __init__ 从参数服务器读取配置值,并创建对象检测库的实例.(reads the configuration values from the parameter server and creates the instance of the object detection library.)
def __init__(self):
        self.__bridge = CvBridge()
        # Publisher to publish update image
        self.__image_pub = rospy.Publisher
                           ("tf_object_detection_node/adjusted_image", Image, queue_size=1)
        # Publisher to publish the result
        self.__result_pub = rospy.Publisher
                            ("tf_object_detection_node/result", detection_results, queue_size=1)
        # Subscribe to topic which will kick off object detection in the next image
        self.__command_sub = rospy.Subscriber
                             ("tf_object_detection_node/start", Empty, self.StartCallback)
        # Subscribe to the topic which will supply the image fom the camera
        self.__image_sub = rospy.Subscriber("camera/image/raw",Image, self.Imagecallback)

        # Flag to indicate that we have been requested to use the next image
        self.__scan_next = False

        # Read the path for models/research/object_detection directory
        # from the parameter server or use this default
        object_detection_path = rospy.get_param('/object_detection/path',
                                '/home/ubuntu/git/models/research/object_detection')

        # Read the confidence level, any object with a level below this will not be used
        confidence_level = rospy.get_param('/object_detection/confidence_level', 0.50)

        # Create the object_detection_lib class instance
        self.__odc = object_detection_lib.ObjectDetection
                        (object_detection_path, confidence_level)
当关于主题的消息(When the message on the topic) tf_object_detection_node/start 收到,所有的(is received, all the) StartCallback 函数的作用是设置一个标志,指示接收到来自摄像机的下一个图像时,我们应该对该图像进行对象检测.(function does is to set a flag indicating that when the next image from the camera is received, we should run object detection on that image.)
# Callback for start command message
def StartCallback(self, data):
    # Indicate to use the next image for the scan
    self.__scan_next = True
当关于主题的消息(When the message on the topic)**相机/图像/原始(camera/image/raw)**收到后,(is received, the) Imagecallback 函数检查对象检测操作是否挂起.如果是这样,我们重置标志,将图像从ROS图像转换为OpenCV图像,然后调用(function checks to see if an object detection operation is pending. If so we reset the flag, convert the image from a ROS image to an OpenCV image and call the) scan_for_objects 图像功能.如果检测到对象,则将更新提供的图像以包含边界框和标签.然后将调整后的图像发布到(function with the image. If objects are detected, the supplied image will be updated to contain the bounding boxes and labels. This adjusted image is then published on the) tf_object_detection_node/adjusted_image 话题.机器人内部未使用此主题,但我们可以在调试/测试过程中对其进行检查.函数的最后一部分创建一个Python列表,其中包含检测到的对象的名称.然后将其发布在(topic. This topic is not used internally by the robot but we can examine it as part of debugging/testing. The final part of the function creates a Python list containing the names of the objects detected. This is then published on the) tf_object_detection_node/result 主题,并将由请求对象检测扫描的节点执行.(topic and will be acted upon by the node that requested the object detection scan.)
# Callback for new image received
def Imagecallback(self, data):
    if self.__scan_next == True:
        self.__scan_next = False
        # Convert the ROS image to an OpenCV image
        image = self.__bridge.imgmsg_to_cv2(data, "bgr8")

        # The supplied image will be modified if known objects are detected
        object_names_detected = self.__odc.scan_for_objects(image)

        # publish the image, it may have been modified
        try:
            self.__image_pub.publish(self.__bridge.cv2_to_imgmsg(image, "bgr8"))
        except CvBridgeError as e:
            print(e)

        # Publish names of objects detected
        result = detection_results()
        result.names_detected = object_names_detected
        self.__result_pub.publish(result)
机器人系统概述(Overview of Robot System)
在本节中,我将非常简要地描述对象检测节点如何与系统中的其他节点配合.描述此问题的最简单方法是使用有关节点的图形.节点(过程)以椭圆形显示,往返于它们之间的线是包含消息的主题. zip文件中有图形的完整尺寸图像.(In this section, I’ll very briefly describe how the object detection node fits in with other nodes in the system. The easiest way to describe this is to use a graph of the nodes in question. Nodes (processes) are shown in oval shapes and the lines to and from them are topics containing messages. There is a full size image of the graph in the zip file.)

在最左侧,(On the far left hand side, the) keyboard 节点实际上在与机器人连接到同一Wi-Fi网络的单独工作站上运行.这使我们可以向机器人发出命令.对于"搜索狗"命令,我们为任务3选择" 3"键.(node is actually running on a separate workstation connected to the same Wi-Fi network as the robot. This allows us to issue commands to the robot. For the “search for a dog” command, we select the ‘3’ key for mission 3. The) rodney_node 收到(receives the) keydown 消息并继续传递(message and passes on a) mission_request 到(to the) rodney_missions 节点.该请求包括参数"(node. This request includes the parameter “) dog " 以便(” so that) rodney_missions_node 知道要搜索的对象的名称.的(knows the name of the object to search for. The) rodney_missions_node 是一种分层状态机,当它逐步执行检测狗的状态时,它可以通过与(is a hierarchical state machine and as it steps through the states involved in detecting a dog, it can move the head/camera through requests with the) head_control_node 并要求(and request that the) tf_object_detection_node 运行TensorFlow图.(runs the TensorFlow graph.)
每次对象检测运行之后,结果都将返回到状态机,在该状态机中将检测到的所有对象与其正在搜索的对象的名称进行比较.如果未检测到物体,则将摄像机/头部移动到下一个位置,并请求重新扫描.如果检测到有问题的物体,则将摄像机保持在该位置,以允许操作员查看摄像机的进给.当操作员准备继续前进时,他们可以通过按"(After each object detection run, the result is returned to the state machine where any objects detected are compared against the name of the object that it is searching for. If the object is not detected, the camera/head is moved to the next position and a new scan is requested. If the object in question is detected, then the camera is held in that position allowing the operator to view the camera feed. When the operator is ready to move on, they can either acknowledge and continue with the search by pressing the ‘) a ‘或使用’取消搜索(’ key or cancel the search with the ‘) c ‘键.(’ key.)
图最右边的节点,(The node on the far right of the graph,) serial_node ,用于与Arduino Nano通信,后者控制伺服器移动磁头/相机.(, is used to communicate with an Arduino Nano which controls the servos moving the head/camera.)
从图中可以看出,(From the graph, it looks like some topics like the)**/任务/致谢(/missions/acknowledge)**和(and)**tf_object_detection/结果(tf_object_detection/result)**没有连接到(are not connected to the) rodney_missions_node ,这仅是因为该图是自动生成的,并且节点在通过状态机时会动态连接到这些主题.(, this is only because the graph is auto generated and the node connects to these topics on the fly as it steps through the state machine.)
有关节点的详细信息,请参见"(In depth details of the nodes can be found in the “) Rodney-期待已久的自主机器人(Rodney - A long time coming autonomous robot) 系列文章.(” series of articles.)
使用代码(Using the Code)
在非ROS环境中进行测试(Testing in a Non ROS Environment)
要仅测试对象检测库,请从(To test just the object detection library, run the following command from the)**tf_object_detection/脚本(tf_object_detection/scripts)**夹.(folder.)
$ ./non-ros-test.py
注意(Note):由于每次运行脚本都会打开TensorFlow会话,因此TensorFlow图需要一段时间才能运行,因为每次都会自动调整模型.(: As the TensorFlow session is opened each time the script is run, the TensorFlow graph takes a while to run as the model will be auto tuned each time.)
短时间后,将显示带有边界对象和对象标签的图像,并在终端上显示检测到的对象的列表.(After a short period of time, an image with the bounded objects and object labels will be displayed and a list of detected objects will be printed at the terminal.)


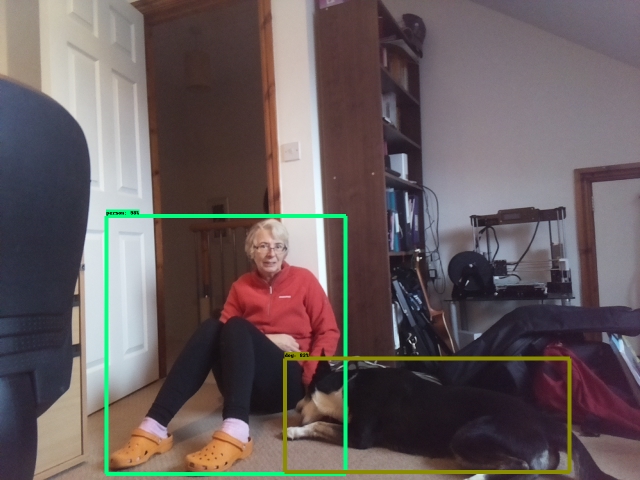
测试输入图像和生成的输出图像(Test input image and the resulting output image)### 在机器人硬件上进行测试(Testing on the Robot Hardware)
如果尚未完成,请在Raspberry Pi上创建一个catkin工作区,并使用以下命令对其进行初始化:(If not already done, create a catkin workspace on the Raspberry Pi and initialize it with the following commands:)
$ mkdir -p ~/rodney_ws/src
$ cd ~/rodney_ws/
$ catkin_make
从zip文件中复制软件包以及(Copy the packages from the zip file along with the) ros-keyboard 包(来自(package (from) https://github.com/lrse/ros-keyboard(https://github.com/lrse/ros-keyboard) ) 进入() into the)**〜/rodney_ws/src(~/rodney_ws/src)**夹.(folder.)
使用以下命令生成代码:(Build the code with the following commands:)
$ cd ~/rodney_ws/
$ catkin_make
生成代码后,所有节点都将使用rodney启动文件在Raspberry Pi上启动.(Having built the code, all the nodes are started on the Raspberry Pi with the rodney launch file.)
$ cd ~/rodney_ws/
$ roslaunch rodney rodney.launch
我们可以在单独的工作站上构建代码,然后使用以下命令在该工作站上启动键盘节点:(We can build the code on a separate workstation and then start the keyboard node on that workstation with the following commands:)
$ cd ~/rodney_ws
$ source devel/setup.bash
$ export ROS_MASTER_URI=http://ubiquityrobot:11311
$ rosrun keyboard keyboard
一个标题为"(A small window whose title is “)ROS键盘输入(ROS keyboard input)“应该正在运行.请确保键盘窗口具有焦点,然后按”(” should be running. Make sure keyboard window has the focus and then press ‘) 3 ‘开始任务的钥匙3.(’ key to start the mission 3.)
罗德尼执行任务3(狗检测)的视频(Video of Rodney running mission 3 (Dog detection))## 兴趣点(Points of Interest)
在本文中,我们不仅研究了使用对象检测API和预先训练的模型,而且将其集成到现有项目中以实际方式使用.(In this article, not only have we looked into using the Object Detection API and pre-trained models but integrated it into an existing project to use in a practical way.)
历史(History)
- 2018/12/01:初始版本(2018/12/01: Initial release)
- 2018/12/11:子节更改(2018/12/11: Subsection change)
- 2019/04/28:修复了指向Raspberry Pi图像说明的损坏的链接(2019/04/28: Fixed broken link to Raspberry Pi image instructions)
许可
本文以及所有相关的源代码和文件均已获得The Code Project Open License (CPOL)的许可。
XML Python C++ Arduino Raspberry Google hardware OpenCV machine-learning text 新闻 翻译