[译]使用ANNdotNET GUI工具创建CIFAR-10深度学习模型
By robot-v1.0
本文链接 https://www.kyfws.com/ai/create-cifar-10-deep-learning-model-with-anndotnet-zh/
版权声明 本博客所有文章除特别声明外,均采用 BY-NC-SA 许可协议。转载请注明出处!
- 12 分钟阅读 - 5868 个词 阅读量 0使用ANNdotNET GUI工具创建CIFAR-10深度学习模型(译文)
原文地址:https://www.codeproject.com/Articles/1273368/Create-CIFAR-10-Deep-Learning-Model-With-ANNdotNET
原文作者:Bahrudin Hrnjica
译文由本站 robot-v1.0 翻译
前言
In this post, we are going to create and train deep learning model for CIFAR-10 data set, and see how it is easy to do that with ANNdotNET v1.2.
在本文中,我们将为CIFAR-10数据集创建和训练深度学习模型,并了解如何使用ANNdotNET v1.2轻松实现这一点. 用(With) ANNdotNET 1.2(ANNdotNET 1.2) 用户可以创建和训练用于图像分类的深度学习模型.图像分类模块提供最少的GUI操作,以便完全准备数据集.在本文中,我们将为CIFAR-10数据集创建和训练深度学习模型,并了解如何使用ANNdotNET v1.2轻松实现这一目标.(, the user is able to create and train deep learning models for image classification. Image classification module provides minimum of GUI actions in order to fully prepare data set. In this post, we are going to create and train deep learning model for CIFAR-10 data set, and see how it easy to do that with ANNdotNET v1.2.)
为了准备数据,我们必须从官方网站下载CIFAR-10数据集(In order to prepare data, we have to download CIFAR-10 data set from the official) 网站(web site) . CIFAR-10数据集以6个二进制批处理文件提供,应将其提取并保存在本地计算机上.名称中的数字10表示为10个标签创建了数据集.下图显示了CIFAR-10数据集的10个标签,每个标签带有少量示例图像.(. The CIFAR-10 data set is provided in 6 binary batch files that should be extracted and persisted on your local machine. Number 10 in the name means that data set is created for 10 labels.The following image shows 10 labels of CIFAR-10 data set each label with few sample images.)
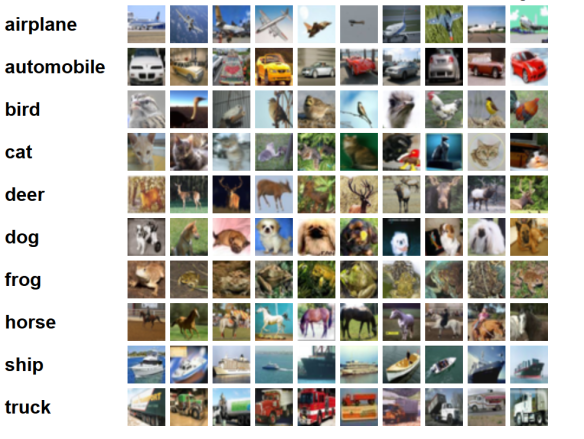
CIFAR-10数据集((CIFAR-10 data set () 从微小图像中学习多层功能(Learning Multiple Layers of Features from Tiny Images) ,Alex Krizhevsky,2009年.)(, Alex Krizhevsky, 2009.))数据集包含32×32的6万张彩色彩色图像(用于训练和验证的图像为50000张,用于测试的图像的分辨率为10000张).数据集CIFAR-100的版本也更大,带有100个标签.我们的任务是创建深度学习模型,该模型只能从每个图像中识别10个预定义标签中的一个.(The data set contains 60 000 (50 000 for training and validation, and 10 000 for test) tiny colored images dimensions of 32×32. There is also bigger version of the data set CIFAR-100 with 100 labels. Our task is to create deep learning model capable of recognizing only one of 10 predefined labels from each image.)
资料准备(Data Preparation)
为了准备图像,我们需要执行以下操作:(In order to prepare images, we need to do the following:)
- 下载压缩文件((Download compressed file () http://www.cs.toronto.edu/~kriz/cifar-10-binary.tar.gz(http://www.cs.toronto.edu/~kriz/cifar-10-binary.tar.gz) )())
- 解压缩文件并将每个图像存储在代表图像标签的10个不同文件夹中(Decompress the file and store each image in 10 different folders that represent image label)
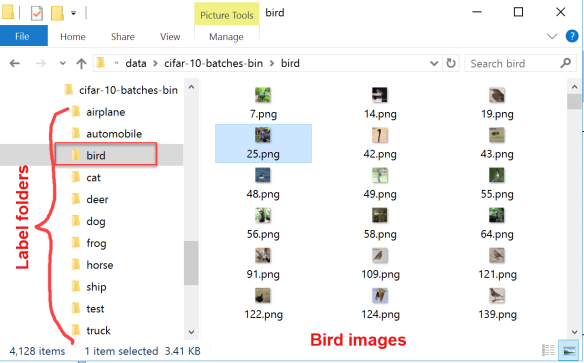
- 每个文件夹包含一个标签的图像(Each folder contains images for one label) 下图显示了保留在10个标签文件夹中的提取数据集. Bird文件夹将打开,并显示所有标记有Bird的图像.的(The following image shows extracted data set persisted in 10 label folders. The bird folder is opened and shows all images labeled for bird. The)**测试(test)**该文件夹包含模型训练后创建的用于测试模型的所有图像.(folder contains all images created for testing the model once the model is trained.)
为了正确保存所有图像,我们需要创建一个简单的C#控制台应用程序,该应用程序应提取并保存所有6万张图像.完整的C#程序可以从以下位置下载(In order to properly save all images, we need to create a simple C# Console application which should extract and save all 60 000 images. The complete C# program can be downloaded from) 这里(here) .(.)
为了成功提取图像,我们必须查看这些图像如何存储在二进制文件中.在官方站点上,我们可以看到有5个用于训练,1个用于测试二进制文件:(In order to successfully extract the images, we have to see how those images are stored in binary files. From the official site, we can see that there are 5 for training and 1 for test binary files:)data_batch_1.bin(data_batch_1.bin),(,)data_batch_2.bin(data_batch_2.bin),…,(, …,)data_batch_5.bin(data_batch_5.bin), 以及(, as well as)test_batch.bin(test_batch.bin).(.)
这些文件中的每个文件的格式如下,以使数组的第一个字节为标签索引,而接下来的3072个字节代表图像.每批包含10000张图像.(Each of these files is formatted as follows so that the first byte of the array is label index, and the next 3072 bytes represent the image. Each batch contains 10 000 images.)
重要的是要知道图像以CHW格式存储,这意味着创建了1d图像数组,因此前1024个字节是红色通道值,后一个1024个是绿色,最后一个1024个是蓝色.这些值以行优先顺序存储,因此前32个字节是图像第一行的红色通道值.为此,在实现Extractor应用程序时已执行了所有这些信息.最重要的方法是将1D字节数组重塑为(It is important to know that images are stored in CHW format which means that 1d image array is created so that the first 1024 bytes are the red channel values, the next 1024 the green, and the final 1024 the blue. The values are stored in row-major order, so the first 32 bytes are the red channel values of the first row of the image. To end this, all that information has been carried out when implementing the Extractor application. The most important methods are reshaping the 1D byte array into)[3,高度,宽度]([3, height, width])图像张量,并根据字节张量创建图像.以下实现显示了如何将一维字节数组转换为3通道位图张量.(image tensor, and creating the image from the byte tensor. The following implementation shows how 1D byte array is transformed into 3channel bitmap tensor.)
static int[][][] reshape(int channel, int height, int width,  byte[] img)
{
    var data = new int[channel][][];
    int counter = 0;
    for(int c = 0; c < channel; c++)
    {
        data[c] = new int[height][];
        for (int y = 0; y < height; y++)
        {
            data[c][y] = new int[width];
            for (int x = 0; x < width; x++)
            {
                data[c][y][x] = img[counter];
                counter++;
            }
        }
    }
    return data;
}
一旦将一维字节数组转换为张量,就可以创建图像并将其保留在磁盘上.以下方法在一个批处理文件中循环访问所有10000张图像,提取它们并将其保留在磁盘上.(Once the 1D byte array is transformed into tensor, the image can be created and persisted on disk. The following method iterates through all 10000 images in one batch file, extracts them and persists on disk.)
public static void extractandSave(byte[] batch, string destImgFolder, ref int imgCounter)
{
    var nStep = 3073;//1 for label and 3072 for image
    //
    for (int i = 0; i < batch.Length; i += nStep)
    {
        var l = (int)batch[i];
        var img = new ArraySegment<byte>(batch, i + 1, nStep - 1).ToArray();
// data in CIFAR-10 dataset is in CHW format, which means CHW: RR...R, GG..G, BB..B;

        // while HWC: RGB, RGB, ... RGB
        var reshaped = reshape(3, 32, 32, img);
        var image = ArrayToImg(reshaped);
        //check if folder exists
        var currentFolder = destImgFolder + classNames[l];

        if (!Directory.Exists(currentFolder))
            Directory.CreateDirectory(currentFolder);

        //save image to specified folder
        image.Save(currentFolder + "\\" + imgCounter.ToString() + ".png");

        imgCounter++;
   }
}
运行Cifar-Extractor控制台应用程序,几分钟即可完成下载,提取和保存图像的过程.最重要的是CIFAR-10数据集将存储在(Run Cifar-Extractor console application and the process of downloading, extracting and saving images will be finished in a few minutes. The most important is that CIFAR-10 data set will be stored in)**c://sc/datasets/cifar-10(c://sc/datasets/cifar-10)**路径.稍后在创建图像分类器时,这一点很重要.(path. This is important later, when we create image classifier.)
现在,在磁盘上有60000个由标签排列的微小图像,我们可以开始创建深度学习模型.(Now that we have 60000 tiny images on disk arranged by labels, we can start creating deep learning model.)
在Anndotnet中创建新的图像分类项目文件(Create New Image Classification Project File in Anndotnet)
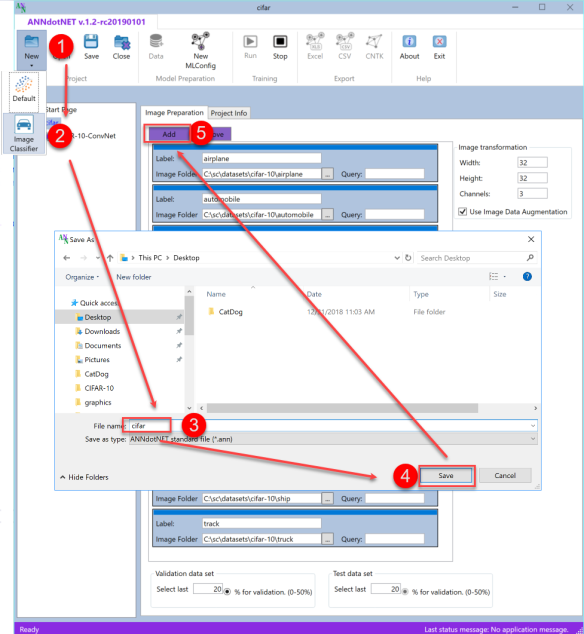
打开最新的ANNdotNET v1.2并选择(Open the latest ANNdotNET v1.2 and select)**新增->图片分类(New-> Image Classification)**项目.输入CIFAR项目名称,然后按保存按钮.下图显示了CIFAR new ann-project:(project. Enter CIFAR project name and press save button. The following image shows CIFAR new ann-project:)
有了新项目后,我们可以按添加按钮开始定义图像标签.对于每10个标签,我们需要在列表中添加一个新标签项.在每个项目中,应定义以下字段:(Once we have a new project, we can start defining image labels by pressing Add button. For every 10 labels, we need to add a new label item in the list. In each item, the following fields should be defined:)
- 图片标签(Image label)
- 带有标签的图像的路径(Path to images with the label)
- 查询–如果需要获取指定路径中带有名称的某些部分的所有图像.如果指定路径中的所有图像都是指示一个标签的图像,则查询应为空字符串.(Query – in case we need to get all images within the specified path with certain part of the name. In case all images within the specified path are images that indicate one label, query should be empty string.)
除了(Besides)
Label因此,应定义图像转换,以定义图像的大小以及创建验证/测试数据集的图像数量.(item, image transformation should be defined in order to define the size of the images, as well as how many images create validation/test data set.)
假设在以下位置提取了CIFAR-10数据集:(Assuming the CIFAR-10 data set is extracted at)**c:/sc/datasets/cifar-10(c:/sc/datasets/cifar-10)**下图显示了如何定义标签项:(folder, the following image shows how label items should be defined:)

如果标签项目应从列表中删除,则可以通过选择项目,然后按"删除"按钮来完成.除了图像属性外,我们还应定义属于验证数据集的图像数量.可以看出,将在所有提取的图像中创建20%的验证数据集.请注意,来自测试文件夹的图像不属于这两个数据集.一旦训练了模型,它们将用于测试阶段.既然我们已经完成了数据准备,那么我们可以转到下一步:创建(In case label item should be removed from the list, this is done by selecting the item, and then pressing Remove button. Besides image properties, we should define how many images belong to validation data set. As can be seen, 20% of all extracted images will be created validation data set. Notice that images from the test folder are not part of those two data set. They will be used for testing phase once the model is trained. Now that we are done with data preparation, we can move to the next step: creating)**mlconifg(mlconifg)**文件.(file.)
在ANNdotNET中创建mlconfig(Create mlconfig in ANNdotNET)
通过选择New MLConfig命令,可以在项目浏览器中创建新的mlconfig文件.此外,通过在选定的mlconfig树项上按F2键,我们可以轻松地将名称更改为"(By selecting New MLConfig command, the new mlconfig file is created within the project explorer. Moreover, by pressing F2 key on selected mlconfig tree item, we can easily change the name into “) CIRAF-10-ConvNet “.之所以命名,是因为我们要使用(”. The reason why we gave such a name is because we are going to use)卷积神经网络(convolution neural networks).(.)
为了定义(In order to define)**mlconfig(mlconfig)**文件,我们需要定义以下内容:(file, we need to define the following:)
- 使用Visual Network Designer进行网络配置(Network configuration using Visual Network Designer)
- 定义学习参数(Define learning parameters)
- 定义训练参数(Define training parameters)
创建网络配置(Create Network configuration)
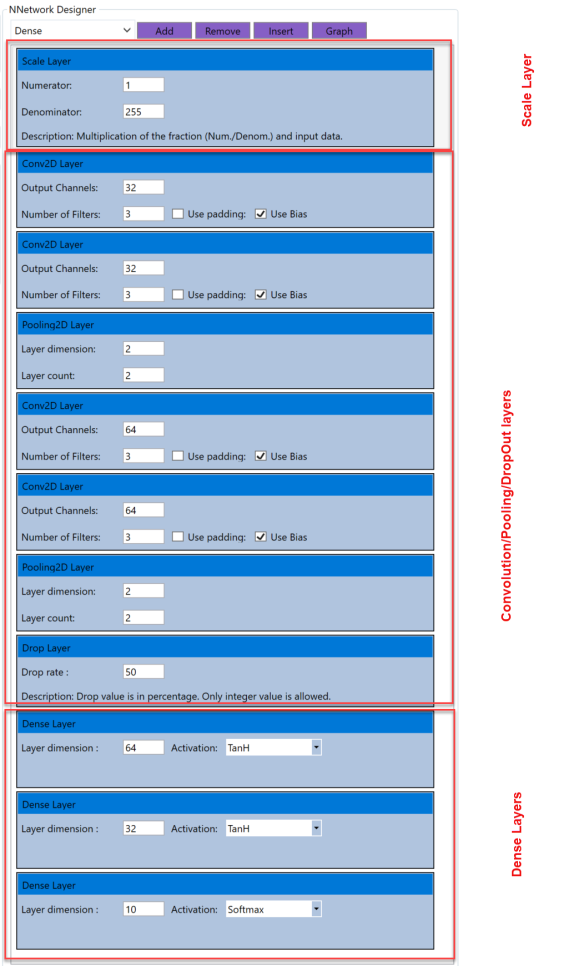
通过使用Visual Network Designer(VND),我们可以快速创建网络模型.对于此CIFAR-10数据集,我们将创建11层模型,其中包含4个卷积层,2个池化层,1个DropOut层和3个Dense层,所有这些层均紧跟Scale层:(By using Visual Network Designer (VND), we can quickly create network model. For this CIFAR-10 data set, we are going to create 11 layers model with 4 Convolutional, 2 Pooling, 1 DropOut and 3 Dense layers, all followed by Scale layer:)
Scale (1/255)->Conv2D(32,[3,3])->Conv2D(32,[3,3])->Pooling2d([2,2],2)->
Conv2D(64,[3,3])->Conv2D(64,[3,3])->Pooling2d([2,2],2)->DropOut(0.5)->
Dense(64, TanH)->Dense(32, TanH)->Dense(10,Softmax)
可以创建此网络,以便我们从VND组合框中选择适当的图层,然后单击"添加"按钮.第一层是"缩放"层,因为我们需要将输入值标准化为间隔(0,1).然后,我们创建了两个卷积序列:池化层.完成此操作后,我们可以添加两个具有64和32个具有TanH激活功能的神经元的密集层.最后一层是必须遵循输出尺寸和Softmax激活功能的输出层.(This network can be created so that we select the appropriate layer from the VND combo box and click on Add button. The first layer is Scale layer, since we need to normalize the input values to be in interval (0,1). Then we created two sequences of Convolution, Pooling layers. Once we are done with that, we can add two Dense layers with 64 and 32 neurons with TanH activation function. The last layer is output layer that must follow the output dimension, and Softmax activation function.)
定义网络模型后,我们可以继续执行下一步:设置学习和训练参数.(Once network model is defined, we can move to the next step: Setting learning and training parameters.)
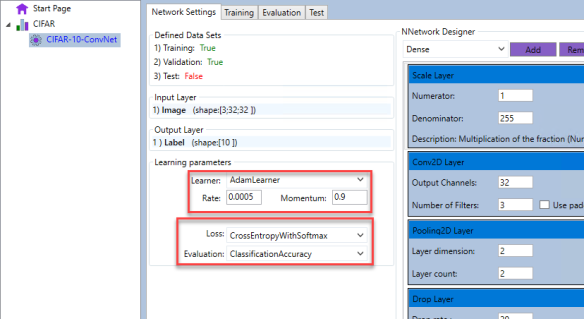
可以通过学习参数界面定义学习参数.对于此模型,我们可以选择:(Learning parameters can be defined through the learning parameters interface. For this model, we can select:)
- AdamLearner的费率为0.005,动量值为0.9.损失函数是CategoryEntropyWithSoftmax,评估函数是分类精度(AdamLearner with 0.005 rate and 0.9 momentum value. Loss function is ClassificationEntropyWithSoftmax, and the evaluation function is Classification Accuracy)
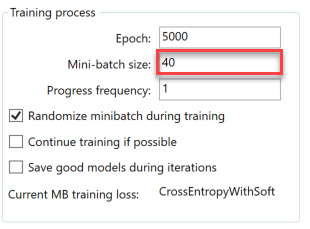
为了定义训练参数,我们切换到训练选项卡页面并进行设置:(In order to define the training parameters, we switch to Training tab page and setup:)
- 纪元数(Number of epoch)
- 小批量(Minibatch size)
- 进度频率(Progress frequency)
- 训练期间随机迷你批次(Randomize minibatch during training)
现在我们有足够的信息来开始模型训练.通过选择开始训练过程(Now we have enough information to start model training. The training process is started by selecting)跑(Run)应用程序功能区中的命令.为了获得好的模型,我们需要训练模型至少数千个纪元.下图显示了带有训练历史记录图表的训练模型.(command from the application ribbon. In order to get good model, we need to train the model at least few thousands epoch. The following image shows trained model with training history charts.)

该模型使用上述网络参数精确地训练了4071个时期.从上图可以看出,小批量损失函数为(The model is trained with exactly 4071 epochs, with network parameters mentioned above. As can be seen from the upper chart, mini-batch loss function was) CrossEntropyWithSoftmax ,而评估功能是(, while the evaluation function was) Classification Accuracy .底部图表显示了训练模型的训练和验证数据集的性能.我们还可以认识到,验证数据集的准确性与训练数据集的准确性大致相同,这表明模型训练得很好.下图显示了有关模型性能的更多详细信息:(. The bottom chart shows performance of the training and validation data sets for trained model. We can also recognize that validation data set has roughly the same accuracy as training data set which indicates the model is trained well. More details about model performance can be seen on the next image:)
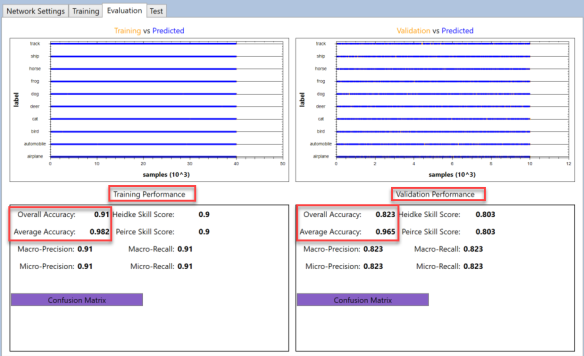
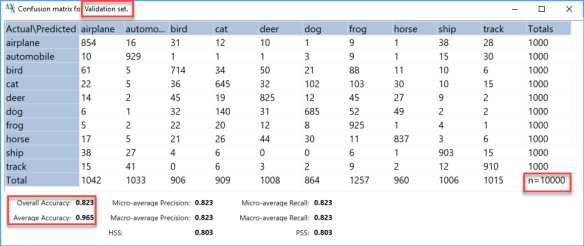
上图的上部图表显示了训练(左)和验证(右)的实际值和预测值.大多数点值是蓝色的,与橙色点重叠,这表示大多数值已正确预测.可以缩放图表并查看每个值的详细信息.评估的底部显示了相应数据集的模型性能参数.可以看出,训练后的模型的训练数据集的总体精度为0.91,而验证数据集的总体精度为0.826,这表明该模型的准确性非常好.此外,接下来的两个图像显示了两个数据集的混淆矩阵,详细显示了模型如何预测所有10个标签.(Upper charts of the image above show actual and predicted values for training (left) and validation (right). Most of the point values are blue and overlap the orange which indicates that most of value are correctly predicted. The charts can be zoomed and view details of each value. The bottom part of the evaluation show performance parameters of the model for corresponded data set. As can be seen, the trained model has 0.91 overall accuracy for training data set and 0.826 overall accuracy for validation data set, which indicate pretty good accuracy of the model. Moreover, the next two images shows confusion matrix for the both data sets, which in details shows how model predict all 10 labels.)

文章的最后一部分是测试数据集的测试模型.为此,我们从测试集的每个标签中选择了10张随机图像,并对模型进行评估.下图显示了模型正确预测的所有10张图像.(The last part of the post is testing model for test data set. For that purpose, we selected 10 random images from each label of the test set, and evaluate the model. The following images shows the model correctly predicted all 10 images.)

结论(Conclusion)
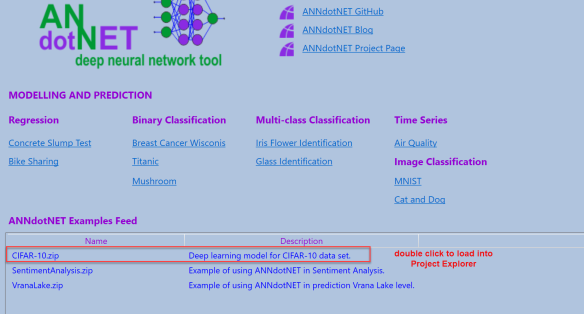
ANNdotNET v1.2图像分类模块为图像分类提供完整的数据准备和模型开发.用户可以准备用于训练的数据,使用Visual Network Designer创建网络模型,并针对训练后的模型执行一组统计工具,以验证和评估模型.重要说明是,图像数据集必须存储在特定位置,才能使用博客文章中显示的经过训练的模型.训练有素的模型,以及(ANNdotNET v1.2 image classification module offers complete data preparation and model development for image classification. The user can prepare data for training, create network model with Visual Network Designer, and perform set of statistical tools against trained model in order to validate and evaluate model. The important note is that the data set of images must be stored on specific location in order to use this trained model shown in the blog post. The trained model, as well as)**mlcofig(mlcofig)**文件,可以通过doubclick将其直接加载到ANNdotNET项目资源管理器中(files, can be load directly into ANNdotNET project explorer by doubclick on)**CIFAR-10.zip(CIFAR-10.zip)**提要示例.(feed example.)
作为开源项目的ANNdotNET为深度学习模型的完整开发提供了一种出色的方法.(ANNdotNET as open source project provides an outstanding way in complete development of deep learning model.)
许可
本文以及所有相关的源代码和文件均已获得The Code Project Open License (CPOL)的许可。
C# 新闻 翻译