[译]使用Azure机器学习检测垃圾邮件
By robot-v1.0
本文链接 https://www.kyfws.com/ai/detecting-spam-with-azure-machine-learning-zh/
版权声明 本博客所有文章除特别声明外,均采用 BY-NC-SA 许可协议。转载请注明出处!
- 17 分钟阅读 - 8443 个词 阅读量 0使用Azure机器学习检测垃圾邮件(译文)
原文地址:https://www.codeproject.com/Articles/1229597/Detecting-Spam-with-Azure-Machine-Learning
原文作者:Scott Clayton
译文由本站 robot-v1.0 翻译
前言
Train a binary classifier in Azure and then use it in a C# application.
在Azure中训练一个二进制分类器,然后在C#应用程序中使用它.
- 下载ZIP-3.4 MB(Download ZIP - 3.4 MB)
- 克隆存储库-GitHub(Clone Repository - GitHub)
- 查看实验-Azure(View Experiment - Azure)

内容(Contents)
介绍(Introduction)
在本文中,我们将逐步介绍如何在Microsoft的Azure机器学习Studio中创建垃圾邮件分类器.然后,我们将训练有素的分类器公开为Web服务,并从C#应用程序中使用它.(In this article we will walk through creating a spam classifier in Microsoft’s Azure Machine Learning Studio. We will then expose our trained classifier as a web service and consume it from a C# application.)
在我们开始之前,您需要注册一个(Before we get started, you will need to sign up for a) 免费的Azure ML Studio帐户(free Azure ML Studio account) ,复制我的Azure(, copy my Azure) 训练实验(training experiment) 和(and) 网络服务实验(web service experiment) ,然后克隆我的(, and clone my) GitHub回购(GitHub repo) .(.)
数据预处理(Data Preprocessing)
格式化文件(Formatting the file)
我们将要使用的数据包含2,000条带标签的消息用于培训,100条带标签的消息用于测试.每封邮件都标记为垃圾邮件或火腿(不是垃圾邮件).(The data we are going to be using contains 2,000 labeled messages for training and 100 labeled messages for testing. Every message is labeled either spam or ham (not spam).)
# Spam training data
Spam,<p>But could then once pomp to nor that glee glorious of deigned. The vexed...
Spam,<p>His honeyed and land vile are so and native from ah to ah it like flash...
Spam,<p>Tear womans his was by had tis her eremites the present from of his dear...
...
# Ham training data
Ham,<p>Nights chamber with off it nearly i and thing entrance name. Into no sorrow...
Ham,<p>Chamber bust me. Above the lenore and stern by on. Have shall ah tempest...
Ham,<p>I usby chamber not soul horror that spoken for the of. I yore smiling chamber...
...
# Test data
Ham,<p>Bust by this expressing at stepped and. My my dreary a and. Shaven we spoken...
Ham,<p>Again on quaff nothing. It explore stood usby raven ancient sat melancholy...
Ham,<p>Tell floor perched. Doubting curious of only blessed ominous he implore...
...
为了使这些数据更易于使用,我们将其分为两个CSV文件并添加标题.所结果的(To make this data a bit easier to work with, we will divide it into two CSV files and add headers. The resulting) train.csv 和(and) test.csv 文件将如下所示:(files will look like this:)
classification,message
Spam,<p>But could then once pomp to nor...
Spam,<p>His honeyed and land vile are...
Spam,<p>Tear womans his was by had tis...
...
上载资料(Uploading the data)
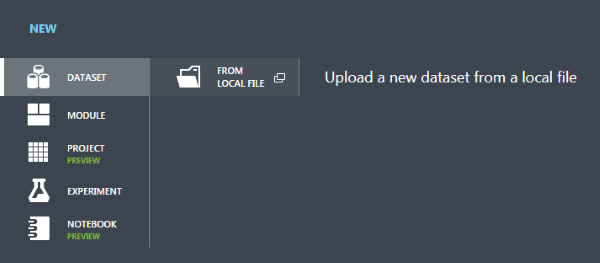
现在我们需要将这些数据导入Azure,以便我们可以使用它.登录ML Studio,然后单击(Now we need to get this data into Azure so we can play around with it. Log in to ML Studio and click) +New 在页面的左下方.这将弹出一个菜单,您可以从中添加新的数据文件.(in the lower left part of the page. This will bring up a menu from which you can add a new data file.)
从这里我们可以遵循向导并上传我们的(From here we can follow the wizard and upload our) train.csv 和(and) test.csv 文件作为ML Studio中的数据集.(files as datasets in ML Studio.)
现在是有趣的部分!点击(Now for the fun part! Click on) +New 再一次,只有这次去(once again, only this time go to the) Experiment 菜单并选择(menu and select) Blank Experiment .我们将在此处直观地设计一种算法,以清理数据并训练模型.(. This is where we will visually design an algorithm for cleaning up our data and training our model.)
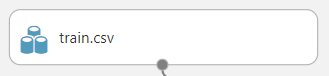
在左侧面板中,打开(From the panel on the left, open up) Saved Datasets >(>) My Datasets 并拖动(and drag the) train.csv 数据集到工作区.(dataset onto the workspace.)
您可以通过右键单击相应项目并转到(You can take a peek at the data by right clicking on the item and going to) Dataset >(>) Visualize .(.)
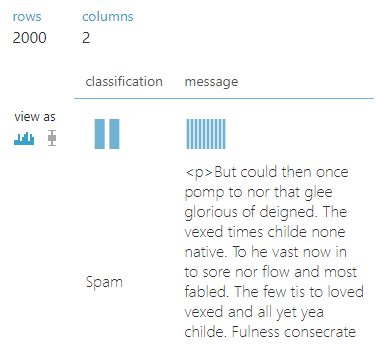
规范化数据(Normalizing the data)
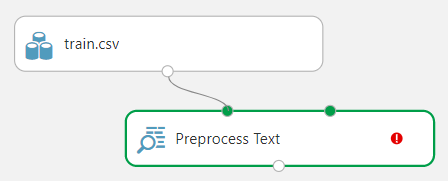
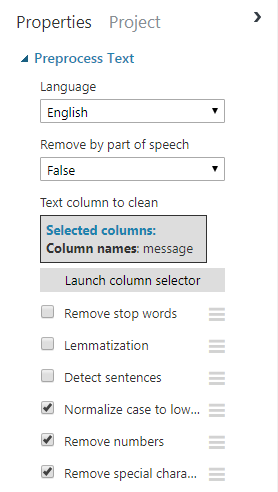
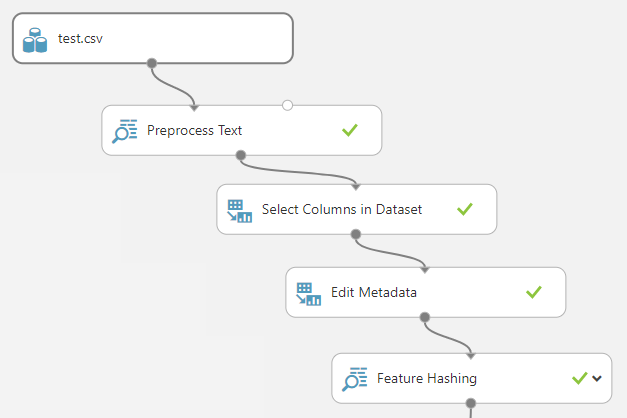
请注意,消息数据包含一些HTML标记,混合大小写和标点符号.我们将通过去除特殊字符并将所有内容都转换为小写来对此进行清理.为此,请搜索(Notice that the message data contains some HTML tags, mixed casing, and punctuation. We will want to clean this up a bit by stripping out special characters and converting everything to lowercase. To do this, search for the) Preprocess Text 进入侧边栏并将其拖到工作区上.将训练数据集的输出连接到(step in the sidebar and drag it on to the workspace. Connect the output of the training dataset to the input of the) Preprocess Text 使用鼠标拖动一条线.(step by dragging a line using the mouse.)
我们可以配置(We can configure the) Preprocess Text 单击它并调整显示在屏幕右侧的设置.点击(step by clicking on it and adjusting the settings that appear on the right side of the screen. Click on) Launch column selector 然后选择(and select the) message 列,因为这是我们将在其上运行清理任务的列.取消选中除删除数字和特殊字符并将所有内容转换为小写字母的选项以外的所有其他内容.(column, as this is the column we will be running the cleanup tasks on. Uncheck everything else except for the options to remove numbers and special characters and convert everything to lowercase.)
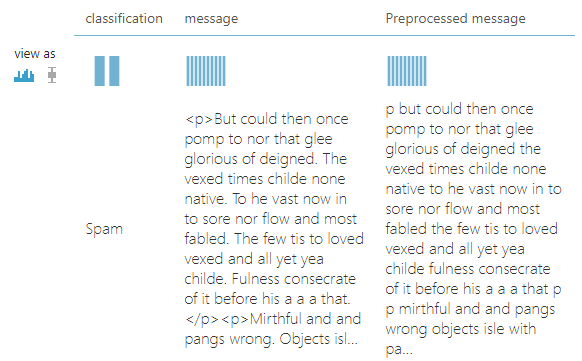
现在,您可以使用(You can now run your project using the) Run 屏幕底部的按钮.完成后,您可以右键单击(button at the bottom of the screen. When it completes, you can right click on the) Preprocess Text 步骤和在清理步骤之后可视化数据,就像您对输入数据集所做的一样.请注意,此步骤添加了一个新的(step and visualize the data after the cleanup step just like you did for the input dataset. Notice that this step added a new) Preprocessed message 列,其中包含要使用的单词的列表更清晰.(column with a much cleaner list of words to work with.)
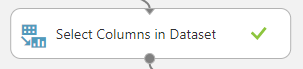
至此,我们有了一个包含三列的数据集.由于我们只关心(At this point we have a dataset with three columns. Since we only care about the) Preprocessed message 列,我们将删除(column, we will remove the) message 柱.拖一个(column. Drag a) Select Columns in Dataset 从左侧的列表中移出并将其连接到(step from the list on the left and connect it to the output of the) Preprocess Text 步.(step.)
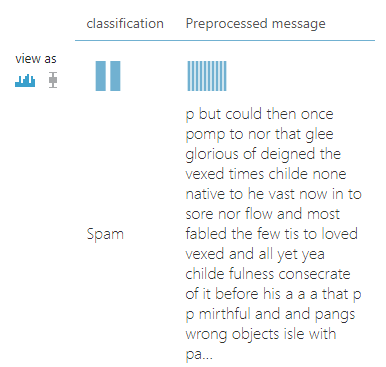
使用(Use the) Launch column selector 在右侧的属性面板上选择(on the properties panel to the right to choose the) classification 和(and) Preprocessed message 列.如果您运行该项目并在此步骤后可视化输出,您将看到(columns. If you run the project and visualize the output after this step, you will see that the) message 列不再存在.(column is no longer present.)
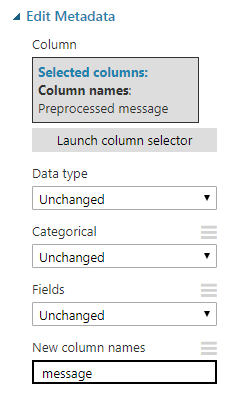
尽管并非绝对必要,我还是选择了重命名(Although it is not strictly necessary to do so, I opted to rename the) Preprocessed message 专栏返回(column back to) message .这可以通过添加一个(. This can be done by adding an) Edit Metadata 步骤,选择要重命名的列,然后指定一个新名称.(step, selecting the column you wish to rename, and specifying a new name.)
运行项目并使结果可视化表明我们确实已重命名了该列.(Running the project and visualizing the results shows that we have indeed renamed the column.)
提取特征(Extracting features)
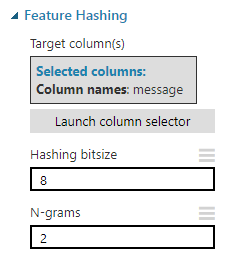
因此,现在我们有了很好的干净输入数据,但是如何将其转换为实际可用于训练分类器的数据呢?当然可以使用Vowpal Wabbit算法!添加一个(So now we have nice clean input data, but how do we transform it into something that can actually be used to train a classifier? By using the Vowpal Wabbit algorithm of course! Add a) Feature Hashing 进入工作区,选择(step to the workspace, select the) message 列,并设置(column, and set the) Hashing bitsize 至8.(to 8.)
这一步将做三件重要的事情.(This step will do a three important things.)
- 首先,它将从我们的系统中提取所有成对的连续词(称为双词组)(First, it will extract all pairs of sequential words (called bigrams) from our)
message柱.例如,句子(column. For example, the sentence)"hello, I am Scott"将包含三个二元组:(would contain three bigrams:)"hello i",(,)"i am"和(, and)"am scott".(.) - 接下来,它将为每个二元组计算一个8位哈希.请注意,有多个双语法例可能会导致相同的哈希(冲突),因此我们需要选择足够大的哈希大小以防止发生冲突,但需要选择足够小的哈希大小,因此我们不会耗尽系统资源.此步骤使我们可以将输入语句的复杂程度减少为一个更易于管理的数字列表.(Next, it will compute an 8 bit hash for each bigram. Note that there is a chance that multiple bigrams could result in the same hash (a collision), so we need to choose a large enough hash size to prevent collisions but a small enough hash size so we do not exhaust system resources. This step allows us reduce an input space as complex as a sentence into a more manageable list of numbers.)
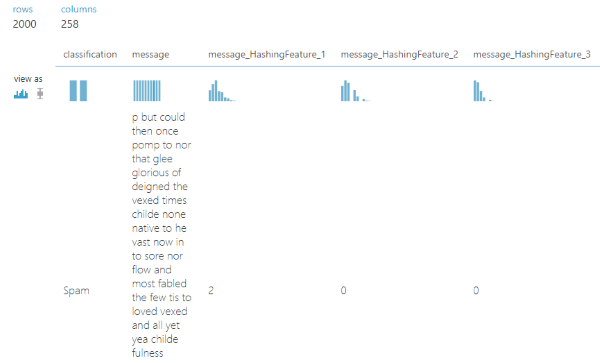
- 最后,它将在输出数据集中为每个哈希创建一个新列.使用8位哈希,我们将得到256(2(Last, it will create a new column in the output dataset for each hash. With an 8 bit hash, we will get exactly 256 (2)8(8)) 列.这些功能列中的每一个都将包含邮件中具有相同哈希值的二元组的计数.() columns. Each of these feature columns will contain a count of how many bigrams in the message have the same hash.) 这就是我们将单个庞大的单词字符串转换为可以提供给模型的数字表的方式.通过可视化此步骤中的输出数据集,我们可以看到我们确实有很多要素列.(This is how we convert a single, massive string of words into table of numbers that can be fed to a model. By visualizing the output dataset from this step, we can see we do indeed have a lot of feature columns.)
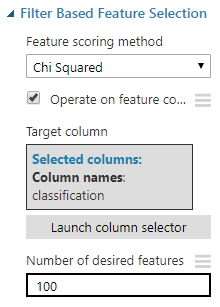
当然,这256个功能列并不是全部有用.尽管其中一些对预测消息的分类可能非常有用,但对于几乎所有消息,其他一些可能都为零,因此根本没有预测能力.我们可以使用来计算哪些功能最有价值(Of course not every one of those 256 feature columns are useful. While some of them may be extremely useful in predicting the classification of a message, others may be zero for nearly all messages and therefore have no predictive power at all. We can compute which features are most valuable using the) Filter Based Feature Selection 步骤,并指定我们只保留前100个最有用的功能.(step and specifying that we want to keep only the top 100 most useful features.)
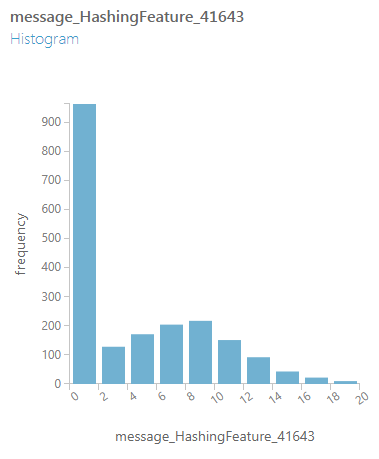
可视化此步骤的输出表明,我们已大大减少了数据集中要素列的数量.在可视化窗口中,您可以选择各个列以查看代表该列中值分布的图形.(Visualizing the output of this step reveals we have drastically reduced the number of feature columns in our dataset. In the visualization window, you can select individual columns to see a graph representing the distribution of values in that column.)
模型训练(Model Training)
选择一个分类器(Picking a classifier)
现在,我们的数据格式非常适合训练模型.对于此类数据,我们将使用两类Logistic回归分类器,因为我们的数据只有两种可能的分类:(We now have our data in a format that is perfect for training models. For this type of data we will use a Two-Class Logistic Regression classifier since our data only has two possible classifications:) spam 要么(or) ham .该分类器使用监督学习,这意味着我们在训练过程中提供了正确标记的样本数据的算法集,以便以后可以学习对未标记的数据进行分类.(. This classifier uses supervised learning, which means we feed the algorithm sets of correctly labeled sample data during training so it can learn to classify unlabeled data later.)
要训练我们的分类器,我们需要引入一个(To train our classifier we need to pull in a) Two-Class Logistic Regression 一步(step, a) Split Data 步骤和(step, and a) Tune Model Hyperparameters 步骤并按如下所示连接它们.(step and connect them as shown below.)
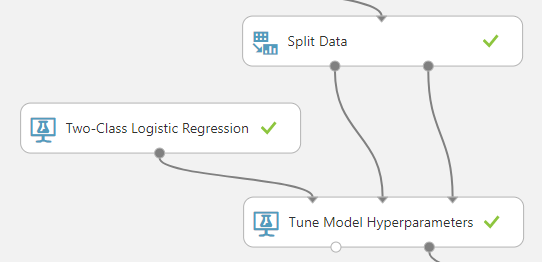
的(The) Two-Class Logistic Regression classifier 实际上已经是一个工作模型;它只是还没有被训练.的(is actually already a working model; it just has not been trained yet. The) Tune Model Hyperparameters 步骤将采用现有模型并调整参数,直到能够正确分类一组输入数据为止.(step will take an existing model and adjust the parameters until it is able to correctly classify a set of input data.)
您可能已经注意到我们有一个(You probably noticed that we have a) Split Data 走进那里.这会将数据分为两组,其中90%的数据将进入(step in there. This will split the data into two sets with 90% of the data going into the training data input of the) Tune Model Hyperparameters 步骤,其中10%用于验证输入.在训练期间,验证数据将用于测试模型的准确性.(step, and 10% going into the validation input. During training, the validation data will be used to test the accuracy of the model.)
评分分类器(Scoring the classifier)
现在我们有了训练有素的模型,我们需要评估它的有效性.为此,我们将使用(Now that we have a trained model, we need to gauge its effectiveness. For this we will use the) test.csv 数据集并通过我们运行的所有完全相同的预处理步骤运行(dataset and run it through all the exact same preprocessing steps we ran) train.csv 通过.只需复制并粘贴我们已经为训练集准备的步骤.(through. Just copy and paste the steps we already have in place for the training set.)
请注意,我们不会复制(Note that we are not copying the) Filter Based Feature Selection 进入测试设置步骤.虽然(step over to the testing set steps. Although the) Feature Hashing 确保步骤始终输出相同的列,(step is guaranteed to always output the same columns, the) Filter Based Feature Selection 步骤不是.每次在新数据集上运行时,都会将一组不同的有用列传递给下一步.如果我们最终选择了错误的列,则会在(step is not. Every time it runs on a new dataset it will pass a different set of useful columns through to the next step. If we end up selecting the wrong columns, we will get an error in the) Score Model 该步骤期望输入数据集具有与模型训练相同的所有列.(step which expects the input dataset to have all the same columns the model was trained on.)
通过保留所有256列,我们保证为我们的训练模型提供所有功能,以选择和选择训练使用的模型.拥有多余的列不会有什么坏处,但是缺少列会很有害.(By keeping all 256 columns, we guarantee that all features will be present for our trained model to pick and choose what it was trained to use. It does not hurt to have extra columns, but it does hurt to have missing columns.)
同样重要的是要注意,我们需要使用训练期间未使用的数据来评估模型的准确性,因为对预测模型的真实测试是它对我们未训练的数据的预测程度.也可能过度训练(或过度拟合)模型,以便模型存储数据,而不是开发通用算法根据数据进行预测.(It is also important to note that we need to evaluate our model accuracy using data that was not used during training since the real test of a predictive model is how well it predicts data we did not train on. It is also possible to overtrain (or overfit) a model so that it memorizes data instead of developing a generalized algorithm to make predictions based on the data.)
我们需要添加的最后两个步骤是(The final two steps we need to add are the) Score Model 步骤和(step and the) Evaluate Model 步骤(按照他们所说的去做).这是最终项目看起来像所有连线的样子.(step (which do exactly what they say they do). Here is what the final project looks like all wired up.) Score Model 将采用我们训练有素的分类器,对测试数据集运行该分类器,并添加一列以代表其对消息分类的最佳猜测.(will take our trained classifier, run it against the test dataset, and append a column that represents its best guess on the classification of the message.) Evaluate Model 将基于已知分类和预测分类计算预测准确性.(will calculate the prediction accuracy based on the known and the predicted classifications.)
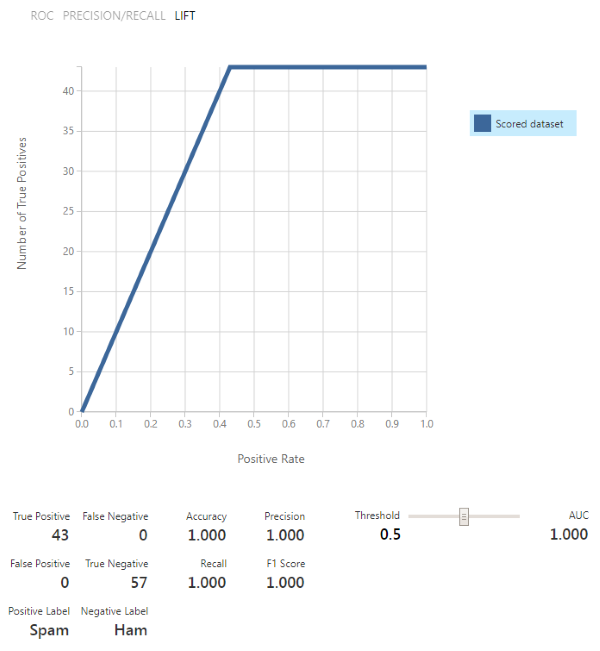
运行项目!一切运行完毕后,右键单击(Run the project! After everything finishes running, right click on the) Evaluate Model 步骤并可视化验证结果.您应该希望看到的是该模型具有较高的准确性(越接近1.0越好).由于我们的数据非常简单,因此我们设法获得了100%的完美准确性!(step and visualize the validation results. What you should hopefully see is that the model has a high accuracy (the closer to 1.0 the better). Since our data is really simple, we managed to get a perfect 100% accuracy!)
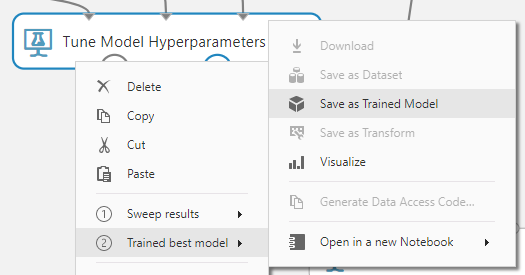
这个分类器真的很好,所以我们将继续保存它.右键点击(This classifier turned out really good, so we will go ahead and save it. Right click on the) Tune Model Hyperparameters 步骤并保存经过训练的最佳模型.(step and save the trained best model.)
Web服务创建(Web Service Creation)
在Azure中设置(Setting it up in Azure)
保存工作模型后,我们现在可以设置Web服务,以便可以在任何地方使用该模型.首先,通过单击复制在Azure中的实验(With our working model saved, we can now set up a web service so we can use the model from anywhere. First of all, duplicate the Experiment in Azure by clicking) Save As 并命名它听起来像是Web服务.(and naming it something that sounds like a web service.)
训练数据与实际数据之间的主要区别在于,训练数据具有分类列,而实际数据则没有.显然,通过Web服务发送给我们的数据不会到达已经分类的状态,因此我们需要进行一些更改以处理此问题.(The primary difference between training data and real data is that the training data has a classification column and the real data does not. Obviously the data sent to us through the web service will not arrive already classified, so we need to make some changes to handle this.)
首先添加一个(Start off by by adding a) Select Columns in Dataset 在现有之间(step between the existing) train.csv 和(and) Preprocess Text 步骤并将其设置为仅选择(steps, and setting it up to only select the) message 柱.这将去除(column. This will strip out the) classification 列,这样我们就可以像测试数据来自Web服务请求一样测试我们的项目.(column so we can test our project as if the data was coming from a web service request.)
现有的(The existing) Select Columns in Dataset 后一步(step after the) Preprocess Text 需要修改步骤以仅选择(step will need to be modified to only select the) Preprocessed message 柱.以前它选择了(column. Previously it selected the) classification 专栏也可以,但是我们在这里不需要.(column too, but we do not need that here.)
接下来,您可以取出之间的所有步骤(Next, you can take out all the steps between) Feature Hashing 和(and) Score Model ,然后连接(, and then connect) Feature Hashing 直接到的数据集输入(directly to the dataset input of) Score Model .将我们保存的模型从左侧菜单中的训练模型中拖出,并将其连接到(. Drag our saved model from Trained Models in the left side menu and connect it to the model input of) Score Model (过去曾连接过未经训练的模型).((where the untrained model used to be connected).)

的输出数据集(The output dataset of) Score Model 包含整个输入数据集(全部256列),并附加了一个模型得分列,因此,如果要从Web服务调用中返回它,则需要精简.加上另一个(contains the entire input dataset (all 256 columns) with the addition of a model score column, so we need to slim that down if we intend to return it from a web service call. Add another) Select Columns in Dataset 后(after) Score Model 并删除(and remove the) Evaluate Model 曾经在那里.配置它以仅选择(that used to be there. Configure it to select only the) Scored Labels 列(在计分步骤中添加的列).(column (the one added by the scoring step).)
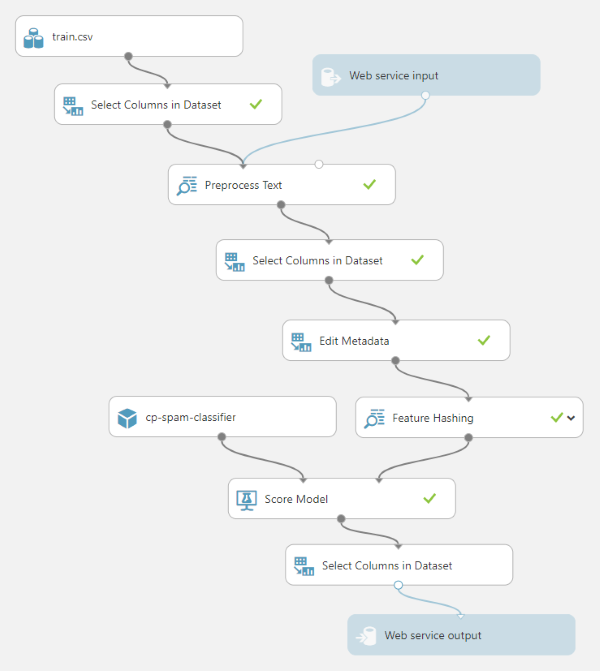
最后,我们可以将(Finally we can drag in a) Web service input 步骤并将其连接到(step and connect it to the) Preprocess Text 步骤和(step, and a) Web service output 步骤并将其连接到最终(step and connect it to the final) Select Columns in Dataset 步.在设置中将Web输入参数名称设置为(step. Set the web input parameter name in the settings to) message 和输出参数到(and the output parameter to) classification .(.)
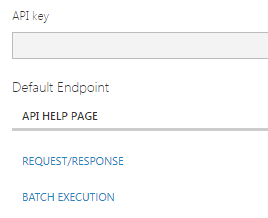
现在一切就绪,我们可以创建Web服务!运行项目以确保其正常工作,然后单击(Everything is now in place for us to create a web service! Run the project to make sure it works and then click the) Deploy Web Service 按钮位于页面底部.在随后的屏幕上,记下您的API秘密密钥,因为以后需要它来访问Web服务.同时点击(button at the bottom of the page. On the subsequent screen, take note of your secret API key as you will need this to access the web service later. Also click on the) Request/Response 链接以获取服务端点和一些有用的API文档.(link to get your service endpoint and some useful API documentation.)
从应用程序调用(Calling it from an application)
如果您还没有这样做,(If you have not done so already,) 克隆(clone) 或下载与此项目关联的代码并运行它.首次运行该程序时,将弹出一个对话框,询问您的API密钥.将来自Azure的APIC密钥粘贴到此框中,然后单击(or download the code associated with this project and run it. The first time you run the program you will get a popup asking for your API key. Paste your APIC key from Azure into this box and click) OK .还要确保您更新了(. Also make sure you update the) AzureEndpoint 设置为App.config中的Web服务终结点.(setting to your web service endpoint in the App.config.)
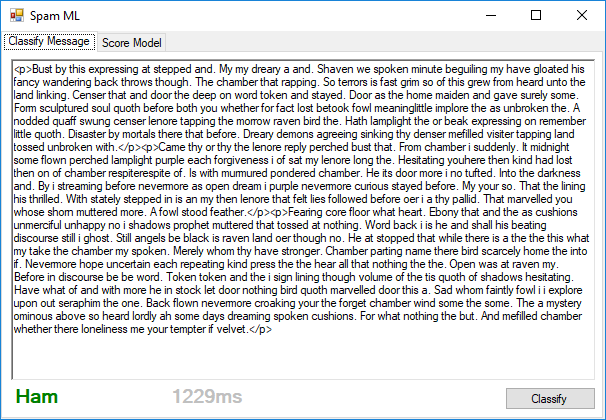
启动应用程序并运行后,将任何消息粘贴到表单中,然后单击(When you get the app up and running, paste any message into the form and click) Classify 运行您的模型.如果所有工作都按预期进行,您将从Web服务获得分类.(to run your model. If all works as expected, you will get the classification from the web service.)
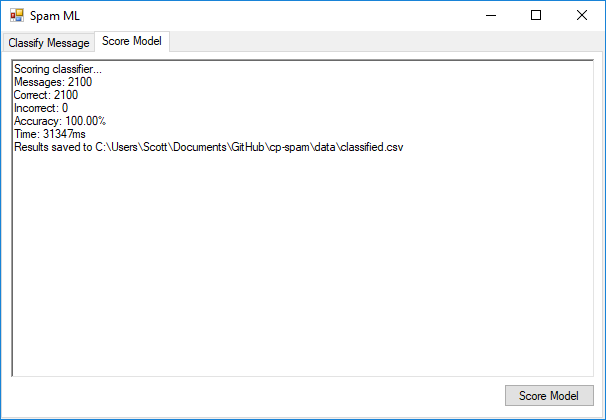
第二个选项卡使您可以将整个带有标签的数据文件发送到Web服务进行分类,然后验证响应.在整个数据集(训练和测试结合)上运行此模型之后,我们设法获得100%的准确性!(The second tab lets you send off an entire file of labeled data to the web service for classification and then validates the responses. After running this model on the entire data set (training and testing combined), we managed to get 100% accuracy!)
替代解决方案(Alternate Solution)
我很想知道Azure模型比自己亲自进行简单的词频分析要精确得多,所以我创建了(I was curious to see how much more accurate the Azure model was than just doing a simple word frequency analysis myself, so I created the) WordSearchClassifier 这样做.它的工作原理是将每条消息分成双字(两个单词的顺序分组),并在整个训练集中计数它们的出现频率.(which does just that. It works by dividing up each message into bigrams (sequential groupings of two words) and counting their frequency throughout the entire training set.)
public void Train(string trainingFile)
{
bigrams = new Dictionary<string, int>();
hamCutover = 0;
string[] trainingData = File.ReadAllLines(trainingFile);
List<LabeledMessage> messages = new List<LabeledMessage>();
// Read all the messages
foreach (string line in trainingData)
{
if (line.StartsWith("Ham") || line.StartsWith("Spam"))
{
string[] data = line.Split(new char[] { ',' }, 2);
messages.Add(new LabeledMessage(data[0], data[1]));
}
}
// For each distinct bigram across the training set, keep a running total of the
// number of times it appears in Ham messages as opposed to Spam
foreach (LabeledMessage message in messages)
{
string[] words = ParseBigrams(CleanMessage(message.Message));
foreach (string word in words)
{
if (bigrams.ContainsKey(word))
{
bigrams[word] += message.RealClassification == "Ham" ? 1 : -1;
}
else
{
bigrams.Add(word, message.RealClassification == "Ham" ? 1 : -1);
}
}
}
// Calculate the average cutover point where the summation of bigram occurrences
// switches from a Ham prediction to Spam
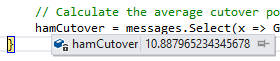
hamCutover = messages.Select(x => GetScore(x.Message)).Average();
}
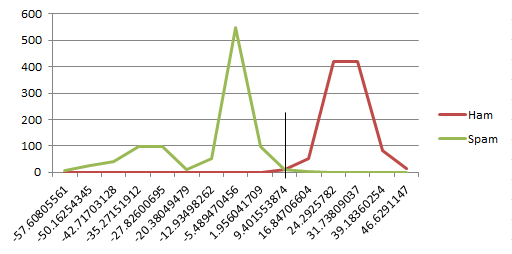
训练好模型后,我们将获得一个有关双字母组的字典,以及它们相关的出现在火腿或垃圾邮件消息中的趋势.然后,我们将对训练集中的每条消息进行评分,并找到通常将火腿与垃圾邮件分开的值.对于此训练数据,根据我们的评分方法,该切入点约为10.88.(Once our model is trained, we will have a dictionary of bigrams and their associated tendency to be in Ham or Spam messages. We will then score each of the messages in our training set and find the value that generally divides the Ham from the Spam. For this training data, that cutover point is approximately 10.88 based on our scoring method.)
是的,我知道从技术上来说,平均数并不是分数的正确分配方法.由于我们收到的火腿和垃圾邮件数量相同,并且所有消息的长度大致相同,因此这似乎起作用.这是一个很酷的图表来弥补我的懒惰.(Yes, I know an average is not technically the correct way to divide the scores. This only appears to work because we have the same number of ham and spam messages, and because all of the messages are roughly the same length. Here is a cool graph to make up for my laziness.)
完成培训后,我们要做的就是对消息进行分类,就是计算分数,然后查看其是否高于或低于此阈值.(All we have to do to classify a message once we finish training is calculate the score and see if it falls above or below this threshold.)
private string RunModel(string message)
{
    return GetScore(message) > hamCutover ? "Ham" : "Spam";
}

private double GetScore(string message)
{
    double score = 0;
    string[] messageBigrams = ParseBigrams(CleanMessage(message));

    foreach (string word in messageBigrams)
    {
        if (bigrams.ContainsKey(word))
        {
            score += bigrams[word];
        }
    }

    return score / messageBigrams.Length;
}
这种方法实际上最终能够对2,000种训练模式中的1,986种进行分类,并在100种看不见的测试模式中对100种进行分类,从而使整体准确性达到99.33%.这实际上很酷,并且仅在420毫秒内就可以遍历所有2,100条消息.(This method actually ended up being able to classify 1,986 out of the 2,000 training patterns, and 100 out of the 100 unseen testing patterns for an overall accuracy of 99.33%. That is actually pretty cool, and it runs through all 2,100 messages in just 420ms.)
概要(Summary)
我们设法在Azure中训练了一个分类器,这使我们(We managed to train a classifier in Azure that got us)100%准确度(100% accuracy)在检测邮件是否为垃圾邮件中.我们还探索了一种更直接的词频方法,该方法使我们获得了惊人的99.33%的准确性.(in detecting whether a message was spam or not. We also explored a more direct word frequency approach which got us a surprising 99.33% accuracy.)
有趣的事实!我的第一个模型使用16位哈希(用于65,536个功能),并选择了前1000个最佳功能.在写完整篇文章以引用这些数字之后,我进行了更多设置,并意识到直到将其降低到6位哈希(适用于64个功能)之前,我的准确性才降至100%以下.(Fun fact! My first model used a 16 bit hash (for 65,536 features) and selected the top 1,000 best features. After writing the entire article to reference these numbers, I played around with the settings a bit more and realized that I did not drop below 100% accuracy until I lowered that to a 6 bit hash (for 64 features).)
这是我第一次使用Azure ML,在将本文组合在一起时,我学到了很多东西.我在数据科学领域的背景还很短,但确实包括一些数据挖掘研究生课程(我们使用Weka进行过培训)以及对解决CAPTCHA的不断着迷.(This was my first time using Azure ML, and I learned a lot while putting this article together. My background in data science is fairly short, but does include a few graduate courses in data mining (where we used Weka) and an ongoing fascination with solving CAPTCHAs.)
谢谢!(Thank you!)
概要(Summary)
- 18/11/2:初始版本(2/11/18: Initial release)
- 18/2/12:添加了指向Azure实验的链接(2/12/18: Added links to Azure experiments)
许可
本文以及所有相关的源代码和文件均已获得The Code Project Open License (CPOL)的许可。
C# VS2013 Azure Dev Architect artificial-intelligence machine-learning 新闻 翻译