[译]向图像添加文本-示例应用程序
By robot-v1.0
本文链接 https://www.kyfws.com/applications/add-text-to-image-sample-application-zh/
版权声明 本博客所有文章除特别声明外,均采用 BY-NC-SA 许可协议。转载请注明出处!
- 10 分钟阅读 - 4978 个词 阅读量 0[译]向图像添加文本-示例应用程序
原文地址:https://www.codeproject.com/Articles/1083427/Add-Text-to-Image-Sample-Application
原文作者:Anatoliy Khotin (9682296)
译文由本站 robot-v1.0 翻译
前言
Small application that allows text to be added to an image for annotation or to create greeting cards using ASP.NET MVC and jQuery
小型应用程序,允许将文本添加到图像中进行注释或使用ASP.NET MVC和jQuery创建贺卡

介绍(Introduction)
网站是一页ASP.NET MVC应用程序(C#).实体框架用于将数据保存到MS SQL数据库中. CRUD操作是使用Web API控制器执行的.客户端上的所有操作都在使用JQuery的JavaScript上执行.(Web-site is a one page ASP.NET MVC application (C#). Entity Framework is used to save data into MS SQL database. CRUD operations are performed using Web API controllers. All operations on client side are executed on JavaScript with JQuery.)
从文本生成图像是一个很棒的库(To generate images from text a wonderful library) 大纲文字(Outline Text) 使用Shao Voon Wong的作品.(from Shao Voon Wong is used.)
SVG负责处理图像.(SVG does the main job for manipulating images.)
网站具有响应式设计.我没有依赖基于浏览器类型的MVC框架内置功能.元素根据屏幕的宽度排列在屏幕上.(Site has responsive design. I did not rely on a MVC framework built-in functionality which is based on type of browser. Elements are arranged on the screen depending on its width.)
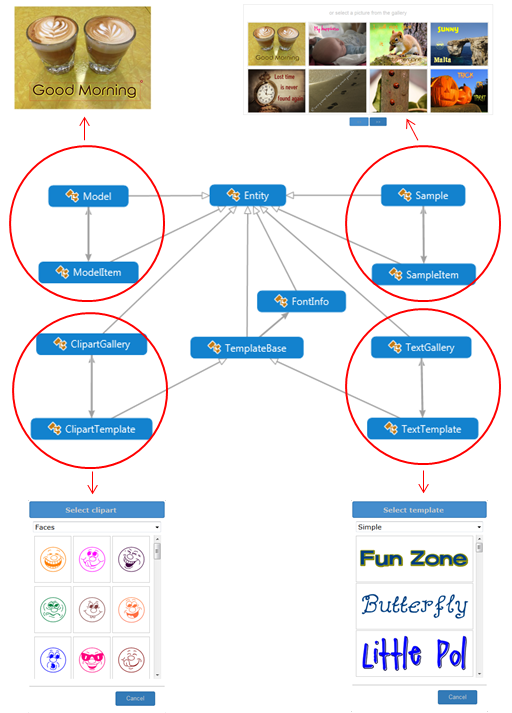
网站仅包含一个页面,该页面分为两个区域.当用户打开站点时,将显示第一个区域:(Web-site contains only one page and this page is divided on two areas. When user opens site the first area is displayed:)
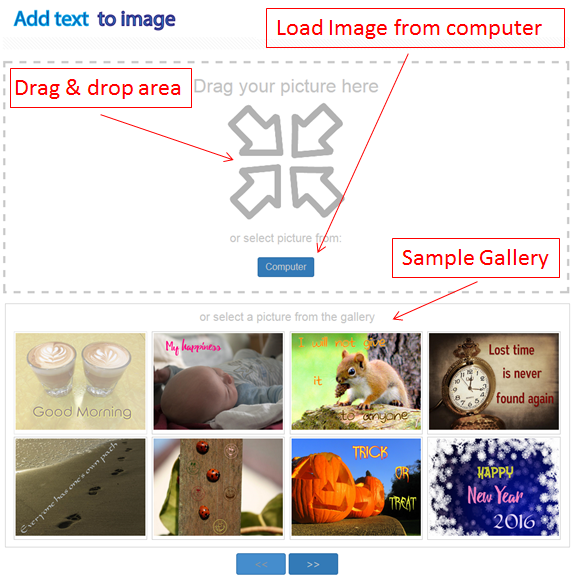
该区域用于上传源图像或从"样本库"中选择样本.因此,用户有三个选择:(This area is used to upload source image or select a sample from the Sample Gallery. So user has three options:)
- 将图像拖放到带有箭头的位置;(drag and drop image to the place with arrows;)
- 从本地驱动器选择图像;(select an image from the local drive;)
- 从样本库中选择一个样本;(select a sample from the Sample Gallery;) 上载图像或选择样本后,隐藏第一个区域,然后显示第二个区域:(After image is uploaded or sample was selected, first area hides and second is shown:)
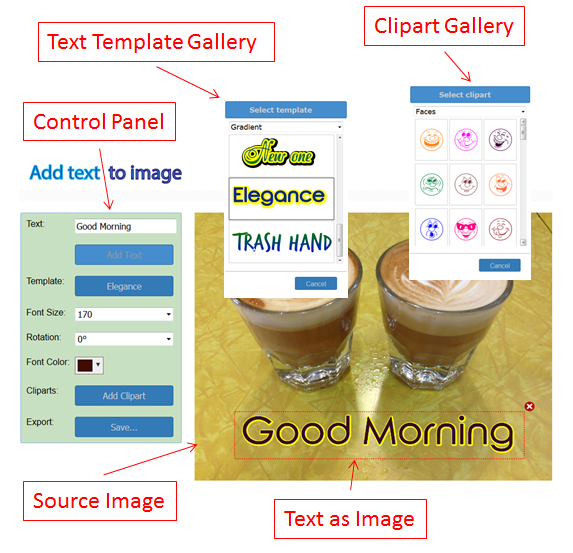
上传的图片位于屏幕的右侧.左侧是一个用于添加文本并更改其设置的面板:字体大小,颜色,旋转度等.(Uploaded image is located on the right side of the screen. On the left side there is a panel for adding text and change its settings: font size, color, rotation, etc.)
从文本生成图像的方法有很多选项:字体类型,颜色,轮廓颜色和粗细,阴影颜色和粗细等.将这些选项的控件放在页面上可能会使用户望而却步.为了减少数量,创建了文本模板库.每个文本模板都包含所有这些属性,并且通过其选择,用户只能更改主要颜色和字体大小.(Method that generates an image from the text has a lot of options: font type, color, outline color and thickness, shadow color and thickness, etc. Putting controls for these options on the page may discourage users. To reduce their quantity Text Template Gallery was created. Each Text Template includes all these attributes and with its selection user can only change main color and font size.)
可从"剪贴画库"中添加的剪贴画将使图像更具吸引力.生成剪贴画图像的方法与生成文本的方法相同.剪贴画是特殊剪贴画字体的一个字符.(Clipart that can be added from the Clipart Gallery will make an image more attractive. Approach for generating clipart image is the same as for text. Clipart is one character of special clipart font.)
用户可以通过单击"保存"按钮将结果图像保存到本地文件系统.(Resulting image can be saved by user to the local file system by clicking Save button.)
运行代码(Running the code)
要运行代码:(To run the code:)
- 在Visual Studio 2013中打开解决方案.(Open the solution in Visual Studio 2013.)
- 全部重建.(Rebuild all.)
- 将AddTextToImage.WebUI设置为启动项目.(Set AddTextToImage.WebUI as a startup project.)
- 运行应用程序.(Run the application.)
使用代码(Using the code)
该代码包含在一个解决方案中,该解决方案是Visual Studio 2013解决方案,由五个项目组成:(The code is contained in one solution, which is a Visual Studio 2013 solution, and consists of five projects:)
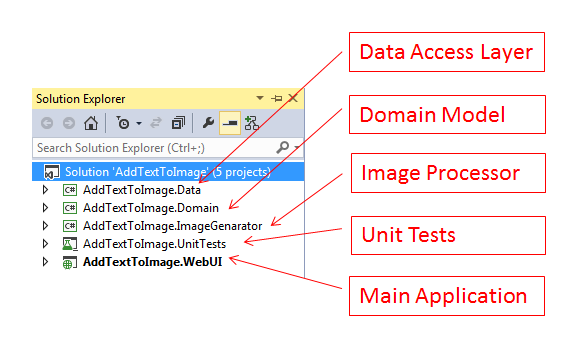
AddTextToImage.Data(AddTextToImage.Data)

数据访问层-包含存储库和(Data Access Layer - contains repository and) DbContextFactory 接口和实现.对于数据访问,使用实体框架代码优先方法.(interfaces and implementations. For data access Entity Framework Code First approach is being used.)
的(The) Db 继承的类(class which inherits) DbContext 有个(has a) DbSet<Entity> EF Code First要求的每个实体.(for each entity as required by EF Code First.)
的(The) DbContextFactory 类用于构造和获取(class is used to construct and get the) DbContext .(.)
Repository<T> 是执行所有基本数据访问操作的通用存储库.(is a generic repository which does all the basic Data Access operations.)
AddTextToImage.Domain(AddTextToImage.Domain)
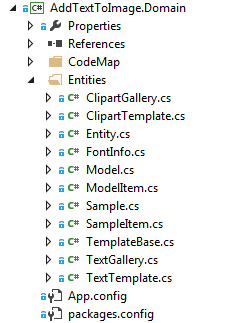
Project AddText To Image.Domain包含应用程序的POCO实体.下图显示了这些类:(Project AddTextToImage.Domain contains POCO entities for the application. Diagram bellow shows these classes:)
类(Class) Entity 是所有POCO类的基类.(is the base class for all POCO classes.) Model 和(and) ModelItem 表示源图像和从添加的文本生成的图像.的目的(represent source image and images generated from the added text. The purpose of) Sample 和(and) SampleItem 类是显示样本库.班级(classes is to display Sample Gallery. Classes) ClipartGallery ,(,) ClipartTemplate 和(and) TextGallery ,(,) TextTemplate 分别显示剪贴画库和文本模板库.(show Clipart Gallery and Text Template Gallery correspondingly.) ClipartGallery 和(and) TextGallery ,(,) ClipartTemplate 和(and) TextTemplate 具有相同的结构.但是,我更喜欢使用单独的类在数据库中具有单独的表.(have the same structure. However, I’ve preferred to use separate classes to have individual tables in the database.)
抽象类(Abstract class) TemplateBase 是…的基类(is a base class for) ClipartTemplate 和(and) TextTemplate .它似乎充当该类的构造函数的参数(. It appeared to serve as a parameter for a constructor of the class) OutlineTextProcessor .在创建过程中(. During the creation of) OutlineTextProcessor 构造函数需要的类(class its constructor takes) ClipartTemplate 要么(or) TextTemplate 作为参数.类(as a parameter. Class) FontInfo 包含位于文件系统上的字体的文件名.(contains file names of fonts which are located on the file system.)
AddTextToImage.ImageGenarator(AddTextToImage.ImageGenarator)

只有一堂课(It has only one class) OutlineTextProcessor 使用TextDesignerCSLibrary.dll库从文本生成图像. (上面链接了有关图像生成过程和该库的文章的链接).(which generates images from the text using TextDesignerCSLibrary.dll library. (Link to an article about image generation process and this library is motioned above).)
AddText到Image.Unit测试(AddTextToImage.UnitTests)
项目包含一类,其中包含针对控制器的多个单元测试.为此,我使用了Visual Studio单元测试框架和Moq库.(Project contains one class with several unit tests for controllers. For this purpose I used Visual Studio Unit Testing Framework and Moq library.)
AddTextToImage.WebUI(AddTextToImage.WebUI)
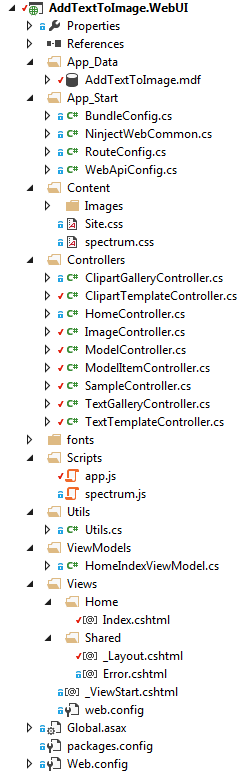
如上所述,站点只有一页,因此,有一个名为(As I mentioned above, site has one page, so, there is one regular controller named) HomeController 在项目中.所有其他控制器都是Web API,它们执行CRUD操作或返回生成的图像.(in the project. All other controllers are Web API and they perform CRUD operations or return generated images.)
为了简化生活,我使用jQuery进行DOM操作.我还使用了jQuery UI中的Dialog小部件来显示Text Template Gallery和Clipart Gallery.这两个库直接从CDN网络加载.(To make life easier I used jQuery for DOM manipulation. Also I used Dialog widget from jQuery UI to display Text Template Gallery and Clipart Gallery. These two libraries are loaded directly from CDN network.)
所有JavaScript代码都在一个文件中:app.js.下表中列出了应用程序中使用的基本JavaScript对象的列表:(All JavaScript code is in a single file: app.js. List of the base JavaScript objects, which is used in the application, are in the table:)
| JavaScript对象(JavaScript objects) | 描述(Description) |
|---|---|
| textAsImage | 顶部对象,包含以下所有对象.(Top object, contains all objects bellow.) |
| errorMessage | 服务器在AJAX请求上返回错误时显示错误消息.(Shows error message when server returns an error on AJAX request.) |
| model | 保存源图像的属性.包含文本图像数组(modelItems).(Saves properties of source image. Contains array of text images (modelItems).) |
| modelItem | 保存所有属性以从文本生成图像.(Saves all properties to generate image from the text.) |
| textSelector | 表示文本模板库.(Represents Text Template Gallery.) |
| clipartSelector | 表示剪贴画库.(Represents Clipart Gallery.) |
| sampleSelector | 表示样本库.(Represents Sample Gallery.) |
| fileUpload | 将源图像上载到服务器.(Uploads a source image to the server.) |
在下面,我描述了JavaScript的主要操作:(Bellow I describe main operations that JavaScript does:)
添加源图像(Adding source image)
页面加载后,它在隐藏区域中包含空容器(SVG元素):(Once the page is loaded, it contains empty container (SVG element) in a hidden area:)
<svg id="canvas" width="100%" height="100%" xmlns="http://www.w3.org/2000/svg" baseProfile="full" version="1.1" xmlns:xlink="http://www.w3.org/1999/xlink" viewBox="0 0 0 0">
</svg>
当用户选择源图像时,它通过AJAX请求保存到数据库中:(When user selects a source image, it saves into database via AJAX request:)
// Upload source image to the server.
function uploadFile(files) {

    var data = new FormData();

    // Add the uploaded image content to the form data collection.
    if (files.length > 0) {

        disableControls();
        $("#file-placeholder").attr("src", basePath + "Content/Images/image-loading.gif");

        data.append("UploadedImage", files[0]);

        // AJAX request to upload source image to the server.
        $.ajax({
            type: "POST",
            url: basePath + "api/Model/UploadFile/",
            contentType: false,
            processData: false,
            data: data,

            success: function (data) {

                $("#select-image").remove();
                $("#image-worker").show();

                model.addModel(data.Id, data.ImageWidth, data.ImageHeight);
            },

            error: function (xhr, textStatus, errorThrown) {
                errorMessage.show(errorThrown);
            }
        });
    }
}
如果保存操作成功完成,将删除页面的第一个区域,并显示第二个区域.(If saving operation completed successfully, the first area of the page is deleted and the second area is shown.)
功能(Function) addModel 将源图像添加到SVG容器:(adds source image to SVG container:)
// Add source image.
function addModel(modelId, modelWidth, modelHeight) {

    // Save id, width and height of the source image.
    id = modelId;
    width = modelWidth;
    height = modelHeight;

    // Create SVG <image> element for source image.
    var svgSourceImg = document.createElementNS("http://www.w3.org/2000/svg", "image");
    svgSourceImg.setAttribute("id", "model" + id);
    svgSourceImg.setAttribute("height", "100%");
    svgSourceImg.setAttribute("width", "100%");
    svgSourceImg.setAttributeNS("http://www.w3.org/1999/xlink", "href", basePath + "api/Model/Image/" + id + "/");
    svgSourceImg.setAttribute("x", "0");
    svgSourceImg.setAttribute("y", "0");
    canvas.setAttribute("style", "margin-left: auto; margin-right: auto; max-width: " + modelWidth + "px;");
    canvas.setAttribute("viewBox", "0 0 " + modelWidth + " " + modelHeight);

    // Append image to SVG container
    canvas.appendChild(svgSourceImg);

    if (detectIE()) {

        var imgHeigth = modelHeight;

        if (modelWidth - $("#image-main").width() > 0) {

            imgHeigth = modelHeight * $("#image-main").width() / modelWidth;
        }

        $("#image-main").css("height", imgHeigth + "px");
    }

    // Set URL for downloading the resulting image.
    $("#form-save-result").attr("action", basePath + "api/Image/Result/" + id);

    // Set size for Delete image and thickness for bounding rectangle depending on the width of the source image.
    setDelImageSize();
}
结果,SVG容器具有元素:(As a result SVG container has element:)
<svg style="margin-left: auto; margin-right: auto; max-width: 1632px;" id="canvas" width="100%" height="100%" xmlns="http://www.w3.org/2000/svg" baseProfile="full" version="1.1" xmlns:xlink="http://www.w3.org/1999/xlink" viewBox="0 0 1632 1224">
    <image y="0" x="0" xlink:href="/api/Model/Image/1424/" width="100%" height="100%" id="model1424"></image>
</svg>
新增文字(Adding text)
当用户输入文本并按下"添加文本"按钮时,新对象(When a user entered text and pressed “Add Text” button new object) modelItem 创建并存储在数据库中.后续生成输出映像时需要将信息保存在数据库中:(is created and it also stores in the database. Saving information in the database is required for the subsequent generation of the output image:)
$("#btn-add-text").on("click", function () {

    if ($("#sample-text").val().length > 0) {

        // Create new text image.
        var modelItem = new ModelItem();
        modelItem.id = 0;
        modelItem.modelId = id;
        modelItem.itemType = 0;
        modelItem.text = $("#sample-text").val();
        modelItem.templateId = textSelector.getSelectedItemId();
        modelItem.fontSize = $("#font-size").val();
        modelItem.fontColor = $("#font-color").spectrum("get").toHexString();
        modelItem.rotation = $("#rotation").val();

        $.ajax({
            url: basePath + "api/Model/AddModelItem/",
            type: "PUT",
            dataType: "json",
            data: modelItem.getData(),

            success: function (modelItemId) {

                modelItem.id = modelItemId;

                addModelItem(modelItem);
            },

            error: function (xhr, textStatus, errorThrown) {
                errorMessage.show(errorThrown);
            }
        });
    }
});
如果保存操作成功完成,则起作用(If saving operation completed successfully, function) addModelItem 添加HTML代码以显示生成的图像:(adds HTML code to show generated image:)
// Add text image.
function addModelItem(modelItem) {

    // Create SVG <g> element.
    var svgGroup = document.createElementNS("http://www.w3.org/2000/svg", "g");
    svgGroup.setAttribute("id", "img-group" + modelItem.id);

    // Create SVG <rect> element: bounding rectangle for the image
    var svgRect = document.createElementNS("http://www.w3.org/2000/svg", "rect");
    svgRect.setAttribute("id", "rect" + modelItem.id);
    svgRect.setAttribute("x", modelItem.positionLeft);
    svgRect.setAttribute("y", modelItem.positionTop);
    svgRect.setAttribute("height", "0");
    svgRect.setAttribute("width", "0");
    svgRect.setAttribute("stroke", "red");
    svgRect.setAttribute("stroke-width", rectangleThickness);
    svgRect.setAttribute("stroke-dasharray", "5");
    svgRect.setAttribute("fill-opacity", "0.4");
    svgRect.setAttribute("fill", "none");
    svgRect.style.display = "none";

    svgGroup.appendChild(svgRect);

    // Create SVG <image> element for image generated from the text.
    var svgTextImg = document.createElementNS("http://www.w3.org/2000/svg", "image");
    svgTextImg.setAttribute("id", "img" + modelItem.id);
    svgTextImg.setAttribute("height", "0");
    svgTextImg.setAttribute("width", "0");
    svgTextImg.setAttributeNS("http://www.w3.org/1999/xlink", "href", basePath + "api/Image/ModelItem/" + modelItem.id + "/" + modelItem.getUrl());
    svgTextImg.setAttribute("x", modelItem.positionLeft);
    svgTextImg.setAttribute("y", modelItem.positionTop);
    svgTextImg.style.cursor = "move";

    svgGroup.appendChild(svgTextImg);

    // Create SVG <image> element for Delete image.
    var svgDelImg = document.createElementNS("http://www.w3.org/2000/svg", "image");
    svgDelImg.setAttribute("id", "del" + modelItem.id);
    svgDelImg.setAttributeNS("http://www.w3.org/1999/xlink", "href", basePath + "Content/Images/delete.png");
    svgDelImg.setAttribute("x", modelItem.positionLeft);
    svgDelImg.setAttribute("y", modelItem.positionTop - 16);
    svgDelImg.style.display = "none";
    svgDelImg.style.cursor = "pointer";
    svgDelImg.setAttribute("height", delImageSize);
    svgDelImg.setAttribute("width", delImageSize);

    svgGroup.appendChild(svgDelImg);

    // Add the whole group: bounding rectangle, image generated from the text and Delete image to canvas.
    canvas.appendChild(svgGroup);

    // Create hidden additional image. When it's loaded its width and height are set to svgRect and svgTextImg elements.
    var $hiddenImg = $("<img>", {
        id: "hidden-img" + modelItem.id,
        src: basePath + "api/Image/ModelItem/" + modelItem.id + "/" + modelItem.getUrl()
    });

    // Add created image to hidden area.
    $("#hidden-images").append($hiddenImg);

    // Attach events.
    $($hiddenImg).on("load", onLoadImage);
    $(svgDelImg).on("click", onClickDelete);
    $(svgTextImg).on("mousedown", onMoveStart);
    $(svgTextImg).on("mouseup", onMoveEnd);
    $(svgTextImg).on("click", onClickImage);
    $(svgTextImg).on("touchstart", onMoveStart);
    $(svgTextImg).on("touchend", onMoveEnd);

    // Add item to an array.
    modelItems.push(modelItem);

    // Select added item: bounding rectangle and Delete image are visible.
    selectItem(modelItem.id);
}
添加文本后,我们得到以下HTML输出:(After adding the text we get the following HTML output:)

在此示例中,我们具有带有源图像的SVG容器:id =model1424.为了显示生成的图像,使用了四个元素:(In this example we have SVG container with source image: id=model1424. To show generated image four elements are used:)
-将rect和两个图像元素分组;( - groups rect and two image elements;) -边界矩形.显示选择了图像.( - bounding rectangle. It shows that image is selected;) -从文本生成的图像;(<image id=img1666> - image generated from the text;) -用作删除按钮;(<image id=del1666> - serves as a delete button;)
影像移动(Image movement)
单击和拖动功能分为以下事件:(The click-and-drag functionality is split into next events:) mousedown ,(,) mousemove ,(,) mouseupm ,(,) mouseout 要么(or) touchstart ,(,) touchmove ,(,) touchend 用于触摸屏设备.第一个是单击,当光标在图像上方或在图像上放置触摸点时,按下鼠标左键会触发该单击:(for touch screen devices. The first is the click, which is triggered when the left mouse button is pressed down while the cursor is over an image or when a touch point is placed on the image:)
// mousedown and touchstart event handlers.
function onMoveStart(e) {

    // Needed for Firefox to allow dragging correctly
    e.preventDefault();

    if (e.type === "touchstart") {

        // Attach touchmove event handler
        $(e.target).on("touchmove", onMove);

        // Save the initial touch coordinates
        mouseStart = getPoint(e.originalEvent.touches[0]);

    }
    else {

        // Attach mousemove and mouseout event handlers
        $(e.target).on("mousemove", onMove).on("mouseout", onMoveEnd);

        // Save the initial mouse coordinates
        mouseStart = getPoint(e);
    }

    // Save top and left position of the image.
    elementStart = {
        x: e.target["x"].animVal.value,
        y: e.target["y"].animVal.value
    };

    // Show bounding rectangle and Delete image. Set values for controls in Control Panel for selected modelItem.
    selectItem(e.target.id.substring(3));
}
处理图像的功能:(The function that deals with moving the image:)
// mousemove and touchmove event handlers.
function onMove(e) {

    // Get digital part of the image id.
    var id = e.target.id.substring(3);

    // Get current mouse or touch coordinates.
    var svgPoint = (e.type === "mousemove") ? getPoint(e) : getPoint(e.originalEvent.touches[0]);

    svgPoint.x = svgPoint.x - mouseStart.x;
    svgPoint.y = svgPoint.y - mouseStart.y;

    var m = e.target.getTransformToElement(canvas).inverse();

    m.e = m.f = 0;
    svgPoint = svgPoint.matrixTransform(m);

    // Set new position for image, bounding rectangle and Delete image.
    $("#img" + id).attr({
        "x": elementStart.x + svgPoint.x,
        "y": elementStart.y + svgPoint.y
    });
    $("#rect" + id).attr({
        "x": elementStart.x + svgPoint.x,
        "y": elementStart.y + svgPoint.y
    });
    $("#del" + id).attr({
        "x": elementStart.x + svgPoint.x + parseInt($("#img" + id).attr("width")),
        "y": elementStart.y + svgPoint.y - delImageSize
    });

    if (selectedItem != null) {

        selectedItem.positionLeft = Math.round(elementStart.x + svgPoint.x);
        selectedItem.positionTop = Math.round(elementStart.y + svgPoint.y);
    }
}
大事记(Events) mouseup 和(and) mouseout 或touchend用于检测用户何时停止移动图像:(or touchend are used to detect when the user stops moving the image:)
// mouseup, mouseout and touchend event handlers.
function onMoveEnd(e) {

    if (e.type === "touchend") {

        // Detach touchmove event handler
        $(e.target).off("touchmove", onMove);
    }
    else {

        // Detach mousemove and mouseout event handlers
        $(e.target).off("mousemove", onMove).off("mouseout", onMoveEnd);
    }

    if (selectedItem != null) {
        selectedItem.updateDatabase();
    }
}
致谢(Acknowledgments)
感谢Shao Voon Wong的文章:(Thanks to Shao Voon Wong for his articles:) 大纲文字(Outline Text) 和(and) 大纲文本第2部分(Outline Text Part 2) .他的库在此应用程序中担任主要工作.(. His library does the main job in this application.)
感谢Rod Stephens的文章(Thanks to Rod Stephens for his article) 在C#中以任意角度旋转图像(Rotate images by an arbitrary angle in C#) ,这是我在应用程序中使用的.(, which I used in my app.)
感谢Brian Grinstead的贡献(Thanks to Brian Grinstead for his) 轻松的JavaScript Colorpicker.(The No Hassle JavaScript Colorpicker.)
历史(History)
- 2016年6月3日-初始版本发布.(06.03.2016 - Initial version released.)
许可
本文以及所有相关的源代码和文件均已获得The Code Project Open License (CPOL)的许可。
Javascript C# .NET MVC entity-framework ASP.NET Dev 新闻 翻译