[译]CM_ConfigBuilder 1.2g:用于应用程序设置图形管理的Visual Studio 6/Visual Studio 2005/Visual Studio 2008代码生成器
By robot-v1.0
本文链接 https://www.kyfws.com/applications/cm-configbuilder-1-2g-visual-studio-6-visual-studi-zh/
版权声明 本博客所有文章除特别声明外,均采用 BY-NC-SA 许可协议。转载请注明出处!
- 27 分钟阅读 - 13135 个词 阅读量 0[译]CM_ConfigBuilder 1.2g:用于应用程序设置图形管理的Visual Studio 6/Visual Studio 2005/Visual Studio 2008代码生成器
原文地址:https://www.codeproject.com/Articles/6681/CM-ConfigBuilder-1-2g-Visual-Studio-6-Visual-Studi
原文作者:Stefano Basili
译文由本站 robot-v1.0 翻译
前言
CM_ConfigBuilder generates and compiles the required files to manage your application’s settings/preferences and to store/retrieve them in XML format.
CM_ConfigBuilder生成并编译所需的文件,以管理应用程序的设置/首选项,并以XML格式存储/检索它们.
- 下载二进制文件(1.2g版)-2.19 MB(Download binaries (version 1.2g) - 2.19 MB)
- 下载源代码(1.2g版)-2.55 MB(Download source code (version 1.2g) - 2.55 MB)
- 下载样本-30.94 KB(Download samples - 30.94 KB)
- 下载sample1二进制文件-204.7 KB(Download sample1 binaries - 204.7 KB)
最新更新(Latest Update)
| CM_Configbuilder版本1.2G(CM_Configbuilder Version 1.2G) |
|---|
| 1. |
| 2. |
介绍(Introduction)
大约两年前,每当客户问我"您能否使该参数可配置"时,我就开始感到无聊.每次使参数可配置时,我都需要编写代码来执行以下操作:将参数保存到文件中,从文件中检索参数,设置一些图形控件以允许用户更改其值(例如文本)框或其他输入控件),并验证用户设置的值.因此,我决定创建一个可以为我完成所有这些操作的工具.(About two years ago, I began to be bored every time my customers asked me, “Can you make this parameter configurable?” Every time I make a parameter configurable, I need to write code to perform the following actions: save the parameter to a file, retrieve the parameter from a file, set up some graphic control to allow the user to change its value (such as text box or some other input control), and validate values set by the user. So, I decided to create a tool that could make all these operations for me.)
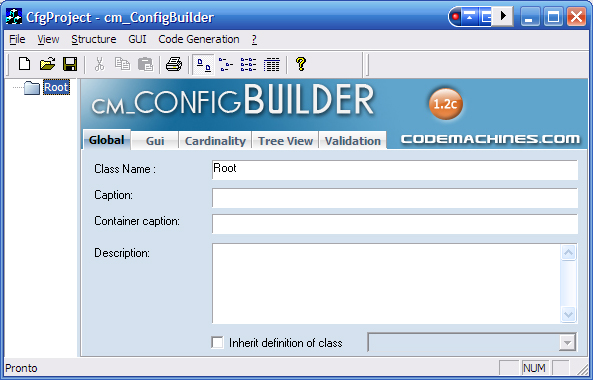
第一步是创建一个工具来描述我想要在应用程序中使用的参数的结构.第二步是添加描述用户如何编辑数据的功能.第三步是建立一个包含所有所需代码的库.所有这些愿望使我写了CM_ConfigBuilder. CM_ConfigBuilder生成管理我的数据结构并将其持久化在XML文件中所需的所有代码. CM_ConfigBuilder生成的GUI显示了一个树视图,其中包含层次结构的所有类:(The first step was to create a tool to describe the structure of the parameters I wanted in my application. The second step was to add the capability to describe how the user could edit the data. The third step was to build a library containing all the needed code. All these wishes led me to write CM_ConfigBuilder. CM_ConfigBuilder generates all the code needed to manage my data structure and to make it persistent in an XML file. The GUI generated by CM_ConfigBuilder shows a tree view containing all the classes of the hierarchy:)
下面是一个简短的教程,该教程显示了如何创建简单的配置.(Here follows a brief tutorial that shows how to create a simple configuration.)
步骤1:创建一些班级成员(Step 1: Create Some Class Members)
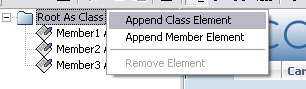
让我们创建一个由具有三个属性的根类组成的简单配置.要将成员添加到班级,请右键单击树形视图,然后选择要添加的项目.在此示例中,我们将添加三个成员:(Let’s create a simple configuration made of a root class with three attributes. To add members to the class, right click on the tree view and select the item you want to add. In this example, we will add three members:)
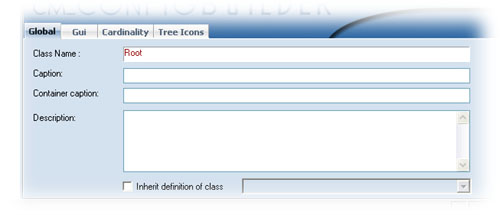
 通过选择一个成员(在树视图中),我们将在右窗格中看到一组选项卡.第一个选项卡(“全局”)包含成员的名称,其标题(在GUI中使用)和"持久模式":(By selecting a member (in the tree view), we will see a set of tabs in the right pane. The first tab (“global”) contains the name of the member, its caption (used in the GUI), and the “persistence mode”:)
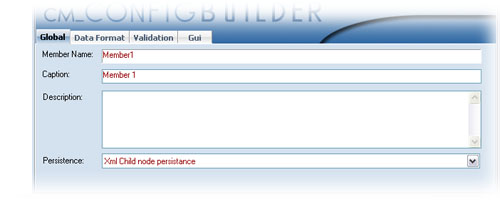 持久模式可以设置为以下值:(The persistence mode can be set to the following values:)
- “没有持久性”:生成器将创建成员,但不会将其保存到文件(或从文件中加载).(“no persistence”: the generator will create the members, but they will not be saved to (or loaded from) a file.)
- " XML子节点持久性":生成器将创建方法以将成员另存为容器类的XML节点子级.(“XML child node persistence”: the generator will create methods to save the member as an XML node child of the container class.)
- " XML属性":该属性将存储为类节点属性.(“XML attribute”: the attribute will be stored as a class node attribute.)
- " #text node":该属性将作为文本节点存储在父代标签中.只有一个成员可以保留为#text节点.("#text node": the attribute will be stored as a text node inside the parent’s tags. Only one member can persist as #text node.)
步骤2:设置成员的数据类型(Step 2: Set Members' Data Type)
CM_ConfigBuilder允许定义成员的数据类型:字符串,长整数,布尔值,双精度,日期,时间.默认情况下,成员的数据类型设置为"字符串"(C ++生成器使用(CM_ConfigBuilder allows definition of members' data types: string, long, Boolean, double, date, time. By default, the data type of members is set to “string” (the C++ generator uses a) CString 派生类称为(derived class called) cmString ):():)

步骤3:设定成员的验证(Step 3: Set Members' Validation)
成员验证当前支持"静态枚举"和"自定义验证".(Member validation currently supports a “Static Enum” and “Custom Validation.")
| 静态枚举(Static Enum) |
|---|
| 当我们选择"静态枚举"验证时,CM_ConfigBuilder生成:(When we select a “Static Enum” validation, CM_ConfigBuilder generates:) |
Get方法(返回当前枚举值)(method (returns the current enum value))Set方法(设置当前枚举值)(method (sets the current enum value))Get_Value方法(返回与当前枚举值关联的值)(method (returns a value associated with the current enum value)) 带有"静态枚举"验证的字段将由ComboBox控件编辑. “默认值"列可用于指定未初始化字段将显示哪个默认值.按钮"清除默认值"将清除整个列:生成器会将初始字段值设置为0.因此,我们可以设置成员变量long,string或double并将其验证为枚举值.让我们举个例子:(Fields with “Static Enum” validation will be edited by ComboBox controls. The column “Default Values” can be used to specify which default value will be displayed for uninitialized fields. The button “Clear Default” will clear the entire column: the generator will set the initial field value at 0. So, we can set up a member variable long, string or double and validate it as an enum value. Let’s have an example:)
我们需要声明一个代表采样率的类成员(我们称之为(We need to declare a class member representing a sampling rate (let’s call it) SampleRate ).我们只想管理几个值:10.55Hz,100.9Hz,1.5KHz.为此,我们只需要创建一个数据类型为” double"的成员.如果我们将其验证为"静态枚举”,则可以指定枚举值:(). We want to manage only a few values: 10.55Hz, 100.9Hz, 1.5KHz. To do this, we just need to create a member with dataType “double.” If we validate it as a “Static Enum,” we can specify the enum values :)
| 名称(Name) | 枚举值(Enum Value) | 关联价值(Associated Value) | 描述(Description) | |
|---|---|---|---|---|
| 1 | Low | 1 | 10.55 | 低采样率(Low sample rate) |
| 2 | Medium | 5 | 100.9 | 中等采样率(Medium sample rate) |
| 3 | High | 10 | 1500 | 高采样率(High sample rate) |
Cm_ConfigBuilder生成以下代码:(Cm_ConfigBuilder generates the following code:)
这样,很容易进行比较((In this way, it is easy to make comparisons () if (GetSampleRate() == enSampleRate_Low)... )并使用该值进行计算(() and to use the value for calculations () double x = GetSampleRate_Value()* 10 ).().)
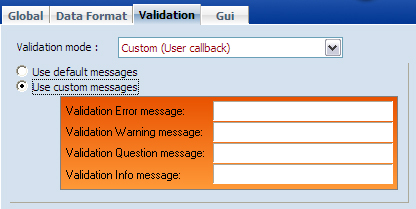
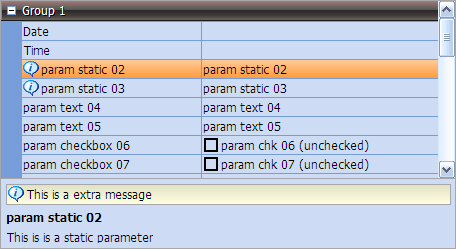
| |自定义验证(Custom Validation)| ||CM_ConfigBuilder可以生成一个接口.该界面包含使用自定义验证的每个成员的验证功能.每个班级成员可以为项目的每个班级分配一个.验证过程已与一组可能的结果相关联:(CM_ConfigBuilder can generate an interface. This interface contains a validation function for each member using Custom Validation. Every class member can have one for each class of the project. The Validation process has been associated with a set of possible results:)
- 错误:显示错误图标((Error: displays an Error Icon ()
 )和错误消息.() and a error message.)
 - 警告:显示警告图标((Warning: displays a Warning Icon ()
 )和警告消息.() and warning message.)
 - 问题:显示问题图标((Question: displays a Question Icon ()
 )和问题消息.() and question message.)
 - 信息:显示一个信息图标((Info: displays an Info Icon ()
 )和信息消息.() and info message.)
 - 确定:不显示图标或消息.(Ok: no icon nor message are displayed.)
GUI模式:用于输入类成员值的文本框失去焦点时,将调用验证功能.当显示类别对话框(类别列表)时,调用相同的功能.对于ATL代码生成,验证函数声明如下:(GUI mode: when the text box used to input a class member’s value loses the focus, the validation function is called. The same function is called when the class dialog (category list) is displayed. For ATL code generation, the validation functions are declared as follows:)
 如果为类成员启用"自定义验证",则将获得以下功能:(If you enable Custom Validation for a class member, you will get the following function:)
下图显示了自定义成员验证的可能用法:(The following image shows a possible use of Custom Member Validation:)
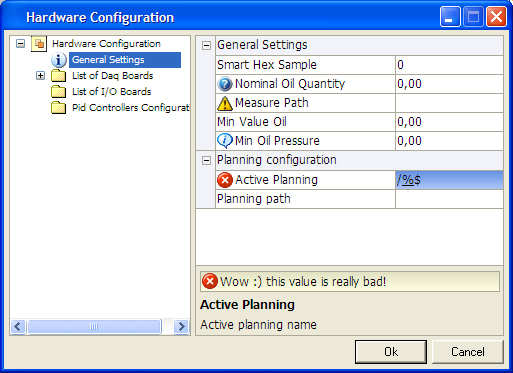 |
|
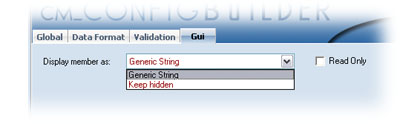
步骤4:设置会员的" GUI模式"(Step 4: Set Members' “GUI Mode”)
另一件事是设置" GUI模式".我们可以决定成员是可见还是隐藏.(Another thing to do is set the “GUI mode.” We can decide if a member is visible or hidden.)
 对于每个类成员,CM_ConfiguBuilder将生成一个(For each class member, CM_ConfiguBuilder will generate a)
 Get /(/) Set 几种方法.如果将成员设置为可见,并且将生成器配置为生成编辑配置所需的GUI,则如果未选中"只读"复选框,则将显示该成员并将其可编辑.(couple of methods. If the member is set to visible and the generator is configured to generate the GUI needed to edit the configuration, the member will be shown and will be editable if the check box “Read only” is not checked.)
步骤5:配置根类(Step 5: Configure the Root Class)
要配置单个类,我们必须在树视图中单击相应的节点.第一个选项卡(“全局”)包含有关该类的常规信息:其名称,其标题(显示在生成的GUI的树形视图中)及其容器标题.当类的基数为时使用容器标题(To configure a single class, we have to click on the corresponding node in the tree view. The first tab (“global”) contains general information about the class: its name, its caption (shown in the treeview of the generated GUI) and its container caption. The container caption is used when the cardinality of the class is) Array 要么(or) Map (请参阅示例1((see sample 1 in)CM_ConfigBuilder_samples.zip(CM_ConfigBuilder_samples.zip)).().)
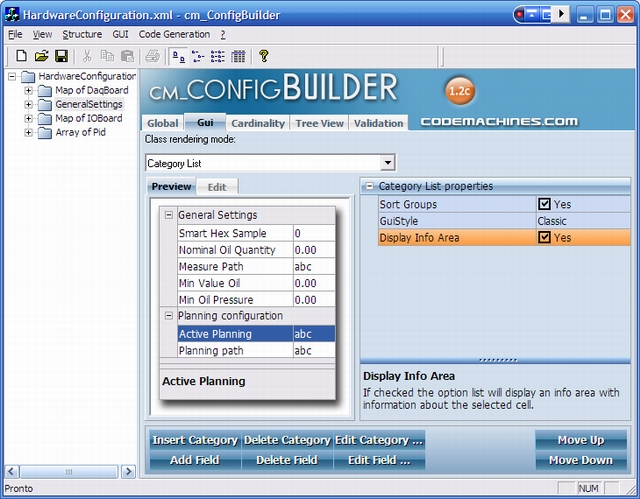
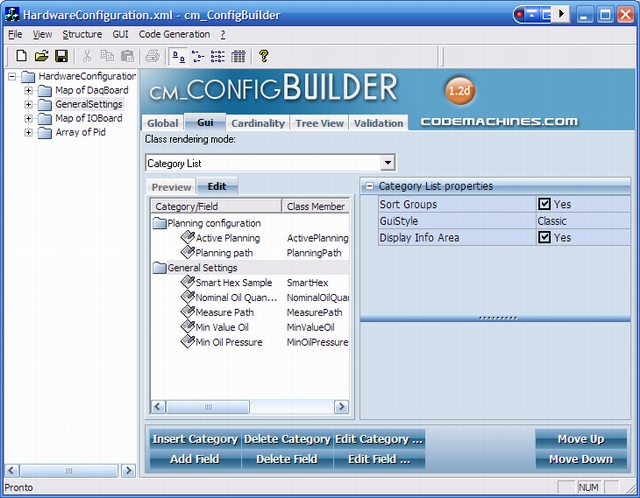
步骤6:定义GUI模式(Step 6: Define GUI Mode)
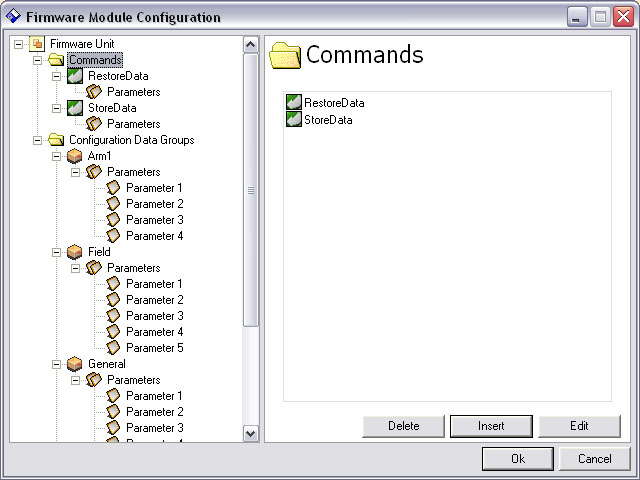
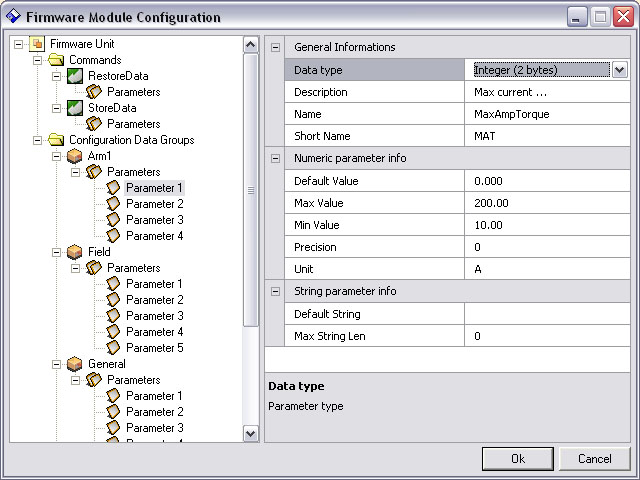
选项卡" GUI"使我们可以定义如何查看属性.当前,仅支持"类别列表"和"网格".(The tab “GUI” allows us to define how we want to see the attributes. Currently, only “Category list” and “Grid” are supported.) CategoryList 允许对类属性进行分组,如下所示.配置面板具有两个选项卡:第一个选项卡是生成的面板的预览,而第二个选项卡允许编辑面板结构.(allows the class attributes to be grouped, as shown below. The configuration panel has two tabs: the first is a preview of the generated panel, while the second tab allows editing of the panel structure.)
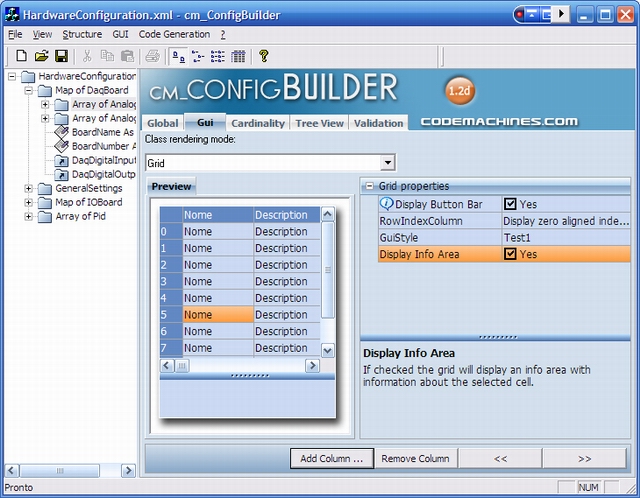
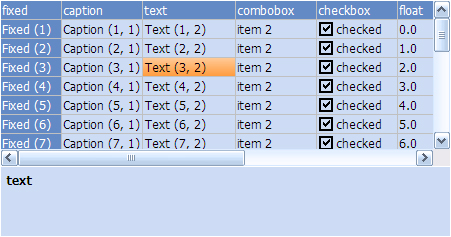
网格样式允许将类的数组显示在单个表中,其中每一行代表一个类实例.当前,CM_ConfigBuilder提供以下定制:(Grid style allows arrays of classes to be shown in a single table, where each row represents a single class instance. Currently, CM_ConfigBuilder provides the following customizations:)
- 按钮栏生成(可以生成带有按钮的工具栏,用于添加/删除行)(Button bar generation (it is possible to generate a toolbar with buttons for add/remove rows))
- 具有行号的可选列(零或一对齐)(Optional column with row number (zero or one aligned))
- GUI样式(当前仅提供经典和test1样式)(GUI style (currently, only classic and test1 styles are provided))
- 信息区显示(Info area display)
 从1.2c版开始,“类别列表”(由组件实现)(Starting from version 1.2c, “category list” (implemented by component)
 cmOptionList)和"网格"(由组件实现)() and “grid” (implemented by component)cmTable)具有新样式(即将可自定义).() have a new style (soon customizable).)
样品(Sample of) cmOptionList ((() style1 ):():)
 样品(Sample of)
 cmTable ((() style1 ):():)
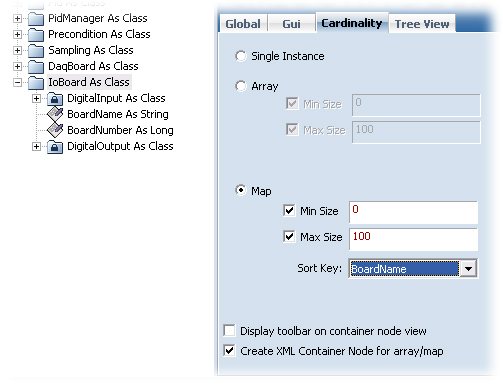
步骤7:定义基数(Step 7: Define Cardinality)
标签"基数"使我们可以说:“此类不是单个实例.“我们可以决定是否要创建类数组或类映射.这些设置显示在样本1中(请参阅样本1).(The tab “Cardinality” allows us to say, “This class is not a single instance.” We can decide if we want to create a class array or a class map. These settings are shown in sample 1 (see sample 1 in)CM_ConfigBuilder_samples.zip(CM_ConfigBuilder_samples.zip)).附言此版本不支持数组或映射的最小/最大大小.(). P.S. this version does not support min/max size of array or map.)
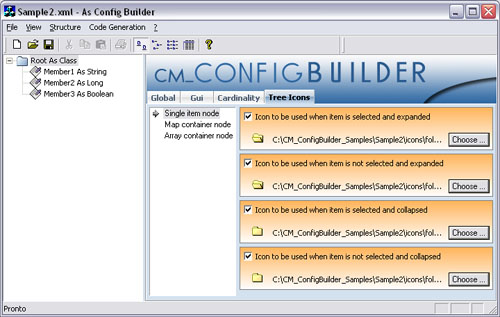
步骤8:定义树图标(Step 8: Define Tree Icons)
标签"树形图标"允许我们指定将在树形视图中显示的图标.对于不是"单个实例"的类(请参见基数),可以指定将在容器节点上显示哪些图标.(The tab “Tree Icons” allows us to specify which icons will be shown in the tree view. For classes not “single instance” (see Cardinality), it is possible to specify which icons will be shown on the container node.)
步骤9:类别验证(Step 9: Class Validation)
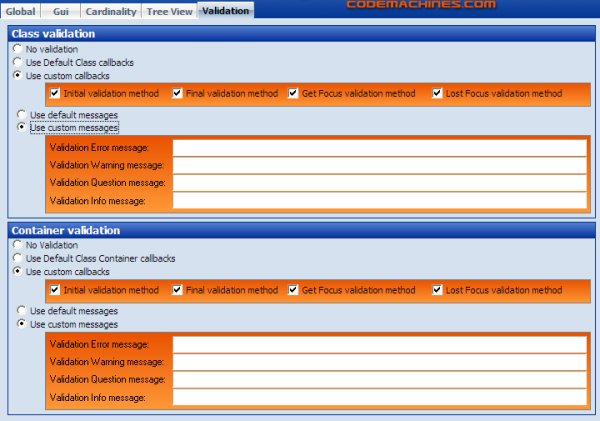 如果您需要为某个类实施特定的验证过程,则需要设置上面显示的面板.对于每个类,您可以选择所需的验证类型:(If you need to implement your specific validation procedure for a class, you’ll need to set up the panel shown above. For each class, you can select which kind of validation you want:)
-
无验证:不会为此类生成验证接口.(No Validation: no validation interface will be generated for this class.)
-
使用默认类回调:CM_ConfigBuilder使用为默认类配置的回调(菜单:代码生成->默认类)生成验证接口.(Use Default Class Callbacks: CM_ConfigBuilder generates a validation interface with the callbacks configured for the default class (Menu: Code Generation->Default Class).)
-
使用自定义回调:您可以启用所需的回调.(Use Custom Callbacks: you can enable the callbacks you want.)
- 初始验证方法:调用此方法时(如果启用)(Initial validation method: this method (if enabled) will be called when you call the)
SetData方法开启(method on)MainDialog.这使您可以执行第一次验证.(. This allows you to perform a first validation.) - 最终验证方法:当用户按下"确定"按钮时,将调用此方法(如果启用).这使您可以对用户输入的所有值执行最终检查.(Final validation method: this method (if enabled) will be called when the user presses the OK button. This allows you to perform a final check of all the values entered by the user.)
GetFocus验证方法:每次要显示类时,都会调用此方法(如果启用).(validation method: this method (if enabled) will be called each time the class is about to be shown.)LostFocus验证方法:每次要隐藏该类(并显示一个新类)时,都会调用此方法(如果启用).(validation method: this method (if enabled) will be called each time the class is about to be hidden (and a new class is displayed).)
- 初始验证方法:调用此方法时(如果启用)(Initial validation method: this method (if enabled) will be called when you call the)
您还可以决定是要显示默认消息(在"默认类别"设置中定义)还是要提供特定于类别的消息.对于具有基数映射或数组的类,您可以使用(You can also decide if you want to display the default messages (defined in the Default Class settings) or if you want to provide class-specific messages. For classes with cardinality Map or Array, you can have a) Container 类验证接口.您可以像配置类验证接口一样配置它,并有更多方法:(Class Validation Interface. You can configure it as you would configure the Class Validation Interface and have some more methods:)
-
OnBeforeItemAdd:在用户尝试向类中添加新项目时调用(: called when the user is trying to add a new item to the class)Container(数组或映射)((Array or Map)) -
OnBeforeItemDelete:在用户尝试从容器类(数组或地图)中删除项目时调用(: called when the user is trying to delete an item from the class Container (Array or Map)) 每个类都有两个附加方法:(Each class has two additional methods:) -
SetClassValidationStatus:允许您指示与该类关联的树视图节点工具提示中显示的验证图标.如果选择(: allows you to indicate the validation icon shown in the tree view node tool tip associated with the class. If you select)enValidationResult_Error,树状视图项目文本将被涂成红色.(, the tree view item text will be painted in red.) -
SetClassValidationMsg:允许您指示与该类关联的树视图节点工具提示中显示的验证消息.(: allows you to indicate the validation message shown in the tree view node tool tip associated with the class.)
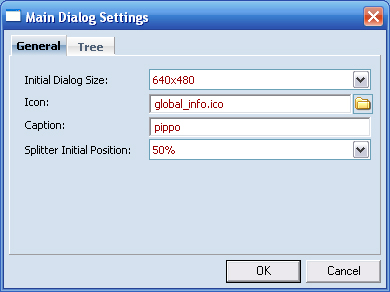
步骤10:自定义主对话框(Step 10: Customize Main Dialog)
CM_ConfigBuilder允许您自定义名为"主对话框"的对话框:(CM_ConfigBuilder allows you to customize the dialog called “Main Dialog”:)

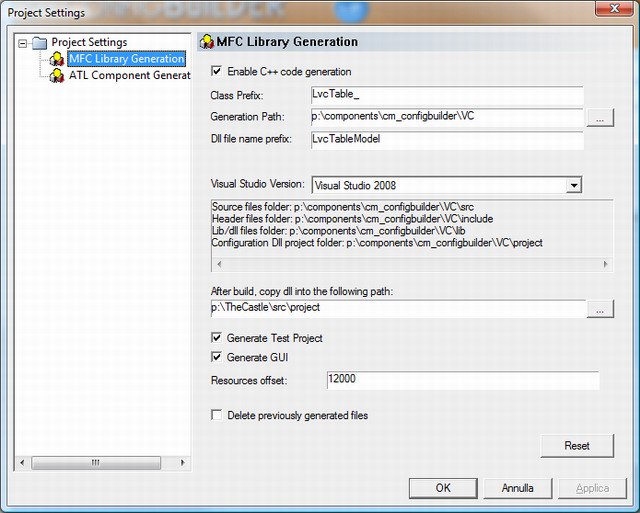
步骤11:MFC DLL的安装选项(Step 11: Setup Options for MFC DLL)
定义自定义数据结构后,我们可以通过选择菜单"代码生成»选项…“来访问这些选项,通过选中"启用C ++代码生成”,我们可以设置C ++库生成:(After the Custom Data Structure has been defined, we can reach the options via selecting the menu “Code Generation » Options…” By checking “Enable C++ code generation,” we are able to set up the C++ library generation:)
-
类前缀:此前缀用于创建类的名称.对于” Root"类,有两个对应的文件(Class prefix: this prefix is used to create the names of the classes. For the class “Root,” two corresponding files)**CfgSample_Root.h/cpp(CfgSample_Root.h/cpp)**将被创建.使用"类前缀"字段可以使我们在同一项目中使用不同的配置(具有不同的前缀).类前缀将用作库的名称:(will be created. The use of the “class prefix” field allows us to use different configurations (with different prefixes) in the same project. The class prefix will be used as the name of the library:)|CfgSample_D.lib(CfgSample_D.lib)|调试版本库(library for debug version)| |-|-| |CfgSample_D.dll|调试版本库(library for debug version)| |CfgSample_DU.lib|图书馆(library for)Unicode调试版本(debug version)| |CfgSample_DU.dll|图书馆(library for)Unicode调试版本(debug version)| |CfgSample_R.lib|发布版本库(library for release version)| |CfgSample_R.dll|发布版本库(library for release version)| |CfgSample_RU.lib|图书馆(library for)Unicode发布版本(release version)| |CfgSample_RU.dll|图书馆(library for)Unicode发布版本(release version)|
-
生成路径:此字段指定生成器将在其中创建所有目录和文件的位置.(Generation path: this field specifies where the generator will create all directories and files.)
-
DLL文件名前缀:此字段指定生成的库(DLL)的名称前缀.最终名称将具有以下格式:(DLL file name prefix: this field specifies the name prefix of the generated library (DLL). The final name will have the following format:)<名称> _ <配置> .dll(_.dll)(配置为_D用于Debug,_DU用于DebugUnicode,_R用于Release,_RU用于ReleaseUnicode)((configuration is _D for Debug, _DU for DebugUnicode, _R for Release, _RU for ReleaseUnicode))
-
Visual Studio版本:允许您指定将使用哪个Visual Studio版本来生成库项目(Visual Studio Version: allows you to specify which version of visual studio will be used to generate the library project)
-
构建后,复制…:此字段指定在构建步骤后将DLL复制到的位置(例如,我们可以设置应用程序的主目录).(After build, copy… : this field specifies where the DLL will be copied after the build step (for example, we can set our application’s home directory).)
-
生成测试项目:如果选中此复选框,则生成器将创建一个简单(非常简单)的项目来测试生成的库.(Generate Test project: if this check box is checked, the generator will create a simple (very simple) project to test the generated library.)
-
生成GUI:选中此复选框后,生成器将生成GUI以编辑类.我们还可以通过设置资源偏移量来避免资源重叠.(Generate GUI: when this check box is checked, the generator generates a GUI to edit the classes. We can also avoid resources overlapping by setting the resources offset.)
-
删除以前生成的文件:(Delete previously generated files:)尚不支持此功能(this feature is not yet supported).(.)
 关于Visual Studio 2005的注意事项:如果您需要在Visual Studio 2005中使用这些库,则只需打开生成的项目((Note on Visual Studio 2005: If you need to use these libraries with Visual Studio 2005, you just have to open the generated project ()*** .dsw(**.dsw*)**)并使用Visual Studio 2005进行编译.(*) with Visual Studio 2005 and compile it.*)
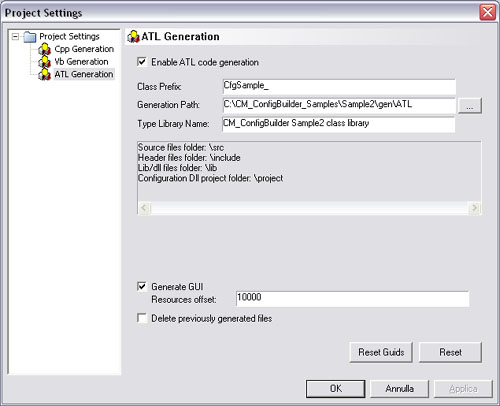
步骤12:ATL DLL的安装选项(Step 12: Setup Options for ATL DLL)
ATL生成允许Visual Basic用户访问类层次结构.通过选中"启用ATL代码生成”,我们可以设置ActiveX ATL库生成:(ATL generation allows Visual Basic users to access the class hierarchy. By checking the “enable ATL code generation,” we are able to set up the ActiveX ATL library generation:)
- 类前缀:请参见C ++库生成.(Class prefix: see C++ library generation.)
- 生成路径:指定生成器将在其中创建所有目录和文件的位置.(Generation path: specifies where the generator will create all directories and files.)
- 构建后,复制…:此字段指定在构建步骤后将DLL复制到的位置(例如,我们可以设置应用程序的主目录).(After build, copy… : this field specifies where the DLL will be copied after the build step (for example, we can set our application’s home directory).)
- 生成测试项目:如果选中此复选框,则生成器将创建一个简单(非常简单)的项目来测试生成的库.(Generate Test project: if this check box is checked, the generator will create a simple (very simple) project to test the generated library.)
- 生成GUI:选中此复选框后,生成器将生成GUI以编辑类.我们还可以通过设置资源偏移量来避免资源重叠.(Generate GUI: when this check box is checked, the generator generates a GUI to edit the classes. We can also avoid resources overlapping by setting the resources offset.)
- 删除以前生成的文件:(Delete previously generated files:)尚不支持此功能(this feature is not yet supported).(.)
- 重置GUID:此按钮将重置与类关联的所有GUID.如果您不按此按钮,则所有类都将维护相同的GUID,这将避免使用该库重新编译应用程序.(Reset GUIDs: this button will reset all GUIDs associated with classes. If you don’t press this button, all the classes will maintain the same GUIDs, which will avoid having to recompile applications using the library.)
- 注意(Note):生成的ATL项目支持以下配置:调试,最小发行版大小,最小发行版依赖性,Unicode调试,Unicode最小发行版大小,Unicode最小发行版依赖性.(: the generated ATL project supports the following configurations: Debug, Release Min Size, Release Min Dependency, Unicode Debug, Unicode Release Min Size, Unicode Release Min Dependency.)
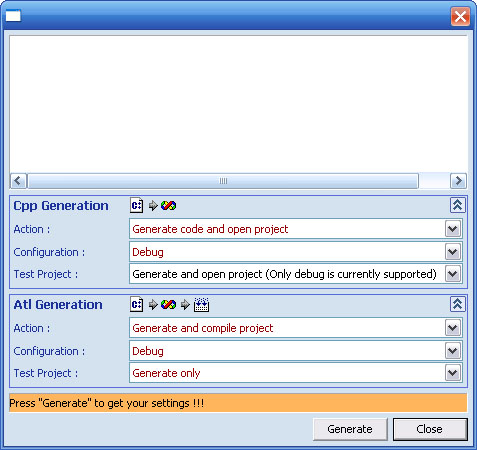
步骤13:^最后^代码生成!!!(Step 13: …And Finally… Code Generation!!!)
选择菜单"代码生成»开始",我们将看到生成器对话框.按下"生成"按钮,我们终于得到了我们想要的!对于C ++和ATL生成器,我们可以定义一些构建后步骤:(Choosing menu “Code generation » Go,” we get the generator dialog. Pressing the button “Generate,” we finally get what we want! For C++ and ATL generators, we can define some post-build steps:)
- 编译库:如果选中,Visual C ++将在编译库时自动启动;调试或发布取决于复选框"调试"或"发布"(发布ATL库的最小依赖关系).(Compile Library: if checked, Visual C++ is launched automatically with compilation of the library; debug or release depends on the check boxes “debug” or “release” (release Min Dependencies for ATL library).)
- 使用MSDEV打开项目:此选项将启动Visual C ++并打开库项目.您将按F7进行编译!如果在编译过程中出错,则此选项很有用.我希望有0个错误和0个警告. ;)(Open project with MSDEV: this option will launch Visual C++ and open the library project. You will compile by pressing F7! This option is useful if there are errors during compilation. I would prefer 0 errors and 0 warnings. ;))
- 不执行任何操作:不执行任何操作.如果已经打开Visual C ++,则此选项很有用.(Do nothing: no action is performed. This option is useful if Visual C++ has been already open.)
步骤14:发生了什么?(Step 14: What’s Happened?)
生成和编译完成后,我们应该看到以下目录结构:(After generation and compilation are done, we should see the following directory structure:)
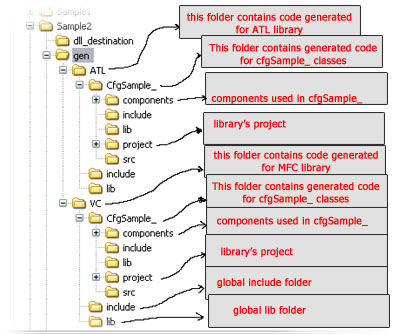 该结构显示了一个"全局包含文件夹",其中包含将库集成到我们的应用程序中所需的所有包含文件.显然,ATL组件不需要包含文件.该结构显示了一个"全局lib文件夹",其中包含所有(The structure shows a “global include folder” that contains all of the include files needed to integrate the library into our applications. Obviously, include files are not needed for ATL components. The structure shows a “global lib folder” that contains all the)*** .lib(**.lib*)**和(*and*)*** .dll(**.dll*)**构建过程生成的文件.(*files generated by the build process.*)
步骤15:将库与MFC应用程序集成(Step 15: Integrating the Library with Your MFC Application)
要将生成的库集成到我们的应用程序中,我们需要执行以下步骤:(To integrate the generated library into our applications, we need to follow these steps:)
- 在菜单"项目»设置» C/C ++ »预处理器"中,将路径添加到"全局包含文件夹".(In the menu “project » settings » C/C++ » preprocessor,” add the path to the “global include folder.")
- 在菜单"项目»设置»链接»输入»对象/库模块"中,添加(In the menu “project » settings » link » input » object/library modules,” add)cfgSample_D.lib(cfgSample_D.lib)(用于调试版本).((for debug version).)
- 在菜单"项目»设置»链接»输入»附加库路径"中,将该路径添加到全局库文件夹中.(In the menu “project » settings » link » input » additional library path,” add the path to the global library folder.)
- 在项目的"文件视图"中,添加生成的类的标题,以查看具有Intellisense支持的标题.只需添加所有(In the “file view” of your project, add the headers of the generated classes to see them with Intellisense support. Simply add all)**CfgSample _ *.h(*CfgSample_*.h*)**和(*and*)**xmlserializable.h(*xmlserializable.h*)**.(*.*) 以下代码显示了如何使用这些类:(*The following code shows how to use the classes:*)
//
// C++ sample
//
Cfg_Root root;
Cfg_CfgManagerDlg dlg;
UINT ret;

ret = root.LoadFromXmlFile("mySettings.xml");
if (!ret)
{
    // file not found: set defaults
    //
    root.SetMember1("default value");
    root.SetMember2(10000);
    root.SetMember3(true);
}
dlg.SetData(root);
ret = dlg.DoModal(); // display modal dialog
if (ret == IDOK) {
   root = dlg.GetData();
   root.SaveToXmlFile("mySettings.xml");
}

// embedded dialog sample
//
BOOL CMyDialog::OnInitDialog()
{
    CDialog::OnInitDialog();

    Cfg_Root root;
    Cfg_CfgManagerDlg dlg;
    UINT ret;

    ret = root.LoadFromXmlFile("mySettings.xml");

    dlg_.CreateAndEmbed(this, CRect(0, 0, 100, 100));
    // dlg_ should be declared as class member
    dlg_.SetData(root);
}
从1.2b版本开始,每个类对话框都可以嵌入到您的应用程序中.每个对话框(为类及其容器生成)都有一个方法:(From version 1.2b, every single class dialog can be embedded in your application. Every dialog (generated for classes and their container) has a method:) CreateAndEmbed .要将对话框嵌入对话框中,您只需:(. To embed a dialog in your dialogs, you have just to:)
- 为您要嵌入的对话框声明一个成员变量.(Declare a member variable for the dialog you want to embed.)
- 为要在表单中进行编辑的类或容器声明一个成员变量.(Declare a member variable for the class or the container you want to be editable in your form.)
- 在你的(In your)
OnInitDialog处理程序,请致电(handler, call the)CreateAndEmbed方法,然后将要使用该方法编辑的变量传递给嵌入式对话框(method and pass to the embedded dialog the variable you want to edit using the method)SetData.(.) - 完成后(例如,在您的(When done (for example, in your)
OnOK()事件处理程序),调用(event handler), call)StoreData在嵌入式对话框中.(on the embedded dialog.)
//
// C++ sample (how to embed a single class)
//

// header file
//

    Cfg_SampleClassDlg dlg_;
    Cfg_SampleClass data_;

// implementation file
//
BOOL CMyClass::OnInitDialog()
{
    CDialog::OnInitDialog();

    dlg_.CreateAndEmbed(this, CRect(0, 0, 200, 200));
    dlg_.SetData(&data_);
}

void CMyClass::OnOK()
{
    dlg_.StoreData();    // this updates data_

    data_.SaveToXmlFile(...) // if you need to store data_
}
您可以得到以下内容(对不起,它是意大利语):(You can get something like this (sorry… it’s in Italian):)

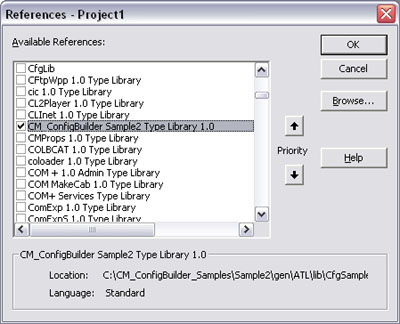
步骤16:将库与我的Visual Basic 6.0应用程序集成(Step 16: Integrating the Library with My Visual Basic 6.0 Application)
要将ActiveX组件与Visual Basic集成,只需选择菜单"项目»引用…",然后选择库” CM_ConfigBuilder Sample2类型库1.0":(To integrate the ActiveX component with Visual Basic, you have just to select the menu “Project » References …” and choose library “CM_ConfigBuilder Sample2 Type Library 1.0”:)
 以下代码显示了如何使用VB中的类:(The following code shows how to use the classes from VB:)
' vb sample
'
Dim dlg As New CFGSAMPLE_Lib.MainDialog
Dim cfg As New CFGSAMPLE_Lib.Root
Dim ret As Boolean

ret = cfg.Load("mySettings.xml")
If Not ret Then
    cfg.Member1 = "default value"
    cfg.Member2 = 10000
    cfg.Member3 = True
End If

ret = dlg.Display(cfg)
If ret Then
    cfg.Save "mySettings.xml"
End If
学分(Credits)
用于创建CM_ConfigBuilder的许多资源都来自CodeProject.我要感谢:(Many resources used to create CM_ConfigBuilder came from CodeProject. I’d like to thank:)
- 所有与(All the people involved with the)
MFCGrid零件.(component.) - .dan.g.对于(.dan.g. for)
CEnTabControl.(.) - Sven Wiegand用于MSXML C ++包装器类.(Sven Wiegand for MSXML C++ wrapper classes.)
- 阿尔瓦罗
门德斯(Alvaro Mendez)(*Alvaro Mendez for the*)CAMSEdit` 验证类.(validating class.) - Marc Richarme用于平面分配器窗口.(Marc Richarme for flat splitter window.)
- Sven Wiegand为(Sven Wiegand for)
CTreePropSheet.(.) - 科奇塞科奇塞(Kochise Kochise for)
CPathSplit.(.) - 保罗
J魏斯(Paul J.(Paul J. Weiss for)CStringUtils.(.) - 达娜
霍尔特(Dana Holt)(*Dana Holt for*)CXSBrowseFolder` .(.) - FahadAsh(FahadAsh for)
CCoolButton.(.) - 弗兰克
卢克斯(Frank Luchs)(*Frank Luchs for*)CVMBitmap` .(.)
历史(History)
-
2008.01.24(1.2F版)(2008.01.24 (version 1.2F))
- 添加了Visual Studio 2008项目生成(Added Visual Studio 2008 project generation)
-
2007.11.28(1.2E版)(2007.11.28 (version 1.2E))
- 错误修正:ATL项目缺少拆分器游标文件(bugfix: missing splitter cursor file for ATL project)
- 错误修正:ATL项目的"打开项目文件夹"不起作用(bugfix: “open project folder” for ATL project doesn’t work)
- 错误修正:ATL项目编译错误(由于新样式)(bugfix: ATL project compile errors (due to new styles))
- ATL项目更新:使用新的cmTableWnd(ATL project update: uses new cmTableWnd)
- 错误修正:cmGlassButton在vs2005下不起作用(bugfix: cmGlassButton doesn’t work under vs2005)
- 错误修正:在vs2005下加载图标时的错误(bugfix: bug when loading icons under vs2005)
- 新:cm_Configbuilder项目已在vs2005下移植(NEW: cm_Configbuilder project has been ported under vs2005)
- 新增:cm_ConfigBuilder现在能够生成vs2005项目,而无需安装Visual Studio 6.0(NEW: cm_ConfigBuilder is now capable to generate vs2005 projects without the need of Visual Studio 6.0 installed)
-
2007.10.30(1.2d版)(2007.10.30 (version 1.2d))
cmTreeCtrl:更快的图标绘制(: faster icon drawing)- 网格对话框:修复了对话框调整大小时的重绘问题(Grid dialogs: fixed redraw issue on dialog resize)
- 类别列表和网格对话框:添加了可调整大小(Category list and grid dialogs: added resizable)
InfoArea - 类别列表和网格对话框:添加的方法(Category list and grid dialogs: added method)
ShowInfoArea - 增强的网格渲染预览(Enhanced grid rendering preview)
- 新类别列表渲染预览(New Category List rendering preview)
- 修复了Test项目中单个嵌入式对话框的错误(Fixed errors on single embedded dialogs in Test project)
- 容器对话框:隐藏的"添加"按钮(container dialog: hidden “Append” button)
- 生成面板中的新按钮"打开项目文件夹".由于CM_ConfigBuilder尚未与Visual Studio 2005集成在一起,因此在代码生成之后,您可以打开项目文件夹并使用VS 2005打开它.(New button “open project folder” in generation panel. Since CM_ConfigBuilder isn’t yet integrated with Visual Studio 2005, after code generation you can open the project folder and open it using VS 2005.)
-
2007.10.10(1.2.d版测试版)(2007.10.10 (version 1.2.d BETA))
- 为GUI组件添加了新的图形样式(Added a new graphic style for GUI component)
cmOptionList.(.) - 为GUI组件添加了新的图形样式(Added a new graphic style for GUI component)
cmTable.(.) - 次要修复程序.(Minor fixes.)
- 为GUI组件添加了新的图形样式(Added a new graphic style for GUI component)
-
2007.09.30(1.2c版)(2007.09.30 (version 1.2c))
- 类和容器的嵌入式对话框(仅MFC库).(Embedded Dialog for classes and containers (MFC library only).)
- 时间数据类型和GUI控件(仅MFC库).(Time DataType and GUI Control (MFC library only).)
- 带有单个类对话框测试器的MFC库测试项目.(MFC library test project with single class dialog tester.)
- 为"静态枚举"验证字段添加了默认值.(Added default value for Static Enums validated fields.)
- 其他次要修复程序.(Other minor fixes.)
-
2007.06.03(1.2b版)(2007.06.03 (version 1.2b))
- 类和容器的嵌入式对话框(仅MFC库).(Embedded Dialog for classes and containers (MFC library only).)
- 时间数据类型和GUI控件(仅MFC库).(Time DataType and GUI Control (MFC library only).)
- 带有单个类对话框测试器的MFC库测试项目.(MFC library test project with single class dialog tester.)
- 静态枚举验证字段的默认值.(Default value for Static Enum validated fields.)
- 次要修复(Minor fixes)
-
2007.01.08(1.2a BETA1版)(2007.01.08 (version 1.2a BETA1))
- MFC库的嵌入式对话框.(Embedded Dialog for MFC Library.)
- 用于ATL库的嵌入式ActiveX组件.(Embedded ActiveX Component for ATL Library.)
- 类验证回调.(Class validation callbacks.)
- 成员验证回调.(Member validation callbacks.)
- 模板类.(Template Class.)
- 模板成员.(Template Member.)
- 次要修复程序.(Minor fixes.)
-
2005.10.07(版本1.1f)(2005.10.07 (version 1.1f))
- 长数据成员的SmartHex字段.(SmartHex field for long data members.)
- 选项对话框中已编译DLL的FileName前缀.(FileName prefix for compiled DLLs in the options dialog.)
- 编译时警告被杀死.(Compile time warning killed.)
- 其他次要修复程序.(Other minor fixes.)
-
2005.07.24(2005.07.24)
- 主对话框树视图中"隐藏/可见"根节点的标志.(Flag for Hidden/Visible root node in the main dialog tree view.)
- 主对话框树视图的自定义外观.(Customized look for main dialog tree view.)
-
2005.06.25(2005.06.25)
- 拖放支持已添加到主树视图中.它使修改配置结构变得更加容易.(Drag & drop support has been added to the main tree view. It makes easier to modify the structure of your configuration.)
- 图标嵌入.以前的版本存储了到与生成的对话框的类树视图节点关联的图标文件的绝对链接.从该版本开始,图标存储在项目中(XML文件).(Icons embedding. The previous versions stored an absolute link to the icon file associated to the class tree view node of the generated dialog. From this version icons are stored inside the project (XML file).)
- 改进的"静态枚举"管理(请参阅本文中的"静态枚举"部分).(Improved “Static Enum” management (see section “Static Enum” in the article).)
- 生成的配置对话框的每个树视图节点的初始状态(折叠/展开).(Initial status (collapsed/expanded) for each treeview node of the generated configuration dialog.)
- 现在,描述(多行文本)的编辑支持" Enter"键.(Editing of descriptions (multiline text) now supports “Enter” key.)
- 类别列表对话框已调整大小,以进行更好的编辑.(Category list dialogs have been made resizable to get a better editing.)
- 其他次要修复程序.(Other minor fixes.)
-
2005.05.03(版本1.1c)(2005.05.03 (version 1.1c))
- 为类成员添加了"作为CDATA"的持久性.(Added persistence “as CDATA” for class members.)
- 其他次要修复程序.(Other minor fixes.)
-
2005.04.08(1.1b版)(2005.04.08 (version 1.1b))
- 为类成员添加了持久性"作为#text节点".(Added persistence “as #text node” for class members.)
- 增加了为具有基数的类避免容器XML节点的可能性.(Added possibility to avoid container XML node for classes with cardinality.)
-
2005.03.29(版本1.1a)(2005.03.29 (version 1.1a))
- 修复了批处理文件生成中的一些错误.(Fixed some bugs on batch files generation.)
-
2005.03.20(版本1.1)(2005.03.20 (version 1.1))
- 添加了对Unicode的完全支持.(Added full support for Unicode.)
- 添加了成员序列化作为属性.(Added member serialization as attribute.)
- 从xmlParser包装器中删除了依赖项(这允许使用Visual Studio .NET打开VC ++ 6.0项目),其他较小的修复程序.(Removed dependency from xmlParser wrapper (this allows to open the VC++ 6.0 Project with Visual Studio .NET), other minor fixes.)
- 注意(Note):cm_configbuilder的Unicode版本使用新的字符串类((: the Unicode version of cm_configbuilder uses a new string class ()
cmString衍生自(derived from)CString).().)
-
2004.05.25(2004.05.25)
- 从ATL生成的库中删除了内存泄漏.(Removed memory leaks from ATL generated library.)
- 添加了VC ++ 7.0库生成.(Added VC++ 7.0 library generation.)
- 增加了将设计顺序保持在类别列表GUI模式的可能性.(Added possibility to keep the design order in Category List GUI mode.)
- 添加了用于ATL库测试的测试项目生成.(Added test project generation for ATL library test.)
- 其他次要修复程序.(Other minor fixes.)
-
2004.04.13(2004.04.13)
- CM_ConfigBuilder的第一个版本.(First release of CM_ConfigBuilder.)
联系(Contact)
您可以在下面的讨论区域中留言以与我联系.如有任何问题,请随时将您的项目和问题的简短说明发送给我.我会尽快回复!(You can contact me by leaving a message in the discussion area below. For any problems, do not hesitate to send me your project and a brief description of the problem. I’ll reply ASAP!)
许可
本文以及所有相关的源代码和文件均已获得The Code Project Open License (CPOL)的许可。
VC7.0 C++ VC6 Win2K WinXP .NET1.0 MFC ATL Visual-Studio Dev 新闻 翻译