[译]带有Angular 2和Web API的ASP.NETCore MVC中的CRUD
By robot-v1.0
本文链接 https://www.kyfws.com/applications/crud-in-asp-netcore-mvc-with-angular-and-web-api-zh/
版权声明 本博客所有文章除特别声明外,均采用 BY-NC-SA 许可协议。转载请注明出处!
- 12 分钟阅读 - 5646 个词 阅读量 0[译]带有Angular 2和Web API的ASP.NETCore MVC中的CRUD
原文地址:https://www.codeproject.com/Articles/1151474/CRUD-in-ASP-NETCore-MVC-with-Angular-and-Web-API
原文作者:O.Nasri
译文由本站 robot-v1.0 翻译
前言
A good example of how build a CRUD web application using ASP.NETCORE with Angular2 and WebApi
一个很好的示例,说明如何使用ASP.NETCORE和Angular2和WebApi构建CRUD Web应用程序
- 下载源代码(ZIP)-16.7 MB(Download source code (ZIP) - 16.7 MB)
- 下载源代码(RAR)-14.7 MB(Download source code (RAR) - 14.7 MB)
介绍(Introduction)
通过本文,您将学习如何创建CRUD Web应用程序.(Through this article, you will learn how you can create a CRUD web application.)
CRUD应用程序是指可以在数据源(例如数据库,XML文件等)上创建,读取,更新和删除记录的应用程序.(CRUD application means an application that can Create, Read, Update and Delete records on a Data Source (such as a Database, XML File, etc.).)
在本演示的结尾,您将学习如何:(At the end of this demo, you will learn how to:)
-
创建一个ASP.NETCore MVC应用程序(Create an ASP.NETCore MVC application)
-
使用npm安装所需的软件包(Angular2,打字等)(Install required packages (Angular2, Typings, etc.) using npm)
-
对安装在数据库中的现有数据库进行逆向工程(Reverse engineering of an existing database installed on)SQL服务器(SQL Server)(使用实体框架优先方法)((using Entity Framework First Approach))
-
创建一个(Create a)RestFul(RestFul)服务器使用(Server using)WebApi(WebApi)
-
在Angular 2上创建组件,模板,服务和类(Create components, template, services, and classes on Angular 2)
-
编译(Compile)角度2(Angular2)项目使用(project using)网页包(webpack)
-
运行ASP.NETCORE MVC Web应用程序(Run the ASP.NETCORE MVC web application) 在本文中,我依靠以下链接来构建我的应用程序:(In this article, I relied on the following links to build my application:)
背景(Background)
为了更好地理解此演示,最好具有以下方面的知识:(To better understand this demo, it is preferable that you have a good knowledge’s of:)
- 使用C#,JavaScript和HTML进行编程(Programming in C#, JavaScript and HTML)
- MVC架构(MVC architecture)
- SQL语言(SQL language)
- 数据绑定(Data Binding)
- 实体框架(Entity Framework)
- Visual Studio程式码(Visual Studio Code)
先决条件(Prerequisites)
要运行此示例,您需要安装:(To run this example, you need to install:)
使用代码(Using the Code)
构建Web应用程序(Building the Web Application)
在本节中,我将逐步向您解释如何轻松构建CRUD Web应用程序:(In this section, I will proceed step by step to explain to you how you can easily build a CRUD web application:)
A)设置ASP.NETCore MVC项目(A) Setup ASP.NETCore MVC Project)
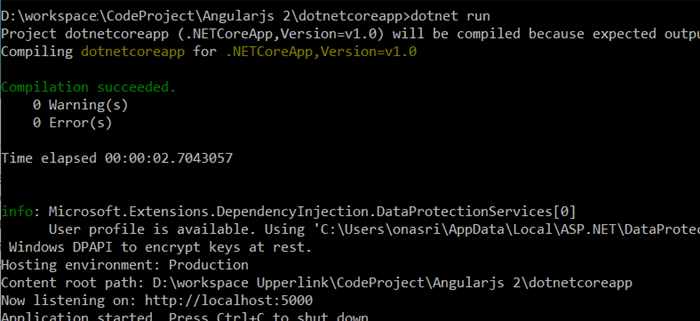
打开CMD控制台(我建议您在管理员模式下执行它)并编写以下命令:(Open your CMD console (I recommend you to execute it in Administrator mode) and write the following commands:)
mkdir dotnetcoreappcd dotnetcoreappdotnet new -t web创建Web应用程序(to create web application)dotnet restore加载依赖项(to load dependencies)dotnet run开始申请(to start application) 结果:(Result:)
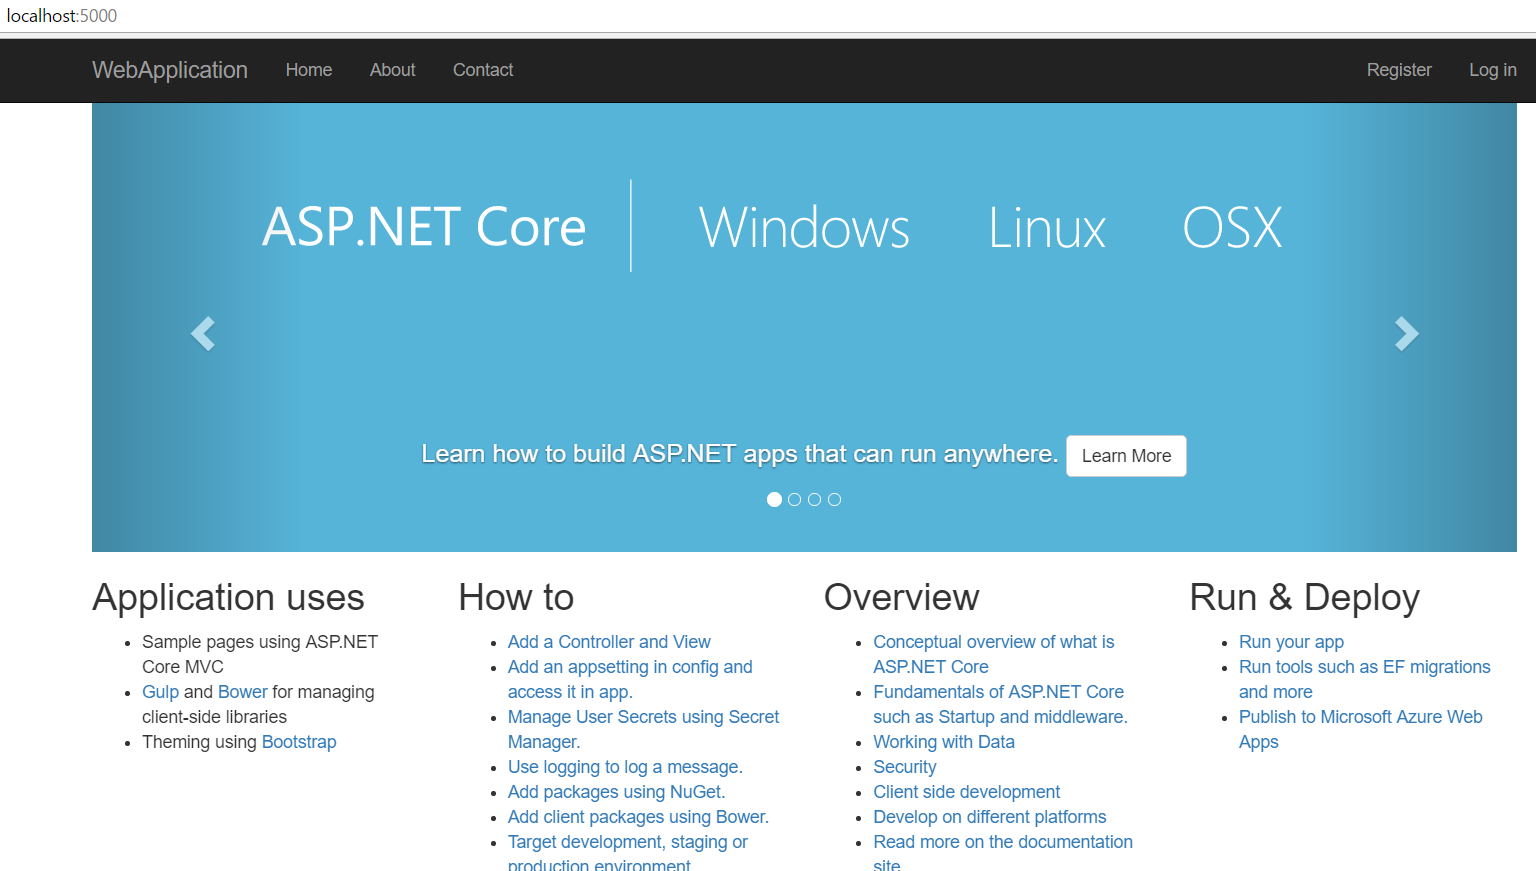
使用浏览器导航到给定的URL(http://localhost:5000),您应该看到:(Use your browser to navigate to the given url (http://localhost:5000), you should see:)
B)创建和配置Angular2项目(B) Create and Configure Angular2 Project)
根据Angular2官方文档,您将创建相同的配置文件:(Based on the official Angular2 documentation, you will create the same configuration files:)
-
package.json(package.json)
-
tsconfig.json(tsconfig.json)
-
Types.json(typings.json) 接下来,您应该安装(Next, you should install)
typescript,(,)typings和(and)webpack使用(using)npm:(:) -
Npm install –g typescript -
Npm install -g typings -
Npm install -g webpack最后,您将在(Finally, you will introduce some change in the)**启动文件(Startup.cs)**文件支持(file to support)Angular2单页应用程序(Angular2 Single Page Application),则应将默认的ASP.NETCore MVC路由更改为指向(, you should change the default ASP.NETCore MVC routing to point on the)指数(index)的页面(page of the)角度2(Angular2)项目((project ()wwwroot/index.html(wwwroot/index.html)).所以你会改变(). So you will change the)Configure专门针对路由代码的方法:(method a little bit specially on routing code:)
public void Configure(IApplicationBuilder app, IHostingEnvironment env, ILoggerFactory loggerFactory)
        {
            loggerFactory.AddConsole(Configuration.GetSection("Logging"));
            loggerFactory.AddDebug();

           if (env.IsDevelopment())
            {
                //read error details
                app.UseDeveloperExceptionPage();
                app.UseDatabaseErrorPage();
                app.UseBrowserLink();
            }
            else
            {
                app.UseExceptionHandler("/Home/Error");
            }
//point on the index page of the Angular2 project
           app.Use(async (context, next) =>
            {
                await next();

                if (context.Response.StatusCode == 404
                    && !Path.HasExtension(context.Request.Path.Value))
                {
                    context.Request.Path = "/index.html";
                    await next();
                }
            });
            app.UseStaticFiles();
            app.UseMvc();
        }
C)设置数据库(C) Setup DataBase)
1)创建数据库(1) Create Database)
我使用SQL Server 2014在本地托管数据库.(I used SQL Server 2014 to locally host my database.)
以下步骤将帮助您准备数据库:(The following steps will help you to prepare your database:)
- 添加一个名为的新数据库(Add a new database named)
DataBaseDotnetCore到您的服务器(to your server) - 执行以下SQL脚本以创建一个名称为非空的表(Execute the following SQL Script to create a not empty table named)
Product
2)使用实体框架优先方法(2) Using Entity Framework First Approach)
在本节中,您将进行逆向工程以从现有数据库创建实体框架模型.为此,您应该按照以下步骤操作:(In this section, you will do a reverse engineering to create an Entity Framework model from your existing database. To do that, you should follow the steps given below:)
-
导航到应用程序的根文件夹((Navigate to the root folder of application ()**dotnetcoreapp(dotnetcoreapp)**夹)(folder))
-
导入所需的依赖项和工具:为此,您应该配置(Import required dependencies and tools: to do that, you should configure the)**project.json(project.json)**通过:(by:)
- 添加以下依赖项:(Adding the following dependencies:)
- 添加工具:(Adding tools:)
- 保存更改并执行命令行:(Saving the changes and executing the command line:)
-
编写以下命令行以开始逆向工程:(Write the following command-line to start the process of reverse engineering:)例如:(For example:)
-
最后,修改(Finally, modify the)
ConfigureServices方法开启(method on)**启动文件(Startup.cs)**文件以创建到数据库的连接:(file to create a connection to your database:)
D)设置Restful WebApi(D) Setup Restful WebApi)
在此步骤中,您将创建一个名为(In this step, you will create a controller named)**ProductsController.cs(ProductsController.cs)**实现了一些(that implements some)HTTP动词(HTTP verbs):(:)
Get:检索列表(: to retrieve the list of)product来自数据库(from database)Post:添加一个新的(: to add a new)ProductPut:更新特定(: to update a specific)ProductDelete:删除特定的(: to remove a specific)Product
using System;
using System.Collections.Generic;
using Microsoft.AspNetCore.Mvc;
using angularapp.Models;
using System.Linq;
using Microsoft.EntityFrameworkCore;

namespace WebApplication
{
    [Route("api/[controller]")]
    [ResponseCache(Location = ResponseCacheLocation.None, NoStore = true, Duration = -1)]
    public class ProductsController : Controller
    {
        private DataBaseDotnetCoreContext _context;

           public ProductsController(DataBaseDotnetCoreContext context)
        {
            _context = context;
        }

        [HttpGet]
        public IEnumerable<dynamic> Get()
        {
                return _context.Product.ToList();
        }

        [HttpPost]
        public string Post([FromBody] Product product)
        {
            Response.StatusCode = 200;

            try{
                    angularapp.Models.Product newProduct = new Product();
                    newProduct.Name = product.Name;
                    newProduct.Description= product.Description;
                     _context.Product.Add(newProduct);
                     _context.SaveChanges();

            }catch(Exception e){
                Response.StatusCode = 400;
                return e.ToString();
            }
            return "OK";
        }
        [HttpPut]
        public string Put([FromBody] Product product)
        {
            Response.StatusCode = 200;

            try{

                    product.Name = product.Name;
                    product.Description= product.Description;
                     _context.Product.Attach(product);
                      _context.Entry(product).State = EntityState.Modified;
                     _context.SaveChanges();

            }catch(Exception e){
                Response.StatusCode = 400;
                return e.ToString();
            }
            return "OK";
        }

        [HttpDelete]
        public String Delete(int id)
        {
            Response.StatusCode = 200;

            try{
                    angularapp.Models.Product newProduct = new Product();
                    newProduct.Id = id;
                    _context.Product.Remove(newProduct);
                     _context.SaveChanges();

            }catch(Exception e){
                 return e.ToString();
            }
            return "OK";
        }
    }
}
E)设置Angular2项目(前端部分)(E) Setup Angular2 Project (frontend part))
在里面(In the)**wwwroot/app(wwwroot/app)**文件夹,创建以下文件:(folder, create the following files:)
a)product.service.ts(a) product.service.ts)
这是我们的服务类,可实现所需的方法和接口,例如:(This is our service class that implements needed methods and interfaces such as:)
AnnounceChange方法:向观察者发送通知,以将刷新数据调用到视图列表中,(method: sends a notification to observers to call refresh data into a list of view,)LoadData方法:由于调用了现有的Web服务[(method: loads data from database, thanks to the call of an existing web service [)/api/产品(/api/products)],(],)Add方法:调用外部Web服务[(method: invokes an external web service [)/api/产品(/api/products)]添加一个新的(] that add a new)Product对象进入数据库,(object into database,)Update方法:通过调用现有的Web服务将现有产品的某些内容更新到数据库中[(method: updates some content of an existing product into database by calling an existing web service [)/api/产品(/api/products)],(],)Delete方法:通过调用现有的Web服务从数据库中删除特定产品[(method: deletes a specific product from database by calling an existing web service [)/api/产品(/api/products)],(],)IProduct类:构成(class: constitutes an)interface对于(for)Product类.(class.)
import { Injectable } from '@angular/core';
import { Http, Response, RequestOptions, Headers } from '@angular/http';
import { Observable, Subject } from 'rxjs/Rx';
import 'rxjs/add/operator/toPromise';

@Injectable()
export class ProductService {
    constructor(private _http: Http) { }
    private RegenerateData = new Subject<number>();
    // Observable string streams
    RegenerateData$ = this.RegenerateData.asObservable();

    AnnounceChange(mission: number) {

          this.RegenerateData.next(mission);
    }

    LoadData(): Promise<iproduct[]> {
        return this._http.get('/api/products')
            .toPromise()
            .then(response => this.extractArray(response))
            .catch(this.handleErrorPromise);
    }

    Add(model) {
        let headers = new Headers({ 'Content-Type':
        'application/json; charset=utf-8' });
        let options = new RequestOptions({ headers: headers });
        delete model["id"];
        let body = JSON.stringify(model);
        return this._http.post('/api/products/', body,
               options).toPromise().catch(this.handleErrorPromise);
    }
    Update(model) {
        let headers = new Headers({ 'Content-Type':
        'application/json; charset=utf-8' });
        let options = new RequestOptions({ headers: headers });
        let body = JSON.stringify(model);
        return this._http.put('/api/products/', body,
               options).toPromise().catch(this.handleErrorPromise);
    }
    Delete(id: number) {
        return this._http.delete('/api/products/?id=' +
        id).toPromise().catch(this.handleErrorPromise);
    }

    protected extractArray(res: Response, showprogress: boolean = true) {
        let data = res.json();

        return data || [];
    }

    protected handleErrorPromise(error: any): Promise<void> {
        try {
            error = JSON.parse(error._body);
        } catch (e) {
        }

        let errMsg = error.errorMessage
            ? error.errorMessage
            : error.message
                ? error.message
                : error._body
                    ? error._body
                    : error.status
                        ? `${error.status} - ${error.statusText}`
                        : 'unknown server error';

        console.error(errMsg);
        return Promise.reject(errMsg);
    }
}
export interface IProduct {
     id : number  ,
     name : string ,
     description : string
}
b)app.componentHW.ts(b) app.componentHW.ts)
这是组件的核心.它包含应用程序的模板和实现:(This is the core of the component. It contains the template and implementation of the application:)
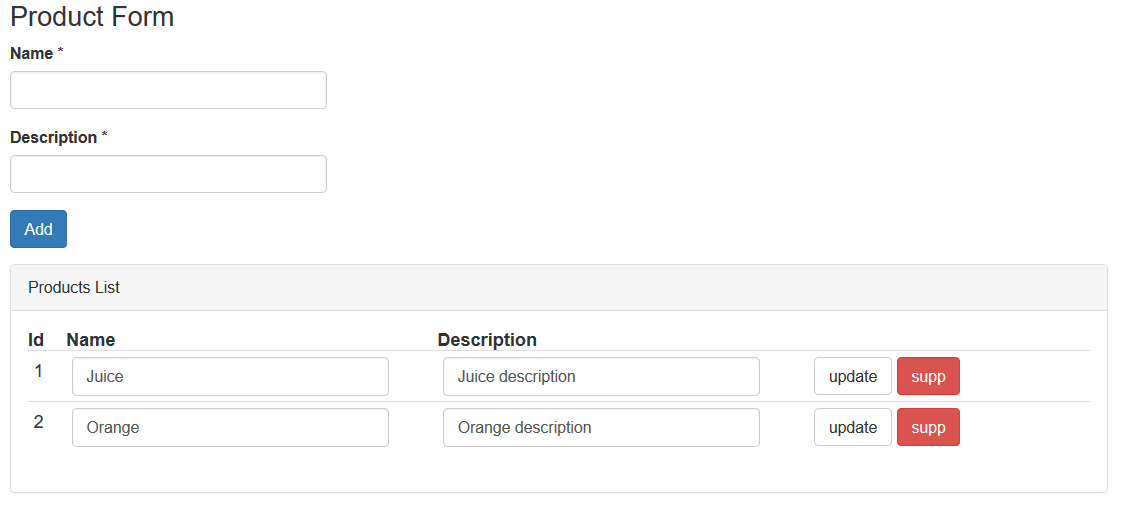
refresh方法:通过调用"通过从外部服务接收数据来刷新产品视图的现有列表(method: Refreshes the existing list of product view by receiving data from an external service by calling “)loadData的方法 “(method” of “)_service变量”,(variable” ,)onUpdate方法:通过调用"的更新方法"来更新数据库上的现有产品(method: Updates an existing product on the database by calling “Update method” of “)_service变量”,(variable",)onDelete方法:通过调用"删除由其"唯一密钥"标识的现有产品(method: Deletes an existing product identified by its “unique key” by calling “)Delete的方法 “(method” of “)_service变量”.(variable” .)
import { Component, OnInit } from '@angular/core';
import { ProductService, IProduct } from './product.service';
import { ProductForm } from './productForm';
import { Subscription }   from 'rxjs/Subscription';
@Component({
  selector: 'myhw',
  template: `
      <div class='row'>
        <pform></pform>
      </div>
      <div class='row'>
       <div class="panel panel-default">
        <!-- Default panel contents -->
        <div class='panel-heading'>Products List</div>
        <div class='panel-body'>
          <table class='table table-condensed'>
            <thead>
              <th>Id</th>
              <th>Name</th>
              <th>Description</th>
                <th></th>
            </thead>
             <tbody>
              <tr *ngFor="let person of persons"  >
                  <td> {{person.id}}  </td>
                  <td> <input type="text"
                  [(ngModel)]="person.name"
                                            name="pname"
                                            class="form-control" /> </td>
                  <td> <input type="text"
                  [(ngModel)]="person.description"
                                            name="pdescription"
                                            class="form-control" /> </td>
                  <td> <input type="button"
                  value="update" class="btn btn-default"
                         (click)="onUpdate(person)"/>
                         <input type="button" value="remove"
                          class="btn btn-danger"
                          (click)="onDelete(person.id)"/></td>
                </tr>
            <tbody>
           </table>
           </div>
           </div>
        </div>
        `
      })
export class HwComponent extends OnInit {
    subscription: Subscription;

     refresh(){
         this._service.loadData().then(data => {
            this.persons = data;
        })
    }
    constructor(private _service: ProductService) {
        super();
          this.subscription = _service.RegenerateData$.subscribe(
          mission => {
              console.log("Good !! ", mission);
               this.refresh();
           });
    }

    ngOnInit() {
        this.Refresh();
    }
    onUpdate(elem){
        console.log(elem);
        this._service.Update(elem).then(data => {
         })
    }
    onDelete(elem : number){
        console.log("Delete Form ! ");
        console.log(elem);
        this._service.Delete(elem).then(data => {
              this.Refresh();
        })
    }
    persons: IProduct[] = [];

     ngOnDestroy() {
    // prevent memory leak when component destroyed
       this.subscription.unsubscribe();
     }
}
c)产品(c) Product.ts)
此类包含有关的详细信息(This class contains details for) product 项目.(item.)
export class Product {
      constructor(
        public id : number,
        public name : string,
        public description : string
      ){

      }
}
d)productForm.component.html(d) productForm.component.html)
这是(This is the)的HTML(HTML)用于我们的模板(template used for our) Product 形成.(Form.)
<div>
   <h3>Product Form</h3>
   <form>
     <div class="form-group">
       <label for="name">Name *</label>
       <input type="text" class="form-control"
       [(ngModel)]="model.name" name="name" required>
     </div>
     <div class="form-group">
       <label for="description">Description *</label>
       <input type="text" class="form-control"
       [(ngModel)]="model.description"  name="email">
     </div>
     <button type="button"  (click)="onSubmit()"
     class="btn btn-primary">Add</button>
   </form>
 </div>
e)productForm.ts(e) productForm.ts)
构成我们后面的代码(Constitute the code behind for our) productForm 模板,您将在其中实现:(template, in which you will have the implementation of:)
onSumbit事件:此事件用于调用添加服务方法(event: This event is used to invoke the Add service method)model属性:与表单的字段绑定(attribute: That binds with the field of the Form)
import { Component, OnInit } from '@angular/core';
import { Product } from './Product';
import { ProductService, IProduct } from './product.service';

@Component({
    moduleId: __filename,
    selector: 'pform',
    templateUrl: './app/productForm.component.html'
 })

export class ProductForm {
    constructor(private _service: ProductService) {

    }
    model = new Product(0,'','');
    submitted = false;
    onSubmit() {
        console.log("Sumbitted Form ! ");
        this.submitted = true;
        this._service.Add(this.model).then(data => {
           this._service.AnnounceChange(1212);
        })
    }

  // TODO: Remove this when we're done
    get diagnostic() { return JSON.stringify(this.model); }
}
f)app.module.ts(f) app.module.ts)
该文件将用于:(This file will be used to:)
- 通过单词key导入所需的Angular2模块:(import needed Angular2 modules via the word key: “)
imports“(") - 通过单词关键字声明组件:"(declare components via the word key: “)
declarations“(") - 通过单词key声明服务:"(declare services via the word key: “)
providers“(") - 指定要包含的根组件(specify the root components to include into)index.html(index.html) `` 通过单词关键字文件:(file via the word key : “)
bootstrap“(")
import { NgModule } from '@angular/core';
import { HttpModule } from '@angular/http';
import { FormsModule } from '@angular/forms';
import { BrowserModule } from '@angular/platform-browser';
import { HwComponent }   from './app.componentHW';
import { ProductService } from './product.service';
import {ProductForm } from './productForm';

@NgModule({
  imports:      [ BrowserModule,
                  FormsModule,
                  HttpModule],
  declarations: [ HwComponent, ProductForm],
  providers: [
        ProductService
  ],
  bootstrap:    [  HwComponent]
})
export class AppModule { }
导航(Navigate to)**wwwroot(wwwroot)**您将在其中开始创建前端项目的文件夹:(folder in which you will start the creation of the frontend project:)
a)systemjs.config.js(a) systemjs.config.js)
该文件用于加载使用(This file is used to load modules compiled using the) TypeScript 编译器.(compiler.)
/**
 * System configuration for Angular 2 samples
 * Adjust as necessary for your application needs.
 */
(function (global) {
    System.config({
        paths: {
            // paths serve as alias
            'npm:': '../node_modules/'
        },
        // map tells the System loader where to look for things
        map: {
            // our app is within the app folder
            app: 'app',
            // angular bundles
            '@angular/core': 'npm:@angular/core/bundles/core.umd.js',
            '@angular/common': 'npm:@angular/common/bundles/common.umd.js',
            '@angular/compiler': 'npm:@angular/compiler/bundles/compiler.umd.js',
            '@angular/platform-browser':
                 'npm:@angular/platform-browser/bundles/platform-browser.umd.js',
            '@angular/platform-browser-dynamic':
                 'npm:@angular/platform-browser-dynamic/bundles/platform-browser-dynamic.umd.js',
            '@angular/http': 'npm:@angular/http/bundles/http.umd.js',
            '@angular/router': 'npm:@angular/router/bundles/router.umd.js',
            '@angular/forms': 'npm:@angular/forms/bundles/forms.umd.js',
            // other libraries
            'rxjs': 'npm:rxjs',
        },
        meta: {
            './app/main.js': {
                format: 'global'
            }
        },
        // packages tells the System loader how to load when no filename and/or no extension
        packages: {
            app: {
                main: './main.js',
                defaultExtension: 'js'
            },
            rxjs: {
                defaultExtension: 'js'
            }
        }
    });
})(this);
b)index.html(b) index.html)
这个HTML文件是应用程序的入口,我们将包括所有必需的JS,CSS文件以呈现我们的组件.(This HTML file is the entry point of the application, in which we will include all required JS, CSS files to render our components.)
<html>
    <head>
        <title>Angular 2 QuickStart</title>
        <meta charset="UTF-8">
        <meta name="viewport" content="width=device-width, initial-scale=1">
        <link rel="stylesheet" href="css/site.css">
        <link rel="stylesheet" href="css/bootstrap.min.css">
        <!-- 1. Load libraries -->
        <script src="js/core.js"></script>
        <script src="js/zone.js"></script>
        <script src="js/reflect.js"></script>
        <script src="js/system.js"></script>
        <!-- 2. Configure SystemJS -->
        <script src="systemjs.config.js"></script>
        <script>
          System.import('app').catch(function(err){ console.error(err); });
        </script>
    </head>
    <!-- 3. Display the application -->
    <body>

        <div class="container">
          <myhw>Loading ...</myhw>
        <div>
    </body>
</html>
最后,您应该配置(Finally, you should configure) webpack 至:(to:)
- 需要出口(Export required)
node_modules至(to)**wwwroot/js(wwwroot/js)**夹(folder) - 转运(Transpile)
**main.ts**到名为(to JavaScript file named)main.js(main.js) 要做到这一点,(To do that,)导航到根文件夹(navigate to the root folder)((()dotnetcoreapp/(dotnetcoreapp/)),然后创建(), and create)webpack.config.js(webpack.config.js):(:)
module.exports = [
 {
   entry: {
     core: './node_modules/core-js/client/shim.min.js',
     zone: './node_modules/zone.js/dist/zone.js',
     reflect: './node_modules/reflect-metadata/Reflect.js',
     system: './node_modules/systemjs/dist/system.src.js'
   },
   output: {
     filename: './wwwroot/js/[name].js'
   },
   target: 'web',
   node: {
     fs: "empty"
   }
 },
 {
   entry: {
     app: './wwwroot/app/main.ts'
   },
   output: {
     filename: './wwwroot/app/main.js'
   },
   devtool: 'source-map',
   resolve: {
     extensions: ['', '.webpack.js', '.web.js', '.ts', '.js']
   },
   module: {
     loaders: [
       { test: /\.ts$/, loader: 'ts-loader' }
     ]
   }
 }];
F)运行Web应用程序(F) Running the Web Application)
要运行演示,您应该使用编写以下命令行(To run the demo, you should write the following command-line using) CMD ,但首先请确保您位于应用程序的根目录中:(, but first be sure that you are in the root directory of your application:)
webpack:将TS文件转换为JavaScript文件(: to transpile TS files to JavaScript files)dotnet run:编译项目并运行服务器(: to compile the project and run the server) 如果编译成功,请在浏览器中打开给定的URL以查看正在运行的Web应用程序:(If the compilation is successful, open the given url on your browser to see the running web application:)
参考文献(References)
- ASP.NET核心文档(ASP.NET Core Documentation)
- Angular2文档(Angular2 Documentation)
- Webpack文档(Webpack Documentation)
- EF命令行工具(EF command-line tools)
兴趣点(Points of Interest)
希望您对此帖子表示赞赏.尝试下载源代码,不要犹豫,留下您的问题和评论.(I hope that you appreciated this post. Try to download the source code and do not hesitate to leave your questions and comments.)
历史(History)
- v1 30/10/2016:初始版本(v1 30/10/2016: Initial version)
许可
本文以及所有相关的源代码和文件均已获得The Code Project Open License (CPOL)的许可。
C# Javascript C .NET-Core .NET LINQ bootstrap Visual-Studio Dev web 新闻 翻译