[译]基于2D LUA的机器人模拟器
By robot-v1.0
本文链接 https://www.kyfws.com/applications/d-lua-based-robot-simulator-zh/
版权声明 本博客所有文章除特别声明外,均采用 BY-NC-SA 许可协议。转载请注明出处!
- 14 分钟阅读 - 6517 个词 阅读量 0[译]基于2D LUA的机器人模拟器
原文地址:https://www.codeproject.com/Articles/33587/D-LUA-Based-Robot-Simulator
原文作者:auralius manurung
译文由本站 robot-v1.0 翻译
前言
An article on designing your own robot simulator
有关设计自己的机器人模拟器的文章
- 下载Azolla 1.0.4(二进制)-583.21 KB(Download Azolla 1.0.4 (binary) - 583.21 KB)
- 下载Azolla 1.0.4(源)-1.36 MB(Download Azolla 1.0.4 (source) - 1.36 MB)
- 下载入门文档-227.78 KB(Download Getting Started Document - 227.78 KB)
介绍(Introduction)
在这里,我想介绍一个2D移动机器人模拟器.借助此模拟器,我们可以使用我们设计的一组规则来设计机器人在2D世界中的导航方式.使用Lua脚本设计规则. Lua本身是一种功能强大,快速,轻巧,可嵌入的脚本语言.使用Lua将为我们设计移动机器人的算法带来很多好处.对于世界编辑器,我们使用GDI设备上下文编程.用户可以使用单击和拖动方法来创建用于测试机器人的环境.以下是这些功能的摘要:(Here, I would like to introduce a 2D mobile robot simulator. With this simulator, we can design how a robot will navigate in a 2D world by using a set of rules that we design. The rules are designed by using Lua script. Lua itself is a powerful, fast, lightweight, embeddable scripting language. Using Lua will offer us many benefits in designing algorithms for mobile robots. For the world editor, we use GDI Device Context programming. Users can create the environment for testing the robots by using the click and drag method. Here is a summary of the features:)
- 差速转向机器人(Differential steering robot)
- 多机器人仿真(Multiple-robot simulation)
- 声纳和激光束式距离传感器(Sonar and laser beam type distance sensor)
- 机器人代码的嵌入式Lua脚本(Embedded Lua script for the robot code)
- 图形世界编辑器(Graphical world editor)
- 具有语法着色和自动完成功能的代码编辑器(Code editor with syntax colorization and auto completion) Lua的知识也是必要的. Lua并不难学.您可以检查(Knowledge in Lua is also necessary. Lua is not something difficult to learn. You can check the) Lua网站(Lua website) .(.)
机器人理论(The Robot Theory)
我们这里拥有的机器人是轮式机器人.它有两个轮子.它使用差速转向驱动系统进行导航.差速转向驱动系统就像是轮椅.可以通过改变轮椅的速度来操纵轮椅.如果一个轮子的旋转速度更快,则带轮椅子将弯曲.如果两个轮子都以相同的速度行驶,则它将走直线.(The robot that we have here is a wheeled robot. It has two wheels. It navigates with a differentially steered drive system. A differentially steered drive system is like a wheeled chair. Steering a wheeled chair can be done by varying the speed of its wheels. If one wheel is rotating faster, the wheeled chair will make a curved path. If both wheels are on the same speed, it will make a straight path.)
机器人数学(The Robot Mathematics)
有关移动机器人理论的详细信息,请参阅(For details about mobile robot theory, you can refer the) 毛重卢卡斯教程(G.W. Lucas tutorial) .为简单起见,以下是用于对差速转向行为进行建模的方程式:(. To make it simple, here are the equations used to model differential steering behaviour:)
 如果左轮和右轮以相同的速度行驶,则上述方程式将无法实现,因为它将导致零误差除法.使用L’Hospital法则,可以证明该方程的极限接近一条直线(再次查看G.W. Lucas教程).因此,当左轮和右轮的速度相同时,请使用以下公式(请注意,(If the left wheel and the right wheel are at the same speed, the equation above cannot be implemented since it will result in division by zero error. Using L’Hospital’s rule, it can be shown that the equation has limits approaching a straight line (check again the G.W. Lucas tutorial). So, when the left wheel and the right wheel are at the same speed, use this equation (please notice that)
 dx/dt 表示当前(means the difference between the current) x 位置和前一个(position and the previous) x 位置):(position):)


要获取机器人的当前位置,我们只需要在上面的方程式中输入时间,左轮速度和右轮速度.机器人角度也是我们还需要计算的.这是计算机器人角度的方程式:(To get the current position of the robot, we only need to input the time, left wheel speed, and the right wheel speed to the equation above. The robot angle is something that we also need to calculate. Here is the equation to calculate the robot angle:)
 最后,这是这些方程式的实现代码:(Finally, here is the implementation code for those equations:)
void CRobot::goRobotGo(double *t){
    if (canResetTime){
        *t = 0;
        canResetTime = false;
    }

    int plusFactor = m_robot.rWheelSpeed + m_robot.lWheelSpeed;
    int minusFactor = m_robot.lWheelSpeed - m_robot.rWheelSpeed;

    if (m_robot.lWheelSpeed - m_robot.rWheelSpeed != 0.0){
        m_robot.theta = m_theta0 + minusFactor * (*t) / m_robot.size ;
        m_robot.pos.x = ceil(m_pos0.x + m_robot.size / 2 * plusFactor / minusFactor
                        * (sin(minusFactor * (*t) / m_robot.size + m_robot.theta0)
                        - sin(m_robot.theta0)));
        m_robot.pos.y = m_pos0.y - m_robot.size / 2 * plusFactor / minusFactor
                        * (cos(minusFactor * (*t) / m_robot.size + m_robot.theta0)
                        - cos(m_robot.theta0));
    }
    else{
        m_robot.pos.x = plusFactor / 2 * cos(m_robot.theta) * (*t) + m_pos0.x;
        m_robot.pos.y = plusFactor / 2 * sin(m_robot.theta) * (*t) + m_pos0.y;
    }
}
与机器人有关的所有东西都放在班上(All things related to the robot are put in the class) CRobot 在文件中(in the files)**机器人(Robot.h)**和(and)机械手(Robot.cpp).(.)
世界编辑(The World Editor)
世界编辑器只是GDI设备上下文编程的一种实现.我们使用诸如矩形,椭圆形和直线之类的简单图形来创建空间和障碍物.只需一点数学,我们就可以使这些图形成为可选择,可移动和可调整大小的图形.这位世界编辑基于(The world editor is simply an implementation of GDI device context programming. We use simple graphs such as rectangle, ellipse, and line to create rooms and obstacles. With a little math, we can make those graphs selectable, moveable, and resizable. This world editor is based on) 我以前的工作(my own previous work) .我知道它很简单,也不好,因为我收到了一些不好的答复.如果有时间,我会做得更好.与世界编辑器有关的所有东西都在(. I know it is very simple and also not good since I received several bad responses on it. I will make it better if I have time. All things related to the world editor are in) CCanvas 在文件中(in the files)**Canvas.h(Canvas.h)**和(and)Canvas.cpp(Canvas.cpp).(.)
代码编辑器(The Code Editor)
对于代码编辑器,我使用Scintilla库.使用Scintilla库,我们可以轻松地创建一个支持语法着色的编辑器.我从在CodeProject上找到的一篇文章了解了该库.检查一下(For the code editor, I use the Scintilla library. With the Scintilla library, we can easily make an editor that supports syntax colorization. I learned about this library from an article I found on CodeProject. Check) 这里(here) 和(and) 这里(here) .与世界编辑器相关的所有信息都在文件中(. All things related to the world editor are in the files)**编辑器(EditorDlg.h)**和(and)编辑器Dlg.cpp(EditorDlg.cpp).(.)
嵌入式Lua(The Embedded Lua)
Lua是一种非常不错的编程语言.它是一种轻量级,小尺寸的编程语言,旨在扩展应用程序.在这里,我使用了Lua创建的Lua脚本C ++包装器,将多个C ++函数嵌入到Lua中.(Lua is a very nice programming language. It is a light-weight, small-footprint programming language designed for extending applications. Here, I embedded several C++ functions to Lua by using the Lua script C++ wrapper created by) 犀牛(RhicadS) .(.)
readsensor(integer index)接受传感器索引;返回活动机器人的测量距离.(accepts the sensor index; returns the measured distance of the active robot.)setspeed(integer left, integer right)接受活动机器人的左右轮速度;什么也不返回.(accepts the left and right wheel speed of the active robot; returns nothing.)getangle()什么都不接受返回活动机器人的当前角度位置(以弧度为单位).(accepts nothing; returns the current angular position of the active robot (in radians).)getnumofrobots()什么都不接受返回现有机器人的数量.(accepts nothing; returns number of existing robots.)getposition()什么都不接受返回活动机器人的x和y位置.(accepts nothing; returns x and y position of active robot.)gettarget(int index)接受目标指标;返回所选目标的x和y位置.(accepts index of target; returns x and y position of selected target.)textline(string msg)接受要显示的消息;什么也不返回.(accepts the message to be displayed; returns nothing.)setactiverobot(integer index)激活某个机器人.(activates a certain robot.)stepforward()一次运行模拟.(runs simulation one time step.) 基本上,这些功能用于操纵机器人. Lua本身具有许多内部函数,可用于开发算法.您可以检查(Basically, those functions are used to manipulate the robot. Lua itself has many internal functions that you can use to develop your algorithm. You can check the) Lua参考手册(Lua reference manual) 查看可用功能,例如:数学,字符串或文件处理功能.(to see the available functions such as: functions for math, string, or file manipulation.)
如何使用(How to Use)
您可以通过单击显示代码编辑器窗口(You can display the code editor window by clicking)查看»编辑器(View » Editor),或点击(, or by clicking)查看代码编辑器(View code editor)在工具栏上(Ctrl + E).世界文件保存为(on the toolbar (Ctrl+E). A world file is saved with a) .wld(.wld*)扩展名,而代码文件用(extension, while the code file is saved with a) .lua(**.lua*)**延期.分别加载和保存它们.(extension. Loading and saving them are done separately.)
让我们尝试一下.首先,在世界编辑器上画一个大椭圆.然后,在第一个椭圆内绘制另一个较小的椭圆(或者您可以加载文件(Let’s give a try. First, draw a big ellipse on the world editor. Then, draw another smaller ellipse inside the first ellipse (or you can load file)doubled_wall.wld(doubled_wall.wld)).将机器人拖到这两个椭圆形的小巷内.加载代码编辑器并粘贴以下代码.运行模拟.当机器人消失时,单击菜单(). Drag the robot inside the alley made by these two ellipses. Load the code editor and paste the following code. Run the simulation. When the robot disappears, click the menu)机器人»重置位置(Robot » Reset Position).(.)
function azolla.main(azolla)
    azolla:setspeed(20,20)
    while true do
        a = azolla:readsensor(1)
        b = azolla:readsensor(5)
        if (a - b > 2) then
            azolla:setspeed(30,20)
        end

        if (a - b < -2) then
            azolla:setspeed(20,30)
        end

        if( (a - b > -2)  and (a - b < 2) ) then
            azolla:setspeed(20,20)
        end
        azolla:stepforward()
    end
end
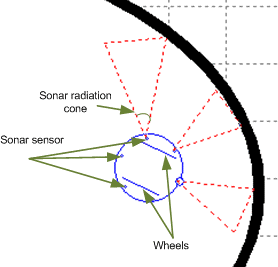
上面的代码是为了使机器人沿着墙壁前进.查看它如何读取传感器值.机器人中有六个传感器(默认情况下).您可以使用菜单修改传感器的数量(The above code is to make the robot move forward following the wall. See how it reads the sensor value. There are six sensors in the robot (by default). You can modify the number of sensors using the menu)机器人(Robot)»(»)设置属性(Set properties).它们都是激光束类型的距离.众所周知,还有声纳式距离传感器.看一下图片.传感器编号从机器人头开始,索引沿顺时针方向增加.(. They are all laser beam type distance. As we know, there are also sonar type distance sensors. Take a look at the picture. Sensor numbering starts from the robot head, and the index increases in the clockwise direction.)
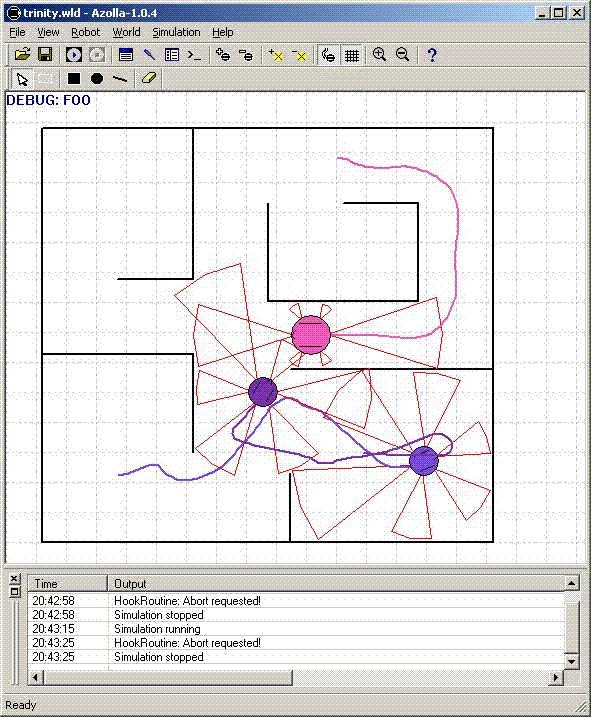
 让我们再试一次.在演示中,我包括了两个文件(Let’s try another. Within the demo, I included two files)**三位一体(trinity.wrl)**和(and)三位一体(trinity.lua).加载两个文件.复制并粘贴以下代码:(. Load the two files. Copy and paste the following code:)
function azolla.main(azolla)
    azolla:textline("START...\n")
    while(true) do
        for i = 0, azolla:getnumofrobots() - 1 do
            azolla:setactiverobot(i)
            front = azolla:readsensor(0)
            left = azolla:readsensor(5)
            right = azolla:readsensor(1)

            if (front < 10) then
                azolla:setspeed(4,-4)

            else
                delta = 0.5 * (right - left)
                azolla:setspeed(4 + delta,4 - delta)
            end
        end
    azolla:stepforward()
    end
end
让我们仔细看看.(Let’s take a closer look.) function azolla.main(azolla) 将始终被首先调用.这是主要功能.该函数始终使用以下形式编写:(will always be first called. It’s the main function. The function is always written with something like this:) function azolla.function_name(azolla) <function_name(parameter_if_exist)> </>.在上面的代码中,机器人将使用简单的P(比例)算法在迷宫中行走.机器人将读取左右传感器的输入.控制信号(<function_name(parameter_if_exist)>< />. In the code above, the robot will travel around the maze using simple P(proportional) algorithm. The robot will read input from left and right sensor. Control signal () delta )将根据左右传感器值之间的差异计算.该控制信号将用于校正两个车轮的速度.() will be calculated based on the difference between left and right sensor value. This control signal will be used to correct the speed of both wheels.< />)
多机器人仿真(Multiple Robot Simulation)
从1.0.2版开始,Azolla现在支持多种机器人仿真.我们可以添加多个机器人并同时运行它们.要激活某个机器人,(Since version 1.0.2, Azolla now supports multiple robot simulation. We can add several robots and run all of them at the same time. To activate a certain robot,) setcativerobot 必须使用.看下面的代码:(must be used. Take a look at the following code:)
function azolla.main(this)
    azolla:setspeed(20,20)
    while true do
        --ACTIVATE THE ROBOT ONE BY ONE!!!
        for i = 0, azolla:getnumofrobot() - 1 do
            --This part is for wall following
            azolla:setactiverobot(i)
            a = azolla:readsensor(1)
            b = azolla:readsensor(5)

            if (a - b > 2) then
                azolla:setspeed(30,20)
            end

            if (a - b < -2) then
                azolla:setspeed(20,30)
            end

            if( (a - b > -2)  and (a - b < 2) ) then
                azolla:setspeed(20,20)
            end
        end
        azolla:stepforward()
    end
end
上面的代码用于控制多个机器人,以使这些机器人将沿着左侧和右侧的墙向前移动.与第一个示例相同((The above code is to control several robots so that those robots will move forward following walls in left and right side. It is the same as the first example ()doubled_wall.wld(doubled_wall.wld)).我们可以对墙后部分使用相同的代码.如我们所见,在移动机器人之前,我们应该决定要移动哪个机器人.我们可以进行迭代以顺序移动所有机器人.(). We can use the same code for wall following part. As we can see, before moving the robot, we should decide which robot we want to move. We can do iteration to move all the robots sequentially.)
局限性(Limitations)
Azolla不是实时机器人模拟器.如果我们添加越来越多的机器人,则模拟运行会变慢.为了加快仿真速度,我们可以增加仿真时间.(Azolla is not a real time robot simulator. If we add more and more robots, the simulation will run slower. To make simulation faster, we can increase time step for simulation.)
对于传感器读取,它基于屏幕的像素读取.在这种情况下,我们必须确保模拟在主窗口区域中运行.如果机器人离开主窗口,则传感器算法将读取错误的屏幕像素.而且,如果主窗口上方还有另一个窗口,并且机器人的传感器可以到达该窗口,则传感器算法也会读取错误的屏幕像素.对于下一个版本,我计划为传感器实现几何方法,而不是读取屏幕像素值.(While for sensor reading, it is based on pixel reading of the screen. In this case, we must make sure that the simulation is run in the area of the main window. If the robot goes out of the main window, the sensor algorithm will read the wrong screen pixels. And also, if we have another window on top of the main window and that window can be reached by sensor of the robot, the sensor algorithm will also read the wrong screen pixels. For the next release, I plan to implement geometrical method for sensor instead of reading screen pixel values.)
兴趣点(Points of Interest)
我真的希望您尝试此仿真软件.自从第一个版本发布以来,我进行了很多改进.以前,该模拟无法在多核计算机上运行.该错误已修复.过多的CPU使用率问题也已得到解决.总的来说,我可以说它非常好用.希望您喜欢它,对您有所帮助.您可以阅读"历史记录"部分以查看所做改进的详细信息.有关更多信息,请查看提供的PDF文件.(I really hope you try this simulation software. There have been plenty of improvements I made since the first release. Previously, the simulation didn’t work in a multi-core computer. That bug has been fixed. Excessive CPU usage issue has also been fixed. Overall, I can say it works very nicely. I hope you like it and it is helpful for you. You can read the History section to see the details of the improvements made. For further information, please take a look at the provided PDF file.)
参考文献(References)
- 机器人车轮执行器差速转向系统的基本轨迹模型(A Tutorial and Elementary Trajectory Model for the Differential Steering System of Robot Wheel Actuators) 由G.W.卢卡斯(by G.W. Lucas)
- Lua参考手册(Lua reference manual)
未来的工作(Future Work)
为了将来的工作,我希望使此仿真软件更加可靠,以便可以将其用于移动机器人领域的研究和研究目的.为了实现该目标,需要做很多事情.(For future work, I want to make this simulation software more reliable so it can be used for study and research purposes in the area of mobile robots. To reach that goal, there are many things that need to be done.)
历史(History)
-
1.0.0(1.0.0)2009年2月(February, 2009)
- 最初的职位(Initial post)
-
1.0.0(1.0.0)2009年3月(March, 2009)
- 文章已更新(Article updated)
- 修正了一些小错误(Minor bug fixes)
-
1.0.1(1.0.1)2010年2月(February, 2010)
- 文章已更新(Article updated)
- 名称更改为Azolla(Name changed to Azolla)
- 用于仿真的数据类型从(Data type for simulation is changed from)
double至(to)float - 固定(Fixed):运动方程式错误,导致奇怪的机器人运动(: Wrong kinematic equation, causing strange robot motion)
- 固定(Fixed):多线程上的错误,导致过多的CPU使用,并且模拟在多核CPU上不起作用(: Bug on multithreading, causing excessive CPU usage, and simulation doesn’t work on multi-core CPUs)
- 添加(Added):用户可以显示/隐藏机器人足迹(: User can show/hide robot trail)
- 添加(Added):用户可以在世界编辑器中显示/隐藏网格(: User can show/hide grid in world editor)
- 添加(Added):声纳型传感器(: Sonar type sensor)
- 添加(Added):用户可以修改声纳传感器的最大,最小和锥角(如果锥角选择为零,则传感器将变为激光束型传感器)(: User can modify maximum, minimum, and cone angle of the sonar sensors (if zero is selected for the cone angle, the sensors will become laser-beam type sensors))
- 添加(Added):用户可以将高斯噪声应用于传感器读数(: User can apply Gaussian noise on sensor readings)
- 添加(Added):用户可以修改时间步长进行仿真(: User can modify time step for simulation)
- 添加(Added):在代码编辑器中自动完成(: Auto completion in code editor)
- 添加(Added):在代码编辑器中"查找下一个"(: “Find next” in code editor)
- 添加(Added):世界编辑器中的"全选"(: “Select all” in world editor)
-
1.0.2(1.0.2)2010年2月(February, 2010)
- 文章已更新(Article updated)
- 固定(Fixed):运动方程运行更快(: Kinematic equation runs much faster)
- 固定(Fixed):机器人的正面看起来更好(: Robot’s front side looks better)
- 固定(Fixed):运行模拟时出现故障(: Glitch appears while running simulation)
- 添加(Added):支持多机器人仿真(: Support for multiple robot simulation)
- 添加(Added):工具栏上的更多图标(: More icons on toolbar)
-
1.03(1.03)2010年3月(March, 2010)
- 固定(Fixed):显示轨迹时出现错误(: Bug when showing trajectory)
- 添加(Added):放大和缩小功能(: Zoom in and zoom out function)
- 添加(Added):可以为每个机器人分配一种颜色(: A color can be assigned to each robot)
- 添加(Added):简单的碰撞检测(: Simple collision detection)
- 许多其他错误修复和功能增强(Many other bug fixes and feature enhancements)
-
1.04(1.04)2010年7月(July 2010)
- 添加(Added):日志窗口和目标标记(: Log window and target mark)
- 添加(Added):几个新命令(: Several new commands)
- 传感器现在使用几何方法工作,例如:线与线的相交,线与矩形的相交以及线与椭圆的相交(Sensors now work using geometrical methods such as: intersection of line to line, line to rectangle and line to ellipse)
- 更好的碰撞检测(Better collision detection)
- 更多信息错误消息(More informative error message)
- 许多其他错误修复和功能增强(Many other bug fixes and feature enhancements)
许可
本文以及所有相关的源代码和文件均已获得The Code Project Open License (CPOL)的许可。
C++ VC6 Windows Visual-Studio MFC GDI VS2008 Dev 新闻 翻译