[译]Visual Studio的工具栏编辑器
By robot-v1.0
本文链接 https://www.kyfws.com/applications/toolbar-editor-for-visual-studio-zh/
版权声明 本博客所有文章除特别声明外,均采用 BY-NC-SA 许可协议。转载请注明出处!
- 14 分钟阅读 - 6624 个词 阅读量 0[译]Visual Studio的工具栏编辑器
原文地址:https://www.codeproject.com/Articles/11196/Toolbar-editor-for-Visual-Studio
原文作者:Francesco Aruta
译文由本站 robot-v1.0 翻译
前言
A toolbar editor for Visual Studio. It can modify, add and create buttons, images and all that is needed for a toolbar.
Visual Studio的工具栏编辑器.它可以修改,添加和创建按钮,图像以及工具栏所需的全部.
- 下载installer_1.60.zip(Download installer_1.60.zip)
- 下载源(Download source)
- 下载PDF手册(Download PDF manual)
- 下载一些不错的图标-340.62 KB(Download some nice icons - 340.62 KB)
介绍(Introduction)
我通常花很多时间为我的项目提供漂亮且用户友好的GUI.我认为,在所有桌面项目中,“几乎"必须为用户提供可以加速常用功能的功能.最简单(也是最常用)的方法是构建工具栏. Visual Studio带有工具栏编辑器,但实际上,我讨厌它.它仍然仅限于16种颜色,它无法加载外部图像,并且每次您想要添加新按钮时,都会很痛苦.由于所有这些原因,我为Visual Studio IDE编写了自己的工具栏编辑器.(I usually spend a lot of time to give my projects a nice and user friendly GUI. In my opinion, in all desktop projects, it’s “almost” mandatory to give the user something that can speed-up functions that are frequently used. The simpler (and most commonly used) method is to build a toolbar. Visual Studio comes with a toolbar editor but, really, I hate it; it’s still limited to 16 colors, it can’t load external images, and every time you want to add a new button, it is a pain. For all these reasons, I wrote my own toolbar editor for the Visual Studio IDE.)
安装(Installation)
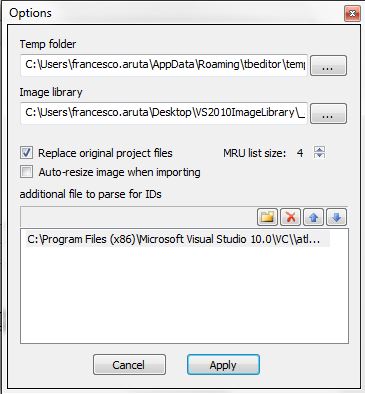
只需运行安装程序,然后按照屏幕上的说明进行操作(仅比平常多:下一步,下一步,是,是,下一步,完成).的设置实用程序(Simply run the setup, and follow the on-screen instructions (nothing more than the usual: next, next, yes, yes, next, finish). The setup utility of)工具栏编辑器(Toolbar Editor)(TE)还将创建两个子目录:((TE) will also create two subdirectories:)**温度(temp)**和(and)img库(imgLib).您可以将所有经常用来构建工具栏的图标/图像放在(. You can put all icons / images that you frequently use to build your toolbars in the)**img库(imgLib)**目录:它们将在以下位置显示和预览(directory: they will be displayed and previewed in)**TE(TE)**因此您可以轻松地将它们放到当前正在使用的工具栏中.这两个文件夹的默认位置是:(so you can easily drop them in the toolbar on which you are currently working on. The default location of the two folder is:) [USERAPPDATA] \ tbeditor([USERAPPDATA]\tbeditor) (在标准Windows 7安装中类似于:C:\ Users \ username \ AppData \ Roaming \ tbeditor)((that in a standard Windows 7 installation is something like: C:\Users\username\AppData\Roaming\tbeditor)) 无论如何,可以通过选项对话框中的专用选项轻松自定义这些文件夹的位置.(In any case the location of these folders can be easly customized by the dedicated option in the options dialogbox.) 为了正确管理工具栏按钮ID,您还应该指定在何处找到(To manage correctly the toolbar buttons ID, you should also specify where to found the)**afxres.h(afxres.h)**文件.从1.6版开始的工具栏编辑器将尝试自行找到它,但是如果失败,则应手动选择它.请参阅"工具栏编辑器的限制"部分,以获取有关此主题的更多信息.(file. Toolbar Editor, starting from the 1.6 version, will try to found it by itself but, in the case it fails, you should select it manually. Please see the “Limitation of the toolbar editor” section for more information about this topic.)
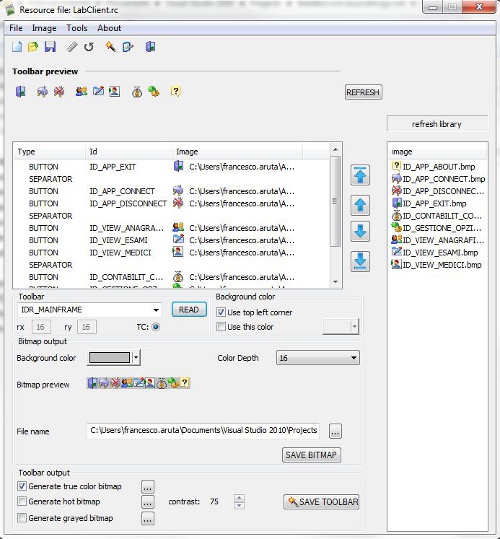
怎么运行的(How it Works)
您可以通过几个步骤开始编辑工具栏:<o:p>(You can start to edit toolbarsin a very few steps:<o:p>)
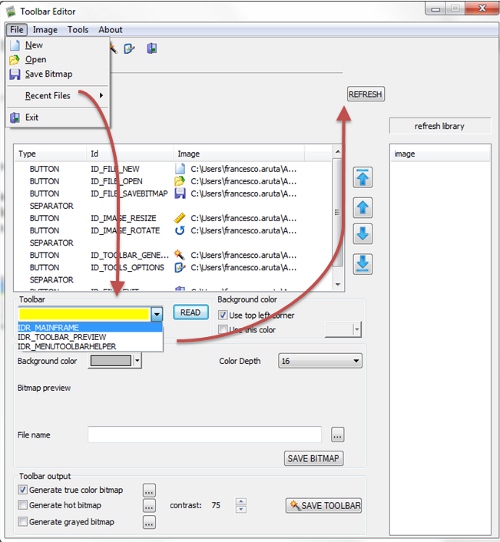
- 打开要编辑的项目的资源文件(.rc)(或创建一个新的工具栏)<o:p>(Open the resource file (.rc) of the project that you want to edit (or create a new toolbar)<o:p>)
- 从组合框中选择资源ID. <o:p>(Select the resource ID from the combo box. <o:p>)
- 单击"扫描"按钮以获取当前加载的工具栏的预览. <o:p>(Click on “Scan” button to get the preview of the currently loaded toolbar. <o:p>)
- 编辑工具栏<o:p>(Edit the toolbar<o:p>)
- 使用” SAVE TOOLBAR"按钮将修改合并到资源文件中<o:p>(Merge the modification to the resource file using the “SAVE TOOLBAR” button<o:p>)
现在,您可以添加新按钮,在现有按钮周围移动等等.用于预览的工具栏和列表框都支持拖放,因此您可以使用鼠标轻松移动按钮.在对话框窗口的右侧,有一个可以用作库的列表框.它从文件夹中读取所有受支持的图像类型(请记住,如果需要,可以在"选项"对话框中对其进行更改),以便可以将其放到工具栏上(也可以从"资源管理器"窗口中放下新图像).如果加载的图像太大(或太小),则可以使用(Now you can add new buttons, move around the existing ones, and so on. Both the toolbar and the listbox used for preview supports drag & drop, so you can easily move buttons using your mouse. On the right side of the dialog window, there is a listbox that you can use as a library; it reads all supported types of images from a folder (remember that,if you want, you can change it in the Options Dialog) so you can take them and drop on the toolbar (you can also drop new images from the Explorer window). If the image loaded is too big (or too small), you can use the) Resize 主菜单中的功能(function from the main menu.)
工具栏准备就绪后,您可以单击"保存工具栏"按钮将其与您的项目合并:将创建所有需要的ID并将其添加到(When your toolbar is ready, you can click on the “SAVE TOOLBAR” button to merge it with your project: all needed IDs will be created and added to the)**资源.h(resource.h)**文件.如果您不想修改项目文件,则可以禁用此功能,并且新文件将仅在编辑器的temp文件夹中创建.默认情况下,生成的位图具有4位色深(16种颜色),以使预览在Visual Studio编辑器中也保持活动状态,但是可以创建灰色,真彩色和"热"位图.(file. If you don’t want to modify your project files, you can disable this feature, and the new files will only be created in the temp folder of the editor. By default, the bitmap generated has a 4 bit color depth (16 colors) to maintain the preview active in the Visual Studio editor also, but it’s possible to create grayed, true color, and “hot” bitmaps.)

位图将在(The bitmaps will be created in the)./res(./res)当前打开的项目的文件夹.默认情况下,它们的名称与工具栏的位图相同,其中(folder of the currently open project. By default, their names are the same as the toolbar’s bitmap, with the)_TC(_TC),(,)**_H T(_HT)和(, and)_GR(_GR)**后缀,但您可以同时更改目标文件夹和名称.您可以将这些位图添加到您的项目中,然后将其与某些真彩色工具栏类(如Dany Cantin’s)一起使用(suffix, but you can change both the destination folder and the name. You can add these bitmaps to your project, and then use them with some true color toolbar class like Dany Cantin’s) CTrueColor工具栏(CTrueColorToolbar) .(.)
比方说(Let’s say that) YOUR_BITMAP_TC ,(,) YOUR_BITMAP_HT 和(, and) YOUR_BITMAP_GR 是这些位图的ID,那么您可以在自己的(are the IDs of these bitmaps, then you can use them in your) OnCreate 喜欢:(like:)
m_ToolBar.LoadTrueColorToolBar(
        16,
        YOUR_BITMAP_TC,
        YOUR_BITMAP_HT,
        YOUR_BITMAP_GR);
您应该始终创建真彩色位图,因为当您再次打开工具栏进行编辑时,它将用于创建(You should always create the true color bitmap because when you will open the toolbar again for editing, it will be used to create the) imagelist 而不是16色版本.请注意,这仅在使用默认名称保存真彩色位图时才有效(instead of the 16 color version. Note that this will work only if the true color bitmap is saved using the default name)bitmap_name_TC.bmp(bitmap_name_TC.bmp).(.)
最后,如果您只需要(Finally, if you need only the) imagelist ,您可以使用位图部分中的"保存"按钮将其保存.这不会更新(, you can save it using the Save button in the bitmap section. This won’t update)**.rc(.rc)**要么(or)**资源.h(resource.h)**在您的项目中.(in your project.)
创建新的工具栏(Creating New Toolbars)
即使您正在创建一个新的工具栏,也需要一个资源文件来放入它.因此,在开始使用新的工具栏之前,请记住打开正确的资源文件.在"文件"菜单上选择"新建"后(或在主菜单中单击"新建"按钮(Even if you are creating a new toolbar, you need a resource file to put it in. For this reason, remember to open the right resource file before starting to work on the new toolbar. After you select “New” on the “File” menu (or you click on the “New” button in the main)**TE(TE)**工具栏),工具栏编辑器将询问有关工具栏的基本信息:ID,大小和类型(Visual C ++ 20XX或Visual C ++ 6).(toolbar), the Toolbar Editor will ask for essential info about the toolbar: ID, size, and type (Visual C++ 20XX or Visual C++ 6).)

工具栏ID也可以是新的(以前未在您的(The toolbar ID can also be a new one (not previously defined in your)**resource.h)(resource.h))**但小心点:(but be careful:)**TE(TE)**不会检查您键入的内容是否是有效的ID名称,因此请避免使用空格,特殊字符等).此后,您可以按照前面所述的方式工作,并且在准备好后,将工具栏与"生成"按钮合并,或使用菜单项将工具栏代码复制到剪贴板中(won’t check if what you typed is a valid ID name, so avoid spaces, special chars, and so on…). After this point, you can work as previously described and, when you are ready, merge the toolbar with the “Generate” button, or copy the toolbar code to the clipboard using the menu entry)工具->工具栏->复制到剪贴板(Tools->Toolbar->Copy to clipboard).(.)
兴趣点(Points of Interest)
好吧,首先,我希望这个工具对我以外的其他人真的有用.您还可以找到启用了拖放功能的工具栏的自定义实现(无需按下Shift按钮即可使用).(Well, first of all, I hope that this tool is really useful for someone else other than me. You can also find a custom implementation of a drag and drop enabled toolbar (it works without the Shift button pressed).)

工具栏编辑器的局限性(Limitations of the Toolbar Editor)
关于ID有一些注意事项.我的编辑器从(There are some considerations about IDs. My editor reads the toolbar structure from the)**.rc(.rc)**文件以及项目中定义的ID(file, and the IDs defined in your project in the)**资源.h(resource.h)**文件:它对其他文件中定义的ID一无所知.因此,当您在工具栏编辑器中编辑ID时要特别小心:如果使用的ID已经在除(file: it doesn’t know anything about any ID defined in other files. So be careful when you edit IDs in the Toolbar editor: if you use an ID already defined somewhere else than)资源.h(resource.h),这可能是编译期间的问题.(, it can be a problem during compilation.)
作为备份解决方案,请考虑(As a backup solution consider that) TbEditor 可以读取其他文件中定义的ID,只需将其添加到选项对话框中可用的文件列表中即可.(can read IDs defined in other files just adding them in the file list available in the option dialog box.)
请注意:安装程序包(Just a note: The setup package)不来(doesn’t come)与(with)**afxres.h(afxres.h)因为我不知道该文件是否受Microsoft版权保护和/或是否可以重新分发.可以在系统中自动找到此文件的功能,TBEditor可以使用该功能,但请注意它不是100%准确的.(because I don’t know if that file is copyrighted by Microsoft and/or if it’s redistributable. A function to automatically found this file in your system is available and used by TBEditor but please consider that is not 100% accurate.)
放入你的(To put in your).rc(.rc)**归档新的工具栏,TE用作标记,此文本:(file the new toolbars, TE uses as marker, this text:) // Toolbar .如果TE在文件中找不到标记,则新工具栏的合并将失败(请注意,这仅对于新工具栏是一个问题).(. If TE can’t find the marker in your file, the merging of new toolbars will fail (note that this is a problem only for new toolbars).)
编译工具栏编辑器准则(Guidelines to Compile Toolbar Editor)
|工具栏编辑器需要Davide Pizzolato的(Toolbar editor need Davide Pizzolato’s) CxImage(CxImage) 类进行编译.(class to compile.)
此类用于构建,更改分辨率,颜色深度等位图.(This class is used to build, change resolution, color depth, etc. of bitmaps.)
的(The) tbeditor 配置为寻找的解决方案(solution it’s configured to look for) CxImage 在同一个目录中(in the same directory where you put the)**Tbeditor(tbeditor)**夹.换句话说,您的目录结构应类似于:(folder. In other words, your directory structure should be something similar to:)
其中j2k,jpeg,jbig等都是位于同一档案中的所有文件夹(where j2k, jpeg, jbig, etc. are all folders that came in the same archive of) CxImage .(.)
始终可以在以下位置找到最新的源版本(The latest sources version can always be found on) sourceforge存储库(the sourceforge repository) .(.)
学分(Credits)
我的工作灵感来自(*My work was inspired by*) 汤姆卡特的(Tomkat’ss) [([) ^)^( ]很棒的工具((*] great tool (*) 超级ImageList和ToolBar生成器(Super ImageList and ToolBar generator) [([) ^)^( ])对我有很大帮助(]) that helped me a lot in the) imagelist 在开发自己的工具之前先进行创作.我还要感谢:(creation before I developed my own tool. I wish to also thank:)
- 戴维`皮佐拉托(Davide Pizzolato)(Davide Pizzolato for or) CxImage(CxImage)
- 西里尔`泽克斯(Cyril Zekser)(Cyril Zekser for) 对话框上的工具栏和状态栏(Toolbars and Statusbars on Dialogs)
- 以及该项目中使用的控件的所有作者(And all the authors of the controls used in this project)
历史(History)
-
1.0(1.0)-(2005/08/02)(- (2005/08/02))
- 首次公开发行(First public release)
-
1.1(1.1)-(2005/08/03)(- (2005/08/03))
- 修复了VC6的一些兼容性问题(Fixed some compatibility issues with VC6)
-
1.2(1.2)-(2005/08/05)(- (2005/08/05))
- 现在可以解析具有ID的更多文件(Now it’s possible to parse more files with IDs)
- 静态链接以避免依赖性问题(Linked statically to avoid dependency problems)
- 将"真彩色位图生成"复选框更改为(Changed true color bitmap generation checkbox to)
true作为默认(as default) - 现在,如果可用,则使用真彩色位图来创建(Now, if available, a true color bitmap is used to create the)
imagelist打开工具栏时(when a toolbar is opened) - 禁用16色位图创建中的"错误扩散"(Disabled “error diffusion” in 16 color bitmap creation)
-
1.3(1.3)-(2005/09/12)(- (2005/09/12))
- 添加了"新"工具栏功能(Added “new” toolbar feature)
- 添加了热图像列表创建(Added hot imagelist creation)
- 添加了一些加速器(Added some accelerators)
- 添加了MRU列表(Added MRU list)
- 改进的拖放(现在您可以使用它来移动按钮,并按住CTRL键仅替换图像)(Improved drag and drop (now you can use it to move buttons also, and replace only the image by holding the CTRL key))
- 修复了两个按钮具有相同ID时的错误(Fixed bug when two buttons have the same ID)
-
1.3b(1.3b)-(2005/10/27)(- (2005/10/27))
- 添加了检查更新例程(Added check for update routine)
- 修复了由MRU实现引起的错误(启动时崩溃)(Fixed bug caused by MRU implementation (crash on startup))
- 修复了带有16色位图的错误(预览时很难看)(Fixed bug with 16 colors bitmap (ugly view in preview))
-
1.3分(1.3c)-(2005/11/06)(- (2005/11/06))
- 对代码进行一些内部修改以准备新版本(Some internal modification on code to prepare the new release)
- 修复了"检查更新例程"的错误(Fixed bug on “check for updates routine”)
-
1.3天(1.3d)-(2006/07/04)(- (2006/07/04))
- 对代码进行一些内部修改以准备新版本(再次)(Some internal modification on code to prepare the new release (again))
- 解析期间更好的错误处理(Better error handling during parsing)
- 小错误修复(Minor bug-fix)
-
1.41(1.41)-(2008/01/05)** SHI ****(*- (2008/01/05) **SHIPON***)
- 新对话框布局可处理高达48x48px的工具栏(New dialog Layout to handle toolbars up to 48x48px)
- 更好的图标处理:现在在使用之前,它们都已移植为真彩色(Better icon handling: now before use they are all ported to true color)
- 添加了对png图像/图标的支持(Added support for png images/icons)
- 修复了在没有真彩色位图的情况下重新打开现有工具栏的错误(Fixed bug on reopening an existing toolbar without a true color bitmap)
- 修复了第一个工具栏显示中的错误:列表控件没有图标预览(Fixed bug on first toolbar display: listcontrol without icon preview)
- 修正了一些小错误(Minor bug fixes)
-
1.42(1.42)-(2009/03/31)** SHI ****(*- (2009/03/31) **SHIPON***)
- 选择透明颜色的新功能(New function to select transparent color)
- 修复了导致错误背景颜色选择的错误(Fixed bug that cause wrong background color selection)
- 修复了如果选择错误的工具栏ID进行分析时崩溃的问题(Fixed crash if wrong toolbar id is selected for parsing)
-
1.50(1.50)-(2011/07/09)** P.WIP **(*- (2011/07/09) **P.WIP***)
- 程序默认数据目录移至(Program default data directory moved to)
[USERAPPDATA]Windows默认文件夹.这是为了避免Vista/Windows 7中需要管理用户权限.(windows default folder. This is to avoid administrative user rights requirement in Vista/Windows 7.) - 在安装包中添加了更详细的手册(Added a more detailed manual to the installation package)
- 移动到共享MFC链接以减少EXE文件的大小(Moved to shared MFC linking to reduce EXE file dimension)
- 修复了新功能选择背景色的错误(Fixed bug on the new function to select the background color)
- 修复了第一个工具栏显示中的错误:(Fixed bug on first toolbar display:)
listcontrol没有图标预览(without icon preview) - 修正了一些小错误(Minor bug fixes)
- 程序默认数据目录移至(Program default data directory moved to)
-
1.60(1.60)-(2012/10/19). ***** 烟花 ***(- (2012/10/19). ***** FIREWORKS *****)
- 改进之处(Improvements)
- 图像列表编辑(Imagelist editing)
- 旋转图像:现在启用了旋转图像功能(Rotate image: now the rotate image function is enabled)
- 调整图像大小现在使用更好的调整大小算法(Resize image now use a better resizing algorithm)
- 将图像导出到库功能(Export image to library function)
- 选项对话框中的一些改进:afxres.h文件的"自动检测"功能(适用于Visual Studio 2005到2010年)(Some improvements in the option dialog: “autodetect” feature of afxres.h file (works with visual studio 2005 up to 2010))
- 保存位图<24位(例如16色位图)时,现在可以通过优化调色板来防止更改背景色(the background color is now prevented to be changed by the optimization of the palette when a bitmap < 24 bit is saved (16 color bitmap for example))
- 更好的工具栏布局和文档处理(Better toolbar layout and document handling)
- 支持UNICODE文件(Support for UNICODE files)
- 某些UI改进(Some UI improvements)
- 错误修复(BugFix)
- 修复了保存灰度位图时的错误(位图文件错误地报告为4位深度)(Fixed a bug during saving of gray scale bitmaps (bitmap file wrongly reported as 4bit depth))
- 修复了菜单的一些不良行为(Fixed some bad behaviors of menu)
- 修正了一些小错误(Minor bug fixes)
附加许可说明(Additional License Note)
该程序是免费的,按"原样"提供,没有任何明示或暗示的保证.使用风险自负!(This program is free and provided “as is” without any expressed or implied warranty. Use at your own risk!)
许可
本文以及所有相关的源代码和文件均已获得The Code Project Open License (CPOL)的许可。
VC8.0 C++ VC7.1 WinXP Vista Win2K Win32 Visual-Studio VS.NET2003 Dev 新闻 翻译