使用XNA对Blender 3D模型中的单个骨骼进行动画处理(译文)
By robot-v1.0
本文链接 https://www.kyfws.com/games/animating-single-bones-in-a-blender-3d-model-with-zh/
版权声明 本博客所有文章除特别声明外,均采用 BY-NC-SA 许可协议。转载请注明出处!
- 28 分钟阅读 - 13547 个词 阅读量 0使用XNA对Blender 3D模型中的单个骨骼进行动画处理(译文)
原文地址:https://www.codeproject.com/Articles/230540/Animating-single-bones-in-a-Blender-3D-model-with
原文作者:Alan Boldock
译文由本站 robot-v1.0 翻译
前言
Many available demonstrations and tutorials demonstrate how to play an animation generated in a 3D application. This tutorial demonstrates how to manipulate a 3D model using only the code to find and manipulate Bones within a simple 3D model generated in Blender.
许多可用的演示和教程演示了如何播放3D应用程序中生成的动画.本教程演示了如何仅使用代码在Blender中生成的简单3D模型中查找和操纵骨骼的方式来操纵3D模型.
内容(Contents)
-
- 步骤1:建立圆柱体(Step 1: Create our cylinder)
- 步骤2:使用紫外线在我们的试管上展开,将皮肤添加到我们的网格中(Step 2: Add skin to our Mesh using UV unwrapping on our tube)
- 步骤3:细分圆柱体(Step 3: Subdivide our cylinder)
- 步骤4:建立骨骼(Step 4: Create our Bones)
- 步骤5:将圆柱体绑定到骨骼(Step 5: Bind your Cylinder to your Bones)
- [第6步:玩DEM骨头!(Step 6: Play with dem Bones!)](https://www.codeproject.com#STEP6:playwithdemBones 10)
- [步骤7:导出到XNA(Step 7: Export to XNA)](https://www.codeproject.com#STEP7:ExporttoXNA 11)
-
您可能会收到的错误消息以及解决方法(Error messages you might get and how to fix them)
介绍(Introduction)
周围有一些很好的示例,展示了如何在3D包中制作动画并在XNA中播放它们,但是如果您希望动画不只是标准的"走动",“奔跑”,“跳跃"等等,该怎么办?如果您希望3D模型与其3D环境进行交互,该怎么办?好吧,那么您需要能够通过使用代码来操纵模型来对3D模型的单个部分进行动画处理.本教程试图向您展示如何使用Blender开发一个简单的3D模型,放入一些骨架骨骼,最后如何使用C#在XNA中对其进行操作.(There are some good examples around that show how to make animations in a 3D package and play them back in XNA, but what if you want your animations to be more than standard ‘walk’, ‘run’, ‘jump’, etc.? What if you want your 3D model to interact with its 3D environment? Well, then you need to be able to animate single parts of your 3D model through manipulating the model with your code. This tutorial attempts to show you how to develop a simple 3D Model using Blender, put in some armature bones, and finally how to manipulate them in XNA using C#.)
背景(Background)
在任何3D游戏中,都有许多与环境互动的项目,从微风中摇曳的树木到带有机枪的菜鸟怪兽的怪物!所有这些游戏资产或模型都通过使用骨骼或骨架来移动.可以将最简单形式的骨骼与人的骨骼进行比较:动画的人的手臂内部可能有骨骼,骨骼可以彼此相对移动,同时彼此保持连接.但是有时候,这就是相似性停止的地方:3D动画世界中的骨骼不需要遵循与现实世界中动物相同的规则.骨骼不需要在体内,因为它们在我们的3D世界中不可见.在动画世界中,人体躯干可能只有一个骨骼,而不是真实人类拥有的许多复杂骨骼.骨骼只需要像我们希望的动画那样复杂即可.(In any 3D game, there are many items that interact with their environments, from trees swaying with the breeze to monsters with machine guns pawning noobs! All of these game assets or Models are moved through the use of Bones or Armatures. Bones in their simplest form can be compared to human bones: an animated human may have bones inside an arm that can be moved in relation to each other while staying attached to each other. Sometimes, however, this is where the similarity stops: Bones in the 3D animated world don’t need to follow the same rules as for animals in the real world. Bones don’t need to be inside a body as they are not visible in our 3D world. A human torso in our animated world may have one single bone, not the many complex sets of bones real humans have. The Bones only need to be as complicated as we we want the animations to be.) 我发现很难找到有关在XNA中操纵模型中的单个骨骼的文档,尤其是在XNA 4.0或Blender 2.5中,因此,在此演示中,我试图将各种信息源整合到一个源中.本文建立在巨人的肩膀上,但希望能为凡人提供有用的参考.(I’ve found documentation on manipulating single Bones in a Model in XNA difficult to find, especially in XNA 4.0 or Blender 2.5, so with this demonstration I’m attempting to bring together various sources of information into a single source. This article has been built on the shoulders of giants but hopefully will provide a useful reference for mere mortals.)
您将需要什么(What you will need)
以下所有产品都是免费的.(All the products below are free.)
- Visual Studio 2010将与Express版一起使用:(Visual Studio 2010, will work with Express edition:) http://www.microsoft.com/visualstudio/zh-CN/products/2010-editions/express-iso(http://www.microsoft.com/visualstudio/en-us/products/2010-editions/express-iso)
- XNA Game Studio 4.0:(XNA Game Studio 4.0:) http://www.microsoft.com/download/en/details.aspx?id=23714(http://www.microsoft.com/download/en/details.aspx?id=23714)
- 搅拌机:(Blender:) http://www.blender.org/download/get-blender/(http://www.blender.org/download/get-blender/) 如果要在皮肤上进行一些漂亮的绘画,则可能要使用Paint.NET,但这不是必需的:(If you want to do some nice painting on your skin, you might want to use Paint.NET but it’s not required:) http://paint.net/(http://paint.net/) .(.) 本文以Microsoft Skinned Model示例为基础.您可以在此处获取原始代码:(This article is built on top of the Microsoft Skinned Model sample; you can get the original code here:) http://create.msdn.com/zh-CN/education/catalog/sample/skinned_model(http://create.msdn.com/en-US/education/catalog/sample/skinned_model) .(.)
任务(Tasks)
首先,我希望在这里向您展示如何:(First, what I hope to do here is to show you how to:)
- 在Blender(管)中生成简单的网格(Generate a simple Mesh in Blender (a tube))
- 使用UV展开将皮肤添加到网格(Add a Skin to the Mesh using UV unwrapping)
- 将骨架(骨骼)添加到网格(Add Armatures (Bones) to the Mesh)
- 告诉网格,当电枢/骨骼移动时如何变形(Tell the Mesh how to deform when the Armatures/Bones move)
- 以XNA可以使用的格式导出网格,骨架和蒙皮(Export the Mesh, Armatures, and Skin in a format that XNA can use)
- 通过自定义内容管道将模型引入XNA(Bring the Model into XNA with a custom content pipeline)
- 通过代码,通过移动电枢来操纵网格(Through code, manipulate the Mesh through moving the Armatures)
搅拌机(Blender)
为了能够使用该模型,我们将在Blender XNA中生成该模型.我将使用的修改版本(To be able to consume the Model, we’re about to generate in Blender, XNA. I’m going to be using a modified version of the) SkinningSampleContent 管道,但在使用此管道之前,我们的Mesh需要做一些事情,以便管道可以正确处理它.它需要:(pipeline, but before we can use this, our Mesh needs a few things so that the pipeline can process it correctly. It needs:)
- 具有至少一个骨骼的网格(A Mesh with at least one Bone)
- 网格中的每个顶点都必须绑定到至少一个骨骼(是的,它们可以绑定到多个骨骼)(Every vertex in our Mesh needs to be bound to at least one Bone (yes they can be bound to multiple Bones))
- 网格上的皮肤(我们将使用UV解包来完成此操作)(A Skin on our Mesh (we’re going to use UV unwrapping to do this)) 听起来很简单,对吧?好的,让我们开始吧.如果还没有,请从以下位置下载Blender(Sounds simple, right? OK, let’s get started. If you don’t have it already, download Blender from) Blender.org(Blender.org) .(.) 我是根据Blender 2.57.1编写的-您将需要2.5或更高版本;用户界面在2.5时发生了巨大变化,现在它已成为一个真正了不起的工具,但由于难以使用的用户界面而受到阻碍.(I wrote this based on Blender 2.57.1 - you will need version 2.5 or later; the user interface took a radical change at 2.5, and it’s now a truly awesome tool that was being held back by a difficult-to-use UI.)
步骤1:建立圆柱体(Step 1: Create our Cylinder)
- 默认情况下,当Blender启动时,它将使用立方体,相机和灯光创建默认场景.选择Blender为您生成的多维数据集(右键单击以选择,然后按” x",然后选择"删除").(By default, when Blender starts, it makes a default scene with a cube, camera, and light. Select the cube that Blender generated for you (right click to select, then press ‘x’, then select ‘Delete’).)
- 确保将" 3D光标位置"设置为(0,0,0);如果不是,请按" n"(当鼠标指针悬停在3D视图上时)以显示3D窗口属性,向下滚动到" 3D光标位置",然后将鼠标悬停在任何字段上,按" 0" ‘将光标设置为原点(如果您喜欢长切,可以将它们全部输入零).(Make sure your ‘3D cursor location’ is set to (0,0,0); if it’s not, press ‘n’ (while your mouse pointer is over the 3D view) to bring up the 3D window properties, scroll down to ‘3D Cursor Location’, and while hovering your mouse over any of the fields, hit ‘0’ to set the cursor to the origin (you can type them all in as zero if you like long-cuts).)
- 现在添加一个圆柱体(Shift + A->网格->圆柱体).(Now add a cylinder (Shift+A -> Mesh -> Cylinder).)
- 在Blender中执行操作时,在工具面板下(参见图片),您将看到我们最新动作的设置(在这种情况下,添加圆柱体),将深度更改为16.我们的圆柱体需要足够大以能够操纵.(When you perform an operation in Blender, under the tool panel (see the image), you’ll see the settings for our latest action (add cylinder in this case), change the depth to 16. Our cylinder needs to be large enough to be able to manipulate.)

图1:指出了UI各个部分的电子管(Figure 1: Our tube with various parts of the UI pointed out)### 步骤2:使用紫外线在我们的试管上展开,将皮肤添加到我们的网格中(Step 2: Add skin to our Mesh using UV unwrapping on our tube) XNA使用前,我们的试管需要包裹一些皮肤.为此,我们将对我们的试管进行"紫外线解开",然后将其制成的皮肤包裹在试管中.顾名思义,紫外线解开会剥开我们的管子,让我们在皮肤上绘画.(Our tube needs to be wrapped with some skin before XNA can use it. To do this, we’re going to do a ‘UV unwrap’ of our tube, then we wrap our tube with the skin this makes. As the name implies, UV unwrapping will peel our tube and allow us to paint on the skin.)
- 确保只选择了试管,然后"跳到"编辑模式(您可能已经从步骤1开始处于编辑模式).(Make sure you have just the tube selected and then ‘tab’ into edit mode (you may already be in edit mode from Step 1).)
- UV展开的作用是将3D曲面"平坦化"为2D,以便我们可以使用图形工具对其进行编辑,但是在展开之前,我们需要告诉Blender如何展开模型.为此,我们沿模型定义了接缝,然后Blender将使用接缝将管拉开.您可以根据需要定义任意多个接缝,并将其分解为小块.今天,我们将定义3个接缝,一个围绕上圆周,一个围绕下圆周,一个沿着一条边.(What UV unwrapping does is “flatten” our 3D surface into 2D so that we can edit it with a graphics tool, but before we can unwrap, we need to tell Blender how to unwrap our model. We do this by defining seams along our model that Blender will then use to pull the tube apart. You can define as many seams as you like and break it down into small pieces. Today we’re going to define 3 seams, one around the top circumference, one around the bottom circumference, and one along one edge.)
- 将Blender置于"边缘选择"模式(" Ctrl + Tab").(Put Blender into ‘edge select’ mode (‘ctrl+tab’).)
- 在模型顶部附近的边缘(在编辑模式下)" Alt +右键单击"以选择一个循环(要记住的非常有用的组合键).(‘Alt+right click’ on an edge around the top of our model (in edit mode) to select a cycle (a very useful key combination to remember).)
- 单击" Ctrl + e",然后选择"标记接缝".(‘Ctrl+e’ and choose ‘Mark Seam’.)
- 对管子的一端和另一端重复此操作(可考虑将其从锡罐上切下,然后用剪刀剪下来并切开罐的长度).(Repeat this for one edge as well as the other end of our tube (think of it as cutting the ends from a tin can then taking a pair of scissors and slicing down the length of the can).)
- 右键单击3D窗口的顶部分隔线,然后选择"拆分",然后将线拖过并将屏幕拆分成两半,关闭其中一个窗口上的工具(" t")和属性(" n"),然后在模式选择下,将窗口更改为" UV/Image editor".(Right click on the top divide of the 3D window and choose ‘Split’, then drag the line across and split the screen in half, turn off the tools (’t’) and properties (‘n’) on one of the windows, and then down in the mode select, change the window to ‘UV/Image editor’.)
- 返回3D视图中,请确保您处于编辑模式(选项卡)并选择了整个对象(a),然后按" u"并选择"展开".您应该在" UV/图像编辑器"窗口中获取展开的图像.(Back in the 3D view press, make sure you’re in edit mode (tab) and the entire object is selected (a), then press ‘u’ and select ‘Unwrap’. You should get the unwrapped image in the ‘UV/Image editor’ window.)
- 现在,我们需要生成一幅图像,以保存我们现在可以绘制到圆柱体上的惊人艺术品.按下我们的UV Unwrap下的加号(+ new)以生成新图像.(We now need to generate an image to hold the amazing art we can now paint onto our cylinder. Press the plus (+ new) under our UV Unwrap to generate a new image.)
- 将我们的图像置于"图像编辑"模式并在其上涂抹(我画了几个点,我不是艺术家!).(Put our image into ‘Image edit’ mode and scribble on it (I did a few dots, I ain’t no artist!).)
- 在我们的UV窗口下的"图像"菜单中,选择"保存图像".如果您想一起玩,请称之为"(In the ‘image’ menu under our UV window, select ‘Save image’. If you want to play along, call it “)CylinderSkin.png(CylinderSkin.png)".我们在XNA中需要此功能.(”. We’ll need this in XNA.)
- 当我们的圆柱体处于纹理模式时,您应该能够看到点,因为UV不成比例,所以点被拉伸了.在这里,我可能不会在其他教程中进行介绍,但是现在并不重要.(With our cylinder in texture mode, you should be able to see the dots, they are stretched as the UV is not proportional. I’m not going to cover this here, maybe in another tutorial, but it doesn’t matter for now.)
UV展开可能很棘手,因此我强烈建议您在YouTube上搜索" Blender 2.5 UV unwrap",以获得一些非常有用的教程.用文本描述过程很困难.(UV unwrapping can be tricky, and I would highly recommend that you search YouTube for “Blender 2.5 UV unwrap” for some fabulous tutorials that will help you a lot. It’s difficult to describe the process in text.)
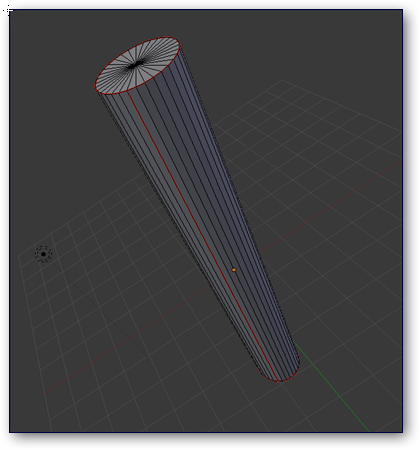
图2:我们的管显示红色接缝(Figure 2: Our tube showing red seams)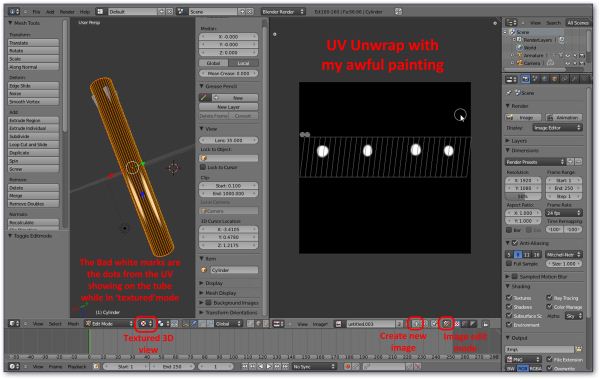
图3:指出了UI各个部分的UV展开管(Figure 3: UV unwrapped tube with various parts of the UI pointed out)### 步骤3:细分圆柱体(Step 3: Subdivide our cylinder) 到目前为止,我们的圆柱体只是直的实心圆柱体.在我们可以将它弯曲到中间之前,它需要有一些可以弯曲的地方.一个很好的类比是,当前我们有一个金属圆柱体,我们不能弯曲它,并且我们想在金属圆柱体中放置一些可能变形的地方,也许可以有效地将我们的金属圆柱体变成一条柔性软管.有几种方法可以对圆柱体执行此操作:我们可以使用’w’进行细分,但是这样做的问题是它将细分我们的所有面.对于这个简单的模型来说这很好,但是随着我们的模型变大,它会很快失去控制,因为我们将拥有成千上万个不需要的顶点.因此,我们将使用cut方法进行细分.本质上,我们将沿着圆柱体的侧面将圆柱体切成薄片.(Up to now, our cylinder is just a straight solid cylinder. Before we can bend it in the middle, it needs to have places where it can bend. A good analogy is that currently we have a metal cylinder, we can’t bend it, and we want to put places in the metal cylinder where it can deform, perhaps effectively changing our metal cylinder into a flexible hose. There are several ways to do this with our cylinder: we can use ‘w’ to subdivide, but the problem with this is that it will subdivide all our sides. This would be fine for this simple model but would get quickly out of hand as our model gets larger, as we would have thousands of vertices we didn’t need. So we’re going to subdivide using the cut method. Essentially, we’re going to slice up our cylinder up along its sides.)
- 确保圆柱体处于编辑模式(选项卡),并且未选中所有节点(a),并确保其均为黑色(未选中).(Make sure our cylinder is in edit mode (tab) and that all the nodes are not selected (a), and make sure it’s all black (not selected).)
- 切割圆柱体(ctrl + r),单击鼠标左键,它将在沿着圆柱体的一半处放置一条切割线.(Cut our cylinder (ctrl+r), click your left mouse button, and it will put a cut line half way along our cylinder.)
- 滚动鼠标滚轮将细分圆柱,再增加约10个细分.我们进行的细分次数越多,动画的外观就越平滑,但是顶点渲染的次数也就越多(还有其他方法可以使模型看起来更平滑,我们可以在网格物体上使用修改器对其进行细分,但是超出了本指南).(Rolling your mouse wheel will subdivide the cylinder, add about 10 subdivisions. The more subdivisions we do, the more smooth our animation will look, but the more vertices we will need to render (there are other ways to make our model appear more smooth, we could use a modifier on our mesh to subdivide it, but that is beyond this walk through).)

图4:我们的圆柱体显示了接缝和细分的侧面(Figure 4: Our cylinder showing seams and the subdivided sides)### 步骤4:建立骨骼(Step 4: Create our Bones) 找到圆柱体的底部中间.如果按照前面的步骤进行操作,则可以通过将" 3D光标视图"修改为Z轴上的-8来实现(在Blender中,Z向上). (您需要处于对象模式才能执行此操作,请使用" tab"交换回它.)(Find the bottom middle of the cylinder. If you followed the previous steps, you can do this by modifying the ‘3D cursor view’ to -8 on the Z axis (in Blender, Z is up). (You’ll need to be in object mode to do this, use ‘tab’ to swap back to it.))
- 现在添加一个骨架(Shift’a'-> Armature-> Single bone).(Now add an Armature (Shift ‘a’ -> Armature -> Single bone).)
- 按下"选项卡"按钮,这将使您进入"编辑"模式(现在位于电枢上,而不是圆柱体上).(Press the ‘tab’ button, this will put you in ‘Edit’ mode (on the Armature now, not the cylinder).)
- 看起来好像什么都没发生,但是您会注意到白色圆圈跳了一点;在其内部单击鼠标左键,然后将屏幕向上拖动到圆柱体的大约一半位置(如果需要,请单击" z"以将电枢限制为z轴的移动).(It might look like nothing has happened but you will notice that the white circle jumps up a little bit; left click inside it and drag up the screen to about half way up the cylinder (if you like, click ‘z’ to restrict the movement of the Armature to the z axis).)
- 好,您应该有一个骨头.现在按" e"以拉伸另一个骨骼,然后再次将其拖动到圆柱体的顶部(请记住,“骨骼"仅是为模型进行装配,它们不是可视项目,如果需要,它们实际上可以在我们的网格之外).(OK, you should have a single Bone. Press ‘e’ now to extrude another Bone and again, drag this up past the top of the cylinder (remember that Bones are just rigging for the model, they are not visual items and can actually be outside our mesh if we wanted).)
- 您现在应该具有如图2所示的内容.(You should now have something like figure 2.)
- 我们想命名我们的骨骼,因此可以在XNA中找到它们,我们可以对其进行操作.(We want to name our Bones, so find them in XNA and we can manipulate them.)
- 在编辑模式下,在我们的骨架上,选择底部的骨骼.在"属性"面板中(使它显示),在项目下,将名称设置为” BottomBone"(参见图片).(In edit mode, on our Armature, select the bottom Bone. In the Properties panel (n to make it appear), under item, set the name to be “BottomBone” (see image).)
- 对另一个骨骼重复此操作,将其称为" TopBone".(Repeat this for the other bone, calling it “TopBone”.)
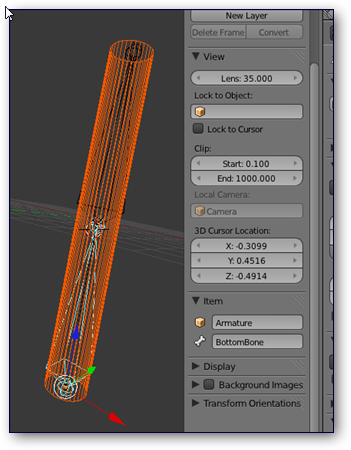
图5:命名骨骼(Figure 5: Naming our Bones)### 步骤5:将圆柱体绑定到骨骼(Step 5: Bind your Cylinder to your Bones) 在骨骼(电枢)影响我们的网格之前,我们需要将它们绑在一起.如果愿意,您可以立即操作骨骼;您可以通过按Ctrl-Tab进入"姿势模式"来执行此操作(或从3D视图底部的模式选择下拉列表中选择它)-请记住,这仅在选定了电枢的对象模式下有效.因此,让我们将它们绑定在一起.(Before our Bones (Armature) can affect our Mesh, we need to tie them together. You can manipulate the Bone now if you like; you do this by pressing Ctrl-Tab to enter ‘pose mode’ (or select it from the mode selection drop down list at the bottom of the 3D view) - keep in mind that this will only work from object mode with the armature selected. So let’s bind them together.)
- 确保您处于对象模式(选项卡将使您退出编辑模式).(Make sure you are in object mode (tab will bring you out of edit mode).)
- 右键单击以选择圆柱体,现在按住Shift键并右键单击电枢(骨骼),以便将两者都选中.(Right click to select the cylinder, now hold the Shift key and right click your Armature (Bones) so both are selected.)
- 现在选择’Ctrl-p'-这将把这两项作为父项.现在最简单的选择是选择"具有自动权重"-这将按与它们在骨骼中位置成比例的方式将权重分配给我们的顶点.(Now select ‘Ctrl-p’ - this is going to parent the two items together. The easiest option is now to choose ‘With Automatic Weights’ - this will assign weightings to our vertices proportional to their location in our Bones.)
好,等一下!这是怎么回事?请记住,回到开始时,在XNA中创建动画模型的要求之一是,每个顶点至少要分配给一个骨骼.如果您连一个都错过了,将模型加载到XNA时会出错.我们在这里所做的就是让Blender为我们做顶点权重;我们可以通过执行"加权绘制"来手动完成此操作(如果愿意,可以选择"圆柱体",然后将模式更改为"加权绘制"(对于ViewPort阴影,在"固态"时更好)).(OK, hold on a minute! What’s all that about? Remember, back at the beginning, one of the requirements for an animated model in XNA is that every vertex is assigned to at least one Bone. If you miss even one, you will get an error when you load your model into XNA. What we are doing here is letting Blender do our vertex weighting for us; we could do it manually by doing a ‘weighted paint’ (you can see this if you like by selecting the Cylinder and then changing the mode to ‘weight paint’ (better when in ‘solid’ for ViewPort shading)).)
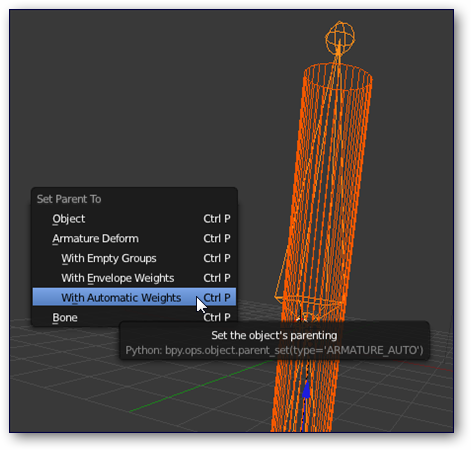
图6:使用"自动砝码"将圆柱体作为骨骼的父母(Figure 6: Parenting our cylinder to our bones with ‘Automatic Weights’)### 第6步:玩DEM骨头!(Step 6: Play with dem Bones!)
- 一切顺利,我们应该将圆柱体绑定到骨骼上,右键单击骨架(而不是圆柱体).(All going well, we should have the Cylinder bound to the Bones, right click on just the Armature (not the Ccylinder).)
- 控制选项卡应将您置于"姿势"模式;在姿势模式下,您可以操纵骨骼使圆柱弯曲.(Control-tab should put you into ‘pose’ mode; in pose mode, you can manipulate your Bones to make the cylinder bend.)
- 选择TopBone(右键单击);现在在底部,将出现一个白色的圆圈,在其中单击鼠标左键并向左和向右拖动,您的试管应该跳一点舞!(Select the TopBone (right click); now at the bottom, a white circle will appear, left-click inside it and drag left and right, your tube should do a little dance!)
- 更好的是,您还可以将视口阴影从线框设置回纹理,并且还应该看到我们的皮肤(图像).(Even better, you can also set the view port shading back from wire frame to textured and you should also see our skin (image).)
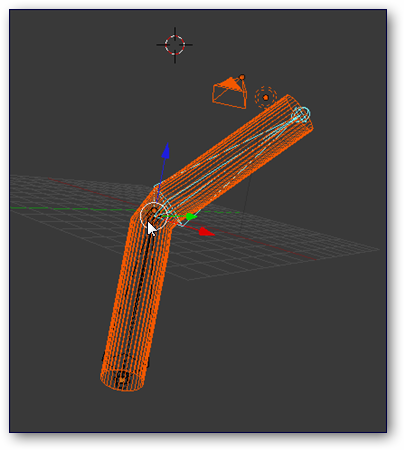
图7:移动骨骼,注意白色圆圈中的鼠标指针(Figure 7: Moving the bones, notice the mouse pointer in the white circle)### 步骤7:导出到XNA(Step 7: Export to XNA) 在导出之前,您需要打开XNA导出器;否则,您将无法打开.默认情况下未启用此功能; Blender附带的标准" fbx"格式在XNA中不起作用.(Before you can export, you need to turn on the XNA exporter; this is not enabled by default; the standard ‘fbx’ format that comes enabled with Blender won’t work in XNA.)
-
在屏幕顶部的"文件"菜单中,选择"用户首选项…".(In the ‘File’ menu at the top of the screen, select ‘User Preferences…".)
-
在"导入导出"部分中,启用"导出XNA格式(.fbx)".(In the ‘Import-Export’ section, enable the “Export XNA format (.fbx)”.)
-
返回我们的3D窗口,选择’文件->导出-> XNA FBX.调用模型保存文件"(Back in our 3D windows, select ‘file->export->XNA FBX. Call the model save file “)AnimatedTube.fbx(AnimatedTube.fbx)”.(".) 我们完成了Blender,并且有两个XNA需要的文件:(We are done with Blender, and we have two files that XNA will need:)
-
AnimatedTube.fbx(AnimatedTube.fbx),我们的模型(, our model)
-
CylinderSkin.png(CylinderSkin.png),我们的皮肤图像(, our skinning image)
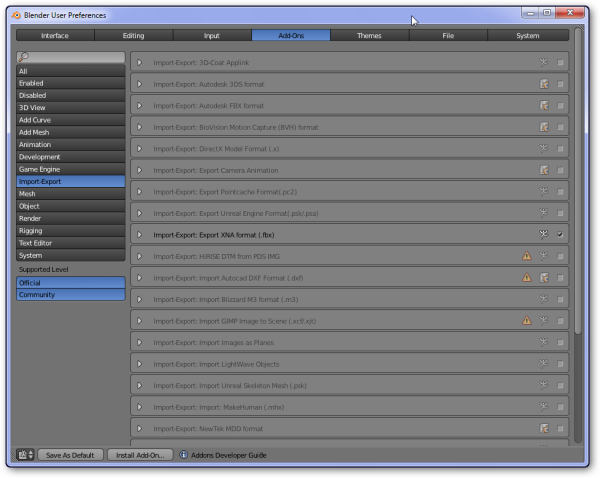
图8:添加XNA作为导出选项(Figure 8: Adding XNA as an export option)## XNA(XNA) 因此,我们现在有了一个可以在XNA中使用的模型.为了使模型进入我们的游戏,我们需要通过内容管道将其导入.内容管道会获取我们的内容并对其进行规范化,以使其在我们的游戏中显示为我们可以在游戏中使用的标准结构化对象.我将本项目的XNA部分基于MS提供的示例.蒙皮的模型样本使用现有模型,该模型具有代码运行的内置动画(遍历).虽然这很棒,但我想演示如何独自操作一个关节而不是运行一个预定义的动画(顺便说一句,如果您使用与我在" dude"模型中演示的相同的代码,则可以"花花公子"来做体操的可能性很小!).(So we now have a Model that we should be able to use in XNA. To get the Model into our game, we need to import it through the content pipeline. The content pipeline takes our content and normalises it so that it appears to our game as standard structured objects that we can use in our game. I’m basing the XNA part of this project on the sample provided by MS. The skinned model sample uses an existing model that has a built-in animation (walk) that the code runs. While this is great, I want to demonstrate how you might manipulate one joint on its own rather than run a pre-defined animation (incidentally, if you use the same code as I’m demonstrating with the ‘dude’ model, you can get the ‘dude’ to do so very unlikely gymnastics!).)
内容管道(Content Pipeline)
Skinned模型样本加载为(The Skinned model sample loads it’s ‘)**dude.fdx(dude.fdx)**通过自定义内容管道进行建模.我们将对管道进行一些修改,以使其不会从"管"模型中加载动画,因为我们没有任何动画.为此,请打开Skinned Model解决方案,然后转到(’ model through a custom content pipeline. We are going to make some modifications to the pipeline so that it doesn’t load the animations from our ‘tube’ model because we don’t have any. To do this, open the Skinned Model solution, go to the)**SkinnedModelPipeline(SkinnedModelPipeline)**项目,然后删除方法(project, and remove the methods) ProcessAnimations (两者)并注释掉动画字典的初始化.((both) and comment out the initialisation of the animation’s dictionary.)
// Convert animation data to our runtime format.
//Dictionary<string, AnimationClip> animationClips;
//animationClips = ProcessAnimations(skeleton.Animations, bones);
还要传递(And also pass in) null 为了我们(for our) animationClips 在以下行中:(in the following line:)
model.Tag = new SkinningData(animationClips, bindPose, inverseBindPose, skeletonHierarchy);
改成:(Change to:)
model.Tag = new SkinningData(null, bindPose, inverseBindPose, skeletonHierarchy);
我们在这里所做的事情被告知内容管道停止在我们的模型中寻找动画-当然,如果有的话,就把它保留下来.您可以进行更彻底的重写,但是我想保留对Microsoft的修改采样到最少.有趣的是,在SkinnedModel示例中,Microsoft选择不扩展Model类,而是将多余的外观数据附加在标准Model类的标签字段中.(What we have done here is told the content pipeline to stop looking for animations in our model - of course, if you have some, leave this in. You could do a more thorough re-write but I wanted to keep the modifications to the Microsoft sample to a minimum. Interestingly, in the SkinnedModel example, Microsoft chose not to extend the Model class, rather they attach the extra skinning data in the tag field for a standard Model class.)
导入我们的模型(Import our Model)
导入模型很简单:将两个文件拖放到" SkinnedSampleContent"项目中.完成之后,选择模型((Importing our model is simple: drag and drop the two files into the ‘SkinnedSampleContent’ project. After you’ve done that, select the model ()AnimatedTube.fbx(AnimatedTube.fbx)),然后在属性中更改其"() and in the Properties, change its ‘) ContentProcessor “财产就是”(’ property to be ‘) SkinnedModelProcessor ‘.这样,XNA便知道,当它引入我们的模型时,它将通过我们刚刚修改的自定义管道来完成此工作.(’. This way XNA knows that when it brings in our model, it will do it through the custom pipeline we just modified.)
这里有一个小问题,如果由于某种原因而无法导入模型,则无法调试内容管道.在执行导入时,管道似乎未在调试器中运行.我尚不确定如何解决此问题(如果其他人知道,请分享!).(One little catch here, if your Model can’t be imported for some reason, you can’t debug the content pipeline. As it performs the import, the pipeline doesn’t seem to be running in the debugger. I’m not sure how to fix this yet (if anyone else knows, please share!).)
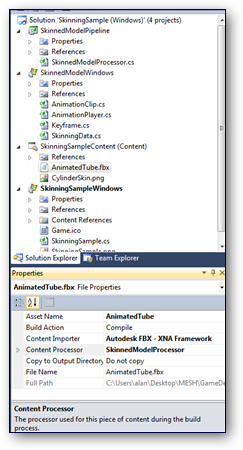
图9:确保将"内容处理器"设置为使用" SkinnedModelProcessor"管道(Figure 9: Make sure that the ‘Content Processor’ is set to use the ‘SkinnedModelProcessor’ pipeline)### SkinnedModelWindows项目AnimationPlayer类(SkinnedModelWindows project AnimationPlayer class)
MS Skinning示例附带的动画播放器用于从动画中读取关键帧.(The animation player that comes with the MS Skinning sample is used to read key frames from the animation in the)**fbx(fbx)**文件并执行它们代表的动画.我们的(file and perform the animation they represent. Our)**fbx(fbx)**文件没有任何内容,因此我们可以摆脱(file doesn’t have any so we can get rid of) Update 和(and) UpdateBoneTransforms .我要做的一件事是使(. The one thing that I have done is to make the) BoneTransforms ,(,) WorldTransforms 和(, and) SkinTransforms 公开(从长远来看,您不会这样做,但这将允许我们在此处进行快速演示).(public (you wouldn’t do this in the long run but it will allow us to do a quick demo here).)
// Current animation transform matrices.
public Matrix[] boneTransforms;
public Matrix[] worldTransforms;
public Matrix[] skinTransforms;
我们稍后将需要它,以便我们可以直接进行转换.(We’ll need this later so we can get directly at the transforms.)
SkinningSample项目(SkinningSample project)
现在我们开始实际操作骨骼.为此,我们需要对一个骨骼进行转换.为此,我们采用初始(Now we get down to actually manipulating our Bones. To do this, we need to apply a transform to one of our Bones. For that, we take the the initial) BindPose 并存储它,然后当我们要操纵我们的骨骼时,我们会根据骨骼的初始状态进行操作.我们需要在某个地方存储这些初始状态.我们有一个数组来存储字段部分中的初始状态:(and store it, then when we want to manipulate our Bone, we do it in relation to our Bone’s initial state. We need somewhere to store these initial states; we have an array to store the initial states in the fields section:)
Matrix[] _originalBonesMatrix;
现在我们修改(Now we modify the) LoadContent 在里面(in the) SkinningSample 类(运行我们的主要代码的地方)因此:(class (this where our main code is running) thus:)
/// <summary>
/// Load your graphics content.
/// </summary>
protected override void LoadContent()
{
    // Load the model.
    currentModel = Content.Load<Model>("AnimatedTube");
    // Look up our custom skinning information.
    SkinningData skinningData = currentModel.Tag as SkinningData;

    // copy the initial bone transforms to keep for later,
    // all new transforms will be performed
    // relative to the initial position
    _originalBonesMatrix = new Matrix[skinningData.BindPose.Count];

    // make copy of the initial BindPose data
    // by iterating through Bones in the BindPose
    // and copying their skinning data into our store of initial info.
    int currentBone = 0;
    while (currentBone < skinningData.BindPose.Count)
    {
        _originalBonesMatrix[currentBone] = skinningData.BindPose[currentBone];
        currentBone++;
    }
    if (skinningData == null)
        throw new InvalidOperationException
            ("This model does not contain a SkinningData tag.");

    // Create an animation player
    animationPlayer = new AnimationPlayer(skinningData);

    // Copy our bonetransforms into our model, displaying our movement
    skinningData.BindPose.CopyTo(animationPlayer.boneTransforms, 0);
}
现在了解XNA,了解它的运行方式很重要:(Now to understand XNA, it’s important to understand the way it runs:)
- 第一(First):它将内容通过内容管道传递给XNA.(: It passes our content through the content pipeline to make it available to XNA.)
- 第二(Second):它做一个(: it does a)
LoadContent将我们的内容带入当前正在运行的游戏中.(to bring our content into the current running game.) - 第三(Third):现在它处于连续循环中(直到我们退出或死亡),从(: It now sits in a continual loop (until we exit or it dies), jumping from the)
Update方法(method to the)Draw方法.编写这些方法中发生的事情是我们的工作;传统上,(method. It’s our job to write what happens in these methods; traditionally,)Update将更新相机,网格物体,骨骼,输入等,其中(will update cameras, meshes, bones, input, etc., where)Draw只需将其全部写入屏幕即可.(will simply write it all to the screen.) 首先,我们修改(First, our modified)Update方法:(method:)
protected override void Update(GameTime gameTime)
{
    HandleInput();
    UpdateCamera(gameTime);
    // so we can see movement without pressing any controls
    // we'll use the game time to introduce a Y axis bend
    float time = (float)gameTime.ElapsedGameTime.TotalMilliseconds;
    bendY += time * 0.001f;
    // find the matrix index for the bone we want to move (this doesn't check
    // to see if you have a bone called this so be carful, or even better add some checking)
    int boneId = currentModel.Bones["TopBone"].Index - 2;
    // find the matrix index Bone by multiplying by it's original 'BindPose' position
    animationPlayer.boneTransforms[boneId] =
      Matrix.CreateFromYawPitchRoll(0, bendY, bendZ) * _originalBonesMatrix[boneId];
    // update the world position
    animationPlayer.UpdateWorldTransforms(Matrix.Identity);
    // update the skin transforms based on new bone movement and world matrix
    animationPlayer.UpdateSkinTransforms();
    base.Update(gameTime);
}
兴趣点(Points of interest)
int boneId = currentModel.Bones["TopBone"].Index - 2;
这似乎很奇怪,我要减去2,但是如果您检查对象,这一切都说得通,我们的"绑定姿势"由三组矩阵组成:(This may seem strange, that I’m subtracting 2, but if you inspect the objects, it will all make sense, our Bind Pose is comprised of three sets of matrices:)
-
基本气缸位置(base cylinder position)
-
底骨(BottomBone)
-
顶骨(TopBone) 但是我们的网格由5个对象组成:(But our Mesh is comprised of 5 objects:)
-
根节点(Root Node)
-
圆筒(Cylinder)
-
衔铁(Armature)
-
底骨(BottomBone)
-
顶骨(TopBone) 这是我们实际执行骨骼运动的地方.我们将骨骼的原始位置乘以旋转变换,然后将其复制回bon(This is where we actually perform the movement of our bone. We take the original location of our bone and multiply it by a rotational transform, we then copy this back into bon) `` 转换为(Transforms for)
Draw申请.(to apply.)
animationPlayer.boneTransforms[boneId] =
  Matrix.CreateFromYawPitchRoll(0, bendY, bendZ) * _originalBonesMatrix[boneId];
最后,为了好玩,让我们添加另一个键盘按键处理程序,以允许我们操纵骨骼,因此在(Finally, just for fun, let’s add another keyboard key press handler to allow us to manipulate our Bone, so inside the) UpdateCamera , 我们增加:(, we add:)
if (currentKeyboardState.IsKeyDown(Keys.V))
{
    bendZ += 0.1f;
}
if (currentKeyboardState.IsKeyDown(Keys.B))
{
    bendZ -= 0.1f;
}
还要注意的另一点是,Blender中的轴在屏幕上下垂直具有" Z"轴,而XNA的" Z"轴则直接出入屏幕.因此,要解决此问题,请将以下内容添加到(Another point to note is that the axis in Blender has the ‘Z’ axis vertically up and down the screen while XNA has the ‘Z’ axis directly out of and into the screen. So to fix this, the following is added to the fields section of the) SkinningSampleGame 类;这会将我们的模型旋转90度.(class; this will rotate our model by 90 degrees.)
float cameraArc = -90;
运行(Run time)
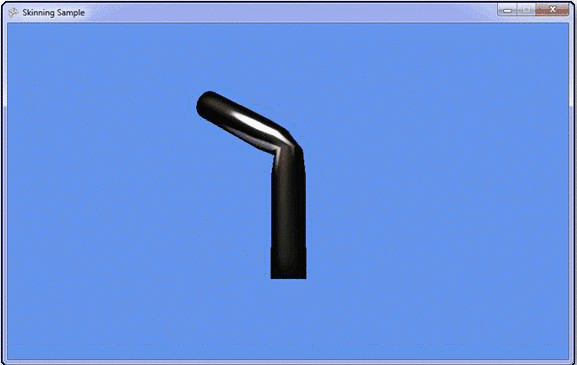
我下载的代码仅适用于Windows版本,可以在Phone 7或Xbox 360中运行它.一切正常,您应该现在就可以运行解决方案并按" v"和" b"键. ‘键弯曲圆柱体.(The code I’ve included in the download is only for the Windows version, feel free to run it in Phone 7 or Xbox 360. All going well, you should be able to run the solution now and press the ‘v’ and ‘b’ keys to bend the cylinder.)
专业术语(Glossary of terms)
- 骨(Bone):没有渲染的人工构造,可以轻松操纵顶点组(网格)(: a none rendered artificial construct to allow the easy manipulation of groups of vertices (meshes))
- 绑定姿势(BindPose):当我们所有骨头从Blender伸直而没有任何操作时的初始位置(: The initial position of all our bones when they are straight from Blender with no manipulation)
- 模型(Model):我们的网格,骨骼,纹理的组合构成了完整的模型(: the combination of our Meshes, Bones, Textures make up our complete model)
- 重量漆(Weight Paint):对网格物体进行人工着色,以显示网格物体如何与骨骼绑定(: an artificial coloration of our Mesh to display how the Mesh is bound to the bones)
- 衔铁(Armature):按等级排列的骨骼集合(1个或更多)(: a collection (1 or more) of Bones arranged hierarchically)
您可能会收到的错误消息以及解决方法(Error messages you might get and how to fix them)
“使用SkinnedEffect的网格” Cylinder"包含缺少通道0纹理坐标的几何"(“The mesh “Cylinder”, using SkinnedEffect, contains geometry that is missing texture coordinates for channel 0”)
首次运行代码时,您可能会得到此信息.您的代码甚至都不会达到断点,只会(似乎)无法编译.这是因为内容管道已经查看了您的模型,但是找不到UV包裹的纹理.返回Blender,并确保您已完成Blender部分中的步骤2.(You might get this when you first run your code. Your code won’t even hit a break point, it just won’t (seem) to compile. This is because the content pipeline has already looked at your Model and couldn’t find the UV wrapped texture. Go back to Blender and make sure you completed Step 2 from the Blender section.)
“标准化顶点骨骼权重时出错.BoneWeightCollection不包含任何权重值."(“Error normalizing vertex bone weights. BoneWeightCollection does not contain any weighting values.")
您的网格中的节点没有绑定到任何骨骼,这在XNA中是非法的.您需要返回Blender,并确保将网格正确绑定到骨骼.使用加权的油漆视图检查以确保所有节点都已着色.(You have nodes in your Mesh that are not bound to any Bones, this is illegal in XNA. You need to go back into Blender and make sure you bind your Mesh to your bones correctly. Check using weighted paint view to make sure all nodes are coloured.)
资源资源(Resources)
- Blender,它是免费的,而且很棒.(Blender, it’s free and it is awesome.) http://www.blender.org/(http://www.blender.org/) .(.)
- 本文改变了一切.在谈到3DS Max时,其概念是相同的,并且XNA部分很棒:(This article made all the difference. While it talks about 3DS Max, the concepts are the same and the XNA part is great:) http://www.nuclex.org/articles/graphics/115-mesh-based-bone-animation-in-xna(http://www.nuclex.org/articles/graphics/115-mesh-based-bone-animation-in-xna) .(.)
- 很棒的讨论主题:(A great discussion thread:) http://forums.create.msdn.com/forums/t/32099.aspx(http://forums.create.msdn.com/forums/t/32099.aspx)
- Stromcode有一个很棒的入门系列,我觉得非常有用;但是,它是在Blender的旧版本中,并且发生了很多变化.但是,它确实很好地解释了这些概念:(Stromcode has a great starter series that I found very useful; however, it is in an older version of Blender and much has changed. It does however explain the concepts well:) http://www.stromcode.com/2008/03/10/modelling-for-xna-with-blender-part-i/(http://www.stromcode.com/2008/03/10/modelling-for-xna-with-blender-part-i/)
- ‘Blender for Dummies 2.5’:虽然我讨厌觉得自己像个假人(书名的确倾向于这样做),但这本书是Blender书籍(IMHO)中最好的,而我也有其中的一些.非常值得$$:(‘Blender for Dummies 2.5’: while I hate to feel like a dummy (and the title does tend to do that), this book is the best of the Blender books (IMHO) and I have a few of them. Well worth the $$:) http://www.amazon.com/gp/product/0470584467(http://www.amazon.com/gp/product/0470584467) .(.)
- 原始的Microsoft Skinned Model示例:(The original Microsoft Skinned Model sample:) http://create.msdn.com/zh-CN/education/catalog/sample/skinned_model(http://create.msdn.com/en-US/education/catalog/sample/skinned_model) .(.)
概要(Summary)
从一开始我就一直想用Amstrad 6128编写游戏,真是太可惜了,我花了这么长时间!令我惊讶的是,找到资源来进行此类工作并计划编写更多内容(如果受到好评)会多么困难.让我知道您如何处理此功能以及Blender零件是否有意义.我确实向他们介绍了几次,但是很难解释其中的一些概念.如有任何问题,请给我留言.(I’ve always wanted to write a game from my first days with my Amstrad 6128, it is a shame it’s taken me so long! I was surprised at how difficult it was to find resources to do this sort of stuff and plan on writing more if this is well received. Let me know how you go with this and if the Blender parts make sense. I did walk them through several times but it’s difficult to explain some of the concepts. Drop me a line if you have any questions.) 对,现在回到我的游戏!(Right, now back to my game!)
历史(History)
初始版本.(Initial version.)
许可
本文以及所有相关的源代码和文件均已获得The Code Project Open License (CPOL)的许可。
C# Mobile XBox Windows-Phone-7 Windows Dev XNA 新闻 翻译