Mario5的编辑器(译文)
By robot-v1.0
本文链接 https://www.kyfws.com/games/editor-for-mario5-zh/
版权声明 本博客所有文章除特别声明外,均采用 BY-NC-SA 许可协议。转载请注明出处!
- 31 分钟阅读 - 15435 个词 阅读量 0Mario5的编辑器(译文)
原文地址:https://www.codeproject.com/Articles/432832/Editor-for-Mario5
原文作者:Florian Rappl
译文由本站 robot-v1.0 翻译
前言
Adding some spice to the Mario game by providing a Level editor with a social platform.
通过为关卡编辑器提供社交平台,为Mario游戏增添一些趣味.
- 下载包含主游戏的演示项目.编辑器-1.06 MB(Download the demo project of the main game incl. the editor - 1.06 MB)
- 下载动画演示(需要主游戏)-2.2 KB(Download the animations demo (requires the main game) - 2.2 KB)
介绍(Introduction)
这是有关Mario5游戏的后续文章.虽然第一篇文章关注于编码技术和原理设计,但本文将关注于如何重用代码和集成现有代码.希望本文将展示以原子方式编写的JavaScript代码实际上可以轻松维护和扩展.也可以集成到现有代码库中.(This is the follow up article on the Mario5 game. While the first article focused on the coding technique and the principle design, this article will focus on how to re-use code and integrate existing code. This article will hopefully show that JavaScript code, which is written in an atomic manner, can actually be easily maintained and extended. The integration into existing code bases is also possible.) 关于Mario5游戏的第一篇文章介绍了基于类的JavaScript方法的概念.本文假设您已阅读(The first article on the Mario5 game introduced the concept of a class based JavaScript approach. This article assumes you’ve read the) 有关CodeProject上Mario5游戏的文章(article about the Mario5 game on the CodeProject) .我们不会讨论基于类的JavaScript方法,也不会在游戏中再次讨论类图的细节.我们已经为关卡设置了一种(可能不是很理想,但是很容易写)格式.由于手写级别是一项繁琐且不可视的任务(因此可能容易出错),因此我们希望在浏览器中创建合适的级别编辑器.无法(直接)将级别保存到文件系统,因此,我们还将研究将现有代码库集成到Web应用程序中.(. We will not discuss the class based JavaScript approach, nor will we go into details of the class diagram again of the game again. We have already set up a (maybe not ideal, but kind of easy to write) format for levels. Since hand-writing levels is a tedious and non-visual (therefore maybe a error-prone) task, we want to create a proper level editor in the browser. Saving the level to the file system is not (directly) possible, therefore we will also look into integrating the existing code base into a web application.)
背景(Background)
如果您尚未玩过Mario游戏,请查看(If you haven’t played the Mario game yet, then check out the) YouTube上的视频(video on YouTube) .在视频中,您将看到第一篇文章的最终结果.我的两个学生启动了Mario项目并完成了所有艺术品(部分完全是自己完成的,部分是通过在Internet上找到免费的艺术品并将其编译成Sprite Sheets)来提供的.由于我们完全重写了游戏,采用了面向对象的方法,因此,我们现在将尝试重新使用为编辑器编写的类.因此,旧的编辑器-编写得很好,并包含撤消,可视化网格等功能,将不在此处显示.相反,我们将使用与第一篇文章中相同的原理来编写全新的编辑器.(. In the video you will see the final outcome of the first article in action. The two students of mine, which started the Mario project and did all the artwork (partly completely themselves, partly by finding free artwork on the Internet and compiling those into sprite sheets), did supply a level editor. Since we rewrote the game completely, embracing an object oriented approach, we will now try to re-use the classes we’ve written for the editor. Therefore the old editor - which was written well and contained features like undo, a visual grid and others - will not be presented here. Instead we will write the editor completely new using the same principles as in the first article.)
使用游戏的基本设计进行扩展(Using the basic design of the game for extensions)
我们可以重用现有对象来构造新的和不同的对象.我们通过创建(We can re-use existing objects to construct new and different ones. We’ve seen this principle by creating the) StaticPlant 和(and) PipePlant 类.这些类是从(classes. Those classes are inheriting from the) Plant 类.因此,这两个类非常相似(它们共享一些属性),但是它们的外观完全不同.(class. Both classes are therefore quite similar (they share some properties), but in their appearance completely different.)
上面的示例本质上非常简单,但是,修改示例时可以应用相同的原理(The example above is quite simple in its nature, however, the same principle can be applied when modifying the) Level 类.让我们考虑以下代码:(class. Let’s consider the following code:)
var Editor = Level.extend({
    init: function(id) {
        this.world = $('#' + id);
        this.grid = false;
        this.setPosition(0, 0);
        this.reset();
        this.undoList = [];
    }
});
这里我们不调用构造函数(通过使用(Here we do not call the constructor (by using) this._super() 的)() of the) Level 类.像一个(class. Like a) Level 对象期望通过该级别的容器的ID,(objects expects an ID of the container for the level to be passed, the) Editor 还希望传递一个ID.我们已经看到编辑器特有的属性像(expects also an ID to be passed. We already see editor specific properties being initialized like the) grid 和(and the) undoList .从原理开始,我们现在可以更改和扩展(. Starting with the principle we can now alter and extend the possibilities of the) Level 上课更多:(class even more:)
var Editor = Level.extend({
    init: function(id) {
        var me = this;
        this.world = $('#' + id);
        this.grid = false;
        this.setPosition(0, 0);
        this.reset();
        this.undoList = [];
    },
    reset: function() {
        this._super();
        $('<canvas />').addClass('grid').appendTo(this.world);
        var data = [];

        for(var i = 100; i--; ) {
            var t = [];

            for(var j = 15; j--; )
                t.push('');

            data.push(t);
        }

        this.load({
            height: 15,
            width: 100,
            background: 1,
            id: 0,
            data: data
        });
    },
    save: function() {
        return JSON.stringify(this.raw);
    },
    setSize: function(w, h) {
        this._super(w, h);
        this.generateGrid();
    },
    setImage: function(index) {
        if(this.raw)
            this.raw.background = index;

        this._super(index);
    },
    generateGrid: function() {
        var c = $('.grid', this.world).get(0).getContext('2d');
        c.canvas.width = this.width;
        c.canvas.height = this.height;
        c.clearRect(0, 0, c.canvas.width, c.canvas.height);

        if(this.grid) {
            for(var i = 32; i < this.width; i += 32) {
                c.moveTo(i, 0);
                c.lineTo(i, 480);
            }

            for(var i = 32; i < 480; i += 32) {
                c.moveTo(0, i);
                c.lineTo(9600, i);
            }

            c.lineWidth = 0.5;
            c.strokeStyle = '#FF00FF';
            c.stroke();
        }
    },
    start: function() {
        //Left blank intentionally...
        //This is just to override (and disable) the parent start();
    },
    pause: function() {
        //Left blank intentionally...
        //This is just to override (and disable) the parent pause();
    },
    gridOn: function() {
        this.grid = true;
        this.generateGrid();
    },
    gridOff: function() {
        this.grid = false;
        this.generateGrid();
    },
    setParallax: function() {
        //Left blank intentionally...
        //This is just to override (and disable) the parent setParallax();
    },
});
这已经是一个了不起的状态.如果现在开始游戏,我们将生成我们的关卡(甚至可以有一个网格来显示每个关卡由32px x 32px的块组成).要看到这一点,我们还需要一些HTML.让我们从以下HTML开始,为我们的关卡编辑器提供合适的容器:(This is already a quite awesome state. If we would now start the game we would generate our level (and could even have a grid to show the 32px x 32px blocks, that each level is consisting of). To see this we will also need some HTML again. Let’s start with the following HTML to provide a proper container for our level editor:)
<!doctype html>
<html>
<head>
<meta charset=utf-8 />
<title>Super Mario HTML5 Editor</title>
<link href="Content/style.css" rel="stylesheet" />
</head>
<body>
<div id="edit">
<div id="edit_world"></div>
</div>
<div id="tool">
<div id="tool_world"></div>
</div>
</div>
<script src="Scripts/jquery.js"></script>
<script src="Scripts/testlevels.js"></script>
<script src="Scripts/oop.js"></script>
<script src="Scripts/constants.js"></script>
<script src="Scripts/main.js"></script>
<script src="Scripts/editor.js"></script>
<script>
$(document).ready(function() {
    var edit = new Editor('edit_world');
    edit.load(definedLevels[1]);
    edit.gridOn();
});
</script>
</body>
</html>
在这里,我们重新使用了第一篇文章中编写的许多脚本.只有(Here we are re-using a lot of scripts that have been written in the first article. Only the)**editor.js(editor.js)**文件是新的.该文件将包含我们将在本文中编写的所有JavaScript(坦率地说,更正确的是,其中大部分).的(file is new. The file will contain all the JavaScript we are going to write in this article (well, to be honest and more correct: most of it). The)**style.css(style.css)**文件与第一篇文章基本相同.我们只需要一些其他声明:(file is basically the same as in the first article. We just need a few additional statements:)
#edit {
	height: 480px; width: 640px; position: absolute; left: 50%; top: 50%;
	margin-left: -321px; margin-top: -241px; border: 1px solid #ccc; overflow: hidden;
}
#tool {
	width: 640px; position: absolute; left: 50%; top: 50%; margin-left: -321px;
	margin-top: 282px; height: 128px; background: #ddd; border: 1px solid #ccc;
}
#tool_world {
	margin: 0; padding: 0; position: relative; top: 0; left: 0; height: 100%; width: 100%;
}
.tool {
	margin: 0; padding: 0; z-index: 99; position: absolute;
}
.grid {
	margin: 0; padding: 0; z-index: 150; position: absolute; top: 0; left: 0;
}
.block {
	z-index: 100;
}
这些规则中的大多数现在都不需要,但是稍后将变得必不可少.现在,我们只需要为带有(Most of those rules are unnecessary for now, but will become essential later. Right now we just need the additional rule for the element with the) #edit 选择器.此规则与(selector. This rule is the same as for the) #game 第一篇文章中的选择器.(selector in the first article.)
到目前为止,我们所做的只是展示出关卡的一部分.在介绍添加和删除项目的可能性之前,我们应该以某种方式介绍水平滚动的可能性.我们可以使用浏览器提供的滚动条来做到这一点-CSS规则的简单更改就足够了.但是,浏览器必须添加附加滚动条,即对于水平滚动条,因此我们必须添加一定数量的高度像素(大约20像素).我们想使用一个不同的滚动条系统,以便总高度仍为480px.(Until now all we did was showing a part of the level. Before we introduce the possibilities of adding and removing items, we should somehow introduce the possibility to scroll (horizontally). We could do this with a scrollbar provided from the browser - a simple change in the CSS rules would be enough. However, must browsers add additive scrollbars, i.e. for a horizontal scrollbar we must therefore add a certain amount of pixels in height (which is about 20px). We would like to use a different scrollbar system, so that we will still just have the 480px as total height.)
我们可以自己编写这样的滚动条控件,但是为了节省时间(也许还省钱),我们选择了适合自己的解决方案.该解决方案应作为jQuery插件提供,因为我们已经在使用jQuery,并且不希望额外的开销或其他原型(如Prototype,MooTools或其他库)的复杂性.有几个可用于jQuery的滚动插件,但其中大多数仅适合垂直滚动(这是最常见的情况).经过长时间的搜索,我们最终得到(We could write such a scrollbar control on our own, but to save time (and perhaps money) we pick a solution to suits our fits. The solution should be available as a jQuery plug-in, since we are already using jQuery and do not want to have extra overhead or complications with another library like Prototype, MooTools, or others. There are several scrolling plug-ins available for jQuery, but most of them just fit for vertical scrolling (which is the most common case). After a long search we eventually end up with)slimScroll(slimScroll),该网址位于(, which is available at) 作者的网站(the author’s website) .(.)
该插件仅用于垂直滚动,因为作者认为水平滚动是一个愚蠢的事情,因此不应该被使用(显然他不了解Metro设计原理或我们的Mario关卡编辑器!).通过将插件中的所有行从水平部分更改为垂直部分,反之亦然,可以修改水平滚动的限制.在这里显示修改后的代码将浪费空间,因为修改量很小.在下载包中还提供了修改后的插件.(This plug-in is only made for vertical scrolling, since the author thinks that horizontal scrolling is a stupid thing and should never be wanted (apparently he did not know about the Metro design principles or our Mario level editor!). The restriction to horizontal scrolling can be modified by changing all lines in the plug-in from the horizontal to the vertical part and vice versa. Showing the modified code here would be a waste of space, since the modifications are really small. Also the modified plug-in is available in the download package.)
最后,我们可以修改(Finally we can modify the constructor of the) Editor 类,方法是在构造函数中添加以下调用:(class by adding the following call in the constructor:)
var Editor = Level.extend({
    init: function(id) {
        /* as before */
        this.world.slimScroll({ height : 480 })
    },
    /* rest as before */
});
现在我们已经可以看到完全创建了关卡.(Now we can already see that the level being created completely.)
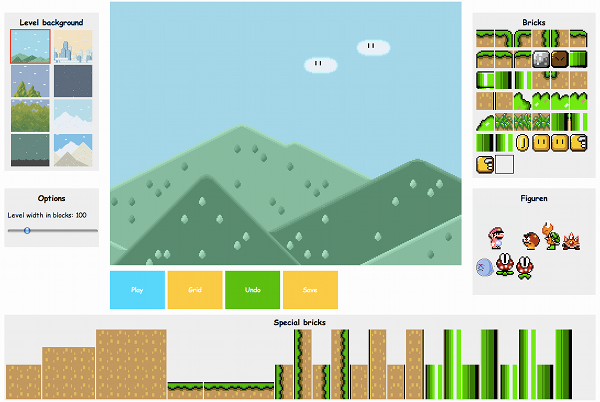
关卡编辑器,工具箱和宏元素(The level editor, toolboxes and macro elements)
至此,我们可以看到并滚动到我们决定编辑的级别.到目前为止,我们还没有包括添加新块或擦除现有块的功能.因此,我们将不得不进一步修改代码.我们的第一个修改将集中于向我们的应用程序添加更多类.首先,我们创建一个类,该类将作为要添加到该级别的项目的容器起重要作用.我们称这堂课(At this point we are able to see and scroll in the level we’ve decided to edit. What we did not include until this point is the ability to add new blocks or erase existing blocks. Therefore we will have to modify the code even further. Our first modifications will focus on adding some more classes to our application. First of all we create a class that will play an important role as a container for items to be added to the level. We will call this class) ToolBox .(.)
var ToolBox = Level.extend({
    init: function(id, edit) {
        this.world = $('#' + id);
        this.edit = edit;
        this.setPosition(0, 0);
        this.reset();
        this.world.slimScroll({height: 128});
    },
    load: function(names) {
        var x = 0;
        this.obstacles = [];

        for(var ref in reflection) {
            if(!names || names.indexOf(ref) !== -1) {
                this.obstacles.push([]);
                var t = new (reflection[ref])(x, 0, this);
                t.view.addClass('block').draggable({
                    stack: false,
                    cursor: 'move',
                    cursorAt: { top: t.height / 2, left: t.width / 2 },
                    opacity: 0.8,
                    distance: 0,
                    appendTo: 'body',
                    revert: false,
                    helper: 'clone',
                }).data('name', ref);
                x += t.width + 2 * (t.x - x);
            }
        }
    },
    getGridHeight: function() {
        return 1;
    },
    getGridWidth: function() {
        return this.obstacles.length;
    },
    start: function() {
        //Left blank intentionally...
        //This is just to override (and disable) the parent start();
    },
    pause: function() {
        //Left blank intentionally...
        //This is just to override (and disable) the parent pause();
    },
});
该类还继承自(The class also inherits from the) Level 类作为(class as the) Editor 做到了.我们还用虚拟方法覆盖了一些方法,以防止使用不适当的东西.一个重要特征在于(did. We are also overriding some methods with dummy methods, to prevent usage of inappropriate stuff. An important feature lies in the) load() 方法.在这里,我们允许一个称为(method. Here we allow an optional argument called) names 被通过.如果传递了此参数,则包含要添加到其中的项目名称的数组(to be passed. If this argument is passed, an array with names of items to be added to this) ToolBox 实例将是预期的.如果我们以后要有单独的工具箱,这将是一个重要的选择.如果尚未设置参数,则将添加所有可用项.(instance will be expected. This will be an important option if we want to have separate toolboxes later on. If the argument has not been set, all available items will be added.)
我们构建的下一个类是仅在编辑器中可用的对象的通用基础.我们首先为此类项目提供一个共同的基础.为了为此提供类,我们首先将创建一个基类以减少代码重复次数.这个新的基类应该称为(The next class we build is a common base for objects that are only available in the editor. We start of by providing a common base for such items. In order to provide classes for this we will first create a base class to end up with less code repetitions. This new base class should be called) ToolBoxBase :(:)
var ToolBoxBase = Base.extend({
    init: function(x, y, level) {
        this.view = $(DIV).addClass(CLS_TOOL).appendTo(level.world);
        this._super(x, y);
        this.level = level;
    },
    addToGrid: function(x, y) {
        this.level.obstacles[x / 32][14 - y / 32] = this;
    },
    onDrop: function(x, y) {
        //Do nothing here by default ...
    },
    setImage: function(img, x, y) {
        this.view.css({
            backgroundImage : img ? c2u(img) : 'none',
            backgroundPosition : '-' + (x || 0) + 'px -' + (y || 0) + 'px',
        });
        this._super(img, x, y);
    },
    setPosition: function(x, y) {
        this.view.css({
            left: x,
            bottom: y
        });
        this._super(x, y);
    },
    setSize: function(w, h) {
        this._super(w, h);
        this.view.css({
            width: w,
            height: h
        });
    },
});
该类的基本结构遵循类的创建(The basic structure of this class follows the creations of classes like) Enemy 和(and) Hero .我们不需要(. We do not need a) move() 这里的方法,因为项目继承自(method here, since items inheriting from) ToolBoxBase 将仅在关卡编辑器中使用.(will be only used in the level editor.)
可以从中得出的第一项(The first item that can be derived from) ToolBoxBase 是橡胶,即用作已添加项目的橡皮擦的项目.我们称这堂课为(is a rubber, i.e., an item that functions as an eraser for already added items. We will call this class just) ToolBoxEraser 并覆盖强制性(and override the mandatory) onDrop() 方法.在这里我们使用以下信息(method. Here we use the information of) x 和(and) y 从指定位置删除项目(to erase the item at the provided location from the) level 实例(实际上是我们的编辑器).我们回来(instance (which is in fact our editor). We return) true 通知调用函数不需要进一步的步骤.(to signal the calling function that no further steps are necessary.)
var ToolBoxEraser = ToolBoxBase.extend({
    init: function(x, y, level) {
        this._super(x, y, level);
        this.view.css('border', '1px solid #000');
        this.setSize(32, 32);
    },
    onDrop: function(x, y) {
        this.level.setItem('', x, y);
        this.view.remove();
        return true;
    },
}, 'Eraser-1x1');
另外,我们希望有可能添加一些宏构建块.这样的块将由现有块组成,并应加快关卡创建的速度.我们为所有此类对象命名基类(Additionally we want to have the possibility of adding some macro building blocks. Such blocks will consist of existing blocks and should speed up the level creation. We name the base class for all such objects) ToolMulti 并再次从(and derive again from the) ToolBoxBase .(.)
var ToolMulti = ToolBoxBase.extend({
    init: function(x, y, level, width_blocks, height_blocks, master) {
        this._super(x, y, level);
        this.master = master;
        this.width_blocks = width_blocks;
        this.height_blocks = height_blocks;
        this.setSize(width_blocks * 32, height_blocks * 32);
    },
    onDrop: function(x, y) {
        this.view.remove();
        return false;
    },
});
在这里(Here the) onDrop() 提供所有类的功能,这些类将代表宏项目组.基本功能是将项目的视图放到关卡上后将其删除.我们回来(provides the functionality for all classes, that will be representatives from the macro items group. The basic functionality is that the item’s view is removed once it’s dropped on the level. We return) false 向调用函数发送信号,表明仍需要将项目添加到级别.(to signal the calling function that adding the item to the level is still necessary.)
现在如何创建在级别编辑器中使用的宏类,看起来完全一样?由于我们在面向对象的正确层次结构中所做的努力,我们只需要使用适当的参数调用基本构造函数即可.最后,我们给该类一个唯一的反射名称-以便将其添加到可创建对象的列表中.这也使我们可以将其添加到仅包含特定元素的工具箱中.(How does creating a macro class for usage in the level editor now look like exactly? Due to our efforts in a proper object oriented hierarchy we do only need to call the base constructor with the appropriate arguments. Finally we give the class a unique reflection name - so that it will be added to the list of creatable objects. This also allows us to add it to a toolbox with specific elements only.)
var ToolMultiSoil2 = ToolMulti.extend({
    init: function(x, y, level) {
        this._super(x, y, level, 2, 2, 'soil');
        this.setImage(images.objects, 1071, 3);
    },
}, 'Soil-2x2');
现在,我们已经创建了用于添加和删除对象的平台,我们只需要在其中添加适当的功能即可.(Now that we have created the platform for having objects to add and erase, we only need to add the proper functionality in the) Editor 类.我们已经在使用方法,例如的(class. We have been already using methods, e.g. the) setItem() 中的方法(method in the) onDrop() 的功能(function of the) ToolBoxEraser 类,目前尚不存在.现在,我们必须将这些方法添加到适当的实现中.(class, which do not exist at the moment. Now we have to add these methods with the proper implementations.)
由于我们的宏对象将是(Since our macro objects will be)**宽x高(width x height)**现有对象的数组,我们将需要一个更通用的(arrays of existing objects, we will need a more general) setItems() 方法.我们还需要围绕这些函数的包装器,这些包装器会在实际调用之前执行一些检查(method. Also we need wrappers around these functions, which perform some checks before actually calling) setItem() 要么(or) setItems() .如果建议的位置有效并且如果建议的位置有效,则检查应涉及增加第二个马里奥(只能有一个玩家!)之类的情况.(. The checks should involve scenarios like the addition of a second Mario (there can only be one player!), if the proposed position is valid and if the) onDrop() 方法确实返回(method did return) true 作为价值.(as value.)
var Editor = Level.extend({
    /* Existing methods */
    setItem: function(value, x, y, noUndo) {
        this.setItems(value, [x], [y], noUndo);
    },
    setItems: function(value, xs, ys, noUndo) {
        var t = [];

        for(var i = 0, n = xs.length; i < n; i++) {
            t.push({
                name: this.raw.data[xs[i]][ys[i]],
                x: xs[i],
                y: ys[i]
            });

            this.raw.data[xs[i]][ys[i]] = value;
        }

        if(!noUndo)
            this.pushUndoList(t);
    },
    addItem: function(name, x, y, noUndo) {
        if(name === 'mario' && this.mario) {
            var oldx = this.mario.i;
            var oldy = this.mario.j;
            this.mario.view.remove();
            this.setItems(['', 'mario'], [oldx, x], [oldy, y]);
            new (reflection[name])(32 * x, 448 - 32 * y, this);
            return;
        }

        this.removeView(x, y);
        var t = new (reflection[name])(32 * x, 448 - 32 * y, this);

        if(t.onDrop && t.onDrop(x, y))
            return;

        var xarr = [];
        var yarr = [];

        if(t.width_blocks && t.height_blocks && t.master) {
            var w2 = t.width_blocks / 2;
            var h2 = t.height_blocks / 2;
            name = t.master;

            for(var xi = Math.ceil(x - w2); xi < Math.ceil(x + w2); xi++) {
                for(var yi = Math.ceil(y - h2); yi < Math.ceil(y + h2); yi++) {
                    xarr.push(xi);
                    yarr.push(yi);
                    this.removeView(xi, yi);
                    new (reflection[name])(32 * xi, 448 - 32 * yi, this);
                }
            }
        } else {
            xarr.push(x);
            yarr.push(y);
        }

        this.setItems(name, xarr, yarr, noUndo);
    },
    removeItem: function(x, y, noUndo) {
        this.removeView(x, y);
        this.setItem('', x, y, noUndo);
    },
    removeView: function(x, y) {
        if(this.obstacles[x][y])
            this.obstacles[x][y].view.remove();
        else {
            for(var i = this.figures.length; i--; ) {
                var gp = this.figures[i].getGridPosition();

                if(gp.i === x && gp.j === y) {
                    this.figures[i].view.remove();
                    this.figures.splice(i, 1);
                    break;
                }
            }
        }
    },
});
方法(The method) removeItem() 处理实际从关卡数组中删除项目的情况.我们还添加了一个辅助方法来删除将要从数组中删除的项目视图.(deals with the case of actually removing an item from the level array. We also added a helper method to remove the view of the item, which is about to be removed from the array.)
最后我们要添加一个工作(Finally we want to add a working) undoList .我们已经准备好数组,并在其中添加了一些方法调用(. We already prepared the array, and added some method call in the) setItems() 方法.在这里,我们不需要太多代码,只需几个函数即可组织列表,并提供一种方法来实际调用撤消操作.(method. We do not need much code here, just a few functions to organize the list and a method to actually invoke an undo action.)
var Editor = Level.extend({
    /* Existing methods */
    pushUndoList: function(action) {
        this.undoList.push(action);
    },
    popUndoList: function() {
        return this.undoList.pop();
    },
    undo: function() {
        if(this.undoList.length) {
            var action = this.popUndoList();

            for(var i = 0, n = action.length; i < n; i++) {
                var x = action[i].x;
                var y = action[i].y;

                if(action[i].name)
                    this.addItem(action[i].name, x, y, true);
                else
                    this.removeItem(x, y, true);
            }
        }
    },
});
现在我们的编辑器已经完成,可以被某些脚本使用.下载包中包含编辑器的演示.基本上,该演示的构建与原始游戏演示的构建相同.(Now our editor is complete and can be used by some script. A demo of the editor is included in the download package. Basically the demo is build up the same way that the original game demonstration was built up.)
围绕游戏构建平台(Building a platform around the game)
维护一个大型JavaScript项目与维护其他大型项目一样乏味.因此,我们需要将代码拆分为较小的项目,这些项目没有任何依赖关系(在最佳情况下).到目前为止,我们建造了什么?(Maintaining a big JavaScript project is as tedious as maintaining other big projects. Therefore we need to split up the code in smaller projects, which do not have any dependencies (in the best case). What have we built so far?)
-
一个抽象层,给我们以JavaScript真正面向对象的代码的印象,名为(1)(An abstract layer for giving us the impression of true object oriented code in JavaScript, named (1))
-
一个声音管理器项目,取决于(1),名为(2)(A sound manager project, depending on (1), named (2))
-
一个键盘(或通用输入)项目,取决于(1),名为(3)(A keyboard (or general input) project, depending on (1), named (3))
-
游戏本身(基础,关卡,某些对象…),取决于(1),名为(4)(The game itself (base, level, some objects, …), depending on (1), named (4))
-
带有一些新对象的关卡编辑器,取决于(1)和(4)(The level editor with some new objects, depending on (1) and (4)) 另外,游戏本身总是要插入(2)和(3),形成带有声音的可控游戏.我们也没有提到我们的游戏需要jQuery作为附加的JavaScript层(简化了跨浏览器编程并提供了一些省时的功能).编辑器还需要jQuery slimScroll插件,该插件确实需要jQuery UI的一部分(以便可拖动以及更多).总的来说,我们必须遵循以下外部依赖关系:(Additionally the game itself always (2) and (3) to be plugged in, forming a controllable game with sound. We also did not mention that our game requires jQuery as an additional JavaScript layer (simplifies cross-browser programming and provides some time-saving features). The editor also requires the jQuery slimScroll plug-in, which does require a part of jQuery UI (in order to be draggable and more). Overall we have to following external dependencies:)
-
jQuery的(jQuery)
-
jQuery UI(通过自定义功能创建就足够了-无需主题)(jQuery UI (custom built with some features is enough - no theme required))
-
jQuery slimScroll(jQuery slimScroll) 现在,对于使用Mario5游戏源的任何应用程序,我们至少需要jQuery和OOP层.由于我们对控制游戏感兴趣,因此我们还需要实现键盘类.如果我们想要声音,还应该包括声音类的正确实现.(Now for any application using the Mario5 game source we need at least jQuery and the OOP layer. Since we are interested in controlling the game we also need an implementation of the keyboard class. If we want to have some sound we should also include a proper implementation of the sound class.) 如果我们的应用程序应提供Mario5级编辑器,则我们需要更多资源.除了Mario5游戏(以及游戏本身)的依赖项之外,我们还需要jQuery UI和jQuery slimScroll插件.提供所有这些脚本可为任何Web应用程序奠定基础.(If our application should provide the Mario5 level editor we need more sources. Additionally to the dependencies of the Mario5 game (and the game itself), we need jQuery UI and the jQuery slimScroll plug-in. Providing all those scripts builds the bases for any web application.) 我们现在的目标是围绕Mario5游戏构建具有社区定位的游戏.首先,我们应该对包含的功能有一个愿景:(Our goal now is to built a game with some community orientation around the Mario5 game. First of all we should have a vision about the included features:)
-
注册和登录(Registration and login)
-
编辑,保存和加载级别(Editing, Saving and loading levels)
-
玩单人战役以及玩提供的自定义级别(Playing the single-player campaign as well as playing provided custom levels)
-
其他作者的等级(这很像CodeProject!)(Rating levels of other authors (this is very CodeProject like!)) 这些基本上是需要提供的所有功能.总而言之,我们有一个非常简单的数据库.下图显示了数据库的代码优先方法:(Those are basically all functions that need to be provided. All in all we have a really simple database. The code first approach to the database can be displayed as the following diagram:)

具体的相关代码(The related code of the specific) DbContext 实现如下所示:(implementation looks like the following:)
namespace SuperMario.Models
{
    public class MarioDB : DbContext
    {
        public DbSet<Level> Levels { get; set; }
        public DbSet<User> Users { get; set; }
        public DbSet<Rating> Ratings { get; set; }

        protected override void OnModelCreating(DbModelBuilder modelBuilder)
        {
            modelBuilder.Conventions.Remove<IncludeMetadataConvention>();
            modelBuilder.Entity<User>().ToTable("My_AspNet_Users");
        }

        public void Detach(object entity)
        {
            var objectContext = ((IObjectContextAdapter)this).ObjectContext;
            objectContext.Detach(entity);
        }
    }
}
由于我们使用的是实体框架,因此只要在(Since we are using the Entity Framework we can use it with any database provider by just setting the appropriate one in the)**web.config(web.config)**文件.(file.) 我们仍然必须编写一些动作.我们不想在这里详细介绍每个实现,因此我们只在此处显示加载和保存级别的实现(因为这是直接的(并且是从属的)JavaScript/我们的Mario5游戏模块).首先,我们需要什么来真正保存一个关卡?(We still have to write some actions. We do not want to go into details of every implementation here, so we just show the implementation of the load and save level here (since this is a direct (and dependent) JavaScript / our Mario5 game module). First of all, what do we need to actually save a level?)
- 触发事件的按钮(A button that triggers the event)
- JavaScript事件处理程序(A JavaScript event handler)
- jQuery的调用(A call to the jQuery)
ajax()方法,或更专业的包装器(method, or a more specialized wrapper) - 适当的操作作为目标URL(A proper action as target URL) 现在我们已经将所有内容放在一起,我们只需要执行操作即可:(Now that we have everything together we just have to implement the action:)
namespace SuperMario.Controllers
{
    public class LevelController : Controller
    {
        /* ... */

        //
        // GET: /Level/Save

        [Authorize]
        public ActionResult Save()
        {
            return PartialView();
        }

        //
        // POST: /Level/Save

        [HttpPost]
        [Authorize]
        public ActionResult Save(Level level)
        {
            if(level == null)
                return PartialView();

            var content = H.Json.Decode<LevelData>(level.Content);
            level.UserId = (int)Membership.GetUser().ProviderUserKey;
            level.Played = 0;
            level.Created = DateTime.Now;
            level.Updated = DateTime.Now;
            level.Background = content.background;

            if (ModelState.IsValid)
            {
                db.Levels.Add(level);
                db.SaveChanges();
                content.id = level.Id;
                level.Content = H.Json.Encode(content);
                db.Entry(level).State = EntityState.Modified;
                db.SaveChanges();
                return Json(new { id = level.Id });
            }

            return PartialView(level);
        }
    }
}
实际上,我们编写了两种方法,一种(表单)在用户单击按钮(通过AJAX请求)时触发,另一种在用户提交表单时触发.在这种方法中,我们正在做一些基本的模型创建和模型更新.由于级别数组将作为包含使用的ID的JSON字符串存储,因此我们需要修改ID.这是一个问题,因为在实际插入之前我们不知道ID.我们可以分两步解决这个问题:(Actually we wrote two methods, one (the form) being triggered when the user hits the button (over an AJAX request) and one being triggered when the user submits the form. In this method we are doing some basic model creation and some model update. Since the level array will be stored as a JSON string containing the used ID, we need to modify the ID. This is a problem, since we do not know the ID before the actual insertion. We can walk around this problem by doing it in two steps:)
- 首先,我们将实体插入数据库(此处是(First we insert the entity into the database (here the)
SaveChanges()通话很重要)(call is important)) - 然后,我们通过反序列化,更新属性,再次序列化并更新实体来更新JSON字符串(Then we update the JSON string by deserializing it, updating the property, serializing it again and updating the entity)
此外,我们还保存了从JSON字符串中提取的一些信息.当请求现有级别的列表时,执行此操作以节省一些计算能力.我们应该注意,我们有直接(Additionally we also save some extracted information from the JSON string. This is performed to save some computation power later, when a list of existing levels is requested. We should note that we have a direct)
DbContext此处访问,在大型Web应用程序中应避免使用.对于我们围绕Mario5游戏的小型Web应用程序,这仍然可以接受.(access here, which should be avoided in big web applications. For our small web app surrounding the Mario5 game this is still acceptable.) Web应用程序的JavaScript需要将此操作连接到适当的按钮,该按钮负责保存当前级别.在这里,我们必须区分保存新级别和保存现有级别,即编辑一个级别.(The JavaScript of the web application needs to wire up this action to a proper button, which is responsible for saving the current level. Here we have to distinguish between saving a new level and saving an existing one, i.e. editing one.)
$('#saveEdit').click(function () {
    var url = edit.id ? ('/Level/Edit/' + edit.id) : '/Level/Save';
    webapp.performAjax(url, function () {
        $('#Content').val(edit.save());
    });
});
此代码段将带有ID的按钮连接起来(This code snippet wires up the button with the ID)**saveEdit(saveEdit)**通过正确的AJAX调用.如果为编辑者分配了有效的ID,我们将使用URL进行编辑操作,否则,我们将使用上面显示的操作.(with the proper AJAX call. If the editor has a valid ID assigned, we use the URL to the edit action, otherwise we use the action we’ve shown above.)
社会融合和移动注意事项(Social integration and mobile considerations)
我们需要考虑使我们的应用程序可用和已知的不同方法(这些可能是当前趋势,但IT总是关于当前趋势):(We need to think of different (those are maybe current trends, but IT is always about current trends) ways to make our application usable and known:)
- 使用共享按钮允许用户轻松传播信息(Using share buttons for allowing users to spread the word easily)
- 使用OAuth允许用户使用其(主要)在线帐户(Using OpenAuth for allowing users to make use of their (primary) online account)
- 集成触摸友好按钮(并将它们连接到触摸控件)以控制游戏(Integrating touch friendly buttons (and wiring them up to the touch control) for controlling the game)
- 使游戏在智能手机等移动设备上可玩(Making the game playable on mobile devices like Smart Phones)
共享按钮将从一个名为(The share buttons will be taken from a page called) Shareaholic.com(Shareaholic.com) .在此页面上,我们可以编译自己的社交书签集.完成后,页面将为您提供一个摘要,该摘要必须包含在页面中我们想要的位置.当然,我们将包括三大巨头(Facebook,Twitter和Google+),还包括Orkut,LinkedIn或更传统的服务,例如通过电子邮件共享.(. On this page we can compile our own set of social bookmarks. Once we are finished the page gives us a snippet, which has to be included at our desired location within the page. Of course we will include the big three (Facebook, Twitter, and Google+), but also Orkut, LinkedIn, or more traditional services like sharing by E-Mail.)
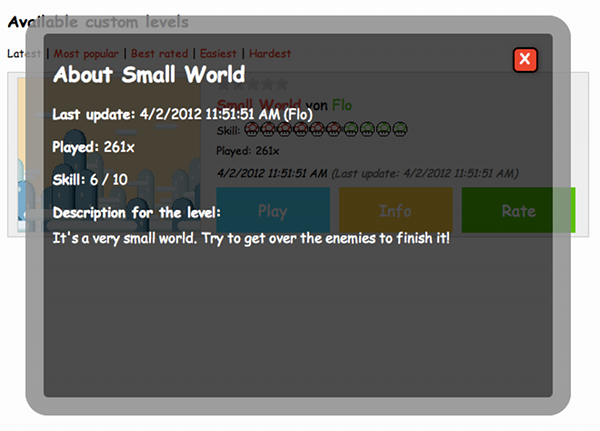
某些页面内容不需要用户的全神贯注,应被视为对常规内容的补充.可以通过使用无模式(即非阻塞)对话框来传递此类内容.此类对话框的原理是,它们可以填充任何内容,而不依赖于当前页面.最后,此类对话框将如下图所示:(Some page content does not need the user’s full attention and should be considered additional to the usual content. Such content can be delivered by using modeless, i.e., non-blocking, dialog boxes. The principle of such dialogs is that they can be filled with whatever content and do not depend on the current page. In the end such dialogs will look like this image:)
包括OAuth提供程序可能很棘手,但对我们来说幸运的是,大部分工作可以由DotNetOpenAuth库完成(托管在(Including an OpenAuth provider can be tricky, but lucky for us most of the work can be done by the DotNetOpenAuth library (hosted at) dotnetopenauth.net(dotnetopenauth.net) ).仍然我们必须编写一些动作,设置一些视图并将所有内容连接在一起.如果您想更详细地介绍OpenId和DotNetOpenAuth,那么您应该阅读类似的内容(). Still we have to write some actions, set up some views and wire everything together. If you want to have a more detailed introduction to OpenId and DotNetOpenAuth, then you should read something like) 此博客文章,有关在ASP.NET MVC中快速设置OpenId(this blog entry about a quick setup for OpenId in ASP.NET MVC) .基本概念如下所示:(. The basic concept looks like that:)
- 我们提供(We provide a)
<form>具有输入字段和提交按钮(with an input field and a submit button) - 输入字段应包含有效的OpenId提供程序(The input field should contain a valid OpenId provider)
- 提交应通过适当的控制器操作(我们的部分)进行处理(The submission should be handled by a proper controller action (our part))
- 然后,控制器会将请求发送到指定的URL,即指定的OpenId提供程序(The controller will then send a request to the specified URL, i.e. the specified OpenId provider)
- 该请求的答案将被检查,结果将对我们的响应产生影响(The answer from this request will be examined and the result will have influence on our response)
- 通常,答案将是重定向到OpenId提供程序(重定向以登录用户)(Usually the answer will be a redirect to the OpenId provider (redirect to login the user))
- 除了重定向,我们还必须为提供者提供有效的回调URL(Along with that redirect we have to give the provider a valid callback URL)
- 提供者的答案将通过一些参数发送到回调URL,在这里我们再次检查答案(The provider’s answer will be sent to the callback URL with some parameters, and here we examine the answer again)
- 最后我们根据整个过程显示结果(Finally we display the result based on the whole process) 总体而言,我们最多需要三个视图和两个动作.我们还需要了解OpenId API,即名称和可接受的值.这听起来有些工作,但是对我们来说幸运的是,我们可以使用提到的DotNetOpenAuth库来完成大部分工作.最后,我们只需要执行一个操作:(Overall we need up to three views and up to two actions. We also need to understand the OpenId API, i.e., the names and accepted values. This sounds like some work, but lucky for us we can use the mentioned DotNetOpenAuth library to do most of the work. Finally we just need one action:)
/* ... */
using DotNetOpenAuth.Messaging;
using DotNetOpenAuth.OpenId;
using DotNetOpenAuth.OpenId.RelyingParty;
using DotNetOpenAuth.OpenId.Extensions.SimpleRegistration;
using DotNetOpenAuth.OpenId.Extensions.AttributeExchange;

namespace SuperMario.Controllers
{
    public class AccountController : Controller
    {
        static OpenIdRelyingParty openid;

        public AccountController()
        {
            openid = new OpenIdRelyingParty();
        }

        [ValidateInput(false)]
        public ActionResult Authenticate(string openid_identifier)
        {
            var response = openid.GetResponse();

            //Distinguish between: Redirect FROM OpenId provider and TO OpenId
            if (response == null) // this case: TO OpenId
            {
                Identifier id;

                if (Identifier.TryParse(openid_identifier, out id))
                {
                    try
                    {
                        var request = openid.CreateRequest(id);
                        var fetch = new FetchRequest();
                        fetch.Attributes.AddRequired(WellKnownAttributes.Contact.Email);
                        request.AddExtension(fetch);
                        return request.RedirectingResponse.AsActionResult();
                    }
                    catch (ProtocolException ex)
                    {
                        TempData.Add("StatusMessage", ex.Message);
                        return RedirectToAction("Index", "Home");
                    }
                }
                else
                {
                    TempData.Add("StatusMessage", "Invalid identifier");
                    return RedirectToAction("Index", "Home");
                }
            }
            else // this case: FROM OpenId
            {
                switch (response.Status)
                {
                    case AuthenticationStatus.Authenticated:
                        // Create account if not already existing
                        // Login user
                        /* ... */
                        return RedirectToAction("Index", "Home");

                    case AuthenticationStatus.Canceled:
                        TempData.Add("StatusMessage", "Canceled at provider");
                        return RedirectToAction("Index", "Home");

                    case AuthenticationStatus.Failed:
                        TempData.Add("StatusMessage", response.Exception.Message);
                        return RedirectToAction("Index", "Home");
                }
            }

            return new EmptyResult();
        }
    }
}
由于仅提供一个文本字段(要输入一个神秘的URL)和一个提交字段会对用户造成一点点(至少可以说)不友好,因此我们应该使用(一些)可用的OpenId提供程序列表.再次考虑到已经存在一些非常好的免费解决方案,这可能会导致过多的工作.最好的解决方案之一是(Since only providing a textfield (with a cryptic URL to enter) and a submit field is a little bit (to say the least) user-unfriendly, we should use a list of (some) available OpenId providers. Again, this could result in too much work considering that there are already some really good free solutions out there. One of the best solutions is the) OpenId选择器(OpenId selector) .这基本上是一个JavaScript解决方案(适用于jQuery或其他流行的库),它将我们的纯格式字段转换为色彩丰富,按钮丰富的选择.现在,用户只需单击一下即可选择自己喜欢的OpenId提供程序.我们要做的就是为图形提供精灵表(或我们自己的编译)并设置JavaScript.(. This one is basically a JavaScript solution (for jQuery or other popular libraries), which transforms our plain form field to a colorful, button-rich, selection. Now the user can select his favorite OpenId provider by just one simple click. All we have to do is to provide the sprite sheet (or our own compilation) for the graphics and to setup the JavaScript.)
一旦我们改变了(Once we changed the) img_path 里面的变量(variable inside the)**openid-jquery.js(openid-jquery.js)**代码,我们已经调整了登录页面.现在,最终的登录页面还包含以下可能性:(code, we have adjusted our login page. The final login page now additionally contains the following possibilities:)

集成触摸友好按钮非常简单(对于任何Web应用程序).我们需要做的就是使任何链接(或通常可单击的元素)足够大.我们不必遵循此处的Metro设计原则指南-但我们可以使用其中描述的一些技巧.这些原则已在(Integrating touch friendly buttons is quite straight forward (for any web application). All we need to do is to make any link (or clickable element in general) big enough. We do not have to follow the Metro design principles guide here - but we can use some of the tips described in it. Those principles have been compiled together in the) 地铁设计语言(Metro design language) 文件.(document.)
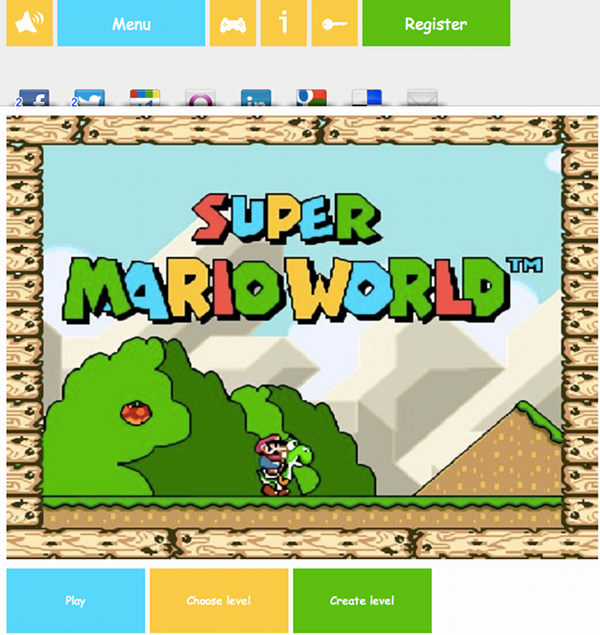
我们将创建带有彩色背景的大矩形按钮.实际(文本)超链接仅在少数情况下使用.主菜单,即Web应用程序加载后用户将直接看到的视图,如下图所示:(We will create big rectangular buttons, with a colored background. Real (text) hyperlinks will only be used on a few occasions. The main menu, i.e. the view the user will see directly after the web application has loaded then looks like the following image:)
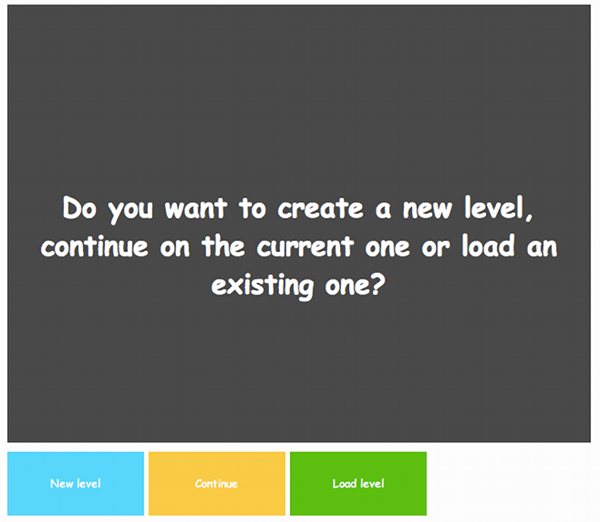
该概念必须移植到每个对话框.这对设计整个应用程序有一些影响.一个重要方面在于对话框的可视化.我们使用完整的视口向用户显示问题.然后,视口下方的按钮行将用于可能的答案.让我们快速看一个例子:(The concept has to be ported to every dialog. This has some implications for designing the whole application. One important aspect lies in the visualization of dialogs. We use the full viewport to display questions to the user. The button row below the viewport is then used for the possible answers. Let’s have a quick look at one example:)
为了使游戏在移动设备上可玩,我们设置了众所周知的(In order to make the game playable on mobile devices we setup the commonly known) <meta name="viewport"> 指示.完整的解释可以在(directive. A full explanation is available at) Mozilla开发人员网络(MDN)(the Mozilla Developer Network (MDN)) .我们的规则如下:(. Our rule looks like:)
<meta name="viewport" content="width=640, user-scalable=no, initial-scale=1.0, minimum-scale=1.0, maximum-scale=1.0">
针对移动设备的另一项调整是特定于设备(宽度)的CSS规则.使用此CSS3功能,我们可以对分辨率较低的设备进行特殊外观.一个重要功能是,游戏按钮在游戏区域内始终可见.通常,游戏按钮位于视口下方的按钮行中.如下图所示:(Another adjustment for mobile devices are device (width) specific CSS rules. Using this CSS3 feature we can make a special look for devices with lower resolutions. One important feature is that the game buttons will always be visible within the game area. Usually the game buttons are positioned in the button row below the viewport. This looks like the following image:)
在移动设备上,我们可以使用以下CSS规则:(On mobile devices we can use the following CSS rules:)
@media only screen and (max-width: 900px)
{
    #editGame { display: none; }
    #sections { top: 50%; margin-top: -240px; }
    #toppanel { z-index: 0; }
    #topnav { position: relative; z-index: 10; }
    #bottompanel { top: auto; bottom: 0; z-index: 10; opacity: 0.8; }
}
最重要的是,顶部和底部面板(负责显示菜单按钮;顶部导航确实是通用的,而底部导航始终显示当前内容的操作)已被更改.现在,内容屏幕始终位于显示的中间,这可能与顶部和底部导航重叠.因此,顶部和底部导航必须置于内容屏幕的前面.这是通过更改(Most importantly the top and bottom panel (responsible for displaying the menu buttons; the top navigation was really generic, while the bottom navigation always showed actions for the current content) have been altered. Now the content screen is always in the middle of the display, which could overlap the top and bottom navigation. Therefore the top and the bottom navigation had to be brought in front of the content screen. This is done by changing the) z-index 规则值设为10.(rule to a value of 10.)
游戏的底部还显示了该行(带有可用作触摸输入面板的按钮),这可能(可能会)导致与游戏重叠.为了避免游戏流程受到限制,例如通过不再看到角色或关卡的一部分,按钮变得透明了.在这里,我们为(The bottom row is also shown in the game (with buttons that can be used as touch input panels), which could (and probably will) result in overlapping with the game. To avoid restrictions in the game flow, e.g. by not seeing the character or part of the level any more, the buttons have been made transparent. Here we just set the rule for) opacity 的值小于1.0(不透明).在这种情况下,值为0.8应该足够.(to a value that is lower than 1.0 (opaque). In this case a value of 0.8 should be sufficient.)
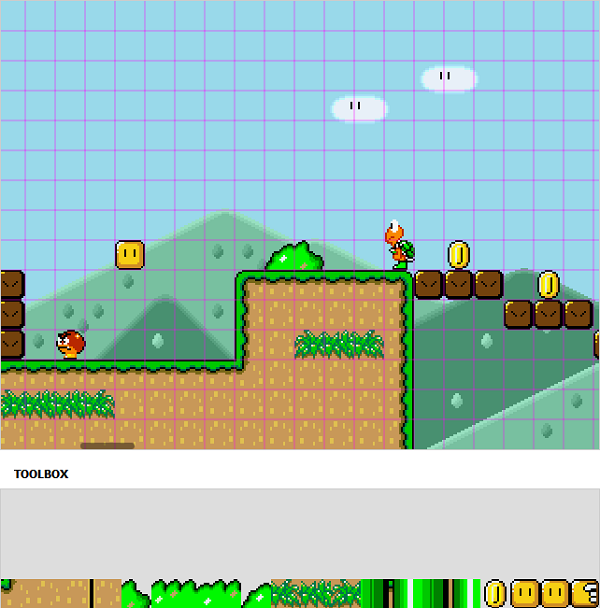
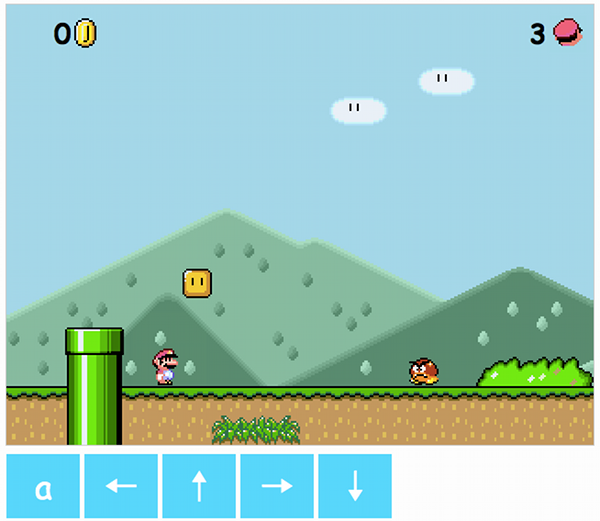
编辑器退出了移动设备,因为(在Mario5 Web应用程序中的所有接口中)编辑器的界面可能是最难移植到分辨率长于900px的移动设备上的.通过查看编辑器的屏幕快照可以看出:(The editor dropped out on mobile devices, since the editor’s interface is probably the hardest (of all interfaces in the Mario5 web application) to port to mobile devices with resolutions lower than 900px on the long edge. This can be seen by having a look at a screenshot of the editor:)
还有一件事:动画!(One more thing: Animations!)
我们需要这样一个平台的另一件事是游戏中的序列.现在,我们只有一种用途:作为在单人战役中取得胜利的好处.(Another thing we need for such a platform are in-game sequences. Right now we just have one use for it: as a benefit for being victorious in the single player campaign.) 通常,我们希望大型Mario在此类动画中出现.我们(针对特定的最终场景)也需要Mario的宝贝桃子.可以快速而直接地创建这两个专业角色:(Usually we want the big Mario to be apparent in such animations. We also (for that specific final scene) we need Mario’s darling Peach. Those two specialized characters can be created really quick and straight forward:)
var Peach = Hero.extend({
	init: function(x, y, level) {
		this.width = 80;
		this._super(x, y, level);
		this.setSize(46, 64);
		this.direction = directions.right;
		this.setImage(images.peach, 0, 80);
	},
	setVelocity: function(vx, vy) {
		this._super(vx, vy);

        if(vx !== 0) {
			if(!this.setupFrames(6, 4, false, 'Walk'))
				this.setImage(images.peach, 138, 80);
		} else if(this.frameTick) {
            this.clearFrames();
			this.setImage(images.peach, 0, 80);
		}
	},
}, 'peach');

var BigMario = Hero.extend({
	init: function(x, y, level) {
		this._super(x, y, level);
		this.direction = directions.right;
		this.setSize(32, 62);
		this.setImage(images.sprites, 0, 88);
	},
	setVelocity: function(vx, vy) {
		this._super(vx, vy);

        if(vx !== 0) {
			if(!this.setupFrames(9, 2, false, 'WalkRightBig'))
				this.setImage(images.sprites, 32, 88);
		} else if(this.frameTick) {
            this.clearFrames();
			this.setImage(images.sprites, 0, 88);
		}
	},
}, 'bigmario');
请注意(Note that the) BigMario 本来可以避免上课,但实际上那几行比调整常规上课要短((class could have been avoided, but those few lines are actually shorter than adjusting the usual class () Mario ).新角色也将自动添加到关卡编辑器中,这为关卡创建者提供了新的可能性.还要注意一点:这两个类都只包含用于在一个特定方向(左或右)上运行的动画.如果有人考虑使用更复杂的动画,则应该扩展此范围.(). Also the new characters are added automatically to the level editor - which gives level creators new possibilities. Also one remark: Both classes only contain animations for running in one specific direction (left or right). This should be extended if one thinks about more sophisticated animations.)
现在,我们在游戏中有了对应的角色,我们就可以在实际(Now that we have the corresponding characters in the game we can work on the actual) Animation 类.在不讨论太多代码的情况下,我们可以先来看一下:(class. Without talking much about the code we can have one look first:)
var Animation = Level.extend({
    init: function (id) {
        this.world = $('#' + id);
		this.setPosition(0, 0);
        this.input = [];
        this.speeches = [];
        this.currentSpeeches = [];
        this.animations = [];
        this.currentAnimations = [];
        this.cycles = 0;
        this.maxCycles = 0;
		this.reset();
    },
    load: function(level) {
        this._super(level);
        this.onend = level.onend || function() {};
        this.maxCycles = Math.ceil(level.duration / constants.interval);

        for(var i = 0; i < level.characters.length; i++) {
            var character = level.characters[i];
            var figure = new (reflection[character.name])(character.x, character.y, this);

            for(var j = 0; j < character.speeches.length; j++) {
                var speech = character.speeches[j];
                this.speeches.push({
                    figure: figure,
                    start: Math.floor(speech.start / constants.interval),
                    end: Math.floor(speech.end / constants.interval),
                    text: speech.text
                });
            }

            for(var j = 0; j < character.animations.length; j++) {
                var animation = character.animations[j];
                var obj = {
                    figure: figure,
                    start: Math.floor(animation.start / constants.interval),
                    end: Math.floor(animation.end / constants.interval)
                };

                for(var key in animation) {
                    if(obj[key] === undefined)
                        obj[key] = animation[key];
                }

                this.animations.push(obj);
            }
        }

        this.speeches.sort(function(a, b) {
            return b.start - a.start;
        });

        this.animations.sort(function(a, b) {
            return b.start - a.start;
        });
    },
    createSpeech: function(s) {
		var pos = s.figure.view.position();
        s.element = $(DIV).addClass('speech-bubble').appendTo(this.world).text(s.text).css({
			left: pos.left - 90,
			top: pos.top - s.figure.view.height() - 40
		});
    },
    removeSpeech: function(index) {
        var s = this.currentSpeeches[index];
        s.element.remove();
        this.currentSpeeches.splice(index, 1);
    },
    createAnimation: function(a) {
        if(a.x !== undefined) {
            var dx = (a.x - a.figure.x) / (a.end - a.start);
            var dy = a.figure.vy;
            a.figure.setVelocity(dx, dy);
        }

        if(a.background !== undefined) {
            a.figure.setImage(a.background.image, a.background.x, a.background.y);
        }
    },
    removeAnimation: function(index) {
        var a = this.currentAnimations[index];

        if(a.x !== undefined) {
            a.figure.setVelocity(0, a.figure.vy)
        }

        this.currentAnimations.splice(index, 1);
    },
    tick: function () {
        var i = 0, figure;

        if(this.cycles === this.maxCycles) {
            this.onend();
            this.pause();
            return;
        }

        for(i = this.currentSpeeches.length; i--; ) {
            if(this.currentSpeeches[i].end === this.cycles)
                this.removeSpeech(i);
			else if(this.currentSpeeches[i].figure.vx !== 0) {
				this.currentSpeeches[i].element.css({
					left: '+=' + this.currentSpeeches[i].figure.vx
				});
			}
        }

        for(i = this.currentAnimations.length; i--; ) {
            if(this.currentAnimations[i].end === this.cycles)
                this.removeAnimation(i);
        }

        while(this.speeches.length && this.speeches[this.speeches.length - 1].start === this.cycles) {
            var speech = this.speeches.pop();
            this.createSpeech(speech);
            this.currentSpeeches.push(speech);
        }

        while(this.animations.length && this.animations[this.animations.length - 1].start === this.cycles) {
            var animation = this.animations.pop();
            this.createAnimation(animation);
            this.currentAnimations.push(animation);
        }

		for(i = this.figures.length; i--; ) {
			figure = this.figures[i];
			figure.move();
			figure.playFrame();
		}

		for(i = this.items.length; i--; ) {
			this.items[i].playFrame();
        }

        this.cycles = this.cycles + 1;
    },
});
因此,这基本上是(So this is basically another implementation of the) Level 类.这次我们重写了类似的方法(class. This time we rewrote methods like) tick() ,只是为了完全按照我们的方式处理动画(这不包括任何命中检测和其他内容,目前对于我们的目的而言不是必需的).如果仔细看一下代码,我们会看到类似(, just to handle animations exactly our way (this excludes any hit-detections and other stuff, that is not required for our purpose right now). If we have a close look at the code we see methods like) createSpeech() 和(and) createAnimation() 弹出.创建这些方法是为了确保动画序列中的两个可能动作.(pop up. Those methods have been created to ensure two possible actions in our animation sequences.)
- 演讲/说话的人物之一(One of the characters giving a speech / talking)
- 角色之一做某事,例如向一个方向走(One of the characters doing something like walking in one direction)
这个课程的水平看起来如何?好吧,与真实关卡没有什么不同,即我们在这里也有一个关卡数组,还有一些属性,例如(How does a level for this class exactly look like? Well, not differently from a real level, i.e. we have also a level array here and some properties like)
width和(and)background.另外,我们必须设置角色并为其分配动画和语音.这是一个例子:(. Additionally we have to set up characters and assign them animations and speeches. Here is an example:)
var endingLevel = {
    /* The start is the same as in ordinary levels */
    onend: function() { }, //This one is new - a callback if the animation has ended
    duration: 16000, //The total duration of the animation - this is when the callback is executed
    characters: [ //Our array of characters
        { // First character
            name: 'bigmario', // what is the name of the character in the reflection array ?
            x: -30, // the starting position
            y: 96,  // x and y coordinates in px
            speeches: [
                {
                    start: 7500, // start at 7.5 s
                    end: 10500, // end at 10.5 s
                    text: 'Oh Daisy!' // this text will be displayed
                }
            ],
            animations: [
                {
                    start: 2500, // start at 2.5 s
                    end: 4100, // end at 4.1 s (duration = 1.6 s)
                    x: 100 // this will be the position in the end: 100px
                },
                /* and more animations */
            ]
        },
        /* and more characters */
    ],
};
关于这些泡泡的最后一句话.我们使用了CSS类(One final note to those speech bubbles. We’ve used the CSS class) speech-bubble 用于语音对象.该类背后的CSS代码如下:(for the speech objects. The CSS code behind this class is the following:)
.speech-bubble {
    position: absolute; padding: 20px; margin: 1em 0 3em; color: #000; background: #fdfdfd; text-align: center;
    border-radius: 100px; width: 160px; height: 25px; z-index: 100; font-size: 1.3em; border: 1px solid #ccc;
}
.speech-bubble:after {
    content: ""; display: block; position: absolute; bottom: -14px; left: 92px; width: 0;
    border-width: 15px 15px 0; border-style: solid; border-color: #fdfdfd transparent;
}
这是一个棘手的难题. CSS专家很久以前发现,边界规则的一个属性实际上非常有用:它们直接连接.这意味着什么?好吧,考虑一个简单的正方形(假设10px x 10px).现在,我们在每侧设置一个简单的边框,每个边框1px.现在我们的正方形实际上是12px x 12px(我们现在使用标准CSS框大小,而不是IE大小,即更直观的大小,可以通过(This one is tricky tricky tricky. CSS gurus found out a long time ago that the one property of the border rules is actually quite useful: they connect directly. What does that mean? Well, consider a simple square (let’s say 10px x 10px). We now set a simple border with 1px on each side. Now our square is actually 12px x 12px (we use the standard CSS box-sizing now, not the IE one, i.e. the more intuitive one, which can be used via) box-sizing: border-box; ).这很简单.如果我们设置(). This is simple. What if we set the) border-top 到0px?好吧,我们有一个12px x 11px的框,左上和右上的边框看起来有些平滑.现在,我们增加边框的宽度(但顶部的边框保持在0px).我们看到三角形出现在左上角和右上角.让我们做一些有线的事情,降低盒子的面积(从10开始(to 0px? Well we have a 12px x 11px box and the border on the left-top and right-top look a little bit smoothen. Now we increase the width of the border (but the border on the top side stays at 0px). We see triangles emerging on the top-left and top-right corners. Let’s do something wired and lower the area of the box (going from 10)2(2)简单地1).我们看到这将是一个三角形! OK:长话短说,我们甚至可以将面积设置为零(宽度为0到高度为0)并获得一个真实的三角形.使用此技巧(可能还有其他技巧),我们可以创建许多可能的形状.很棒的页面是(to simply 1). We see that this is going to be a triangle! OK: Long story short we can even set the area to zero (with 0 width a 0 height) and obtain a real triangle. Using this trick (and maybe various others) we can create a lot of possible shapes. A great page is) 在线访问CSS-Tricks.com(online at CSS-Tricks.com) .(.)
兴趣点(Points of Interest)
实际上,OpenAuth集成非常重要,因为它减少了注册过程的麻烦.有些人只是为每个页面注册,但是大多数人试图通过只创建需要他们的帐户来最小化他们的在线帐户.例如,如果需要Twitter API密钥,则必须进行Twitter注册.即使是非常简单直接的注册表格(例如用于Mario5平台的表格),对大多数人来说显然也是痛苦的.因此,OpenAuth在使用户尝试或使用Web应用程序动画方面大有帮助.(The OpenAuth integration is actually quite important because it decreases friction of the registration process. Some people just register for every page, but most people try to minimize their online account number by making only accounts where an account is necessary for them. One example would be the obligatory Twitter registration if one needs a Twitter API key. Even really straight forward registration forms (like the one used for the Mario5 platform) are obviously painful for most people. Therefore the OpenAuth helps a lot in animating users to try or use the web application.) 您可以在线播放完整版(You can play the full version online at) mario5.florian-rappl.de(mario5.florian-rappl.de) .(.)
历史(History)
- v1.0.0(v1.0.0)|初始版本2012年1月8日.(| Initial release | 01.08.2012.)
- v1.1.0(v1.1.0)|包含的动画| 02.08.2012(| Included animations | 02.08.2012)
- v1.1.1(v1.1.1)|修正了一些错别字| 03.08.2012(| Fixed some typos | 03.08.2012)
许可
本文以及所有相关的源代码和文件均已获得The Code Project Open License (CPOL)的许可。
Javascript CSS HTML CSS3 C# MVC jQuery ASP.NET Dev 新闻 翻译