UNITY 3D –游戏编程–第9部分(译文)
By robot-v1.0
本文链接 https://www.kyfws.com/games/unity-d-game-programming-part-8-zh/
版权声明 本博客所有文章除特别声明外,均采用 BY-NC-SA 许可协议。转载请注明出处!
- 27 分钟阅读 - 13371 个词 阅读量 0UNITY 3D –游戏编程–第9部分(译文)
原文地址:https://www.codeproject.com/Articles/890716/UNITY-D-Game-Programming-Part-8
原文作者:Vahe Karamian
译文由本站 robot-v1.0 翻译
前言
The ninth article in a series to discuss Unity 3D and how to get started with your own 3D projects.
该系列的第9篇文章讨论Unity 3D以及如何开始自己的3D项目.
介绍(Introduction)
在文章的第9部分中,我们将介绍游戏整体外观的更多增强功能.具体来说,我们将介绍一个主菜单,声音效果和视觉效果!增强我们的小游戏的吸引力!(In part nine of the article we will introduce more enhancements to the overall look and feel of our game. Specifically speaking, we will introduce a main menu, sound effects, and visual effects! Enhancing the appeal of our little game!) 如果您尚未这样做,请花一点时间阅读:(If you have not already done so, please take a moment and read:)
-
Unity 3D –游戏编程–第9部分(Unity 3D – Game Programming – Part 9)
Unity 3D网络文章:(Unity 3D Networking Article(s):)
-
Unity 3D-网络游戏编程(Unity 3D - Network Game Programming) Unity 3D Leap Motion和Oculus Rift文章:(Unity 3D Leap Motion and Oculus Rift Article(s):)
-
Unity 3D-Leap Motion集成(Unity 3D - Leap Motion Integration) 在本系列的第一部分中,我们从Unity 3D环境的基础知识入手.感受一下IDE以及将在整个项目中使用的不同部分.我们还介绍了如何使用设计器中的工具将不同的变换应用于选定的游戏对象:定位,旋转和缩放.最后,我们研究了如何创建第一个脚本,并使用该脚本在多维数据集的Y轴上应用了旋转变换.(In the first part of the series we started by the very basics of the Unity 3D environment. Getting a feel of the IDE and the different sections which you will be working with throughout your project. We also covered how to use the tools in the designer to apply different transformation to a selected Game Object: positioning, rotation and scaling. We finally looked at how to create our first script and using the script apply a rotation transform on the Y-Axis of our cube.) 在本系列的第二部分中,我们研究了通过编码对给定对象进行的更多转换.我们还研究了如何创建对于场景中的对象渲染至关重要的光源.(In the second part of the series, we looked at more of the transformation of a given object through coding. We also looked at how to create light sources that are crucial for the rendering of your objects in the scene.) 在本系列的第三部分中,我们研究了如何通过键盘处理用户输入,并根据键码采取了特定的操作.(In the third part of the series we looked at how to process user input through the keyboard and based on the key code take particular actions.) 在本系列的第四部分中,我们着眼于创建一个简单的用户界面.我们开发的用户界面为我们提供了一种向用户反馈的方式,并且为用户提供了输入我们的游戏或模拟游戏的另一种方法.(In the fourth part of the series, we looked at creating a simple user interface. The user interface that we developed provided us a means to feedback to the user, and also another method for the user to input to our game or simulation.) 在第五部分,我们开始了一个简单游戏的想法.我们还研究了如何将3D模型导入游戏引擎.(In the fifth part, we started the idea of a simple game. We also looked at how to import 3D models into the game engine.) 在第六部分中,我们扩展了我们的游戏构想,使其更加有趣和完整.我们介绍了有关游戏和游戏设计的几个概念,并为我们的游戏创建了一个简单的用户界面.(In the sixth part, we expanded on our game idea and making it more interesting and more complete. We introduced several concepts regarding game play and game design as well as created a simple user interface for our game.) 在第七部分中,我们回答了第6部分中提出的一些问题.(In the seventh part, we answered some of the questions that got raised in Part 6.) 在第八部分中,我们为玩家创造了更好的用户体验以及视觉效果.(In the eighth part, we creating a better user experience and also visuals for our players.) 在系列的第9部分中,我们将继续增强小游戏的视觉效果.我们还将为游戏引入一个开始菜单,用户可以在其中选择一些选项并确定我们的游戏难度.此外,还将有声音效果和视觉效果来增强游戏的整体外观.(In part nine of the series, we will continue on enhancing the visual effects of our little game. We will also be introducing a start menu for the game where the user can select some options and also determine the difficulty of our game. In addition, there will be sound effects and visual effects to enhance the overall look and feel of the game.)
游戏编程简介:使用C#和Unity 3D(Introduction to Game Programing: Using C# and Unity 3D*) (Paperback)*)(平装)( 要么(or*) (eBook)*)(电子书)( 是为帮助对计算机科学和游戏编程领域感兴趣的个人而设计和开发的.它旨在说明计算机编程的概念和基础.它使用简单游戏的设计和开发来说明和应用这些概念.(is designed and developed to help individuals that are interested in the field of computer science and game programming. It is intended to illustrate the concepts and fundamentals of computer programming. It uses the design and development of simple games to illustrate and apply the concepts.) [ 
](http://www.lulu.com/commerce/index.php?fBuyContent=18159441) 书号:9780997148404(ISBN: 9780997148404) 版本:第一版(Edition: First Edition) 发行人:Noorcon Inc.(Publisher: Noorcon Inc.) 英语语言(Language: English) 274页(Pages: 274) 装订:装订完美的平装本(彩色)(Binding: Perfect-bound Paperback (Full Color)) 尺寸(英寸):6宽x 9高(Dimensions (inches): 6 wide x 9 tall) -
 |
||电子书(ePUB)(eBook (ePUB))
书号(ISBN):9780997148428(ISBN: 9780997148428)
版本:第一版(Edition: First Edition)
发行人:Noorcon Inc.(Publisher: Noorcon Inc.)
英语语言(Language: English)
|
||电子书(ePUB)(eBook (ePUB))
书号(ISBN):9780997148428(ISBN: 9780997148428)
版本:第一版(Edition: First Edition)
发行人:Noorcon Inc.(Publisher: Noorcon Inc.)
英语语言(Language: English)
| 大小:9.98 MB(Size: 9.98 MB) |
|---|
|
|可从:(Available From:) 


 |
|
Windows Phone 8.x演示:(Windows Phone 8.x Demo:)
我提供了一个免费的电话应用程序,您可以在Windows Phone上下载和预览演示.要下载移动应用程序,请点击以下链接:(I have provided a free phone application that you can download and preview the demos on your Windows Phone. To download the mobile application, follow the link:) CodeProjectArticleSample(CodeProjectArticleSample)
![]() 代码项目文章示例移动应用(Code Project Articles Sample Mobile App)
代码项目文章示例移动应用(Code Project Articles Sample Mobile App)
文章代码和视觉效果的实时预览:(Live Preview of Article Code and Visuals:)
 链接到实时预览:(Link to live preview:) http://www.noorcon.com/CodeProject/CodeProjectArticlePreview.html(http://www.noorcon.com/CodeProject/CodeProjectArticlePreview.html)
背景(Background)
**注意:(NOTE:)**对于这个粒子,我将使用Expression Design创建一些简单的菜单和按钮或其他可视组件,这些组件将用于增强游戏的视觉吸引力!(For this particle, I will be using Expression Design to create some simple menus and buttons or other visual components, which will be used to enhance the visual appeal of the game!) **注意:(NOTE:)**对于这个粒子,我将使用SketchUp创建一些简单的构建基块,并将其导入到Unity中!我不是3D建模者或设计师,因此请耐心等待,请原谅!(For this particle, I will be using SketchUp to create some simple building blocks, which I will use to import into Unity! I am not a 3D Modeler or Designer, so please be patient and excuse the mess!) 假定本文的读者通常熟悉编程概念.还假定读者具有C#语言的理解和经验.还建议本文的读者也熟悉面向对象的编程和设计概念.我们将根据需要在本文中简要介绍它们,但是由于它们完全是单独的主题,因此我们将不对其进行详细介绍.我们还假设您有学习3D编程的热情,并且具有3D图形和矢量数学的基本理论概念.(It is assumed that the reader of this article is familiar with programming concepts in general. It is also assumed that the reader has an understanding and experience of the C# language. It is also recommended that the reader of the article is familiar with Object-Oriented Programming and Design Concepts as well. We will be covering them briefly throughout the article as needed, but we will not get into the details as they are separate topics altogether. We also assume that you have a passion to learn 3D programming and have the basic theoretical concepts for 3D Graphics and Vector Math.) 最后,本文使用Unity 3D版本4.6.1,这是截至初始发布日期的最新公共发行版.该系列中讨论的大多数主题都将与旧版本的游戏引擎兼容,也许还与应该在今年某个时候发布的新版本兼容.但是,有一个主题与当前版本的游戏引擎相比在当前4.6.1版本中有显着差异,那就是UI(用户界面)管道.这是由于引擎中的新UI架构远远优于我们在此版本之前所拥有的.首先,我对新的UI架构感到非常满意.(Lastly, the article uses Unity 3D version 4.6.1 which is the latest public release as of the initial publication date. Most of the topics discussed in the series will be compatible with older versions of the game engine, and perhaps also the new version which is supposed to be release sometime this year. There is however, one topics which is significantly different in the current 4.6.1 version compared to the older version of the game engine, and that is the UI (User Interface) pipeline. This is due to the new UI architecture in the engine which is far superior to what we had prior to this release. I for one, am very happy with the new UI architecture.)
使用代码(Using the code)
下载文章系列的项目/源代码:(Downloading the project/source code for article series:) 下载源(Download source) .(.) 随着每篇连续的文章的提交,项目/源代码也将不断扩展.新的项目文件和源文件将包括该系列中的较早部分.(With each consecutive article that is submitted, the project/source code will be also expanding. The new project files and source files will be inclusive of older parts in the series.) **注意:(NOTE:)**要获取最新代码,请转至该系列中最新发布的部分并下载代码.(To get the latest code, go to the most recent published part in the series and download the code.)
改善游戏(Improving the Game)
在第8部分中,我们设计并开发了一种大炮,这种大炮的行为就像是玩家的障碍物.加农炮的设计是根据我们逻辑内定义的一些随机规格来发射加农炮弹.我们还讨论了声音以及如何在游戏中添加声音.(In part 8, we designed and developed a cannon that was supposed to behave kind of like an obstacle for the player. The cannon was designed to shoot cannon balls based on some random specifications that were defined within our logic. We also discussed sound and how to add sound to our game.) **注意:(NOTE:)**我们没有涵盖有关音频的所有内容.这是一个广泛而广泛的话题,因此,它留给读者自己进一步研究.(We did not cover everything regarding Audio. It is a large and broad topic, therefore, it is left for the reader to pursue it further on their own.)
金币模型(Model for Gold Coins)
无论您的项目大小,它的最重要方面之一就是视觉部分.对于第8部分之前的金币,我们使用了(No matter how small or large your project is, one of the most important aspects of it will be the visual part. For our gold coins up to part 8, we used a)**胶囊原始(Capsule Primitive)**并为其分配了我们在前面系列文章中定义的材料.(and assigned it a material which we defined in the previous series of the articles.)
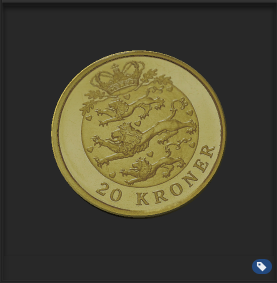
我决定用更具吸引力的东西代替我们的硬币模型.有许多免费的3D模型可供您在项目中使用.我决定购买一个免费的金币模型.(I have decided to replace our coin model with something much more appealing. There are many 3D models available for free that you can use in your projects. I decided to grab a free gold coin model.)
|
|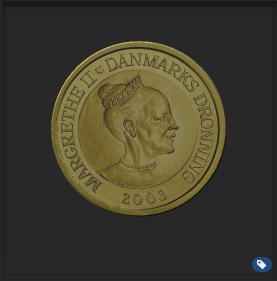
我不认识你,但我相信这比我们以前的好多了!无论如何,该模型都包含在您的下载源中.(I don’t know about you, but I believe this looks much nicer then what we had previously! In any case, the model is included in the download source for you.) 原始模型在(The original model is under the)楷模(models)文件夹并命名为(folder and is named)特卫`克朗(TyveKrone).对于我们的游戏,我必须对原始模型进行一些修改,因此,我创建了一个新的Prefab并将其放置在以下文件夹中:(. For our game, I had to make several modifications to the original model, therefore, I created a new Prefab and placed it under the following folder:)预制件->零件9->金币(prefabs->part_9->Gold_Coin)在下面(under the)资产(Assets)夹.(folder.) 您将注意到有关预制件的几件事:(Several things you will note about the prefab:)
-
规模增加了10倍!这是因为原始模型由于其原始单位和尺寸而非常小.因此,为了使其适合我们的游戏,我必须将其放大10倍.(The scale has been increased by a multiple of 10! This is because the original model was very small due to its original units and also dimension. Therefore, to make it feasible for our game, I have to scale it up by a factor of 10.)
-
它在其X轴上旋转90度.(It is rotate 90 degrees on its X-Axis.)
-
我附上了(I attached it a)球形对撞机(Sphere Collider),并设置其(, and set its)是触发(Is Trigger)至(to)真正(True).另外,(. Also, the)半径(Radius)设定为(is set to)0.01(0.01)在对撞机上.添加了此对撞机,以便它调用处理on Trigger Enter的事件.(on the collider. This collider was added so that it calls the event that handles the on Trigger Enter.)
-
预制脚本还附加了两个脚本:(Two scripts have also been attached to the prefab:)GoldCoinRotation.cs(GoldCoinRotation.cs)和(and)Coin.cs(Coin.cs).之间的唯一区别(. The only difference between)**GoldCoinRotation.cs(GoldCoinRotation.cs)**和(and the)**rotationCoin.cs(rotateCoin.cs)**脚本是旋转轴.由于新模型Axis与原始硬币原始模型有所不同,因此我决定制作一个新脚本,该脚本将仅对新模型应用旋转,而不会破坏文章的旧部分.(script is the rotation axis. Since the new model Axis are different then our original coin primitive, I decided to make a new script that will apply the rotation just for the new model without breaking the old parts of the articles.)**Coin.cs(Coin.cs)**跟我们以前一样(is the same as what we had before.)
为了使我们能够使用新模型,我们所需要做的就是替换模型上的参考.(In order for us to use the new model, all we need to do it replace the reference on the)playerInput.cs(playerInput.cs)新模型的脚本.因此,我们的Coin Prefab参考应该指向我们的GoldCoin Prefab.(script with the new model. So our Coin Prefab reference should point to our GoldCoin Prefab.)
为Cannon/Cannon Ball添加声音FX(Adding Sound FX to the Cannon / Cannon Ball)
为了使我们的游戏更有趣,可以向其中添加一些声音效果.特别是在发射炮弹时!向我们的项目添加简单的声音效果真的非常简单.首先,我们需要确定游戏所需的音效类型和类型,然后我们需要自己创建这些音效或获取已经存在的音效.(To make our game more interesting, it would be nice to add some sound effects to it. Especially when the cannon ball is fired! It is really very simple to add simple sound effects to our project. First, we need to decide what kind and what type of sound effects we want for our game, then we need to either create these sound effects ourselves, or get some that already exist.) 我想要一种加农炮音效,因此,我在网上做了一些搜索,并想出了一个令我满意的效果.我将用于该系列文章的所有音频都放在了(I want a cannon sound effect, therefore, I did some search online and came up with one that I was pleased with. I placed all of the audio that I have used for the article series under the)音讯(audio)夹.在音频文件夹中,您会注意到一个名为(folder. In the audio folder, you will notice a file called)炮弹(CannonBall),这是我的声音,将用于炮弹射击效果.(, this is my sound that will be used for the cannon ball shooting effect.) 为了将这种音频整合到我们的游戏中,我们需要修改我们的(In order to incorporate this audio in our game, we need to modify our)炮弹预制(CannonBall Prefab).您将需要添加一个新的(. You will need to add a new)音频源组件(Audio Source Component)到预制.一旦有了音频源组件,您要做的就是将(to the prefab. Once, you have the Audio Source component, all you need to do is to associate the)音频剪辑(Audio Clip)属性设置为音频文件夹(在本例中为CannonBall)下的实际音频剪辑(声音文件).选中标记(property to the actual audio clip (sound file) under the audio folder, in this case, CannonBall. Check mark the)醒着玩(Play On Awake)属性,并确保(property, and make sure that the)循环(Loop)属性为假.我们只希望音频在唤醒时播放一次;那就是对象实际被初始化的时候!(property is false. We only want the audio to be played once on awake; that is when the object actually gets initialized!)
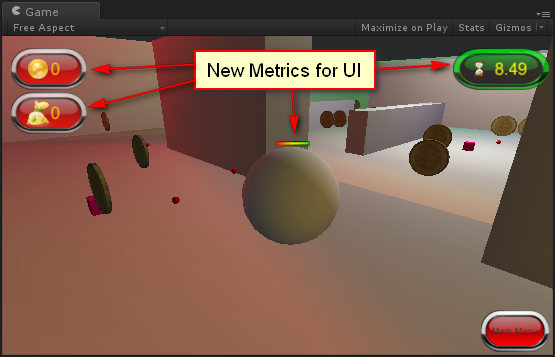
向用户界面添加更多指标(Adding More Metrics to the User Interface)
我们的用户界面设计中已经有两个指标:(We already had two metrics in our user interface design: the)得分了(score)和(and the)计时器(timer).得分是收集到的所有硬币的总和,计时器很好,这是玩家收集金币的剩余时间.我向用户界面引入了两个新指标:(. The score was the sum of all coins collected, and the timer was well, the time left for the player to collect the gold coins. I have introduced two new metrics to the user interface:)收集的硬币数量(number of coins collected)和一个(and a)健康吧(health bar)为玩家.(for the player.)
收集的硬币数量没有说明可做,因为它显示了玩家在游戏中收集了多少硬币,因此引入了健康栏,作为衡量和显示玩家健康状况的一种手段.这是由于我们在游戏中将大炮和大炮球作为障碍物.因此,如果玩家被炮弹击中,他/她将受到伤害,因此其健康状况将下降.(Number of coins collected has no explaining to do, as it is displaying how many coins the player has collected in the game, the health bar is introduced as a means to measure and display the health of the player. This is due to the cannon and the cannon balls we implemented as an obstacle in the game. So if the player gets hit by a cannon ball he/she will be damaged and therefore their health will decrease.)
我将不介绍如何实现收集的硬币数量,因为它很简单,并且遵循与前两个指标得分和时间相同的逻辑和UI设计.(I will not cover how to implement the number of coins collected, as it is simple and follows the same logic and UI design as our previous two metrics score and time.)
我将介绍为播放器提供的健康栏的实现和UI设计,因为有多种方法可以执行此操作.同样,对于像我们这样的简单游戏,我将使用最简单的实现方式.(What I will cover is the implementation and the UI design of the health bar for our player as there are several ways to do this. Again, for a simple game such as ours, I will use the simplest means of implementing.)
我们来看一下为播放器实现健康栏表示的一种方法.另请注意,我添加了一些其他图标以使其更具吸引力.(Let’s take a look and see one way of implementing the representation of the health bar for the player. Also note, that I have added a few more icons to make it more eye appealing.)
设计和实施健康栏(Designing and Implementing the Health Bar)
我将向您展示做健康吧的最简单方法之一!确实没有比这更简单的了.我要实现的运行状况栏将为矩形,并且将包含两个图形部分.第一个是框架,第二个将是代表健康栏的实际颜色.(I am going to show you one of the simplest ways to do a health bar! It really can’t get any simpler than this. The health bar I want to implement is going to be rectangular and it is going to have two graphical parts to it. The first will be the frame, and the second will be the actual color(s) representing the health bar.)
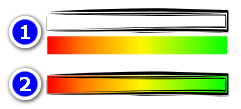
图4-健康栏图像(Figure 4-Health Bar Images)
图4展示了我的健康栏的外观.从技术上讲,它将由两个单独的图像组成,一个代表框架,另一个代表实际的健康状况栏.将两者结合在一起时,您将获得如图4中数字2所示的效果.(Figure 4 demonstrates the look of my health bar. Technically it will be comprised of two separate images, one representing the frame and the other the actual health bar. When the two are combined together, you will get the effect as indicated by number 2 in Figure 4.)
回到Unity 3D的IDE,我们要在播放器上方显示健康栏.为此,我们需要附加一个(Going back to Unity 3D’s IDE, we want to display the health bar above the player. In order to achieve this, we need to attach a)画布UI(Canvas UI)反对我们的角色扮演者,并更改(object to our character player, and change the)渲染模式(Render Mode)归因于(attribute to)世界空间(World Space)从(from)屏幕空间覆盖(Screen Space Overlay).这将根据健康条在3D世界中的位置进行渲染,并且不会从相机的眼睛中将其渲染为场景中的任何其他对象.接下来要做的是重置它,使其相对于角色播放器的中心定位.您将更改(. This will render the health bar according to its location in the 3D world, and it will not be rendered as any other object in the scene from the eyes of the camera. The next thing you would do is to reset it so that it is positioned relative to the center of the character player. You would change the)矩形变换(Rect Transform)到以下内容:(to the following:)(0,0,0)((0,0,0))分别在(x,y,z)轴上.默认情况下,(respectively on the (x,y,z) axis. By default the actual size of the)帆布(Canvas)与您的世界相比,它将会变得非常大,因此调整此效果的最佳方法不是减少(is going to be very large compared to your world, so the best way to adjust this, is not by reducing the)**高度(Height)**和(and the)宽度(Width),因为这是实际的分辨率,所以您不想降低该分辨率,可以使用(, as that is the actual resolution, you don’t want to reduce that, you will use the)比例向量(Scale Vector)进行相应的缩放,因此在我的情况下,我将"画布"缩小到(to scale accordingly, so in my case, I have scaled the Canvas down to)(0.03,0.03,1)((0.03, 0.03, 1))在(x,y,z)轴上.(on the (x,y,z) axis.)
上述步骤是可视化运行状况栏的关键.我们还没有完成,我们需要添加两个(The steps described above are the key to the visual implementation of the health bar. We are not done yet, we need to add two)图片界面(Image UI)对象到我们的画布,每种图像类型一个.继续添加两个(objects to our canvas, one for each image type. Go ahead and add two)图片界面(Image UI)对象,第一个将引用表示实际健康状况条的图像精灵,第二个将引用代表我们的健康状况条的图像精灵.(objects, the first one will reference the image sprite that will represent the actual health bar, and the second will reference the image sprite that represents the frame for our health bar.)
您的结构应类似于以下内容:(Your structure should look something like the following:)
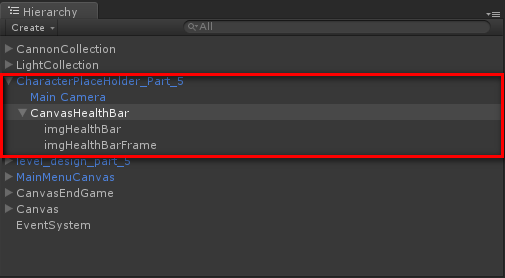
图5-附加在玩家角色上的HealthBar画布(Figure 5-HealthBar Canvas Attached to Player Character) 您将需要调整每个图像对象上的Rect变换,以将它们相应地放置在播放器上.就我而言,以下是Rect转换数字:(You will need to adjust the Rect Transform on each image object to place them accordingly over the player. In my case, the following are the Rect Transform numbers:)
-
两个图像的锚点都设置在中间.(Anchor for both images are set to the center.)
-
X,Y和Z位置分别设置为0\20和0.(The X, Y and Z positions are set to 0, 20, and 0 respectively.)
-
imgHealthBar的宽度和高度设置为10x1(The width and height of imgHealthBar is set to 10x1)
-
imgHealthBarFrame的宽度和高度设置为10x2(The width and height of imgHealthBarFrame is set to 10x2)
如您所见,除了帧的宽度和高度为10x2外,所有属性都是相同的.框架必须大于其容纳的框架.顺序在这里也很重要(As you can see all of the attributes are the same with the exception of the width and height of the frame which is 10x2. The frame need to be bigger than what it contains. The order is also important here,)imgHealthBar(imgHealthBar)将在之前渲染(will be rendered before)imgHealthBarFrame(imgHealthBarFrame),因此框架将始终位于健康栏的顶部.另请注意,我们没有触及比例因子!这是因为Canvas将为我们完成工作!(, and hence the frame will be always on top of the health bar. Also notice that we did not touch the scale factor! This is because the Canvas will do the work for us!) 您将需要执行另一重要步骤.对于(There is one more important step that you will need to do. For)imgHealthBar(imgHealthBar)UI对象,在(UI object, under the)图像(脚本)组件(Image (Script) Component)改变(change the)图像类型(Image Type)从(from)简单(Simple)至(to)填充(Filled),同时更改(, also change the)填充方式(Fill Method)至(to)卧式(Horizontal)和(, and the)填充原点(Fill Origin)至(to)剩下(Left),还要确保(, also make sure that the)填充量(Fill Amount)设定为(is set to)1个(1),即使我们还是通过脚本进行了设置.(, even though we set this through the script anyway.) 最后一步是从脚本中引用我们的健康栏并能够对其进行控制.为此,我们需要引入一些新变量.我使用整数存储玩家的健康值,并使用另一个Image类型的变量来引用UI Canvas中的imgHealthBar.(The last step is to reference our health bar from our script and be able to control it. In order to do this, we need to introduce a few new variables. I use an integer to store the player’s health value and another variable of type Image to reference imgHealthBar in the UI Canvas.) 这是完整的脚本清单(Here is the full script listing for)playerInput.cs(playerInput.cs):(:)
using UnityEngine;
using UnityEngine.UI;
using System.Collections;

public class playerInput : MonoBehaviour {

 public Text lblScore;   	// text UI element for displaying score
 public Text lblTimer;   	// text UI element for displaying timer
 public Text lblNumOfCoins;  	// text UI element for displaying coins collected

 public Canvas endGameCanvas; 	// Canvas holding UI elements for End of Game

 public Text lblEndOfGameScore;
 public Text lblEndOfGameTime;
 public Text lblEndOfGameCoinCont;

 public GameObject coinPrefab; 	// variable used to store the coin prefab

 public GameObject hitEffect;

 private int score;    		// internal score variable

 public int health;    		// keep track of player health
 public Image healthBar;   	// visual health bar for player

 public int SCORE
 {
  get{ return this.score; }
 }

 private float levelTime;   	// variable holing time to complete level
 private float timeLeft;    	// variable for the actual timer count down

 public bool END_GAME;    	// variable indicating end of game

 public int numOfCoinsInLevel;  	// will be initialized at the Start of the game
 public int numOfCoinsCollected;  	// will be incremented each time we collect a coin

 // Use this for initialization
 void Start () {

  //GameObject _GM = GameObject.Find ("_GameMaster") as GameObject;

  Debug.Log (GameMaster.GameMode);

  if (this.healthBar != null)
   this.healthBar.fillAmount = 1.0f;

  this.health = 100;

  #region COIN CREATION
  // This checks to make sure we have the prefab, also so that it does not break previous code
  if(this.coinPrefab!=null){
   // we need to create the coins dynamically per region
   // Coins for Region 1
   for (int i=0; i<16; i++) {
    // Fill the Top part of Region 1
    if(i<4){
     GameObject coin = GameObject.Instantiate(this.coinPrefab,
                      		new Vector3(Random.Range(-4.5f, 4.5f), 0.25f, Random.Range(3.0f, 4.5f)),
                                this.coinPrefab.transform.rotation) as GameObject;
     coin.name = "R1TopC"+i;
    }
    // Fill the Bottom part of Region 1
    if(i>3 && i<8){
     GameObject coin = GameObject.Instantiate(this.coinPrefab,
                                new Vector3(Random.Range(-4.5f, 4.5f), 0.25f, Random.Range(-4.5f, -3.0f)),
                                this.coinPrefab.transform.rotation) as GameObject;
     coin.name = "R1BottomC"+i;
    }
    // Fill the Left part of Region 1
    if(i>7 && i<12){
     GameObject coin = GameObject.Instantiate(this.coinPrefab,
                                new Vector3(Random.Range(-4.5f, -3.0f), 0.25f, Random.Range(-4.5f, 4.5f)),
                                this.coinPrefab.transform.rotation) as GameObject;
     coin.name = "R1LeftC"+i;
    }
    if(i>11 & i<16){
     GameObject coin = GameObject.Instantiate(this.coinPrefab,
                                new Vector3(Random.Range(3.0f, 4.5f), 0.25f, Random.Range(-4.5f, 4.5f)),
                                this.coinPrefab.transform.rotation) as GameObject;
     coin.name = "R1RightC"+i;
    }

   }

   // Coins for Region 2
   for (int i=0; i<4; i++) {
    GameObject coin = GameObject.Instantiate(this.coinPrefab,
                                new Vector3(Random.Range(-2.0f, 2.0f), 0.25f, Random.Range(1.5f, 2.0f)),
                                this.coinPrefab.transform.rotation) as GameObject;
    coin.name = "R2C"+i;
   }

   // Coins for Region 3
   for (int i=0; i<4; i++) {
    GameObject coin = GameObject.Instantiate(this.coinPrefab,
                                new Vector3(Random.Range(-2.0f, 2.0f), 0.25f, Random.Range(-0.5f, 0.5f)),
                                this.coinPrefab.transform.rotation) as GameObject;
    coin.name = "R3C"+i;
   }

   // Coins for Region 4
   for (int i=0; i<4; i++) {
    GameObject coin = GameObject.Instantiate(this.coinPrefab,
                                new Vector3(Random.Range(-2.0f, 2.0f), 0.25f, Random.Range(-2.0f, -1.5f)),
                                this.coinPrefab.transform.rotation) as GameObject;
    coin.name = "R4C"+i;
   }
  }
  #endregion

  this.score = 0;
  this.levelTime = Time.time + Random.Range (30.0f, 60.0f);
  this.numOfCoinsCollected = 0;

  this.END_GAME = false;

  if (this.endGameCanvas != null) {
   this.endGameCanvas.gameObject.SetActive (false);
  }

  // check to make sure labels are defined before updating
  if (this.lblScore != null)
   this.lblScore.text = this.score.ToString();

  if (this.lblTimer != null)
   this.lblTimer.text = string.Format("{0:F2}", this.levelTime - Time.time);

  if (this.lblNumOfCoins != null)
   this.lblNumOfCoins.text = this.numOfCoinsCollected.ToString ();

  // get number of coins in the scene at the start of the game
  this.numOfCoinsInLevel = GameObject.FindGameObjectsWithTag ("coin").Length;

 }

 // Update is called once per frame
 void Update () {
  if (!this.END_GAME) {

   // compute time left
   this.timeLeft = this.levelTime - Time.time;

   // update UI label for timer
   if (this.lblTimer != null){
    this.lblTimer.text = string.Format("{0:F2}", this.timeLeft);
   }

   // check to see if we need to end the game based on the timer
   if(this.timeLeft<=0.00f || this.numOfCoinsInLevel<=this.numOfCoinsCollected){
    this.END_GAME = true;

    if (this.lblTimer != null && this.lblEndOfGameTime != null){

     if(this.timeLeft>=0.00f){
      this.lblTimer.text = string.Format("{0:F2}", this.timeLeft);
      this.lblEndOfGameTime.text = string.Format("{0:F2}", this.timeLeft);
     }else{
      // this else block is written to ensure that if the timer is up, we always get 0.00
      // and not positive or negative values, i.e. 0.01, or -0.01 and etc...
      this.lblTimer.text = string.Format("{0:F2}", 0.00f);
      this.lblEndOfGameTime.text = string.Format("{0:F2}", 0.00f);
     }
    }

    if(this.lblEndOfGameScore != null && this.lblEndOfGameCoinCont != null){
     this.lblEndOfGameScore.text = this.SCORE.ToString();
     this.lblEndOfGameCoinCont.text = this.numOfCoinsCollected.ToString();
    }

   }

   // code for the movement of player (CP) forward
   if(Input.GetKey(KeyCode.UpArrow)){
    this.transform.Translate(Vector3.forward * Time.deltaTime);
   }
   // code for the movement of player (CP) backward
   if(Input.GetKey(KeyCode.DownArrow)){
    this.transform.Translate(Vector3.back * Time.deltaTime);
   }
   // code for the movement of player (CP) left
   if(Input.GetKey(KeyCode.LeftArrow)){
    this.transform.Rotate(Vector3.up, -5);
   }
   // code for the movement of player (CP) right
   if(Input.GetKey(KeyCode.RightArrow)){
    this.transform.Rotate(Vector3.up, 5);
   }
  }else{
   if(this.endGameCanvas != null){
    this.endGameCanvas.gameObject.SetActive(true);
   }
  }

 }

 // This event will be raised by object that have their Is Trigger attributed enabled.
 // In our case, the coin GameObject has Is Trigger set to true on its collider.
 void OnTriggerEnter(Collider c){

  // used to detect if we collided with a coin GameObject
  if(c.tag.Equals("coin")){
   Coin coin = c.GetComponent<Coin>();

   // increase score
   this.score += coin.VALUE;
   this.numOfCoinsCollected += 1;

   // update score on the UI
   if (this.lblScore != null)
    this.lblScore.text = this.score.ToString();
   if(this.lblNumOfCoins != null)
    this.lblNumOfCoins.text = this.numOfCoinsCollected.ToString();

   // remove the Coin object from the scene
   Destroy(c.gameObject);
  }

  // used to detect if we collided with a cannon ball GameObject
  if (c.tag.Equals ("cannon_ball")) {
   string info = string.Format("{0}-{1}", c.name, "CANNON BALL!!!");

   Debug.Log(info);

   this.health -= 10;

   // remove the cannon ball object from the scene after a hit
   Destroy(c.gameObject);

   if(this.hitEffect!=null)
   {
    GameObject fx = GameObject.Instantiate(GameMaster.GM.playerHitFx,
                                           this.transform.position,
                                           this.transform.rotation) as GameObject;

    if(this.healthBar != null){
     this.healthBar.fillAmount = (this.health / 100.0f);
    }
   }
  }
 }

 public void butPlayAgain_Click(){

  // get all object of type coin
  /*GameObject[] coins = GameObject.FindGameObjectsWithTag ("coin");

  // remove eahc object from the scene
  foreach (GameObject coin in coins){
   Destroy(coin);
  }

  Start ();*/

  Application.LoadLevel (Application.loadedLevelName);
 }
}
如果您一直关注该系列,那么您应该已经非常熟悉此代码.唯一的主要变化是(You should already be very familiar with this code if you have been following the series. The only main change is in the)OnTriggerEnter(对撞机c)(OnTriggerEnter(Collider c))功能.并且可以处理与炮弹的碰撞.如果我们打炮弹,则会降低玩家的生命值,还会实例化表示爆炸效果的预制件.(function. And that handles the collision with the cannon balls. If we hit a cannon ball, we reduce the health of the player and also instantiate a Prefab that represents an explosion Effect.)
创建游戏菜单(Creating a Game Menu)
下一步是为游戏创建一个主菜单.因此,我使用了现有场景并将其保存为新场景.然后,我删除了场景中不会使用的不必要的游戏对象.即玩家角色.为了更好地组织场景,我创建了两个(The next step is to create a main menu for the game. So I used our existing scene and saved it as a new scene. Then I removed the unnecessary game object that would not be used in the scene. Namely the player character. To organize the scene better, I created two)空的游戏对象(Empty GameObjects)并将它们命名为:(and named them the following:)大炮收藏(CannonCollection)和(and)LightCollection(LightCollection).我都搬了(. I moved all)大炮游戏对象(Cannon GameObjects)在下面(under the)大炮收藏(CannonCollection)和所有(and all)PointLight游戏对象(PointLight GameObjects)在下面(under the)LightCollection(LightCollection).由于这些场景是静态的,因此最好以这种方式组织它们,并在场景中减少混乱(. Since these are static in the scene it would be better to organize them this way and create less clutter in the)层次窗口(Hierarchy Window).(.)
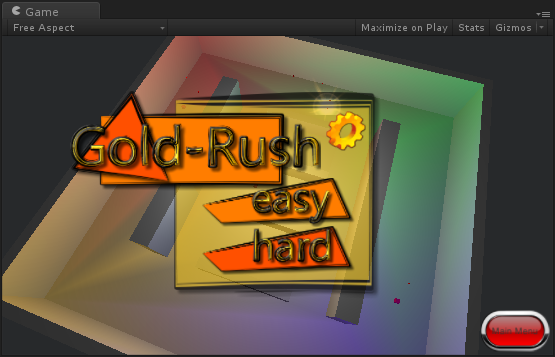
图6-主游戏菜单(Figure 6-Main Game Menu) 我使用Expression Design为菜单和按钮设计了一些UI设计元素.我创建了几个单独的Canvas UI对象来处理UI元素.用我的精灵根据自己的喜好配置它们,并为每个按钮关联正确的事件处理程序.(I used Expression Design to come up with some UI design elements for my menus and buttons. I created couple of separate Canvas UI objects to handle the UI elements. Used my sprites to configure them to my likings and associating the proper event handlers for each button.) **注意:(NOTE:)如果您还没有学习过UI元素,请参阅本系列的较早部分以获取有关如何实现和构造UI元素的详细说明.(Please refer to older parts in the series for a detailed explanation of how to achieve and construct your UI elements if you have not studied them already.) 一个新的GameObject叫做(A new GameObject called)_GameMaster(_GameMaster)已经在现场介绍了.尽管实现非常简单,但此处的概念很重要.的(has been introduced in the scene. The concept here is important albeit the implementation is very simple. The)_GameMaster GameObject(_GameMaster GameObject)是一个(is an)空GameObject(Empty GameObject)用一个叫做(with a script called)**GameMaster.cs(GameMaster.cs)**附加到它.(attached to it.) 注意:(NOTE:)****_GameMaster GameObject的要点是我希望您从这里摘掉的概念.而且它是通过简单的方式完成的,在更复杂的游戏中,实际的_GameMaster会更加复杂.(The main point of the _GameMaster GameObject is the concept that I want you to take away from here. And it is done in a simple way, in more complex game, the actual _GameMaster would be much more complex.) 通常来说,游戏管理员将控制和管理游戏的所有相关部分.这包括玩家,敌人,音频,声音效果,视觉效果以及游戏中的任何其他相关对象.基本上它将是将所有主要组件粘合在一起的主要类!您的Game Master实施将取决于您的OOD/OOP技能.我不会在本文中介绍这些内容,因为这只是示例.(Usually speaking, the Game Master will be controlling and managing all of the relevant parts of your game. This includes, the player, the enemies, the audio, the sound effects, the visual effects, and any other relevant object in your game. Basically it is going to be the main Class that will glue all major components together! Your Game Master implementation will come down to really your OOD/OOP skills. I won’t be covering those in this article, as this is just a sample.) 让我们来看看(Let’s take a look at the)**GameMaster.cs(GameMaster.cs)**脚本:(script:)
using UnityEngine;
using UnityEngine.UI;
using System.Collections;

public class GameMaster : MonoBehaviour {

 public static GameMaster GM;

 public static int GameMode;

 public GameObject playerHitFx;
 public GameObject cannonBallFireFx;

 public Image progressBar;
 public Canvas loadingPanelCanvas;

 // Use this for initialization
 void Start () {
  GameMaster.GM = this;
  DontDestroyOnLoad (this);

  if (this.progressBar != null)
   this.progressBar.fillAmount = 0.0f;
 }

 // Update is called once per frame
 void Update () {

  if (this.progressBar != null) {
   this.progressBar.fillAmount = Application.GetStreamProgressForLevel("part_9_game");
  }

  if (Application.CanStreamedLevelBeLoaded ("part_9_game")) {
   if(this.loadingPanelCanvas!=null)
    this.loadingPanelCanvas.enabled = false;
  }

 }

 public void butEasy(){
  GameMaster.GameMode = 0;
  this.LoadGame ();
 }

 public void butHard(){
  GameMaster.GameMode = 1;
  this.LoadGame ();
 }

 private void LoadGame(){
  if (Application.CanStreamedLevelBeLoaded ("part_9_game")) {
   Application.LoadLevel ("part_9_game");
  }
 }
}
这里发生了几件事,让我们更仔细地看看它们.我想专注于代码中最重要的部分.第一个是静态变量.第一个是类型(Several things are happening here, let’s take a look at them more closely. I want to concentrate on the most important sections of the code. The first being the static variables. The first one is of type)游戏大师(GameMaster)叫(called)通用汽车(GM),第二个是type(, and the second one is of type)整型(int)叫(called)游戏模式(GameMode).这两个变量是静态的,因为它们在游戏的整个生命周期中都不会改变.(. These two variable are static because they will not change throughout the life span of the game.) **注意:(NOTE:)代码很脏,可以改进!(The code is dirty, and can be improved!) 下一个重要部分是(The next important section is the)开始()(Start())功能.在里面(function. In the)开始()(Start())我们正在设置的功能(function we are setting the)通用汽车(GM)关键字的变量(variable to the keyword)这个(this),代表的实例(, representing the instance of the)游戏大师(GameMaster)目的.然后我们使用称为(object. Then we are using the function called)DontDestroyOnLoad(this);(DontDestroyOnLoad (this);)告诉游戏引擎从内存加载或卸载场景时不要破坏引用的GameObject.换句话说,(which tells the game engine to not destroy the referenced GameObject when loading or unloading scenes from the memory. In other words, the)_GameMaster GameObject(_GameMaster GameObject)除非游戏结束或我们在代码中手动销毁它,否则一旦销毁就不会销毁.(once in memory will not be destroyed unless the game ends or we manually destroy it in the code.) 在第8部分中我们没有涉及的是特定级别的流负载.您可以在(Something we did not cover in part 8 is the stream loading of a particular level. You can see the implementation of this in the)更新()(Update())功能.以下内置功能(function. The following built in function)Application.CanStreamedLevelBeLoaded(" <场景名称>");(Application.CanStreamedLevelBeLoaded ("<scene_name>");)返回介于(return a value between)0和1(0 and 1),此值代表(, this value represents the)百分比(%)(percentage (%))为特定场景加载的必要GameObject的数量.当您在线和通过网络部署游戏时,这非常有用.随着您的游戏变得越来越复杂,游戏的大小将会增加.也就是说,随着资产的增加和场景的复杂化,游戏文件的大小将相应增加.拥有2GB至3GB范围的项目文件夹不要感到惊讶!(of the necessary GameObjects loaded for a particular scene. This is very useful when you are deploying games online and over the network. As you game becomes more complex, the size of your game is going to increase. That is, as your assets increase and your scenes become more complex, the size of your game file is going to increase accordingly. Do not be surprise to have a project folder in the 2GB to 3GB range!) 在我们的案例中,我们没有太多复杂的模型和纹理,因此我们的模型和纹理尺寸对于游戏来说非常小,但是,由于我们引入了一些声音效果和视觉效果,因此项目的大小相应地增加了.特别是对于音频部分,因为这是占用大量空间的主要资产!(In our case, we don’t have a lot of complex models and textures, so our model and texture size is super small for the game, but, since we introduced some sound effects and visual effects, the size of our projects has increased accordingly. Especially for the audio part, since that is the main asset that takes much space!) 在实施(The implementation in the)更新()(Update())功能将确保在所有资产都下载到用户的计算机上之前,我们不会加载游戏级别.(function will make sure that we don’t load our game level until all assets have been downloaded to the user’s machine.)
兴趣点(Points of Interest)
本文引入了许多新概念.还要注意,即使我们已经为游戏模式放置了代码,我们实际上并没有使用它来调整游戏的玩法.这是我希望您进行的工作,同时也请您提供一些改进方面的反馈.(A lot of new concepts have been introduced in this article. Also notice that even though we have placed the code for the game mode, we are not actually using it to adjust our game play. This is something that I would like you to work on and also give some feedback on improvements on your own.) 该代码的结构不好,可以更好地进行整理和整理.我想听听您关于如何改进和/或实现您的版本的信息.(The code is not well structured and can be cleaned up and organized much better. I would like to hear from you on how you have improved and or implemented your version.)
历史(History)
这是该系列的第九篇文章,我将慢慢为Code Project社区做出贡献.(This is the ninth article of a series which I would slowly contribute to the Code Project community.)
-
Unity 3D –游戏编程–第9部分(Unity 3D – Game Programming – Part 9)
Unity 3D网络文章:(Unity 3D Networking Article(s):)
-
Unity 3D-网络游戏编程(Unity 3D - Network Game Programming) Unity 3D Leap Motion和Oculus Rift文章:(Unity 3D Leap Motion and Oculus Rift Article(s):)
许可
本文以及所有相关的源代码和文件均已获得The Code Project Open License (CPOL)的许可。
C# .NET Mobile iPhone Android Windows Design Dev 新闻 翻译