UNITY 3D –游戏编程–第10部分(译文)
By robot-v1.0
本文链接 https://www.kyfws.com/games/unity-d-game-programming-part-9-zh/
版权声明 本博客所有文章除特别声明外,均采用 BY-NC-SA 许可协议。转载请注明出处!
- 26 分钟阅读 - 13009 个词 阅读量 0UNITY 3D –游戏编程–第10部分(译文)
原文地址:https://www.codeproject.com/Articles/893407/UNITY-D-Game-Programming-Part-9
原文作者:Vahe Karamian
译文由本站 robot-v1.0 翻译
前言
The tenth article in a series to discuss Unity 3D and how to get started with your own 3D projects.
本系列的第十篇文章讨论Unity 3D以及如何开始自己的3D项目.
介绍(Introduction)
在本系列文章的第十部分中,我们将增强我们的GameMaster.cs代码库,并在游戏过程中为玩家提供一些选择.我还将在游戏中介绍另一个元素.(In part ten of the article series we will enhance our GameMaster.cs code base and also give the player some options in the game play. I will also introduce another element into the game.) 如果您尚未这样做,请花一点时间阅读:(If you have not already done so, please take a moment and read:)
-
Unity 3D –游戏编程–第10部分(Unity 3D – Game Programming – Part 10)
Unity 3D网络文章:(Unity 3D Networking Article(s):)
-
Unity 3D-网络游戏编程(Unity 3D - Network Game Programming) Unity 3D Leap Motion和Oculus Rift文章:(Unity 3D Leap Motion and Oculus Rift Article(s):)
-
Unity 3D-Leap Motion集成(Unity 3D - Leap Motion Integration) 在本系列的第一部分中,我们从Unity 3D环境的基础知识入手.感受一下IDE以及将在整个项目中使用的不同部分.我们还介绍了如何使用设计器中的工具将不同的变换应用于选定的游戏对象:定位,旋转和缩放.最后,我们研究了如何创建第一个脚本,并使用该脚本在多维数据集的Y轴上应用了旋转变换.(In the first part of the series we started by the very basics of the Unity 3D environment. Getting a feel of the IDE and the different sections which you will be working with throughout your project. We also covered how to use the tools in the designer to apply different transformation to a selected Game Object: positioning, rotation and scaling. We finally looked at how to create our first script and using the script apply a rotation transform on the Y-Axis of our cube.) 在本系列的第二部分中,我们研究了通过编码对给定对象进行的更多转换.我们还研究了如何创建对于场景中的对象渲染至关重要的光源.(In the second part of the series, we looked at more of the transformation of a given object through coding. We also looked at how to create light sources that are crucial for the rendering of your objects in the scene.) 在本系列的第三部分中,我们研究了如何通过键盘处理用户输入,并根据键码采取了特定的操作.(In the third part of the series we looked at how to process user input through the keyboard and based on the key code take particular actions.) 在本系列的第四部分中,我们着眼于创建一个简单的用户界面.我们开发的用户界面为我们提供了一种向用户反馈的方式,并且为用户提供了输入我们的游戏或模拟游戏的另一种方法.(In the fourth part of the series, we looked at creating a simple user interface. The user interface that we developed provided us a means to feedback to the user, and also another method for the user to input to our game or simulation.) 在第五部分,我们开始了一个简单游戏的想法.我们还研究了如何将3D模型导入游戏引擎.(In the fifth part, we started the idea of a simple game. We also looked at how to import 3D models into the game engine.) 在第六部分中,我们扩展了我们的游戏构想,使其更加有趣和完整.我们介绍了有关游戏和游戏设计的几个概念,并为我们的游戏创建了一个简单的用户界面.(In the sixth part, we expanded on our game idea and making it more interesting and more complete. We introduced several concepts regarding game play and game design as well as created a simple user interface for our game.) 在第七部分中,我们回答了第6部分中提出的一些问题.(In the seventh part, we answered some of the questions that got raised in Part 6.) 在第八部分中,我们为玩家创造了更好的用户体验以及视觉效果.(In the eighth part, we creating a better user experience and also visuals for our players.) 在系列的第9部分中,我们增强了小游戏的视觉效果.我们还介绍了游戏的开始菜单,用户可以在其中选择一些选项并确定游戏的难度.此外,我们引入了声音效果和视觉效果,以增强游戏的整体外观.(In part nine of the series, we enhanced the visual effects of our little game. We also be introduced a start menu for the game where the user could select some options and also determine the difficulty of the game. In addition, we introduced sound effects and visual effects to enhance the overall look and feel of the game.) 在第十部分中,我们将实现游戏选项功能,该功能将允许用户控制在第9部分中实现的背景噪音的音量和声音效果的音量.此外,我们还将介绍另一种游戏方式元素,如果可以及时捕获健康状况对象,它可以增加我们的健康状况!(In part ten, we are going to implement the game option feature that will allow the user to control the volume of the background noise and the volume of the sound effects we implemented in part 9. In addition, we are going to introduce another game play element, a health bar object to increase our health if we can capture it in time!)
游戏编程简介:使用C#和Unity 3D(Introduction to Game Programing: Using C# and Unity 3D*) (Paperback)*)(平装)( 要么(or*) (eBook)*)(电子书)( 是为帮助对计算机科学和游戏编程领域感兴趣的个人而设计和开发的.它旨在说明计算机编程的概念和基础.它使用简单游戏的设计和开发来说明和应用这些概念.(is designed and developed to help individuals that are interested in the field of computer science and game programming. It is intended to illustrate the concepts and fundamentals of computer programming. It uses the design and development of simple games to illustrate and apply the concepts.) [ 
](http://www.lulu.com/commerce/index.php?fBuyContent=18159441) 书号:9780997148404(ISBN: 9780997148404) 版本:第一版(Edition: First Edition) 发行人:Noorcon Inc.(Publisher: Noorcon Inc.) 英语语言(Language: English) 274页(Pages: 274) 装订:装订完美的平装本(彩色)(Binding: Perfect-bound Paperback (Full Color)) 尺寸(英寸):6宽x 9高(Dimensions (inches): 6 wide x 9 tall) -
 |
||电子书(ePUB)(eBook (ePUB))
书号(ISBN):9780997148428(ISBN: 9780997148428)
版本:第一版(Edition: First Edition)
发行人:Noorcon Inc.(Publisher: Noorcon Inc.)
英语语言(Language: English)
|
||电子书(ePUB)(eBook (ePUB))
书号(ISBN):9780997148428(ISBN: 9780997148428)
版本:第一版(Edition: First Edition)
发行人:Noorcon Inc.(Publisher: Noorcon Inc.)
英语语言(Language: English)
| 大小:9.98 MB(Size: 9.98 MB) |
|---|
|
|可从:(Available From:) 


 |
|
Windows Phone 8.x演示:(Windows Phone 8.x Demo:)
我提供了一个免费的电话应用程序,您可以在Windows Phone上下载和预览演示.要下载移动应用程序,请点击以下链接:(I have provided a free phone application that you can download and preview the demos on your Windows Phone. To download the mobile application, follow the link:) CodeProjectArticleSample(CodeProjectArticleSample)
![]() 代码项目文章示例移动应用(Code Project Articles Sample Mobile App)
代码项目文章示例移动应用(Code Project Articles Sample Mobile App)
文章代码和视觉效果的实时预览:(Live Preview of Article Code and Visuals:)
 链接到实时预览:(Link to live preview:) http://www.noorcon.com/CodeProject/CodeProjectArticlePreview.html(http://www.noorcon.com/CodeProject/CodeProjectArticlePreview.html)
背景(Background)
**注意:(NOTE:)**对于这个粒子,我将使用Expression Design创建一些简单的菜单和按钮或其他可视组件,这些组件将用于增强游戏的视觉吸引力!(For this particle, I will be using Expression Design to create some simple menus and buttons or other visual components, which will be used to enhance the visual appeal of the game!) **注意:(NOTE:)**对于这个粒子,我将使用SketchUp创建一些简单的构建基块,并将其导入到Unity中!我不是3D建模者或设计师,因此请耐心等待,请原谅!(For this particle, I will be using SketchUp to create some simple building blocks, which I will use to import into Unity! I am not a 3D Modeler or Designer, so please be patient and excuse the mess!) 假定本文的读者通常熟悉编程概念.还假定读者具有C#语言的理解和经验.还建议本文的读者也熟悉面向对象的编程和设计概念.我们将根据需要在本文中简要介绍它们,但是由于它们完全是单独的主题,因此我们将不对其进行详细介绍.我们还假设您有学习3D编程的热情,并且具有3D图形和矢量数学的基本理论概念.(It is assumed that the reader of this article is familiar with programming concepts in general. It is also assumed that the reader has an understanding and experience of the C# language. It is also recommended that the reader of the article is familiar with Object-Oriented Programming and Design Concepts as well. We will be covering them briefly throughout the article as needed, but we will not get into the details as they are separate topics altogether. We also assume that you have a passion to learn 3D programming and have the basic theoretical concepts for 3D Graphics and Vector Math.) 最后,本文使用Unity 3D版本4.6.1,这是截至初始发布日期的最新公共发行版.该系列中讨论的大多数主题都将与旧版本的游戏引擎兼容,也许还与应该在今年某个时候发布的新版本兼容.但是,有一个主题与当前版本的游戏引擎相比在当前4.6.1版本中有显着差异,那就是UI(用户界面)管道.这是由于引擎中的新UI架构远远优于我们在此版本之前所拥有的.首先,我对新的UI架构感到非常满意.(Lastly, the article uses Unity 3D version 4.6.1 which is the latest public release as of the initial publication date. Most of the topics discussed in the series will be compatible with older versions of the game engine, and perhaps also the new version which is supposed to be release sometime this year. There is however, one topics which is significantly different in the current 4.6.1 version compared to the older version of the game engine, and that is the UI (User Interface) pipeline. This is due to the new UI architecture in the engine which is far superior to what we had prior to this release. I for one, am very happy with the new UI architecture.)
使用代码(Using the code)
下载文章系列的项目/源代码:下载源.(Downloading the project/source code for article series: Download source.) 随着每篇连续的文章的提交,项目/源代码也将不断扩展.新的项目文件和源文件将包括该系列中的较早部分.(With each consecutive article that is submitted, the project/source code will be also expanding. The new project files and source files will be inclusive of older parts in the series.) **注意:(NOTE:)**要获取最新代码,请转至该系列中最新发布的部分并下载代码.(To get the latest code, go to the most recent published part in the series and download the code.)
实施游戏选项(Implementing the Game Options)
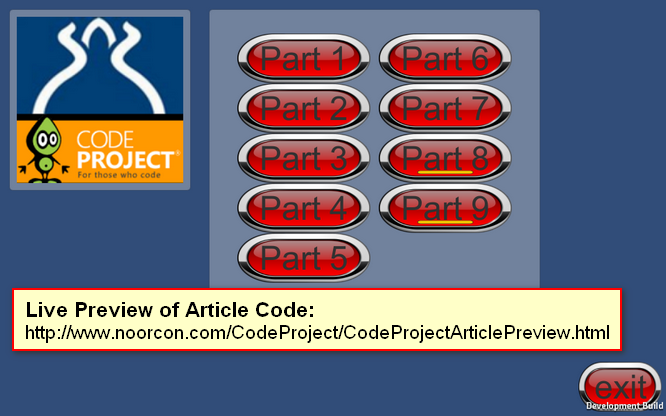
您可能已经从第9部分中注意到,在主菜单中有一个图标,该图标通常与给定应用程序中的设置/选项相关联.在第10部分中,我们将实现按钮,该按钮将负责游戏中的"选项菜单".(You might have noticed from Part 9 that in the main menu there is an icon which is usually associated with settings / options in a given application. In Part 10 we are going to implement the button that will be responsible for our Options Menu in the game.)

图1主菜单截屏,显示选项(Figure 1-Screenshot of Main Menu with Options Showing)
图1显示了游戏主菜单的完整UI(用户界面).为了实现图示的界面,我必须在现有的UI Canvas中添加一些UI元素.我将继续列出这些要素,但不会讨论基础知识.有关概念,请参阅第4部分和第5部分.(Figure 1 display the full UI (User Interface) for our game’s main menu. In order to implement the illustrated interface, I had to add a few UI elements to our existing UI Canvas. I will go ahead and list the elements, but will not be discussing the basics. Please refer to Part 4 and Part 5 for the concept.)
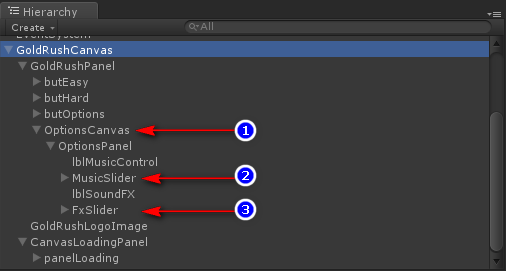
图2-显示画布层次结构的层次结构窗口(Figure 2-Hierarchy Window displaying Canvas Hierarchy) 图2显示了通过文章的第9部分和第10部分实现的GoldRushCanvas的层次结构.第10部分的主要新增内容是用数字表示的项目.注意命名,您会发现命名是通过这种方式完成的,可以使您了解使用了哪些UI组件并将它们相互连接.如果您注意到,有一个(Figure 2 displays the hierarchy of the GoldRushCanvas that was implemented through Part 9 and Part 10 of the articles. The main additions for Part 10 are the items illustrated by the numbers. Pay attention to the naming and you will see that the naming is done in such a way to give you a sense of what UI components have been used and connected to one another. If you notice, there is an)选项画布(OptionsCanvas),这是代表整个选项UI元素的画布.我们拥有此子画布的主要原因是,我们可以通过代码来启用和禁用它. UI元素的其余部分只是(, this is the canvas that represents the whole options UI elements. The main reason we have this child canvas is so that we can enable and disable it through our code. The rest of the UI elements are just children of the)OptinosCanvas(OptinosCanvas).我们有以下内容:(. We have the following:)
-
选项面板(OptionsPanel)
-
lblMusicControl(lblMusicControl)
-
音乐滑块(MusicSlider)
-
lblSoundFx(lblSoundFx)
-
Fx滑块(FxSlider)
选项面板(OptionsPanel)用于包含和组织子元素.(is used to contain and organize the child elements.)lblMusicControl(lblMusicControl)只是显示标题的Text UI对象,所以(is just a Text UI object displaying the caption, and so is)lblSoundFx(lblSoundFx).(.)音乐滑块(MusicSlider)是一个Slider UI对象,将用于控制背景音乐的音量,因此也是(is a Slider UI object that will be used to control the volume of the background music, and so is)Fx滑块(FxSlider).(.) 与往常一样,您将需要为两个滑块创建事件处理程序.因此,继续为两个滑块创建On Value Changed事件.如果您一直按照说明进行操作,并使用了相同的命名和结构,则可以继续并将MainCamera GameObject分配到插槽中.(As always, you will need to create the event handlers for the two sliders. So go ahead and create the On Value Changed event for both sliders. If you have been following along with the instructions and have used the same naming and structure, you can go ahead and assign the MainCamera GameObject into the slot.) **注意:(NOTE:)**在我的项目中(In my project, the)MainCamera GameObject(MainCamera GameObject)包含(contains the)MenuSelection.cs(MenuSelection.cs)处理所有菜单交互的脚本.如果您以其他方式进行操作,则可能会有所不同.(script which handles all of the menu interactions. Yours might be different if you have done it differently.) 现在,在实际分配功能之前,我们将需要创建该功能以处理背景音乐和声音效果的音量.(Now, before you can actually assign a function, we will need to create the function to handle the volume level for both the background music and the sound effects.) 我们将需要更新我们的(We will need to update our)**MenuSelection.cs(MenuSelection.cs)**脚本:(script:)
using UnityEngine;
using UnityEngine.UI;
using System.Collections;

public class MenuSelection : MonoBehaviour {

 public Scrollbar level8progressbar;
 public Scrollbar level9progressbar;

 public Canvas optionsCanvas;
 public Slider gameMusicControl;
 public Slider gameFxControl;

 private bool DISPLAY_OPTIONS;

 // Use this for initialization
 void Start () {
  this.DISPLAY_OPTIONS = false;

  if (this.gameMusicControl != null) {
   this.gameMusicControl.value = GameMaster.gameMusicVolume;
   this.gameObject.audio.volume = GameMaster.gameMusicVolume;
  }

  if (this.gameFxControl != null) {
   this.gameFxControl.value = GameMaster.gameFxVolume;
  }

  if (this.optionsCanvas != null)
   this.optionsCanvas.enabled = this.DISPLAY_OPTIONS;
 }

 // Update is called once per frame
 void Update () {
  if (this.level8progressbar != null) {
   this.level8progressbar.size = Application.GetStreamProgressForLevel("part_8");
  }
  if (this.level9progressbar != null) {
   this.level9progressbar.size = Application.GetStreamProgressForLevel("part_9");
  }

  if (this.optionsCanvas != null)
   this.optionsCanvas.enabled = this.DISPLAY_OPTIONS;
 }

 public void ExitApplication(){
  Application.Quit();
 }

 public void DisplayOptions(){
  this.DISPLAY_OPTIONS = !this.DISPLAY_OPTIONS;
 }

 public void GameSound(){
  GameMaster.gameMusicVolume = this.gameMusicControl.value;
  this.gameObject.audio.volume = GameMaster.gameMusicVolume;
 }

 public void GameFxVolume(){
  GameMaster.gameFxVolume = this.gameFxControl.value;
 }

 public void LoadMainMenu(){
  Application.LoadLevel ("main_menu");
 }

 public void LoadPart1(){
  Application.LoadLevel ("part_1");
 }

 public void LoadPart2(){
  Application.LoadLevel ("part_2");
 }

 public void LoadPart3(){
  Application.LoadLevel ("part_3");
 }

 public void LoadPart4(){
  Application.LoadLevel ("part_4");
 }

 public void LoadPart5(){
  Application.LoadLevel ("part_5");
 }

 public void LoadPart6(){
  Application.LoadLevel ("part_6");
 }

 public void LoadPart7(){
  Application.LoadLevel ("part_7");
 }

 public void LoadPart8(){
  if (Application.CanStreamedLevelBeLoaded("part_8"))
   Application.LoadLevel("part_8");
 }

 public void LoadPart9(){
  if (Application.CanStreamedLevelBeLoaded ("part_9"))
   Application.LoadLevel ("part_9");
 }
}
我在上面的代码中引入了几个变量:(I have introduced several variables in the code above:)options帆布(optionsCanvas)这是一个Canvas对象,(which is a Canvas object,)游戏音乐控制(gameMusicControl)和(and)gameFxControl(gameFxControl)是Slider对象,最后是(which are Slider objects and finally a)显示选项(DISPLAY_OPTIONS)这是布尔类型.(which is a Boolean type.) 的(The)开始()(Start())功能已更新,以确保(function has been updated to make sure that the)options帆布(optionsCanvas)通过设置不显示(does not display by setting the)显示选项(DISPLAY_OPTIONS)变量为false.此变量控制画布的可见性.然后,我们检查是否(variable to false. This variable controls the visibility of the canvas. Then we check to see if the)游戏音乐控制(gameMusicControl)和(and)gameFxControl(gameFxControl)已设置,如果已设置,我们将为其分配所需的初始值.(have been set, and if so, we assign them the desired initial values.) **注意:(NOTE:)我们正在使用(We are using the)游戏大师(GameMaster)类来获取和设置将在整个游戏中使用的变量.(class to get and set variables that will be used throughout the game.) 在里面(In the)更新()(Update())功能,我们检查一下是否(function we check to see if the)显示选项(DISPLAY_OPTIONS)设置为true,如果显示,则显示(is set to true, and if so we display the)options帆布(optionsCanvas).(.) 的(The)显示选项()(DisplayOptions())函数设置值(function sets the value of the)显示选项(DISPLAY_OPTIONS)变量,基本上每次您在用户界面中按下按钮时都会将其反转.(variable, it basically inverts it each time you press the button in the UI.) 的(The)GameSound()(GameSound())和(and the)GameFxVolume()(GameFxVolume())功能用于设置背景音乐和声音效果的内部音量.再次注意,这是通过使用(functions are used to set the internal volume for the background music and sound effects. Again note that this is done using the)游戏大师(GameMaster)目的.(object.) 一旦实现了这些功能并保存了脚本,请继续并将适当的功能分配给通过IDE创建的事件.(Once you have implemented these functions and saved your script, go ahead and assign the appropriate function to the events that you have created through the IDE.)
GameMaster类(The GameMaster Class)
的(The)**GameMaster.cs(GameMaster.cs)**脚本用于保存将在不同时间和场景下在游戏中共享的一些通用数据.的(script is used to hold some of the common data that will be shared across the game at different times and scenes. The)游戏大师(GameMaster)我们的工具非常简单,并没有真正利用单例的概念.我们稍后会讨论.但是该实现确实为演示目的模拟了类似的内容.(we have implements is very simple and it does not really utilize the concept of a singleton. We will get to that at a later time. But the implementation does simulate something similar for the purposes of the demonstration.) 目的(The purpose of the)游戏大师(GameMaster)是集中和共享整个游戏中的公共资源.这些是各种因素,例如游戏结束状态,玩家的健康状况,敌人,航路点,声音管理器,存货,音频等^这实际上取决于您的游戏.简而言之,正是游戏的粘合剂和大脑使所有内容保持同步!(is to centralize and share common resources across the game. These are various things such as the over game state, the player’s health, enemies, way points, sound manager, inventory, audio and etc… it really comes down to your game. But in short, it is the glue and the brain of your game that keeps everything in sync!) 我们的(Our)游戏大师(GameMaster)到目前为止,它非常简单明了,让我们看一下清单:(is very simple and straight forward as of now, let’s take a look at the listing:)
using UnityEngine;
using UnityEngine.UI;
using System.Collections;

public class GameMaster : MonoBehaviour {

 public static GameMaster GM;      // static variable to hols instance of GameMaster

 public static int GameMode;      // variable to define Game Mode
 public static bool EndGame;      // variable to define End of Game

 public static float playerSpeed = 50.0f;  // initial player speed
 public static float gameMusicVolume = 0.75f; // game background music level
 public static float gameFxVolume = 0.75f;  // game sound fx level

 public GameObject playerHitFx;     // visual fx for player hit
 public GameObject cannonBallFireFx;    // visual fx for cannon ball blast off
 public GameObject playerHealthFx;    // visual fx for health up

 public Image progressBar;      // visual representation of level load
 public Canvas loadingPanelCanvas;    // should be moved to MenuSelection.cs

 // Use this for initialization
 void Start () {

  GameMaster.EndGame = false;
  GameMaster.GM = this;
  DontDestroyOnLoad (this);

  if (this.progressBar != null)
   this.progressBar.fillAmount = 0.0f;
 }

 // Update is called once per frame
 void Update () {

  if (this.progressBar != null) {
   this.progressBar.fillAmount = Application.GetStreamProgressForLevel("part_9_game");
  }

  if (Application.CanStreamedLevelBeLoaded ("part_9_game")) {
   if(this.loadingPanelCanvas!=null)
    this.loadingPanelCanvas.enabled = false;
  }

 }

 // this function should be moved to MenuSelection.cs
 public void butEasy(){
  GameMaster.GameMode = 0;
  this.LoadGame ();
 }

 // this function should be moved to MenuSelection.cs
 public void butHard(){
  GameMaster.GameMode = 1;
  this.LoadGame ();
 }

 // this function should be moved to MenuSelection.cs
 private void LoadGame(){
  if (Application.CanStreamedLevelBeLoaded ("part_9_game")) {
   Application.LoadLevel ("part_9_game");
  }
 }
}
剧本(The script)**GameMaster.cs(GameMaster.cs)**已包含在以前的文章发行版中,但我们从未讨论过.花一点时间去上课.这里没有什么专业.如您所见,我们正在定义将在整个游戏中使用的变量.(was included in the previous articles releases but we never discussed it. Take a moment to study the class. Nothing major is going on here. As you can see we are defining variables which we will be using throughout the game.) 让我们看一下显而易见的:(Let’s take a look at the obvious ones:)playerHitFx(playerHitFx),(,)炮弹射击(cannonBallFireFx)和(, and)playerHealthFx(playerHealthFx)是所有GameObject变量,它们将引用我们将在游戏中使用的视觉效果.变量(are all GameObject variables that will be referencing to the visual effects we will be utilizing in our game. The variables)玩家速度(playerSpeed),(,)游戏音乐量(gameMusicVolume)和(and)gameFxVolume(gameFxVolume)是所有浮点变量,分别根据其健康水平,游戏背景音乐水平和声音效果水平来代表玩家的速度.请注意,这些是静态变量.(are all floating point variables that will be representing the player’s speed based on their health level, the game background music level, and the sound effects level respectively. Notice that these are static variables.) 下一个重要的变量是GM变量,其类型为(The next variable with importance is the GM variables that is of type)游戏大师(GameMaster)并定义为静态.这是代表(and is defined as static. This is a variable representing the)游戏大师(GameMaster)对象初始化之后.(object after it has been initialized.) 回去参观(Going back and visiting)**MenuSelection.cs(MenuSelection.cs)**脚本,您会注意到我们正在访问(script, you will notice that we are accessing)游戏大师(GameMaster)获取设置为的音量的初始值(to get the initial values of the sound volumes which are set to)75%(75%)被定义为(defined by)0.75f(0.75f).然后使用此值设置背景音乐和声音效果的实际音量.每次更改/调整滑块时,GameMaster都会跟踪音量级别.(. Then using this value we set the actual volume for our background music and sound effects. Each time the slider is changed / adjusted the GameMaster keeps track of the volume level.) 还有一些功能(There are also some functions,)butEasy()(butEasy())和(and)butHard()(butHard()),用于控制游戏模式.这些功能可能会移至(, defined that are used to control the game mode. These functions would probably be moved to the)**MenuSelection.cs(MenuSelection.cs)**脚本.目前,它们已在GameMaster中实现.(script. At the moment they have been implemented in the GameMaster.)
添加新的游戏元素(Adding a New Game Play Element)
通常,当您在开发和创建软件的项目中工作时,或者实际上,任何事情都不一定仅仅是软件,在设计和实现的整个过程中,您会获得关于如何增强它.好吧,这对于我们的小游戏演示没什么不同.(Usually when you work on a project developing and creating software, or for the matter of a fact anything in general, doesn’t necessarily have to be just software, throughout the process of the design and implementation, you get more and better ideas on how to enhance it. Well, this is not different for our little game demo.) 很少有可以增强游戏玩法的元素.一种是,如果玩家被炮弹击中,他或她将如何恢复健康?另一个是,我们可以引入一个元素来增加时间吗?这两个问题的答案都是肯定的!(There are few elements that can enhance the game play. One is, if the player is hit by the cannon ball, how will he or she be able to increase their health back? Another one is, can we introduce an element to also increase the time? The answer to both of these questions are yes!) 我只执行了其中一项建议.球员被炮弹击中后能够增强自己的健康状况会很不错.因此,我创建了一个新的GameObject来为我们处理.再一次,这不是图形竞赛,我继续并重复了(I have gone and implemented only one of the suggestions. It would be nice for the player to be able to increase their health after they have been hit by a cannon ball. Therefore, I have created a new GameObject to handle this for us. Again since, this is not a graphics competition, I have gone ahead and duplicated the)炮弹(CannonBall)预制并将其重命名为(Prefab and renamed it to)保健球(HealthBall).(.) 但是,在创建完(But, there are several modifications that I have done after I have created the)保健球预制(HealthBall Prefab).首先要做的是更改(. The first thing to do is to change the)标签(Tag)除(property to something other than)炮弹(cannon_ball).那是为(. That is reserved for the)炮弹(CannonBall)预制件,这是我们在脚本中识别它的方式来处理(Prefab and it is how we identify it in our script to handle the)OntriggerEnter()(OntriggerEnter())事件发生(event in)**PlayerInput.cs(PlayerInput.cs)**脚本.所以我创建了一个名为(script. So I created a new tag called)health_ball(health_ball)这将确定我们(that will identify our)保健球(HealthBall)预制件.(Prefab.) 我要做的下一件事是删除(The next thing I did was remove the)**CannonBallSize.cs(CannonBallSize.cs)**脚本并创建了一个名为(script and created a new script called)**HealthBallSize.cs(HealthBallSize.cs)**并将其附加到(and attached it to the)保健球(HealthBall)预制件.脚本中的实际代码是相同的,但是我将它们分开了,因为将来我们可能会让它们做不同的事情.(Prefab. The actual code in the script is the same, but I have separated them because in the future we might have them do different things.) 最后,我创建了一种名为(Finally, I created a new material called)health_ball(health_ball)并使颜色变为绿色.也将此材料附加到(and made the color be green. Also attached this material to the)保健球(HealthBall)预制件替代现有材料.(Prefab replacing the existing material.) 的清单(The listing for)**HealthBallSize.cs(HealthBallSize.cs)**脚本:(script:)
using UnityEngine;
using System.Collections;

public class HealthBallSize : MonoBehaviour {

 public int mass;      // used to scale and also calculate damage

 public AudioClip healthPickUp;   // clip to play after we pick-up health

 // Use this for initialization
 void Start () {

  this.gameObject.audio.volume = GameMaster.gameFxVolume;

  this.mass = Random.Range (1, 3);

  this.transform.localScale = new Vector3 (this.transform.localScale.x * this.mass,
                                           this.transform.localScale.y * this.mass,
                                           this.transform.localScale.z * this.mass);
 }

 // Update is called once per frame
 void Update () {

 }
}
请注意,实例化预制件的规模将基于1到3之间的一个随机数.该值将用于指示预制件的健康程度.(Notice that the scale of the instantiated prefab will be based on a random number between 1 and 3. This value will be used to indicated how much health the)保健球(HealthBall)将提供给玩家.巧合的是,(will provide to the player. Coincidently, the same logic is used in the)**CannonBallSize.cs(CannonBallSize.cs)**脚本,但事实恰恰相反.这将根据玩家的身高决定玩家受到的伤害.(script, but the opposite is true. It will dictate how much damage the player will receive based on the size of the)炮弹(CannonBall).(.) 另请注意,我们正在根据(Also notice that we are adjusting the audio volume based on the)GameMaster.gameFxVolume(GameMaster.gameFxVolume)变量.请记住,我们已经使每个(variable. Remember that we have made each)炮弹(CannonBall)和(and)保健球(HealthBall)发挥爆炸作用(play the explosion effect upon)苏醒()(Awake()).这将确保根据主菜单中用户选项的选择,将Sound FX音量从一个场景转移到另一个场景.(. This will make sure that our Sound FX volume is carried over from scene to scene based on the user option selection in the main menu.) 还创建了一个新脚本,名为(A new script was also created called)LaunchHealthBall.cs(LaunchHealthBall.cs).该脚本负责实例化和管理(. This script is responsible of instantiating and managing the)保健球(HealthBalls)在游戏里.然后将该脚本附加到(in the game. This script was then attached to the)大炮预制(Cannon Prefab),作为(, as the)大炮预制(Cannon Prefab)是预制件,负责管理我们的启动(is the Prefab that manages the launching of our)炮弹(CannonBalls)和(and)保健球(HealthBalls).(.) 上市(Listing of the)LaunchHealthBall.cs(LaunchHealthBall.cs):(:)
using UnityEngine;
using System.Collections;

public class LaunchHealthBall : MonoBehaviour {

 public float canonBallSpeed = 0.5f;  // spped of our cannon ball
 public float rateOfFire = 5.5f;   // cannon blast rate in seconds
 public float fireDelay;

 public GameObject healthBall;   // used to store our health ball prefab
 public GameObject cannonBase;   // used to store our cannon base
 public GameObject cannonStart;   // used to store our cannon nozle starting point

 private GameObject fireObject;

 // Use this for initialization
 void Start () {

  this.canonBallSpeed = Random.Range (3, 4);  // randomize cannon ball speed between 3 and 4
  this.rateOfFire = Random.Range (6.5f, 13.0f); // randomize rate of fire between 3 and 6.5 seconds

  // set a fire delay time for the cannon
  this.fireDelay = Time.time + this.rateOfFire;
 }

 // Update is called once per frame
 void Update () {

  // if the current game running time is larger then our fire delay time, then fire!
  if (Time.time > this.fireDelay){

   // cannon ball speed and rate of fire will be randomly generated based
   // on the defined boundaries ...
   this.canonBallSpeed = Random.Range (3, 4);
   this.rateOfFire = Random.Range (6.5f, 13.0f);

   // re-set our fire delay
   this.fireDelay = Time.time + this.rateOfFire;

   // instantiate our cannon ball at the specified location
   this.fireObject = GameObject.Instantiate(this.healthBall,
                                            this.cannonStart.transform.position,
                                            this.cannonStart.transform.rotation) as GameObject;

   // self-destruct our cannon ball after 10 seconds
   Destroy(this.fireObject, 10.0f);

   // use the physics engine to push/give velocity to our cannon ball
   this.fireObject.rigidbody.velocity = this.cannonStart.transform.TransformDirection(
    new Vector3(0,this.canonBallSpeed,0));

   // used for the FX
   GameObject fx = GameObject.Instantiate(GameMaster.GM.cannonBallFireFx,
                                          this.cannonStart.transform.position,
                                          this.cannonStart.transform.rotation) as GameObject;
   Destroy(fx, 3.0f);
  }

  // rotate the cannon base around its Y-Axis continiously
  this.cannonBase.transform.Rotate (Vector3.up, 10 * Time.deltaTime);

 }
}
该脚本中的所有内容都与(Everything in this script is similar to that of)LaunchCannon.cs(LaunchCannon.cs),除了我们引用的是(, with the exception that we are referencing the)保健球预制(HealthBall Prefab)还有我们的(and also our)Random.Range()(Random.Range())标准不同,这会影响射速.(criteria is different, which effects the rate of fire.)
修改播放器输入(Modification to Player Input)
的(The)**PlayerInput.cs(PlayerInput.cs)**脚本也进行了修改和更新.我决定在播放器的健康栏上方显示实际健康值.因此,有一个引用Text UI对象的变量在需要时更新和显示值.但主要变化是基于(script has been also modified and updated a bit. I have decided to display the actual health value on top of the health bar for the player. So there is a variable referencing the Text UI object to update and display the value whenever needed. But the main changes are based on the)游戏大师(GameMaster)对象来设置适当的音乐音量级别,以及播放器的速度等…(object to set the proper music volume level, and also the player’s speed and etc…) 最后,对(And finally a few modifications to the)PlayerInput.cs(PlayerInput.cs):(:)
using UnityEngine;
using UnityEngine.UI;
using System.Collections;

public class playerInput : MonoBehaviour {

 public Text lblScore;   // text UI element for displaying score
 public Text lblTimer;   // text UI element for displaying timer
 public Text lblNumOfCoins;  // text UI element for displaying coins collected

 public Canvas endGameCanvas; // Canvas holding UI elements for End of Game

 public Text lblEndOfGameScore;
 public Text lblEndOfGameTime;
 public Text lblEndOfGameCoinCont;

 public GameObject coinPrefab; // variable used to store the coin prefab

 private int score;    // internal score variable

 public int health;    // keep track of player health
 public Image healthBar;   // visual health bar for player
 public Text healthBarCaption; // display actual health value over the health bar

 public int SCORE
 {
  get{ return this.score; }
 }

 private float levelTime;   // variable holing time to complete level
 private float timeLeft;    // variable for the actual timer count down

 //public bool END_GAME;    // variable indicating end of game

 public int numOfCoinsInLevel;  // will be initialized at the Start of the game
 public int numOfCoinsCollected;  // will be incremented each time we collect a coin

 // Use this for initialization
 void Start () {

  GameMaster.EndGame = false;
  GameMaster.playerSpeed = 50.0f;

  this.gameObject.audio.volume = GameMaster.gameMusicVolume;

  #if UNITY_EDITOR
  Debug.Log (GameMaster.GameMode);
  #endif
  this.health = 100;

  if (this.healthBar != null)
   this.healthBar.fillAmount = 1.0f;
  if(this.healthBarCaption != null)
   this.healthBarCaption.text = this.health.ToString();

  #region COIN CREATION
  // This checks to make sure we have the prefab, also so that it does not break previous code
  if(this.coinPrefab!=null){
   // we need to create the coins dynamically per region
   // Coins for Region 1
   for (int i=0; i<16; i++) {
    // Fill the Top part of Region 1
    if(i<4){
     GameObject coin = GameObject.Instantiate(this.coinPrefab,
                                              new Vector3(Random.Range(-4.5f, 4.5f), 0.25f, Random.Range(3.0f, 4.5f)),
                                              this.coinPrefab.transform.rotation) as GameObject;
     coin.name = "R1TopC"+i;
    }
    // Fill the Bottom part of Region 1
    if(i>3 && i<8){
     GameObject coin = GameObject.Instantiate(this.coinPrefab,
                                              new Vector3(Random.Range(-4.5f, 4.5f), 0.25f, Random.Range(-4.5f, -3.0f)),
                                              this.coinPrefab.transform.rotation) as GameObject;
     coin.name = "R1BottomC"+i;
    }
    // Fill the Left part of Region 1
    if(i>7 && i<12){
     GameObject coin = GameObject.Instantiate(this.coinPrefab,
                                              new Vector3(Random.Range(-4.5f, -3.0f), 0.25f, Random.Range(-4.5f, 4.5f)),
                                              this.coinPrefab.transform.rotation) as GameObject;
     coin.name = "R1LeftC"+i;
    }
    if(i>11 & i<16){
     GameObject coin = GameObject.Instantiate(this.coinPrefab,
                                              new Vector3(Random.Range(3.0f, 4.5f), 0.25f, Random.Range(-4.5f, 4.5f)),
                                              this.coinPrefab.transform.rotation) as GameObject;
     coin.name = "R1RightC"+i;
    }

   }

   // Coins for Region 2
   for (int i=0; i<4; i++) {
    GameObject coin = GameObject.Instantiate(this.coinPrefab,
                                             new Vector3(Random.Range(-2.0f, 2.0f), 0.25f, Random.Range(1.5f, 2.0f)),
                                             this.coinPrefab.transform.rotation) as GameObject;
    coin.name = "R2C"+i;
   }

   // Coins for Region 3
   for (int i=0; i<4; i++) {
    GameObject coin = GameObject.Instantiate(this.coinPrefab,
                                             new Vector3(Random.Range(-2.0f, 2.0f), 0.25f, Random.Range(-0.5f, 0.5f)),
                                             this.coinPrefab.transform.rotation) as GameObject;
    coin.name = "R3C"+i;
   }

   // Coins for Region 4
   for (int i=0; i<4; i++) {
    GameObject coin = GameObject.Instantiate(this.coinPrefab,
                                             new Vector3(Random.Range(-2.0f, 2.0f), 0.25f, Random.Range(-2.0f, -1.5f)),
                                             this.coinPrefab.transform.rotation) as GameObject;
    coin.name = "R4C"+i;
   }
  }
  #endregion

  this.score = 0;
  this.levelTime = Time.time + Random.Range (30.0f, 60.0f);
  this.numOfCoinsCollected = 0;

  //this.END_GAME = false;

  if (this.endGameCanvas != null) {
   this.endGameCanvas.gameObject.SetActive (false);
  }

  // check to make sure labels are defined before updating
  if (this.lblScore != null)
   this.lblScore.text = this.score.ToString();

  if (this.lblTimer != null)
   this.lblTimer.text = string.Format("{0:F2}", this.levelTime - Time.time);

  if (this.lblNumOfCoins != null)
   this.lblNumOfCoins.text = this.numOfCoinsCollected.ToString ();

  // get number of coins in the scene at the start of the game
  this.numOfCoinsInLevel = GameObject.FindGameObjectsWithTag ("coin").Length;

 }

 // Update is called once per frame
 void Update () {
  if (!GameMaster.EndGame) {

   // compute time left
   this.timeLeft = this.levelTime - Time.time;

   // update UI label for timer
   if (this.lblTimer != null){
    this.lblTimer.text = string.Format("{0:F2}", this.timeLeft);
   }

   // check to see if we need to end the game based on the timer
   if(this.timeLeft<=0.00f || this.numOfCoinsInLevel<=this.numOfCoinsCollected){
    GameMaster.EndGame = true;

    if (this.lblTimer != null && this.lblEndOfGameTime != null){

     if(this.timeLeft>=0.00f){
      this.lblTimer.text = string.Format("{0:F2}", this.timeLeft);
      this.lblEndOfGameTime.text = string.Format("{0:F2}", this.timeLeft);
     }else{
      // this else block is written to ensure that if the timer is up, we always get 0.00
      // and not positive or negative values, i.e. 0.01, or -0.01 and etc...
      this.lblTimer.text = string.Format("{0:F2}", 0.00f);
      this.lblEndOfGameTime.text = string.Format("{0:F2}", 0.00f);
     }
    }

    if(this.lblEndOfGameScore != null && this.lblEndOfGameCoinCont != null){
     this.lblEndOfGameScore.text = this.SCORE.ToString();
     this.lblEndOfGameCoinCont.text = this.numOfCoinsCollected.ToString();
    }

   }

   // code for the movement of player (CP) forward
   if(Input.GetKey(KeyCode.UpArrow)){
    this.transform.Translate(Vector3.forward * Time.deltaTime);
   }
   // code for the movement of player (CP) backward
   if(Input.GetKey(KeyCode.DownArrow)){
    this.transform.Translate(Vector3.back * Time.deltaTime);
   }
   // code for the movement of player (CP) left
   if(Input.GetKey(KeyCode.LeftArrow)){
    this.transform.Rotate(Vector3.up, -5);
   }
   // code for the movement of player (CP) right
   if(Input.GetKey(KeyCode.RightArrow)){
    this.transform.Rotate(Vector3.up, 5);
   }
  }else{
   if(this.endGameCanvas != null){
    this.endGameCanvas.gameObject.SetActive(true);
   }
  }

 }

 // This event will be raised by object that have their Is Trigger attributed enabled.
 // In our case, the coin GameObject has Is Trigger set to true on its collider.
 void OnTriggerEnter(Collider c){

  // used to detect if we collided with a coin GameObject
  if(c.tag.Equals("coin")){
   Coin coin = c.GetComponent<Coin>();

   // increase score
   this.score += coin.VALUE;
   this.numOfCoinsCollected += 1;

   // update score on the UI
   if (this.lblScore != null)
    this.lblScore.text = this.score.ToString();
   if(this.lblNumOfCoins != null)
    this.lblNumOfCoins.text = this.numOfCoinsCollected.ToString();

   // remove the Coin object from the scene
   Destroy(c.gameObject);
  }

  // used to detect if we collided with a cannon ball GameObject
  if (c.tag.Equals ("cannon_ball")) {

   // play the explosion sound fx when we collide
   c.gameObject.GetComponent<AudioSource>().Play();

   #if UNITY_EDITOR
   string info = string.Format("{0}-{1}-{2}", c.name, "CANNON BALL!!!", c.gameObject.GetComponent<CannonBallSize>().mass);
   Debug.Log(info);
   #endif

   // reduce the health
   this.health -= 10 * c.gameObject.GetComponent<CannonBallSize>().mass;

   // also change the speed of the player ... when damaged it will go slower
   GameMaster.playerSpeed += c.gameObject.GetComponent<CannonBallSize>().mass*10; //GameMaster.playerSpeed * c.gameObject.transform.localScale.x;

   #if UNITY_EDITOR
   Debug.Log("SPEED:" + GameMaster.playerSpeed);
   #endif

   // remove the cannon ball object from the scene after a hit
   Destroy(c.gameObject);

   if(GameMaster.GM.playerHitFx != null)
   {
    GameObject fx = GameObject.Instantiate(GameMaster.GM.playerHitFx,
                                           this.transform.position,
                                           this.transform.rotation) as GameObject;

    if(this.healthBar != null){
     this.healthBar.fillAmount = (this.health / 100.0f);
    }
    if(this.healthBarCaption != null){
     this.healthBarCaption.text = this.health.ToString();
    }

    Destroy(fx, 3.0f);
   }
  }

  if (c.tag.Equals ("health_ball")) {

//   c.gameObject.GetComponent<AudioSource>().PlayOneShot(
//    c.gameObject.GetComponent<HealthBallSize>().healthPickUp,
//    GameMaster.gameFxVolume);
//   c.gameObject.GetComponent<AudioSource>().SetScheduledEndTime(2.0f);

   if(this.health<100){
    // reduce the health
    this.health += 10 * c.gameObject.GetComponent<HealthBallSize>().mass;

    // also change the speed of the player ... when damaged it will go slower
    GameMaster.playerSpeed -= c.gameObject.GetComponent<HealthBallSize>().mass*10;
   }

   if(this.health>100)
    this.health = 100;

   if(GameMaster.GM.playerHealthFx != null)
   {
    GameObject fx = GameObject.Instantiate(GameMaster.GM.playerHealthFx,
                                           this.transform.position,
                                           this.transform.rotation) as GameObject;

    if(this.healthBar != null){
     this.healthBar.fillAmount = (this.health / 100.0f);
    }
    if(this.healthBarCaption != null){
     this.healthBarCaption.text = this.health.ToString();
    }

    Destroy(fx, 3.0f);
   }

   // remove the cannon ball object from the scene after a hit
   Destroy(c.gameObject);
  }
 }

 public void butPlayAgain_Click(){

  // get all object of type coin
  /*GameObject[] coins = GameObject.FindGameObjectsWithTag ("coin");

  // remove eahc object from the scene
  foreach (GameObject coin in coins){
   Destroy(coin);
  }

  Start ();*/

  Application.LoadLevel (Application.loadedLevelName);
 }
}
处理炮弹和健康球的工作的主要肉类捕获在(The main meat of the work that handles the cannon ball hit and the health ball hit is captured in the)OnTriggerEnter()(OnTriggerEnter())功能.该代码应该是不言自明的.您会注意到,有一个新条件检查与我们碰撞的对象是否标记为(function. The code should be self-explanatory. You will notice that there is a new condition that checks to see if the object we collided with is tagged as)health_ball(health_ball),如果是,它将执行我们为获得健康而实施的逻辑.(, and if so it performs the logic that we have implemented for gaining health.)

图3-显示游戏的附加内容(Figure 3-Displaying the additions to the game play) 在图3中,您可以看到游戏的新增内容. (1)球员健康状况的数字表示,以及(2)健康球.(In Figure 3, you can see the new additions to the game play. (1) The numerical representation of the player’s health, and (2) the Health Ball.)
兴趣点(Points of Interest)
我们的小游戏发展缓慢,并且越来越有吸引力.需要考虑的事情,您可能希望实现另一个游戏元素,以使玩家能够增加或减少他/她必须抓住金币的时间.(Our little game is taking shape slowly and is becoming more appealing. Something to consider, you may want to implement another game play element to enable the player to increase or decrease the time he/she has to grab the gold coins.) 另外,您可能要实现的另一个想法是创建特殊的隐藏门户,该门户将玩家从一个维度传送到另一个维度,然后再传送回来.这将是对游戏玩法的一个不错的增强.新的维度可能有一些怪物???好吧,天空是极限!您就是自己世界的创造者和建筑师!(Also, another idea you might want to implement would be to create special hidden portals that will transport the player from one dimension to the next and back. This would be a cool little enhancement to the gameplay. The new dimension might have some monsters??? Well, the sky is the limit! And you are the creator and the architect of your own world!)
历史(History)
这是系列文章的第十篇,我将慢慢为Code Project社区做出贡献.(This is the tenth article of a series which I would slowly contribute to the Code Project community.)
-
Unity 3D –游戏编程–第10部分(Unity 3D – Game Programming – Part 10)
Unity 3D网络文章:(Unity 3D Networking Article(s):)
-
Unity 3D-网络游戏编程(Unity 3D - Network Game Programming) Unity 3D Leap Motion和Oculus Rift文章:(Unity 3D Leap Motion and Oculus Rift Article(s):)
许可
本文以及所有相关的源代码和文件均已获得The Code Project Open License (CPOL)的许可。
C# .NET Mobile iPhone Android Windows Design Dev 新闻 翻译