XNA:初学者的介绍(译文)
By robot-v1.0
本文链接 https://www.kyfws.com/games/xna-a-beginner-s-introduction-zh/
版权声明 本博客所有文章除特别声明外,均采用 BY-NC-SA 许可协议。转载请注明出处!
- 12 分钟阅读 - 5972 个词 阅读量 0XNA:初学者的介绍(译文)
原文地址:https://www.codeproject.com/Articles/19633/XNA-A-Beginner-s-Introduction
原文作者:Marc Clifton
译文由本站 robot-v1.0 翻译
前言
Getting started with XNA, Blender, and 3D modeling
XNA,Blender和3D建模入门
介绍(Introduction)
这是有关XNA开发的介绍性文章,讨论了开始使用Blender中创建的简单模型使用XNA Game Studio的工具和最少的代码.(This is an introductory article for XNA development, discussing tools and the minimum amount of code to start using the XNA Game Studio with simple models created in Blender.)
工具类(Tools)
要使用XNA Game Studio编写应用程序(例如游戏),必须下载并安装各种工具.由于Microsoft经常更改其网站,因此不能保证这些链接有效.如果您未进入下载页面,请使用Google使用适当的关键字搜索新链接.(To write applications (such as games) using the XNA Game Studio, you must download and install a variety of tools. Since Microsoft changes its website frequently, these links are not guaranteed to work. If you don’t get to the download pages, use Google to search for the new links using the appropriate keywords.) 本文使用以下内容编写:(This article is written using:)
- 带SP1的Visual Studio C#2005 Express Edition(Visual Studio C# 2005 Express Edition with SP1)
- XNA Game Studio Express 1.0刷新(XNA Game Studio Express 1.0 Refresh)
- XNA Framework 1.0刷新(XNA Framework 1.0 Refresh)
- 搅拌器2.44(Blender 2.44)
- Python 2.51(Python 2.51)
Visual Studio Express(Visual Studio Express)
在撰写本文时,XNA开发只能使用Visual Studio Express进行.(XNA development, as of the writing of this article, can only be done using Visual Studio Express.)
- 下载Visual Studio C#2005 Express Edition(Download Visual Studio C# 2005 Express Edition) 这里(here)
- 下载VS Expression Edition的SP1(Download SP1 for VS Expression Edition) 这里(here) (向下滚动)((scroll down a bit))
XNA(XNA)
XNA开发需要Game Studio Express(GSE)和XNA Framework:(XNA development requires both the Game Studio Express (GSE) and the XNA Framework:)
- 下载XNA Game Studio Express(Download XNA Game Studio Express) 这里(here)
- 下载XNA框架(Download XNA Framework) 这里(here)
建模工具(Modeling Tool)
如果您打算使用XNA做任何"严肃的事情",您将很快发现您需要使用建模工具来创建3D模型.我建议使用Blender(免费)或AutoDesk Maya,价格为2000美元.猜猜我将在本文和其他文章中提到哪种工具?(If you’re going to be doing anything “serious” with XNA, you will quickly discover that you need a modeling tool to create your 3D models. I recommend Blender (which is free) or AutoDesk Maya, which is $2000. Guess which tool I’ll be mentioning in this and other articles?)
- 下载搅拌机(Download Blender) 这里(here)
- 使用Maya个人学习版在Maya上流口水(Drool over Maya using the Maya Personal Learning Edition) 这里(here) Maya PLE不能用于创建XNA模型(据我所知),因为它不能导出为XNA所需的格式.(The Maya PLE cannot be used for creating models for XNA (as far as I know) because it cannot export to the format that XNA requires.)
外挂程式(Plug-Ins)
您可能要利用Blender中使用Python的插件和脚本.(You will probably want to take advantage of plug-ins and scripts in Blender, which use Python.)
- 下载Python(Download Python) 这里(here) Blender会自动检测Python安装,因此您无需进行任何其他工作.(Blender automatically detects the Python installation, so no further work on your part is necessary.)
讲解(Tutorials)
有关XNA和Blender的教程非常丰富,分别有Microsoft和Blender站点以及许多第三方站点上的教程.只是Google,您会发现很多资源.我首先阅读了有关显示3D模型的Microsoft教程.注意我描述的宽高比错误(Tutorials on XNA and Blender are quite abundant and the Microsoft and Blender sites respectively and on numerous third party sites. Simply Google and you will find many resources. I started by going through the Microsoft tutorial on displaying a 3D model. Be aware of the aspect ratio bug which I describe) 这里(here) .这不是致命的,但是如果您使用Microsoft教程作为使用Blender中创建的模型的基础,它将导致对象拉伸.(. It’s not fatal, but it will lead to stretched objects if you use the Microsoft tutorial as a basis for working with models created in Blender.)
创建Windows XNA项目(Creating a Windows XNA Project)
启动Visual Studio C#2005 Express Edition.(Launch Visual Studio C# 2005 Express Edition.)
创建Windows游戏项目(Creating the Windows Game Project)
通过选择Windows游戏项目图标来创建Windows游戏项目:(Create a Windows Game project by selecting the Windows Game project icon:)
 输入项目的名称,然后单击"确定".(Enter a name for the project and click on OK.)
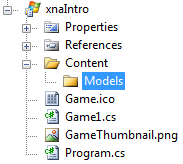
创建模型文件夹(Create a Model Folder)
模型(宇宙飞船,人,物体等)通常生活在(Models (spaceships, people, objects, etc.) typically live in a)**内容\型号(Content\Models)**夹.右键单击该项目,然后添加(folder. Right click on the project and add the)**内容(Content)**文件夹和(folder and)**楷模(Models)**子文件夹,因此您的项目树如下所示:(sub-folder, so your project tree looks like this:)
 如果构建并运行该项目,则将出现一个带有蓝色字段的窗口.(If you build and run this project, you will get a window with a blue field.)
在Blender中创建模型(Create a Model in Blender)
启动Blender. Blender以多维数据集作为初始模型开始,尽管由于您从顶部看多维数据集,所以它看起来像一个正方形:(Launch Blender. Blender starts with a cube as an initial model, although since you’re looking at the cube from the top, it looks like a square:)
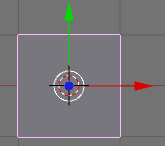 要查看它实际上是一个多维数据集,请单击数字键盘0(启用numlock),您将看到:(To see that it’s actually a cube, click on the numpad 0 (with numlock on) and you will see:)

导出模型(Export the Model)
XNA无法加载Blender文件,因此,必须将Blender模型导出为FBX格式.您可以阅读一些有关FBX的信息(XNA cannot load Blender files, so rather, you must export your Blender model to an FBX format. You can read a little bit about FBX) 这里(here) .基本上,这是由AutoDesk创建的开放标准,与平台无关的3D文件格式.您也可以导出为DirectX(.x)格式,但是这会弹出一个复杂的选项对话框,而FBX导出则不会.(. Basically it’s an open standard, platform independent 3D file format created by AutoDesk. You can also export to DirectX (.x) format, however this brings up a complicated options dialog, whereas the FBX export does not.)
Blender UI对于Windows用户来说有点奇怪,所以这里是演练:(The Blender UI will be a bit weird to Windows users, so here’s the walkthrough:)

- 在顶部的菜单栏上,单击"文件"(不要尝试将键盘与典型的Alt-F组合键一起使用!)(On the menu bar at the top, click on File (do not try to use the keyboard with the typical Alt-F keystroke combo!))
- 向下移动鼠标以导出(Move the mouse down to Export)
- 将鼠标移到Autodesk FBX(Move the mouse over to Autodesk FBX)
- 将出现一个带有两个文本框的对话框,第一个显示路径,第二个输入文件名.单击第二个编辑框,然后键入"多维数据集"(不带引号).(A dialog will appear with two textboxes, the first showing the path and the second for entering the filename. Click on the second edit box and type in “cube” (without the quotes).)
- 单击导出FBX按钮或按两次Enter键.(Click on the Export FBX button or press the Enter key twice.)
将模型导入XNA(Import the Model into XNA)
现在可以将模型导入XNA:(The model is now ready for importing into XNA:)
- 返回到XNA Game Studio,然后右键单击"模型"文件夹,然后选择"添加/现有项目…".(Go back to the XNA Game Studio and right click on the Models folder and select “Add / Existing Item…”.)
- 在文件类型中,选择"内容管道文件"(In the file types, select “Content Pipeline Files”)
- 导航到Blender文件夹,然后选择(Navigate to the Blender folder and select the)**立方体(cube.fbx)**文件.(file.)
添加代码以渲染模型(Add the Code to Render the Model)
渲染模型涉及:(Rendering the model involves:)
- 定义模型在哪里(Defining where the model is)
- 定义相机在哪里(Defining where the camera is)
- 定义相机方向(Defining the camera orientation)
- 将模型加载到内容管道中(Loading the model into the content pipeline)
- 绘制模型(Drawing the model)
所有这些工作将在(All of this work will be done in the)**game1.cs(game1.cs)**文件和(file and the)
Game1类.(class.)
定义模型的位置(Defining Where the Model Is)
为简单起见,将模型放置在世界坐标(0,0,0)处.为模型位置创建一个字段:(For simplicity, the model is placed at world coordinates (0, 0, 0). Create a field for the model position:)
protected Vector3 modelPosition = Vector3.Zero;
定义相机在哪里(Defining Where the Camera Is)
创建摄像机位置的字段:(Create a field for the camera position:)
protected Vector3 cameraPosition = new Vector3(0.0f, 0.0f, 10.0f);
我如何得出这些价值?向量由模型的x,y和z轴位置组成. X为左右,Y为上下,Z为内外.如果查看上面的多维数据集的屏幕截图,您会注意到一个网格.每条网格线代表一个单位,因此立方体的宽度为2个单位,长度为2个单位,高度为2个单位.相机的位置距世界中心(0,0,0)十个单位,这将创建适当大小的立方体渲染.(How did I arrive at these values? The vector consists of the x, y, and z axis position of the model. X is left-right, Y is up-down, and Z is in-out. If you look at the screenshots of the cube above, you will notice a grid. Each grid line represents one unit, therefore the cube is a 2 units wide, 2 units long, and 2 units tall. The camera is position ten units away from the world center (0, 0, 0) which creates a reasonably sized rendering of the cube.)
将模型加载到内容管道中(Loading the Model into the Content Pipeline)
为您的模型创建一个字段:(Create a field for your model:)
protected Model myModel;
在里面(In the) LoadGraphicsContent 方法,加载您的多维数据集模型:(method, load your cube model:)
protected override void LoadGraphicsContent(bool loadAllContent)
{
  if (loadAllContent)
  {
    myModel = content.Load<Model>("Content\\Models\\cube");
  }
}
请注意,您未指定文件扩展名. XNA Game Studio将加载适当的文件,因为模型实际上已编译为与添加到FBX文件中的FBX文件不同的文件扩展名.(Note that you do not specify the file extension. The XNA Game Studio will load the appropriate file, as the model is actually compiled to a different file extension from the FBX file that you added to the)**内容\型号(Content\Models)**文件夹.(folders.) 当我们在这里时,我们还要获取视口(我们的窗口)的纵横比,因为这对于渲染模型是必要的,以便看起来像一个立方体.添加字段:(While we’re here, let’s also get the aspect ratio of the viewport (our window) as this is necessary for rendering the model so that it looks like a cube. Add the field:)
protected float aspectRatio;
然后按照上述方法,计算宽高比:(and, to the above method, calculate the aspect ratio:)
protected override void LoadGraphicsContent(bool loadAllContent)
{
  if (loadAllContent)
  {
    myModel = content.Load<Model>("Content\\Models\\cube1");
  }

  aspectRatio = ((float)graphics.GraphicsDevice.Viewport.Width) /
     ((float)graphics.GraphicsDevice.Viewport.Height);
}
绘制模型(Drawing the Model)
修改(Modify the) Draw 方法,以使其遍历模型网格,适当地平移和旋转它们,等等.(method so that it iterates through the model meshes, translating and rotating them appropriately, etc.)
protected override void Draw(GameTime gameTime)
{
  graphics.GraphicsDevice.Clear(Color.CornflowerBlue);

  Matrix[] transforms = new Matrix[myModel.Bones.Count];
  myModel.CopyAbsoluteBoneTransformsTo(transforms);

  // Draw the model. A model can have multiple meshes, so loop.
  foreach (ModelMesh mesh in myModel.Meshes)
  {
    // This is where the mesh orientation is set, as well as our camera and
    // projection.
    foreach (BasicEffect effect in mesh.Effects)
    {
      effect.EnableDefaultLighting();
      effect.World = transforms[mesh.ParentBone.Index];
      effect.View = Matrix.CreateLookAt(cameraPosition, Vector3.Zero,
         Vector3.Up);
      effect.Projection = Matrix.CreatePerspectiveFieldOfView(
         MathHelper.ToRadians(45.0f), aspectRatio, 1.0f, 10000.0f);
    }

    // Draw the mesh, using the effects set above.
    mesh.Draw();
  }

  base.Draw(gameTime);
}
运行程序时,将在蓝色字段上呈现一个多维数据集:(When you run the program, you will get a cube rendered on the blue field:)
 以下是上述方法的简要说明.这些副主题中的每个主题都应提供我提供的更多描述,但我认为这不在本文的讨论范围之内.(The following is a brief description of what is going on in the above method. Each of these subtopics deserves considerably more description that I have provided, but I feel that is outside the scope of this beginner article.)
骨头(Bones)
上面的代码是游戏中所有模型的基本渲染循环. XNA使用骨骼动画技术,您可以阅读以下内容(The code above is the basic rendering loop for all models in the game. XNA uses a skeletal animation technique which you can read about) 这里(here) .(.)
modelMesh ModelMesh
多维数据集的XNA网格:(The XNA Mesh for the cube:)
 由1组成(consists of 1)
 ModelMeshPart 具有8个顶点的对象,这是立方体中的顶点数(上述模型有51个顶点).(object which has 8 vertices, which is the number of vertices in the cube (the above model has 51 vertices).)
第二个例子是这样的对象:(As a second example, an object like this:)
 (其中四边形网格已转换为一个面的三角形,并且其中一个三角形已被挤出)仍仅表示为一个((in which the quad–square–meshes have been converted to triangles for one face and one of the triangles has been extruded) still is represented as only one)**模型网格(model mesh)**在XNA模型中.(in the XNA model.)
特效(Effects)
这行代码:(This line of code:)
foreach (BasicEffect effect in mesh.Effects)
是一种简短的说法(再次注意,我们正在处理(is an shorthand way of saying (again note we’re dealing with the)**模型(model)**网格部分):(mesh part):)
foreach (ModelMeshPart part in mesh.MeshParts)
{
  BasicEffect effect = (BasicEffect)part.Effect;
  ...
但是,前者经过优化,可以避免多余的设置工作(如果有多个)(However the former is optimized to avoid redundant setup work if more than one) ModelMeshPart 具有相同的效果((shares the same effect () 参考(reference) ).().)
效果属性(Effect Properties)
每个模型网格都是基于以下内容渲染的:(Each model mesh is rendered based on:)
- 它的方向(its orientation)
- 相机的方向(the orientation of the camera)
- 相机视场(the camera field of view) 如以下三个陈述所示:(as expressed by these three statements:)
effect.World = transforms[mesh.ParentBone.Index];
effect.View = Matrix.CreateLookAt(cameraPosition, Vector3.Zero, Vector3.Up);
effect.Projection = Matrix.CreatePerspectiveFieldOfView(
     MathHelper.ToRadians(45.0f), aspectRatio, 1.0f, 10000.0f);
- 的(The)
World属性为该模型网格建立世界矩阵(从模型世界的角度来看),该矩阵通常是父骨骼变换和仅应用于此骨骼的任何局部变换的组合.(property establishes the world matrix for this model mesh (from the perspective of the model’s world), which is typically a combination of the parent bone transforms and any local transforms applied just to this bone.) - 的(The)
View属性确定相机的方向-相机的位置,所处的位置及其方向.(property establishes the orientation of the camera–its position, where it’s looking, and its orientation.) - 的(The)
Projection属性确定摄影机如何将其视图投射到屏幕上-视场,视口的纵横比以及摄影机可以看到的边界(距离):近平面和远平面.(property establishes how the camera projects its view onto the screen–the field of view, the aspect ratio of the viewport, and the boundaries (in distance) of what the camera can see: the near plane and the far plane.) 每个模型网格都需要(Each model mesh requires the)World要设置的属性,以反映父骨骼的任何更改和任何局部更改.的(property to be set to reflect any changes in the parent bone and any local changes. The)View和(and)Projection每当相机位置和方向改变时,都需要设置属性.在这个简单的示例中,我们可以预先计算这些值:(properties need to be set whenever the camera position and orientation changes. In this simple example, we could pre-calculate those values:)
effect.World = transforms[mesh.ParentBone.Index];
effect.View = lookAt;
effect.Projection = projection;
哪里(where) lookAt 和(and) projection 是(are) Matrix 在中初始化的对象(objects initialized in the) LoadGraphicsContent 方法:(method:)
lookAt = Matrix.CreateLookAt(cameraPosition, Vector3.Zero, Vector3.Up);
projection = Matrix.CreatePerspectiveFieldOfView(MathHelper.ToRadians(45.0f),
    aspectRatio, 1.0f, 10000.0f);
动画化模型(Animating the Model)
上面的多维数据集屏幕快照看起来很无聊,根本不像多维数据集.使对象自行旋转是最简单的动画形式之一.下面的代码将绕X和Y轴旋转多维数据集,使其旋转得很好.首先,添加:(The above screenshot of the cube looks utterly boring and not like a cube at all. Getting an object to rotate on its own is one of the simplest forms of animation. The following code will rotate the cube around the X and Y axis, giving it some nice spin. First, add:)
protected float modelRotation = 0.0f;
到(to the) Game1 类.该字段用于保持旋转角度.(class. This field is used for holding the rotational angle.)
在里面(In the) Update 方法,添加行以根据更新之间的经过时间来增加模型旋转:(method, add the line to increment the model rotation based on the elapsed time between updates:)
protected override void Update(GameTime gameTime)
{
  // Allows the game to exit
  if (GamePad.GetState(PlayerIndex.One).Buttons.Back == ButtonState.Pressed)
    this.Exit();

  modelRotation += (float)gameTime.ElapsedGameTime.TotalMilliseconds *
     MathHelper.ToRadians(0.1f);
  base.Update(gameTime);
}
在里面(In the) Draw 方法,修改(method, modify the) World 属性分配以旋转模型网格:(property assignment to rotate the model meshes:)
protected override void Draw(GameTime gameTime)
{
  graphics.GraphicsDevice.Clear(Color.CornflowerBlue);

  Matrix[] transforms = new Matrix[myModel.Bones.Count];
  myModel.CopyAbsoluteBoneTransformsTo(transforms);

  // Draw the model. A model can have multiple meshes, so loop.
  foreach (ModelMesh mesh in myModel.Meshes)
  {
    // This is where the mesh orientation is set, as well as our camera and
    // projection.
    foreach (BasicEffect effect in mesh.Effects)
    {
      effect.EnableDefaultLighting();
      effect.World = transforms[mesh.ParentBone.Index] *
          Matrix.CreateRotationX(modelRotation) *
          Matrix.CreateRotationY(modelRotation);
      effect.View = Matrix.CreateLookAt(cameraPosition, Vector3.Zero,
        Vector3.Up);
      effect.Projection = Matrix.CreatePerspectiveFieldOfView(
        MathHelper.ToRadians(45.0f), aspectRatio, 1.0f, 10000.0f);
    }

    // Draw the mesh, using the effects set above.
    mesh.Draw();
  }

  base.Draw(gameTime);
}
这将创建一个漂亮的旋转立方体:(This creates a nice rotating cube:)

结论(Conclusion)
本文总结了我进行的研究和实验,以基本了解XNA,以及如何使用Blender之类的工具开始开发XNA可以渲染的模型.我一直在写关于我的审判和磨难的博客(This article encapsulates the research and experimentation that I’ve done to get a basic understanding of XNA and how to use a tool such as Blender to start developing models that XNA can render. I’ve been blogging about my trials and tribulations) 这里(here) ,并且随着我在不断发展的这一概念上取得进展,我将继续这样做.我主要是想将XNA用作渲染空间而不是游戏开发,但我可能只是出于娱乐目的而将我几年前在Windows 3.1中编写的简单游戏组合在一起.(, and I will continue to do so as I make progress on this concept that I’m developing. I’m primarily interested in using XNA as a rendering space rather than game development, but I may just for fun diverge and put together a simple game that I wrote years ago in Windows 3.1.)
许可
本文以及所有相关的源代码和文件均已获得The Code Project Open License (CPOL)的许可。
C# C#2.0 Windows .NET .NET2.0 DirectX Visual-Studio Dev 新闻 翻译