在Raspberry Pi上轻松设置.NET Core,并使用VS代码进行远程调试(译文)
By robot-v1.0
本文链接 https://www.kyfws.com/pi/easy-set-up-of-net-core-on-raspberry-pi-and-remote-zh/
版权声明 本博客所有文章除特别声明外,均采用 BY-NC-SA 许可协议。转载请注明出处!
- 11 分钟阅读 - 5035 个词 阅读量 0在Raspberry Pi上轻松设置.NET Core,并使用VS代码进行远程调试(译文)
原文地址:https://www.codeproject.com/Articles/5266758/Easy-Set-Up-of-NET-Core-on-Raspberry-Pi-and-Remote
原文作者:Jonathan Nethercott
译文由本站 robot-v1.0 翻译
前言
Automated Raspberry Pi Setup for .NET Core development and remote debugging using Visual Studio Code
使用Visual Studio Code进行.NET Core开发和远程调试的自动Raspberry Pi安装程序
This article shows how to setup a Raspberry Pi from scratch, install the .NET core SDK and debugger and then demonstrates publishing and debugging a couple of simple programs remotely from a desktop or laptop.
本文介绍如何从头开始设置Raspberry Pi,安装.NET Core SDK和调试器,然后演示如何从台式机或笔记本电脑远程发布和调试几个简单程序.
介绍(Introduction)
手动设置了用于.NET Core和远程调试的Raspberry Pis之后,我想要一个更简单,更自动化的解决方案.这样做的好处是:(Having set up Raspberry Pis for .NET core and remote debugging manually, I wanted an easier, more automated solution. The benefits being that it would be:)
- 更轻松,更省时(Easier and less time consuming)
- 更少的错误倾向(Less error prone)
- 更容易跟上Raspbian的新版本(Easier to keep up with new versions of Raspbian)
- 无头-即无需显示器,键盘或鼠标.(Headless - i.e. no need for a monitor, keyboard or mouse.)
背景(Background)
关于这个主题还有很多其他文章,可能对我来说最有用的是(There were plenty of other articles that cover this subject, probably the most useful to me was) Scott Hanselman的这篇文章(this article by Scott Hanselman) .但是,它们都需要大量的手动设置.我想要一个尽可能自动化的解决方案.显然,需要进行一些手动干预,因为您必须物理地移动SD卡,给设备加电等,但是除此之外,我的目的是运行脚本,然后设置便会发生.正如Scott Hanselman所说:(. However, they all required a lot of manual setup. I wanted a solution that was as automated as possible. Obviously, there needs to be some manual intervention because you have to physically move SD cards, power up devices, etc., but other than that, my aim was to run a script and the setup would just happen. As Scott Hanselman says:) 引用:(Quote:)好的(有点笑话,但不是真的)是程序员的经验法则-(A good (kind of a joke, but not really) programmer rule of thumb is -)如果您执行两次操作,请使其自动化(if you do something twice, automate it).(.) 我希望安装程序实现以下目标:(I wanted the setup to achieve the following:)
- 从开发机器上新格式化的SD卡开始(Starting with a newly formatted SD card on the development machine)
- 将卡配置为在传输到Raspberry Pi时允许远程ssh(Configure the card to allow remote ssh when transferred to the Raspberry Pi)
- 配置Raspberry Pi以实现安全的无密码ssh连接(Configure the Raspberry Pi for secure passwordless ssh connection)
- 安装.NET Core和VS远程调试器(Install .NET Core and the VS remote debugger) 最后,我将添加几个C#项目来演示所有工作.(Finally, I would add a couple of C# projects to demonstrate it all working.)
工具选择(Choice of Tooling)
我已经使用VS Code几年了,并且真的很喜欢它-这就是我决定使用的方式(几十年来我也使用过各种版本的Visual Studio-但我不会继续他们每个人的优点和缺点.:))(I’ve been using VS Code for a few years now and really like it - so that is what I decided to use (I’ve also used various versions of Visual Studio for decades now - but I’m not going to go into the advantages and disadvantages of each of them here. :)))
我也非常喜欢Powershell,但决定将Bash用于脚本.希望这将使其尽可能成为跨平台的.您将需要配置VS Code以将bash作为默认外壳程序-最简单的方法是按(I also like Powershell a lot, but decided to use Bash for the scripts. That would hopefully make this as cross platform as possible. You will need to configure VS Code to have bash as the default shell - the easiest way to do this is to press)Ctrl + Shift + P(Ctrl+Shift+P)和类型(and type) default shell .这将提供命令提示符,Powershell或各种Linux版本的选项.最适合我的人是(. This will give the option of command prompt, Powershell or various flavors of Linux. The one that worked best for me was)吉特`巴什(Git Bash)但是其他的也应该起作用.(but other ones should work too.)
先决条件(Prerequisites)
VS Code解决方案可以复制到开发机器上的任何位置.在Visual Studio Code中打开它时,请使用(The VS Code solution can be copied anywhere on your development machine. When opening it in Visual Studio Code, use)打开文件夹(Open Folder)来自(from the)文件(File)菜单.(menu.) 您将需要一种将Raspbian映像保存到SD卡的方法.我建议(You’ll need a way to get the Raspbian image onto the SD card. I would recommend the) Raspberry Pi成像仪(Raspberry Pi Imager) .您不必先下载图像,但我认为这是值得做的,因为否则,您可能会发现自己使用了大量的Internet带宽(即使压缩后,图像的大小也往往为GB).下载的图像可通过访问(. You don’t have to download the image first but I think it is worth doing because otherwise you could find yourself using a lot of internet bandwith (images tend to be gigabytes even when zipped). Downloaded images are accessed via)使用自定义(Use custom)在图像列表上.(on the image list.) 您将需要一个Wifi路由器,并且需要知道SSID和PSK.我认为你有那些:).而且显然是Raspberry Pi和电源.我在Raspberry Pi 3上进行了测试,但是从V2起的任何版本都可以.注意这个(You’ll need a Wifi router, and you’ll need to know the SSID and PSK. I assume you have those :). And obviously a Raspberry Pi and power supply. I tested this on a Raspberry Pi 3 but any version from V2 upwards should be ok. Note that this)**惯于(won’t)**在Raspberry Pi Zero上工作,因为它使用了.NET核心(不幸)不支持的ARMV6.如果您的Raspberry Pi没有内置Wifi,则还需要一个USB Wifi加密狗.(work on a Raspberry Pi Zero because that uses ARMV6 which is (sadly) not supported by .NET core. If your Raspberry Pi doesn’t have Wifi built in, you will also need a USB Wifi dongle.) 最后,您将需要(Finally, you will need to) 下载最新版本的.NET Core SDK(download the latest version of .NET core SDK) .在撰写本文时,版本为3.1.这应该复制到(. At the time of writing, that was version 3.1. This should be copied to the)**Pi文件(PiFiles)**夹.您将需要ARM32版本,并且应该期望它的大小超过100MB.(folder. You’ll need the ARM32 version and you should expect it to be over 100MB in size.)
准备SD卡(Preparing the SD Card)
一旦有了新刷新的SD卡,在将其插入Raspberry Pi之前,需要一些额外的配置.这是任务1和2.要运行任务,请按(Once you have a newly flashed SD card, it needs some extra configuration before inserting it into the Raspberry Pi. This is task 1 and 2. To run tasks, press)Ctrl + Shift + P(Ctrl+Shift+P)然后选择(and select)任务:运行任务(Tasks: Run Task).您应该看到如下任务列表:(. You should see a list of tasks like this:)
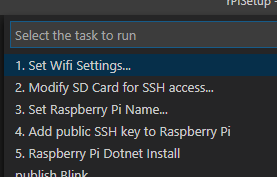
选择任务(Select task)1.设置Wifi设置…(1. Set Wifi Settings…)这将要求您提供Wifi SSID和PSK.当您输入这些内容时,它们将存储在(This will ask you for your Wifi SSID and PSK. When you enter these, they will be stored in)settings.json(settings.json)因此您不必再次输入它们.(so you don’t have to enter them again.) 然后选择任务(Then select task)2.修改SD卡以进行SSH访问…(2. Modify SD Card for SSH access…)这将要求您提供带有SD卡的驱动器.由于这将在bash脚本中进行访问,因此可能类似于(This will ask you for the drive with the SD card. Because this will be accessed in a bash script, this is likely to be something like)/d(/d)要么(or)/mnt/d(/mnt/d).如果您刚刚对卡进行了成像,则可能需要重新插入它,因为成像程序会在完成后将其弹出.运行任务2后,应该弹出卡并将其插入Raspberry Pi.打开Raspberry Pi的电源并等待其启动,然后再进行下一步.(. If you have just imaged the card, it may need to be reinserted because the imaging program ejects it when it is finished. Once you have run task 2, you should eject the card and insert it into the Raspberry Pi. Power up the Raspberry Pi and wait for it to boot up before going onto the next step.)
SSH配置和.NET安装(SSH Configuration and .NET Installation)
下一步是运行任务(The next step is to run task)3.设置树莓派名称(3. Set Raspberry Pi Name).这将从默认更改主机名(. This will change the hostname from the default)树莓(raspberrypi)到一个(to a) 您选择的名称(name of your choosing) .还会询问您是否要设置静态IP地址.如果您不希望使用静态IP,请将其留空.我在Windows 10和本地主机名查找(mDNS)方面的经验是零星的-我不确定它是否应该可靠.但是,即使您根本无法使用本地名称解析,也应该可以使用IP地址.和以前一样,这些设置会记住(. You will also be asked if you want to set a static IP address. If you don’t want a static IP, leave this blank. My experience with Windows 10 and local hostname lookups (mDNS) has been patchy - I’m not sure it is as reliable as it should be. However, even if you can’t get local name resolution working at all, you should be able to use IP addresses instead. As before, these settings are remembered in)**settings.json(settings.json)**因此您不必重新输入它们.(so you don’t have to reenter them.)
设置新名称,任务(Having set the new name, task)4.将公共SSH密钥添加到Raspberry Pi(4. Add public SSH key to Raspberry Pi)将重新配置Raspberry Pi并将其复制到公共ssh密钥,这样,当您(或VS工具)通过ssh连接时,您不必输入密码.系统将询问您是否要连接(键入(will reconfigure the Raspberry Pi and copy the public ssh key to it so that you don’t have to enter the password when you (or the VS tools) connect via ssh. You will be asked if you want to connect (type) yes ),然后输入raspberry pi密码(输入() and then for the raspberry pi password (type) raspberry ).此时,Raspberry Pi将重新启动,因此您需要等待,然后再运行下一步.如果您尚未设置ssh密钥,(). At this point, the Raspberry Pi will reboot, so you need to wait before running the next step. If you don’t have an ssh key already setup,) 这样的文章向您展示如何创建一个(articles like this show you how to create one) .现在,您无需输入密码即可登录,而只能从您的计算机登录.(. You will now be able to login without having to type in the password, but only from your machine.)
任务(Task)5. Raspberry Pi Dotnet安装(5. Raspberry Pi Dotnet install)将在Raspberry Pi上安装.NET核心SDK和VS调试器.这将需要一段时间,但是一旦完成,我们现在就可以在Raspberry Pi本身上或在我们的主要开发机器上远程编写.NET程序-显然,远程编写会变得更加有趣!(will install the .NET core SDK and VS debugger on the Raspberry Pi. This will take a while but once complete, we are now able to write .NET programs either on the Raspberry Pi itself or remotely on our main development machine - obviously remotely is going to be a lot more fun!)
范例程序(Example Programs)
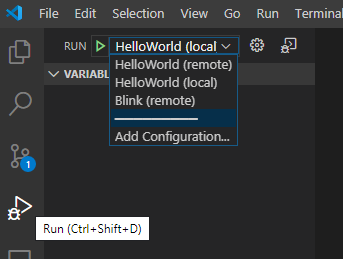
我创建了两个示例程序.第一个是(I have created two example programs. The first one is a)你好,世界(Hello World)项目.这将在本地(即在开发计算机上)和远程运行.运行它的最简单方法是选择(project. This will run both locally (i.e., on the development machine) and remotely. The easiest way to run it is to select the)跑(Run)图标,然后从下拉菜单中选择配置:(icon on the left hand side and choose the configuration from the dropdown:)
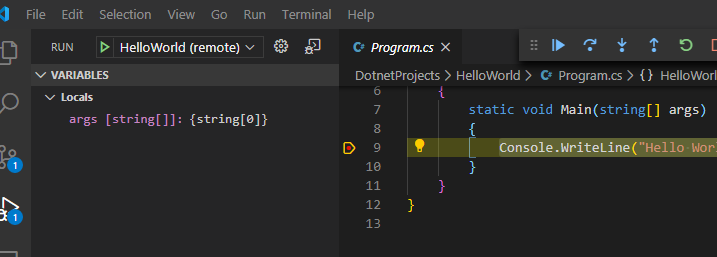
现在,您应该能够像在本地一样设置断点并进行调试:(You should now be able to set breakpoints and debug just as you would locally:)
为了运行Blink程序,您需要将LED连接到GPIO引脚之一.眨眼程序使用出色(In order to run the Blink program, you will need to connect a LED to one of the GPIO pins. The blink program uses the excellent) System.Device.Gpio(System.Device.Gpio) 库,应使用NuGet自动安装.(library which should be automatically installed using NuGet.) 在下一篇文章中,我将展示如何创建一个更大,更现实的解决方案,包括单元测试,依赖项注入和模拟.该文章可以在这里找到:(In the next article I will show how to create a larger and more realistic solution including unit tests, dependency injection and mocking. That article can be found here:) 为Raspberry Pi开发.NET应用程序:第2部分(Developing .NET Applications for the Raspberry Pi: Part 2)
兴趣点(Points of Interest)
这就是本文的内容.使用Python编写眨眼程序可能会容易得多,但是对我而言,使用C#的全部目的是您可以使用.NET创建更大,更可维护的解决方案(尽管我敢肯定有些人会不同意接着就,随即).话虽如此,本文中的演示程序并非旨在用作更大程序的模板.我写了另一篇文章(见上文),阐述了我认为是一个很好的结构,包括用于GPIO接口的库(仍在使用(So that’s it for this article. It probably would have been a lot easier to write the blink program using Python, but for me, the whole point of using C# is that you can create much larger and more maintainable solutions with .NET (although I’m sure some people will disagree with that). Having said that, the demonstration programs in this article are not intended as templates for larger programs. I have written another article (see above) that sets out what I think is a good structure, including a library for the GPIO interfacing (still using) System.Device.Gpio(System.Device.Gpio) )和单元测试项目.我已经解决了如何使用来模拟Gpio调用() and a unit test project. I’ve worked out how to mock the Gpio calls using) 起订量(Moq) 和依赖注入.我认为也可以创建一个自定义(and dependency injection. I think it should also be possible to create a custom) Gpio.Device 并制作一个模拟器,但必须等到第3条…(and make a simulator but that will have to wait until article 3…)
历史(History)
- 1个(1)圣(st)2020年5月:初始版本(May, 2020: Initial release)
- 7(7)日(th)2020年5月:次要更新(May 2020: Minor updates)
- 25(25)日(th)2020年5月:添加对第2部分的引用(May 2020: Add reference to Part 2)
许可
本文以及所有相关的源代码和文件均已获得The Code Project Open License (CPOL)的许可。
C# .NET-Core .NET DevOps JSON shell 新闻 翻译