IoT中心让我们:教程1(译文)
By robot-v1.0
本文链接 https://www.kyfws.com/pi/lets-iot-hub-tutorial-zh/
版权声明 本博客所有文章除特别声明外,均采用 BY-NC-SA 许可协议。转载请注明出处!
- 19 分钟阅读 - 9306 个词 阅读量 0IoT中心让我们:教程1(译文)
原文地址:https://www.codeproject.com/Articles/1249621/Lets-IoT-Hub-Tutorial
原文作者:g96b10
译文由本站 robot-v1.0 翻译
前言
Set up an Azure IoT Hub and connect to it via Raspberry Pi 3
设置Azure IoT中心并通过Raspberry Pi 3连接到它
前言(Preface)
本教程假定您具有一定的编程背景知识,但没有Raspbian(或任何Linux发行版),GPIO微处理器(Pi,Arduino等)或Python的经验.可以参考以前的教程.(This tutorial assumes some background knowledge of programming, but no prior experience with Raspbian (or any Linux distribution), GPIO microprocessors (Pi, Arduino, etc), or Python. References may be made to previous tutorials.) 我的主要编程语言是Java,C#.NET和VB.NET.您可能会注意到我的Python代码与Python的标准约定和格式之间存在一些细微差异.这不应影响您对代码的理解.(My main programming languages are Java, C#.NET, and VB.NET. You may notice some slight differences between my Python code and the standard conventions and formatting for Python. This should not affect your understanding of the code.)
目标(Goal)
使用Microsoft Azure的IoT中心发送云到设备的消息,该消息会更改连接到Raspberry Pi 3的LED的物理状态.(Send a cloud-to-device message using Microsoft Azure’s IoT Hub that alters the physical state of an LED attached to a Raspberry Pi 3.)
用例范例(Example Use Cases)
- 网络摄像头的遥控伺服器(Remote-controlled servos for a webcam)
- 简单的壁挂式数字留言板(Simple wall-mounted digital message board)
- 智能家居系统,例如自动百叶窗(Smart Home systems like automatic blinds)
入门(Getting Started)
您首先需要为本教程设置合适的编码环境. Pi的在线文档随附了这样做的说明,并在(You’ll need to set up the proper coding environment for this tutorial first. The instructions for doing so come with the Pi’s online documentation and are described in) 第0部分(Part 0) 本教程的内容,因此这里是基本步骤:(of the tutorial, so here are the basic steps:)
- 安装Raspbian Jessie(Install Raspbian Jessie)
- 检查发布的更新(Check for updates to your distribution)
- 使用连接到Pi引脚或其他某种形式的接线板的面包板为设备进行物理准备.(Physically prepare your device with a breadboard connected to the Pi’s pinouts or some other form of wiring.) 现在您的Pi已启动并运行,我们需要安装IoTHub库.有两种方法可以做到这一点;您可以访问Github((Now that your Pi is up and running, we need to install the IoTHub library. There are two methods to do this; either you can access Github () https://github.com/Azure-Samples/iot-hub-python-raspberrypi-client-app(https://github.com/Azure-Samples/iot-hub-python-raspberrypi-client-app) ),以Zip格式下载资源库,然后提取文件,或者;您可以通过终端克隆存储库.(), download the repository as a Zip, and extract the files, or; you can clone the repository via terminal.)
sudo apt-get install git-core

git clone https://github.com/Azure-Samples/iot-hub-python-raspberrypi-client-app.git
要编译Python库,请运行以下命令(根据需要调整目录路径):(To compile the Python library, run the following (adjusting the directory path as necessary):)
cd ./iot-hub-python-raspberrypi-client-app
sudo chmod u+x setup.sh
sudo ./setup.sh

提示(Tips)
- 如果没有其他类似名称的目录,则可以使用通配符更改目录.在上面的示例中:(You can change directories using wildcards if you have no other similarly-named directories. In the above example: “)
cd ./iot-*“将使您进入正确的目录.(” will get you to the correct directory.) - 基本目录”(The base directory “)./(./)此处的"(” here refers to “)/home/pi(/home/pi)".如果您使用git clone,则会在此处找到新的文件夹和文件.否则,将其替换为您下载并提取的zip文件夹位置.(”. You’ll find the new folder and files here if you used git clone. Otherwise, replace it with your downloaded and extracted zip folder location.)
- 如Github文档所述,您可能会发现(As the Github documentation states, you may find that)
iothub_client.so在编译时卡住.为了防止这种情况发生,请打开第二个终端并准备运行(gets stuck while compiling. To prevent this from happening, open a second terminal and prepare to run) “(“)free -m每当您看到编译速度变慢时.具有活动的VNC连接可能会导致此问题.如果仍然无法解决问题,请尝试通过HDMI查看您的Pi或通过SSH控制它.如果系统完全死机,可以通过断开并重新连接电源来强制重启Pi.(” whenever you see the compiling slow down. It is possible that having an active VNC connection causes this problem; try viewing your Pi via HDMI or control it via SSH if the freezes persist. If the system does freeze completely, it is safe to forcefully reboot the Pi by disconnecting and reconnecting the power source.) 在本教程中,这两种方法都可以使用,因为我们将从示例目录中提取文件以使用.(For the purposes of this tutorial, either method will work, since we will be pulling a file from the example directory to use.) 您还需要在本教程上在Azure上设置IoT中心.为此的步骤在本文档中进行了详尽的详细介绍(You’ll also need to set up an IoT Hub on Azure for this tutorial. The steps for that are extensively detailed in this) Microsoft帮助文档(Microsoft Helpdoc) :到达”(: Stop when you reach the section “)设置Raspberry Pi(Set Up Raspberry Pi)".(”.) 如果您目前无法访问该网页,请按照以下基本说明进行操作.创建一个新资源,即IoT中心.设置适当的订阅(可以使用免费订阅,或者按需付费)和距离您最近的区域.继续设置所需的价格和规模,然后完成创建.部署将需要一些时间.然后,打开您的IoT中心,然后选择"(If you can’t get to the webpage at the moment, follow these basic instructions. Create a New Resource, namely an IoT Hub. Set the proper subscription (a Free one will work, or a Pay-as-you-go) and the region closest to you. Continue with setting up your desired pricing and scale, and finish the creation. It will take some time to deploy. Afterwards, open your IoT Hub and select “)物联网设备(IoT devices)“菜单中的"资源管理器"下.添加新设备,并记下该新设备的连接字符串.(” in the menu, under Explorers. Add a new device, and take note of this new device’s connection string.) 确保你保持你的(Make sure you keep your)IoT中心设备详细信息(IoT Hub Device Details)页面打开(page open)(在单独的设备上或在您的Pi上).您稍后将需要使用一些值来设置与Pi的正确身份验证.(, either on a separate device or on your Pi. You’ll need to use some values to set up the proper authentication with your Pi later.)
图书馆(The Library)
编译后,您会发现一个文件”(After compiling, you’ll find a file “)**iothub_client.so(iothub_client.so)**大小约为3.6 MB,称为共享库.这是从原始C代码编译而成的Python就绪库.您还会发现,位于目录"(” approximately 3.6 MB in size, described as a shared library. This is the Python-ready library compiled from the original C code. You’ll also find, nestled in the directories “)设备/iothub_python(device/iothub_python)",Python包装器源代码.它为编写IoTHub设备所需的所有方法和参数提供了不错的参考.(”, the Python wrapper source code. It serves as a decent reference for all the methods and parameters you will need to write a IoTHub device.)
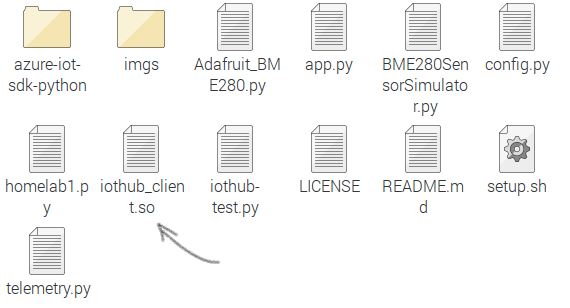
这个(This)**iothub_client.so(iothub_client.so)**库(以下简称"库")包含网络协议和各种类,这些类将使我们能够立即编写有用的应用程序.尽管您可以使用很多函数和回调方法,但在本入门教程中,我们只会使用其中一些.当然,我强烈建议您探索该库的各个方面,并在任何您喜欢的地方引入新代码-但我暂时不会.(library (henceforth referred to as ‘the library’) contains the networking protocol and various classes that will shortcut us into immediately writing useful applications. Although there are a lot of functions and callback methods at your disposal, for this starter tutorial, we’ll only be using a few of them. Of course, I strongly encourage you to explore the many facets of the library and to introduce new code wherever you fancy – but I won’t be, for now.)
设置代码(Setting Up the Code)
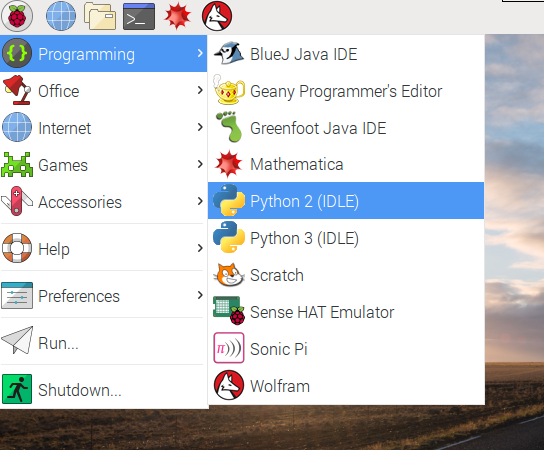
重要的提示(Important note):Python 3使用与Python 2不同的方法调用集来初始化内容.该库和教程将(: Python 3 uses a different set of method calls than Python 2 for initializing stuff. This library and tutorial will)**不(not)**使用Python3.请确保您使用的是Python2.在Raspbian Jessie中,“编程"菜单项下的两个选项均可用–确保选择”(work with Python 3. Ensure you’re using Python 2. In Raspbian Jessie, both options will be available under the Programming menu item – ensure that you select “)Python 2(闲置)(Python 2 (IDLE))".(”.)
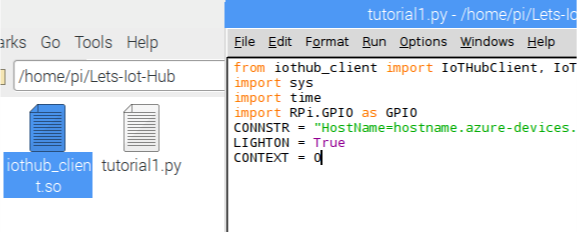
启动Python之后,您需要通过File> New File创建一个新文档.让我们用重要的文件来设置文件(Once you’ve launched Python, you’ll need to create a new document via File>New File. Let’s set up the file with the important) import 声明:(statements:)
from iothub_client import IoTHubClient, IoTHubClientError, IoTHubTransportProvider,
IoTHubClientResult, IoTHubMessage, IoTHubMessageDispositionResult, IoTHubError,
DeviceMethodReturnValue
import sys
import time
import Pi.GPIO as GPIO
小费(Tip):不要简单地在此处复制并粘贴代码段.由于特殊的格式,它们的行为可能与您在IDE中所期望的不一样.(: Don’t simply copy-and-paste the code snippets here. Due to special formatting, they might not behave as you’d expect in the IDE.)
最重要的(The most important) iothub_client 我们将在这里使用的导入是(imports we’ll be using here are) IoTHubClient ,它是提供消息传递功能的客户端类,并且(, which is the client class that provides messaging capabilities, and) IoTHubMessageDispositionResult ,这很重要,我们稍后将介绍.(, which is oddly important as we’ll see later on.)
我们还创建一些变量以保持代码干净.我们将存储您设备的连接字符串以及LED(尚未连接)的状态.(Let’s also create some variables to keep our code clean. We’ll store your device’s Connection String, as well as the state of the (not yet connected) LED.)
# Replace the string with the string provided by Azure
CONNSTR = "HostName=hubname.azure-devices.net;...;..."
LIGHTON = True
CLIENT = 0
连接字符串的格式应为"(The connection string should have the format “) HostName=…;DeviceId=…;SharedAccessKey=… “.如果这不正确,则您的客户端将无法初始化.(”. If this is not correct, your client will fail to initialize.)
小费(Tip):(:)如果您的客户端无法实例化并引发异常,但字符串格式与上述匹配,请确保您已从(If your client fails to instantiate and throws an exception but the string format matches the above, ensure you have copied the key from your)**设备详细信息(Device Details)**页面而不是IoTHub页面.密钥格式相同,但用途不同.(page and not the IoTHub page. The key formats are identical but serve different purposes.)
另外,您也可以根据需要创建三个变量来存储连接字符串的每个部分.但是,客户端仅接受如上所述格式设置的连接字符串.(Alternatively, if you’d prefer, you can create three variables to store each part of the connection string. However, the client only accepts a connection string formatted as described above.)
现在我们已经建立了文档,我们可以开始创建将与我们的Hub通信的客户端.我建议定期保存和运行该模块,以确保您的代码正常工作.继续尝试一下.(Now that we have our document set up, we can start creating the client that will communicate with our Hub. I recommend saving and running the module periodically to ensure your code works. Go ahead and give it a try.)
如果您按照上述步骤操作,您可能会注意到Python无法识别您的导入!这是因为您尚未在与Python文件相同的目录中创建该库的副本.找到”(If you’ve followed the steps above, you may notice that Python doesn’t recognize your imports! This is because you haven’t created a copy of the library in the same directory as your Python file. Find where “)iothub_client.so(iothub_client.so)",然后将其复制到保存代码的目录中.回想一下,它应该在存储库目录中,并且直到"(” resides, and make a copy of it into the directory where you saved your code. Recall that this should be in the repository directory, and will not exist until the “)setup.sh(setup.sh)“脚本已运行.(” script has been run.)
某些文件和文件夹可能是隐藏的,您可能需要运行提升权限的文件管理器才能查看它们.如果是这样,请执行”(Some files and folders may be hidden, and you may need to run an elevated File Manager to see them. If that’s the case, execute “) sudo pcmanfm 在终端中.(” in a terminal.)
如果最初失败,请尝试再次运行该模块.它应该运行良好,并立即停止执行.如果不是,请仔细检查错误并根据需要解决.(Try running the module again, if it failed at first. It should run fine, and stop execution immediately. If not, double check the error and resolve it as necessary.)
创建一个客户(Creating a Client)
为了保持代码的整洁有序,我们将为每个任务创建函数.首要的任务是初始化一个(In order to keep our code clean and organized, we’ll be making functions for each task. The first task at hand is to initialize an) IoTHubClient .(.)
def setupClient():
      global CONNSTR # We need to use this previously declared variable

      # Create a client with the connection string and use MQTT
      client = IoTHubClient(CONNSTR, IoTHubTransportProvider.MQTT)
      # Optional key-value settings
      client.set_option("product_info", "RPI-Python")
      return client
这个功能给我们一个(This function gives us an) IoTHubClient 可以发送和接收消息的对象.让我们来创建(object that can send and receive messages. Let’s create the) main 同时运行此代码的方法.最后,在文件末尾运行它(method to run this code as well. Finally, at the end of the file, have it run) main() .请记住,Python是对缩进敏感的语言.您的代码应如下所示:(. Remember, Python is an indent-sensitive language. Your code should look like this:)
def main():
      global CLIENT
      # Instantiate a client and store in global CLIENT variable.
      #   If CLIENT isn’t global, the object gets disposed immediately
      #   after exiting the method.
      CLIENT = setupClient()

# Begin code execution
print ("Starting IoT Hub Client...")
main()
那不是很令人兴奋,但是无论如何都要运行它.如果您的连接字符串正确,并且您的Pi可以访问互联网,则您的代码将运行并退出而不会出现问题.(That’s not very exciting, but give it a Run anyways. If your connection string is correct and your Pi has internet access, your code will run and exit without problem.) 现在,我们已经建立了与云的连接.我们现在要做的就是从集线器收到一条消息,并在发生这种情况时做些事情.(What we have now is an established connection to the cloud. All we need to do now is receive a message from the Hub, and to do something when that happens.)
设置回调方法(Setting Up the Callback Methods)
的(The) IoTHubClient 利用回调方法来触发事件,并且收到的消息将需要其自己的回调方法.让我们进行设置.(utilizes callback methods to trigger events, and a received message will need its own callback method. Let’s set that up.)
def gotMail(message, context):
      # These arguments are required by IoTHubClient.
      # ‘message’ contains the details of the message
      #     sent from the server.
      # ‘context’ is the user-provided context of an undefined type

      # Read the bytes and deserialize it into a string
      message_buffer = message.get_bytearray()
      size = len(message_buffer)
      msg = message_buffer[:size].decode("utf-8")
      print ("Server says: %s" % (msg))
小费(Tip):Python的(: Python’s) string 格式如下:(formatting is as follows:) “%s abcdef %s …” % (arg1, arg2, …)
现在我们有了此功能,我们需要通知(Now that we have this function, we need to inform the) IoTHubClient .在实例化一个客户时,我们会做的正确.(. We’ll do that right as we instantiate a client in) setupClient() .修改您以前写的(. Modify your previously written) setupClient 方法.(method.)
def setupClient():
     global CONNSTR, gotMail

     # Create a client with the connection string and use MQTT
     client = IoTHubClient(CONNSTR, IoTHubTransportProvider.MQTT)
     # Optional key-value settings
     client.set_option("product_info", "RPI-Python")

     # Set callback method for messages
     client.set_message_callback(gotMail, 0) #(context := 0)
     return client
小费(Tip):虽然Python是缩进敏感的,但不是行敏感的.您可以根据需要调整代码,注释和函数之间的间距.(: While Python is indent-sensitive, it is not line-sensitive. You may adjust spacing between code, comments, and functions as you see fit.) 注意(Note):声明的全局变量已更新为包括gotMail.(: The global variables declared have been updated to include gotMail.) 给代码运行.同样,它似乎几乎立即停止执行,即使没有引发任何错误.那是因为到达代码的最后一行时,Python无法说明我们正在等待服务器向我们发送消息的事实.让我们创建一些代码,即使没有任何事情要做,也可以保持应用程序运行.(Give the code a Run. Again, it seems to stop execution almost immediately, even without throwing any errors. That’s because upon reaching the last line of code, Python doesn’t account for the fact that we’re waiting for the server to send us a message. Let’s create some code to keep the application running even if there’s nothing left to do.)
...
# Begin code execution
print ("Starting IoT Hub Client...")
main()
while True:
      time.sleep(1)
小费(Tip):(:) time.sleep(n) 需要(takes)**ñ(n)**片刻之间.它也可能需要浮点数才能获得几分之一秒的时间.(in seconds. It can take floats as well, to get fractions of a second.)
啊,臭名昭著的"(Ah, the infamous “) while True “循环.这将定期(每隔一秒钟)一次又一次地将主线程设置为睡眠状态.不幸的是,这意味着您的代码将永远不会停止.但是,我们仍然可以在Python Shell中使用Ctrl + C停止代码执行.(” loop. This will periodically (every one second) set the main thread to sleep, again and again. Unfortunately, this means your code won’t ever come to a natural stop. We can still halt code execution with Ctrl+C in the Python shell, however.)
再次运行代码.您会注意到该外壳不再立即通知我们它已重新启动.这意味着我们的代码会持续运行,即使没有实际迹象表明这样做也是如此.让我们的代码运行一会儿,然后转到IoT中心的Azure页面.(Run the code again. You’ll notice that the shell no longer immediately informs us that it has RESTARTed. This means our code is continually running, even if there’s no physical indication of it doing so. Let’s leave our code running for a bit and turn towards the Azure page for your IoT Hub.)
发送信息(Sending a Message)
如果你有你的(If you have your)设备详细信息(Device Details)页面打开,继续阅读.如果没有,您可以通过主页>您的中心>物联网设备>您的设备找到它.记住,这是(page open, read on. If not, you can find it via Home>Your Hub>IoT Devices>Your Device. Remember, this is the)您设备的连接字符串的页面(page with your device’s Connection String)****而不是集线器的连接字符串.(on it, not the Hub’s connection string.)
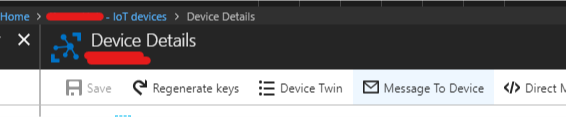
在设备详细信息的上方菜单中,您会看到一个标签为”(On the upper menu of Device Details, you’ll see a button labelled “)消息到设备(Message To Device)".打开后,您将进入一个简单的表单,该表单支持发送消息和一些其他信息.在表单的"邮件正文"部分中键入内容,然后单击顶部的"发送邮件".(”. Opening that will bring you to a simple form that supports sending a message and some additional information. Type something into the Message Body portion of the form, and click Send Message at the top.) 注意(Note):您无法通过消息传递门户传输"未识别的ASCII符号".(: You cannot transmit “unidentified ASCII symbols” through the messaging portal.) 如果一切设置正确,则您的Python Shell应该指示服务器已发送消息.恭喜,您刚刚将数据从Internet浏览器发送到Raspberry Pi.(If everything is set up properly, your Python shell should indicate that the server has sent a message. Congratulations, you’ve just sent data from your internet browser to your Raspberry Pi.)
设置LED(Setting Up the LED)
既然我们已经建立了可以建立连接并将信息从服务器传输到客户端的功能,那么让我们获得更直观的体验.准备一个标准的LED和一个大约100欧姆的电阻,然后在Pi3上找到一个空的引脚.在本教程中,我们将使用(Now that we’ve established that you can make a connection and transfer information from server to client, let’s make this a more visual experience. Prepare a standard LED and a resistor of about 100 ohms, and locate a free pin on your Pi3. For this tutorial, we’ll be using)**GPIO引脚6(GPIO pin 6)**如Pi3引脚所示,但是您可以选择任何支持GPIO的数字.(as labelled by the Pi3 pinout, but you may choose any number that supports GPIO.)
将LED的正极(长脚)连接到引脚6,然后将负极连接到电阻器.最后,将电阻接地.这应该是串联的电路,而不是并联的电路.(Connect the LED’s positive terminal (the longer leg) to pin 6, and connect the negative terminal to the resistor. Finally, connect the resistor to ground (GND). This should be a circuit in series, not parallel.)
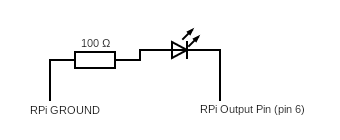
Pi3 GPIO引脚都可提供3V电压–如果您看到LED指示灯非常亮,请立即将其卸下,然后用一个更高阻值的电阻器代替该电阻器.如果您的LED暗,请降低电阻值.如果您的LED突然熄灭,请断开连接并使用1.5 V电源(AA电池或类似电池)进行测试-它可能已烧坏.(The Pi3 GPIO pinouts all deliver 3V – if you see that the LED is extremely bright, remove it immediately and replace your resistor with a higher value resistor. If your LED is dim, reduce your resistor value. If your LED suddenly turns off, disconnect and test it with a 1.5 V source (AA battery or similar) – it may have burned out.) 注意(Note):如果您不熟悉电阻器或电路,请严格遵循所有给定的值和引脚选择.这将有助于减少故障的机会.(: If you’re unfamiliar with resistors or circuitry, follow all of the given values and pin selection exactly. This will help reduce the chance of malfunction.) 现在电路已经完成,我们需要在代码中对引脚进行编程.(Now that the circuit is complete, we need to program the pin in our code.)
...
# Set pin numbering mode
GPIO.setmode(GPIO.BCM)
# Set pin 6 (or whatever number you’re using)
GPIO.setup(6, GPIO.OUT)

# Begin code execution
...
我们已通知Pi,我们要使用GPIO 6作为输出引脚.现在,我们需要一种将信号设置到所需位置的方法.让我们提出更多方法.请记住,这些方法声明必须在调用之前编写,因此有助于将所有声明分组在文档顶部.(We’ve informed our Pi that we want to use GPIO 6 as an output pin. Now, we need a way to set the signal to our desired position. Let’s make some more methods. Remember that these method declarations must be written before they are called, so it helps to group all your declarations at the top of the document.)
def turnLightOn(): # Regardless of state, turn the light on
      global LIGHTON

      # Remember the set state
      LIGHTON = True
      # Set pin 6 to HIGH voltage (3V)
      GPIO.output(6, GPIO.HIGH)
      print ("LED on!")

def turnLightOff(): # Regardless of state, turn the light off
      global LIGHTON

      #Remember the set state
      LIGHTON = False
      # Set pin 6 to LOW voltage (0V)
      GPIO.output(6, GPIO.LOW)
      print ("LED off.")

def toggleLight(): # Toggle the light state from one to the other
      global LIGHTON
      print ("Toggling...")
      if LIGHTON:
            turnLightOff() # if ON then TURN OFF
      else:
            turnLightOn()  # if OFF then TURN ON
为确保代码具有确定性,请确保我们为LED设置了默认状态.另外,让LED闪烁让事情变得有趣.(To keep our code deterministic, let’s make sure we set a default state for our LED. Also, let’s make things interesting by having the LED blink.)
...
# Begin code execution
turnLightOn()                       # Ensure start state is ON
print ("Starting IoT Hub Client...")
main()
while True:
      toggleLight()                 # Blink the LED every second
      time.sleep(1)
运行您的代码-您的LED应该每秒闪烁一次.如果没有,请仔细检查您的接线和引脚号.也要跟踪缩进.如果有帮助,您可以通过使用注释为方法添加"假"结尾:(Run your code - your LED should be blinking every second. If not, double check your wiring and pin number. Also keep track of your indents. If it helps, you can include ‘fake’ endings for your methods by using comments:)
def func():
      code code code
# end func
连续执行(Continuous Execution)
与其使用Ctrl + C停止代码执行,不如从集线器向您的Pi发送一条消息,看看会发生什么.您会注意到,由于某种原因,闪烁停止了,代码也停止了.事实证明,用于接收消息的回调方法需要返回一个值,以便线程保持运行状态.让我们回去编辑该代码.(Rather than using Ctrl+C to stop code execution, let’s send a message from the Hub to your Pi and see what happens. You’ll notice that the blinking stops and your code stops as well, for some reason. As it turns out, the callback method for receiving messages needs to return a value in order for your thread to remain running. Let’s go back and edit that code.)
def gotMail(message, context):
      ...
      print ("Server says: %s" % (msg))

      #Allow code execution to continue
      return IoTHubMessageDispositionResult.ACCEPTED
现在,运行此命令应该可以使您的LED继续闪烁,即使收到多个消息也是如此.(Running this should now allow your LED to continue blinking even if multiple messages are received.)
互动式LED(Interactive LED)
最后,让我们连接集线器消息和我们的LED.我们希望能够通过发送简单的消息来通过服务器设置LED的状态(Finally, let’s hook up the Hub messages and our LED. We want to be able to set the state of our LED through the server by sending a simple) string .(.)
首先,我们需要禁用闪烁的LED.您可以通过用井号(#)注释掉它或删除"(First, we need to disable the blinking LED. You can do this by commenting it out with a pound (#) or deleting the line within the ‘) while True ’循环.(’ loop.)
不幸的是,Python没有(Unfortunately, Python doesn’t have a) Switch -case结构,因此我们不能使用它来设置命令.目前,我们将坚持(-case structure, so we can’t use that to set up our commands. For now, we’ll stick with the) If –(-) ElseIf 确定传入消息内容的结构.(structure to determine what the incoming message says.)
def gotMail(message, context):
      ...
      # print ("Server says: %s" % (msg))

      # Message interpretation
      if msg == "turn on" or msg == "on":
            turnLightOn()
      elif msg == "turn off" or msg == "off":
            turnLightOff()
      elif msg == "toggle":
            toggleLight()
      else:
            print ("I don’t know how to ‘%s’." % (msg))
      return ...
小费(Tip):Python不使用"(: Python doesn’t use “) elseif " 要么 “(” or “) else if “, 反而, “(”, but rather, “) elif “.它也没有用(”. It also doesn’t use) && 要么(or) || .(.)
注意(Note):请注意,此处已注释掉不必要的初始打印语句.(: Notice that the unnecessary initial print statement has been commented out here.)
运行该模块,然后开始从您的中心网页发送消息.您应该看到LED的行为完全符合您的指示.发送"打开"应点亮LED,“切换"应在打开和关闭之间切换.如果您看到Python外壳宣布它正在打开和关闭LED,但是您看不到它在现实中发生,请检查接线,并确保LED没有烧坏.(Run the module, and start sending messages from your Hub webpage. You should be seeing your LED behave exactly as you tell it to; sending “turn on” should light the LED up, and “toggle” should switch between on and off. If you’re seeing the Python shell announce that it is turning the LED on and off but you don’t see it happening in reality, check your wiring and ensure your LED hasn’t burnt out.)
结论(Conclusion)
恭喜你!您已经设置了Azure物联网中心,将Raspberry Pi 3作为IoT设备连接,接收了从中心页面发送的服务器消息,并通过专门编写的命令更改了LED的状态.(Congratulations! You’ve set up an Azure Internet of Things Hub, connected your Raspberry Pi 3 as an IoT Device, received server messages sent from the Hub webpage, and altered the state of an LED via specifically written commands.)
接下来我该怎么办?(What Can I Do Next?)
探索Python语言并清理您编写的代码.在您的代码中添加详细信息,例如省略的"上下文"字段.尝试将第二个LED连接到另一个GPIO引脚,并创建一个命令解释器,该命令解释器可以控制给定编号的特定LED的状态.添加一些错误处理程序(Explore the Python language and clean up the code you’ve written. Add detail into your code, such as the omitted ‘context’ fields. Attempt to connect a second LED to another GPIO pin, and create a command interpreter that can control a specific LED’s state given its number. Add some error handlers with) Try –(-) Except 块以自动处理异常.(blocks to automatically handle exceptions.)
继续(Continue)
教程2(Tutorial 2) |(|) 教程3(Tutorial 3)
许可
本文以及所有相关的源代码和文件均已获得The Code Project Open License (CPOL)的许可。
Python Raspberry Azure IoT 新闻 翻译