Raspberry Pi 2,第1个,共n个-初始设置(译文)
By robot-v1.0
本文链接 https://www.kyfws.com/pi/raspberry-pi-of-n-initial-setup-zh/
版权声明 本博客所有文章除特别声明外,均采用 BY-NC-SA 许可协议。转载请注明出处!
- 13 分钟阅读 - 6358 个词 阅读量 0Raspberry Pi 2,第1个,共n个-初始设置(译文)
原文地址:https://www.codeproject.com/Articles/1044859/Raspberry-Pi-of-n-Initial-setup
原文作者:Mike Hankey
译文由本站 robot-v1.0 翻译
前言
First in a series of articles relating to the new Raspberry Pi 2 running the new Raspbian Jesse OS.
有关运行新Raspbian Jesse OS的新Raspberry Pi 2的系列文章的第一篇.
介绍(Introduction)
您已经将手指放在准备拉动触发器的鼠标按钮上,并最终命令刚刚发布的Raspberry Pi 2,但是您不知道是否有时间进行研究以学习如何设置它并开始编程.在第n部分系列文章的第一部分中,我将引导您完成配置Pi的过程.在以后的文章中,我们将配置Pi以使用C/C ++和Python语言进行编程.(You’ve got your finger on the mouse button ready to pull the trigger and finally order that Raspberry Pi 2 that just came out but you don’t know if you’ve got the time to do the research to learn how to set it up and start programming it. In this first of n part series of articles I will walk you through the process of getting the Pi configured. In future articles we will configure the Pi to program in the C/C++ and Python languages.) 我们将主要通过命令行与OS进行交互,因此Linux命令的基本知识将有所帮助,但我将使其保持简单.一个好的备忘单总是有帮助的,因此请提供一个包含Linux命令的链接.(We will be interacting with the OS primarily through the command line so a basic knowledge of Linux commands would be helpful but I will keep it simple. A good cheat sheet is alwys helpful so am providing a link to one that contains Linux commands.) [Linux命令行备忘单(Linux command line cheat sheet)7](http://www.pixelbeat.org/cmdline.html)
在SD卡上获取操作系统(Getting the OS on the SD card)
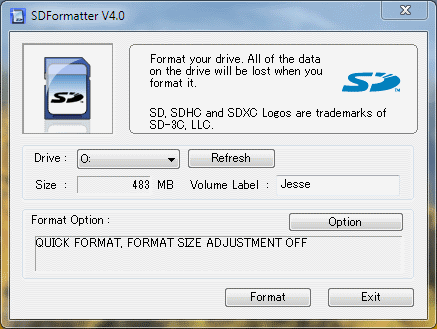
Raspberry Pi目前有几种操作系统,我尝试了几种,发现(There are several OS’s currently available for the Raspberry Pi, I have tried a few and have found that) 覆盆子杰西(Raspian Jesse) 1虽然不是最全能的是最精简的,但我们将在本教程中使用的是OS.(while not the most versatile is the leanest and is the OS we will be using in this tutorial.) 下载Raspian Jesse映像后,下一步是将其安装到SD卡上,为此,我们需要下载几个实用程序来格式化并将映像写入新格式化的卡.(Once you have downloaded the Raspian Jesse image the next step will be to install it onto the SD card and for this we will need to download a couple of utilities to format and write the image to the newly formatted card.) SD卡格式化程序是从SD协会免费下载的,将用于格式化卡.只需使用默认选项并仅提供标签即可.在我的配置中,我使用的是一张16GB San Disk Micro SD卡,它是从newegg那里以8美元左右的价格购买的,它的工作原理还不错.此步骤是可选的,仅在打算将格式保留为FAT32时使用.无论如何,我只是为了擦除驱动器上的现有数据而这样做.(The SD Card Formatter is a free download from the SD Association that will be used to format the card. Just use the default options and supply only the label. In my configuration I am using a 16GB San Disk Micro SD card that I got from newegg for around $8 and it works just fine. This step is optional and used only if you intend on keeping the format as FAT32. I did it anyway just to erase existing data I had on the drive.)
-
SD卡格式化(SD Card Formatter*)2 , https://www.sdcard.org/downloads/formatter_4*),https://www.sdcard.org/downloads/formatter_4(
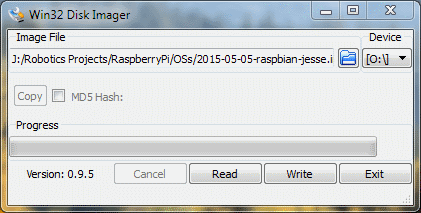
 我们需要做的下一件事是将新下载的映像写入SD卡,并使用Win32DiskImager实用程序来执行此操作.这很简单.选择SD卡驱动器,然后浏览至下载的Jesse映像,然后单击"写入"按钮.(The next thing we need to do is write the newly downloaded image to the SD card and to do this we use the Win32DiskImager utility. It’s fairly straight forward; select the SD cards drive and browse to the downloaded Jesse image and click the Write button.)
要备份SD卡的内容,请关闭Pi,取出SD卡并将其放入读卡器中,调出Wine32DiskImager应用程序,然后按照我们在将图像写入卡中的方式进行选择,然后选择卡驱动器,浏览至文件夹要在其中存储备份的位置,请提供备份映像的名称,然后单击"读取".(To backup the contents of the SD card shutdown the Pi, remove the SD card and put it into your card reader, bring up the Wine32DiskImager application then select the cards drive as done previously when we wrote the image to the card, browse to the folder where you want the backup to be stored, supply a name for the backup image then click Read.)
我们需要做的下一件事是将新下载的映像写入SD卡,并使用Win32DiskImager实用程序来执行此操作.这很简单.选择SD卡驱动器,然后浏览至下载的Jesse映像,然后单击"写入"按钮.(The next thing we need to do is write the newly downloaded image to the SD card and to do this we use the Win32DiskImager utility. It’s fairly straight forward; select the SD cards drive and browse to the downloaded Jesse image and click the Write button.)
要备份SD卡的内容,请关闭Pi,取出SD卡并将其放入读卡器中,调出Wine32DiskImager应用程序,然后按照我们在将图像写入卡中的方式进行选择,然后选择卡驱动器,浏览至文件夹要在其中存储备份的位置,请提供备份映像的名称,然后单击"读取".(To backup the contents of the SD card shutdown the Pi, remove the SD card and put it into your card reader, bring up the Wine32DiskImager application then select the cards drive as done previously when we wrote the image to the card, browse to the folder where you want the backup to be stored, supply a name for the backup image then click Read.) -
Win32磁盘映像器(Win32 Disk Imager*)3 , http://sourceforge.net/projects/win32diskimager*),http://sourceforge.net/projects/win32diskimager(
 如果您的SD卡上已经装有Raspian Wheezy操作系统,则可以通过在Raspian内部的终端上执行以下操作来就地升级.这需要10到15分钟,完成后,您将需要重新启动Pi.这个过程为您提供了最新的操作系统版本,但是我发现它们是稳定的并且可以定期推送.(If you already have the Raspian Wheezy OS on your SD card you can upgrade in place by doing the following at a terminal from within Raspian. It takes 10-15 minutes and when completed you will need to reboot your Pi. This process gives you the bleeding edge version of the OS but I’ve found them to be stable and they push fairly regularly.)


配置Pi(Configuring the Pi)
Win32DiskImager完成将映像安装到SD卡后,将卡放入Pi中并通电.当Jesse首次启动时,它将启动到桌面,并以pi用户身份自动登录,并为英国配置了本地化.(When Win32DiskImager has finished installing the image to the SD card, place the card in the Pi and apply power. When Jesse first boots up it boots to Desktop, automatically logs on as user pi and the localization is configured for the UK.)
新的Raspbian Jessie OS提供了一个漂亮的GUI,用于设置各种系统参数,并且可以通过浏览到以下位置启动:(The new Raspian Jesse OS provides a nice GUI for setting various system parameters and can be lauched by browsing to;)菜单->首选项->树莓派配置(Mennu->Preferences->Raspberry Pi Configuration),然后单击菜单项以启动该应用程序.我们需要做的第一件事是扩展文件系统,以便它利用整个SD卡而不是仅使用4GB(这是默认设置),除非您当然只希望为OS使用4GB的卡,在这种情况下,通过在剩余空间中创建分区,可以将卡的其余部分用作驱动器.如果您愿意,那么GParted(, and clicking on the menu item to launch the application. The first thing we need to do is expand the file system so that it utilizes the whole SD card instead of just 4GB, which is the default, unless of course you wish to only use 4GB of the card for the OS and in that case the rest of the card can be used as a drive by creating a partition in the remaining space. If this is to your liking then the GParted) [(GNOME分区编辑器((GNOME Partition Editor)4)())](http://gparted.org) 是一个很好的实用程序,可让您管理设备上的分区.(is a nice utility that will allow you to manage partitions on the device.)
 第二个选项卡允许我们启用某些接口,这些接口在我们开始对Pi进行编程时会很有用,因此,我建议至少启用SSH(如果尚未启用).以后我们开始对Pi进行编程时,可以使用spi和I2C接口,但是这些接口可以随时设置,将在下一篇文章中进行详细讨论.(The second tab allows us to enable certain interfaces that will be useful when we start programming the Pi, so I would recommend at least enabling the SSH, if it’s not already. The spi and I2C interfaces may be used later when we start programming the Pi, but these can be set at any time and will be discussed in the next article in more detail.)
 其他选项卡可用于使设备超频并设置本地化参数.由于Pi是英国产品,因此为英国设置了时区和键盘设置,因此您需要为您所居住的区域设置这些参数.对设置满意后,您将需要重新启动Pi.(The other tabs can be used to overclock the device and set localization parameters. Because the Pi is a British product the time zone and keyboard setup are set for the UK so you will need to set those parameters for the area in which you reside. Once you are satisfied with the setup you will need to reboot your Pi.)
Pi WiFi(Pi WiFi)
如果您拥有受支持的加密狗,则可以直接在Pi上使用WiFi.我尝试了几种不同类型的WiFi设备,但无法使用WiFi,因此我购买了一个(Getting WiFi to work on the Pi is straight forward if you have a supported dongle. I tried a couple of different types of WiFi devices and couldn’t get the WiFi to work so I purchased a) EDIMAX EW-7811Un N150 USB 2.0无线纳米适配器(EDIMAX EW-7811Un N150 USB 2.0 Wireless nano Adapter) 有了这个装置,它在几分钟之内就可以运行了.(and with this device had it going within minutes.) 除非您更改位置,否则固定在屏幕顶部的主工具栏上有一个网络图标,单击该图标可显示可用的WiFi网络列表.单击您要连接的网络,然后会弹出一个窗口,要求您输入网络密码,一旦输入该图标,图标将更改,几秒钟后您将连接.(On the main toolbar, which is docked to the top of the screen unless you’ve changed it’s location there’s a network icon that when clicked displays a list of available WiFi networks. Click on the network that you wish to connect to and a window will pop up asking for the network password, once this is entered the icon will change and after a few seconds you will be connected.) 可以在以下位置找到支持的WiFi设备的列表(A list of supported WiFi devices can be found at) http://elinux.org/RPi_USB_Wi-Fi_Adapters(http://elinux.org/RPi_USB_Wi-Fi_Adapters) .(.)
安装拇指驱动器(Mounting a Thumb Drive)
一篇很棒的文章(An excellent article,) 如何在Raspberry Pi上安装USB闪存盘(How To Mount A USB Flash Disk On The Raspberry Pi) 5很好地解释了该过程,但是我将简要回顾一下格式化和自动安装拇指驱动器所使用的步骤.(explains the process very well but I’ll briefly review the steps that I used to get the thumb drive formatted and auto mounted.)
我将设备格式化为EXT4格式是因为我在许可方面遇到了很多问题,而且自格式化以来就再也没有问题.此步骤是可选的,如果您决定保留FAT32格式,则需要相应地修改fstab中设备的条目.有关选项的完整列表和fstab的说明,请参见;(I formatted the device in the EXT4 format because I was having a lot of problems with permisssion and haven’t had that problem since formatting. This step is optional and if you decide to keep the FAT32 format you will need to modify the entry for the device in fstab accordingly. For a full list of options and an explaination of fstab refer to;) [Debian的fstab(debian fstab)11](https://wiki.debian.org/fstab) .(.)
将拇指驱动器放在USB连接器之一中,并在Pi上调出一个端子,然后键入;(Place the thumb drive in one of the USB connectors and bring up a terminal on the Pi then type;)ls -l/dev/sd (ls -l /dev/sd),其显示效果应类似于下图所示.(, which should produce a display sinilar to that in the image below.)
 使用以上信息,我们现在可以使用以下摄像机格式化和安装磁盘;(Using the above information we can now format and mount the disk using the following cammands;)
- 第1行-[可选]将驱动器格式化为EXT4格式,并带有标签" label".(line 1 - [optional] format the drive to EXT4 format, with the label “label”.)
- 第2行-创建一个目录作为拇指驱动器的安装点.(line 2 - Ceate a directory as a mounting point for the thumb drive.)
- 第3行-更改所有权,以便我们作为谦逊的用户可以访问它.(line 3 - Change ownership so we as humble users can access it.)
- 第4行-使用我们在第2行中创建的安装点手动安装设备.(line 4 - Manualy mount the device using the mounting point we created in line 2.)
这一切都很好,但是您不需要每次启动Pi时都必须这样做,因此我们需要配置系统以自动安装设备.由于Linux中的所有操作都是使用文件系统完成的,因此我们需要修改(This is all well and good but you don’t want to have to do this everytime you boot your Pi so we need to configure the system to auto mounted the device. Since everything in Linux is done using the file system we need to modify the)**/etc/fstab(/etc/fstab)**文件并添加有关我们的驱动器的信息.(file and add information about our drive.)
在终端窗口中输入以下命令来修改fstab文件;(Enter the following command from a terminal window to modify the fstab file;)须藤nano/etc/fstab(sudo nano /etc/fstab),并添加下图所示的最后一行.完成后输入(, and add the last line shown in the image below. When you are done type)**按Ctrl-X,然后按Y(Ctrl-X and then Y)**保存并退出nano编辑器.可以在以下位置找到有关使用nano编辑器的非常好的初学者教程.(to save and exit the nano editor. A very good beginners tutorial on using the nano editor can be found at) [极客(How-To-Geek)6](http://www.howtogeek.com/howto/42980/the-beginners-guide-to-nano-the-linux-command-line-text-editor/)
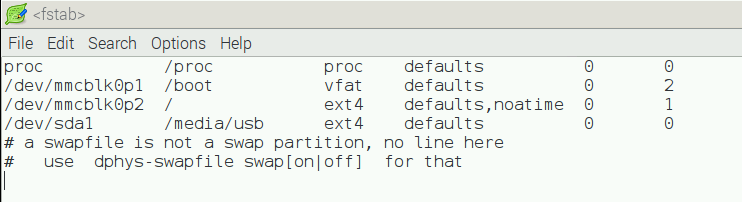 注意:如果您的设备使用FAT32格式,则用其替换底行;(Note: If your device is formatted with FAT32 replace the bottom line with this;)
现在,当您启动Pi时,驱动器将自动安装并可以使用.我使用我的所有开发文件,包括数据表和其他用于开发的文件.然后,当我转到另一台机器时,我要做的就是卸载它(Now when you boot your Pi the drive will be automatically mounted and ready for use. I use mine to put all my development files including Datasheets and other files that I use for development. Then when I go to another machine all I have to do is unmount it)**须藤umount/media/usb(sudo umount /media/usb)**然后我就可以将它带到另一台机器或任何其他机器上.(and I can take it with me to another machine or whatever.)
注意:如果您的设备使用FAT32格式,则用其替换底行;(Note: If your device is formatted with FAT32 replace the bottom line with this;)
现在,当您启动Pi时,驱动器将自动安装并可以使用.我使用我的所有开发文件,包括数据表和其他用于开发的文件.然后,当我转到另一台机器时,我要做的就是卸载它(Now when you boot your Pi the drive will be automatically mounted and ready for use. I use mine to put all my development files including Datasheets and other files that I use for development. Then when I go to another machine all I have to do is unmount it)**须藤umount/media/usb(sudo umount /media/usb)**然后我就可以将它带到另一台机器或任何其他机器上.(and I can take it with me to another machine or whatever.)

SSH进入Pi(SSH into the Pi)
为了SSH进入Pi并使用SFTP协议传输文件,请下载(In order to SSH into the Pi and transfer files using the SFTP protocol Download the) FileZilla客户端(FileZilla Client) 8应用程序,或使用您选择的提供SFTP传输的替代应用程序.我将使用FileZilla来执行此操作,但我可以想象其他客户端也会类似.(application, or use the alternative application you choose that provides SFTP transfer. I’ll use FileZilla to do this but I would imagine other clients woudl be similar.)
为了配置FileZilla,您需要知道Pi的IP地址,以便在Pi类型的终端窗口中找到它.(In order to configure FileZilla you will need to know the IP address of your Pi so in a terminal window on the Pi type;)ifconfig(ifconfig),您应该会看到与下图类似的内容.(, you should see something similar to that in the image below.)
 从上图可以看到Pi的地址是(From the image above we see that the address of the Pi is)192.168.254.15(192.168.254.15),在FileZilla的"主机"文本框中输入该地址,在适当的区域中提供登录信息,然后保存.如果您未将IP地址设置为静态,则IP地址可能会有所变化,但如果没有连接,请按照上述步骤操作或将其设置为静态.(, enter this address in Host textbox in FileZilla, provide your logon information in the appropriate area then save it. If you don’t set the IP address as static it will change ocassionally but if it doesn’t connect just follow the procedure outlined above or make it static.)
 建立连接后,您便可以与Pi进行文件传输,也可以将文件从一个窗口拖放到另一个窗口.十分简单!(Once you have a connection you will be able to transfer files to/from the Pi but dragging and dropping from one window to the other. Easy peasy!)
修剪脂肪(Trimming the fat)
与几乎所有操作系统一样,您根本不需要或不需要很多BS,如果您打算在Pi上进行任何认真的开发,则可以减少很多赘肉,这不仅不必要,而且浪费空间.(As with just about any OS there is a lot of BS that you just don’t want or need and if you plan on doing any serious development on your Pi a lot of fat can be trimmed that is not only unnecessary but just wastes space.) 我涉足了很多站点,以找出需要删除的方式和内容,并找到了(I waded through quite a few site to find out how and what needed to be removed and found the) 缩小现有的Raspbian映像(Slimming down an existing Raspbian image) 9和(and) 为Raspberry Pi创建自己的极简Raspbian映像(Creating your own minimalistic Rasbian image for the Raspberry Pi) 10文章将非常有帮助.这是一个非常主观的主题,因为每个人都会在使用Pi进行其他操作.但是删除软件包/应用程序的基本命令是通过以下方式完成的:(articles to be very helpful. This is a very subjective subject since everyone will be using the Pi for different things. But the basic commands to remove packages/applications is done by;)
推荐应用(Recommended Applications)
下面是我经常使用的通用应用程序列表,只是认为我会通过.在下一篇文章中,我将介绍一些用于开发的应用程序,因此请务必查看第2部分.(Below is a list of general purpose applications that I use on a regular basis and just thought I would pass them along. In the next article I will introduce a few more applications that I use for development so be sure to look for Part 2.) 推荐应用(Recommended Applications)|名称(Name)|链接(Link)|安装(Install)|描述(Description)| |-|-|-|-| |IceWeasel| http://elinux.org/RPi_IceWeasel |须藤apt-get install iceweasel(sudo apt-get install iceweasel)|Raspberry Pi的FireFox浏览器(FireFox browser for the Raspberry Pi)| |康基*(*conky **)| https://help.ubuntu.com/community/SettingUpConky |须藤apt-get install conky(*sudo apt-get install conky*)|显示系统信息的可配置HUD(*Configurable HUD that shows system information*)| |scrot| http://linuxaria.com/howto/linux-shell-take-screenshots-with-scrot |须藤apt-get install scrot(*sudo apt-get install scrot*)|命令行屏幕抓图应用(*Command line screen grap application*)| |KolourPaint| http://kolourpaint.sourceforge.net |须藤apt-get install koloutpaint(*sudo apt-get install koloutpaint*)|基本油漆应用(*Basic paint application*)| | *http://www.wikihow.com/Configure-Conky -conky的配置选项(*- Configuration options for conky*) *http://conky.sourceforge.net/config_settings.html -conky的配置设置(*- Configuration settings for conky*)|
下一步是什么(What’s next)
在下一个教程中,我将为C/C ++和Python语言设置开发环境.另外,我将介绍可在我们的嵌入式开发环境中使用的一些工具.(In the next tutorial I will be setting up the development environments for both C/C++ and Python languages. Additionally I will descibe some of the tools that can be used in our embedded development environment.)
参考文献(References)
1为Raspberry Pi下载Raspbian,(Download Raspian for Raspberry Pi,) https://www.raspberrypi.org/downloads/raspbian(https://www.raspberrypi.org/downloads/raspbian) 2用于SD/SDHC/SDXC的SD Formatter 4.0,(SD Formatter 4.0 for SD/SDHC/SDXC,) https://www.sdcard.org/downloads/formatter_4(https://www.sdcard.org/downloads/formatter_4) 3Win32 Disk Imager,(Win32 Disk Imager,) http://sourceforge.net/projects/win32diskimager(http://sourceforge.net/projects/win32diskimager) 4GNOME分区编辑器,(GNOME Partition Editor,) http://gparted.org/livecd.php(http://gparted.org/livecd.php) 5如何在Raspberry Pi上安装USB闪存盘,(How To Mount A USB Flash Disk On The Raspberry Pi,) http://www.raspberrypi-spy.co.uk/2014/05/how-to-mount-a-usb-flash-disk-on-the-raspberry-pi(http://www.raspberrypi-spy.co.uk/2014/05/how-to-mount-a-usb-flash-disk-on-the-raspberry-pi) 6Linux命令行文本编辑器Nano入门指南,(The Beginner’s Guide to Nano, the Linux Command-Line Text Editor,) http://www.howtogeek.com/howto/42980/the-beginners-guide-to-nano-the-linux-command-line-text-editor/(http://www.howtogeek.com/howto/42980/the-beginners-guide-to-nano-the-linux-command-line-text-editor/) 7Linux命令行备忘单,http://www.pixelbeat.org/cmdline.html>(Linux command line cheat sheet, http://www.pixelbeat.org/cmdline.html>) 8FileZilla客户端,(FileZilla Client,) https://filezilla-project.org/download.php(https://filezilla-project.org/download.php) 9缩小现有的Raspbian图像,(Slimming an exisiting Raspbian image,) http://blog.samat.org/2015/02/05/slimming-an-existing-raspbian-install/(http://blog.samat.org/2015/02/05/slimming-an-existing-raspbian-install/) [10([10)为Raspberry Pi创建自己的简约Raspbian映像,(Creating your own minimalistic Rasbian image for the Raspberry Pi,) https://brandonb.io/creating-your-own-minimalistic-rasbian-image-for-the-raspberry-pi(https://brandonb.io/creating-your-own-minimalistic-rasbian-image-for-the-raspberry-pi) 11fstab,debian Wiki,https://wiki.debian.org/fstab(fstab, debian wiki, https://wiki.debian.org/fstab)
许可
本文以及所有相关的源代码和文件均已获得The Code Project Open License (CPOL)的许可。
Raspberry Dev 新闻 翻译