Raspberry Pi-第3部分IoT Hello World(译文)
By robot-v1.0
本文链接 https://www.kyfws.com/pi/raspberry-pi-part-iot-hello-world-zh/
版权声明 本博客所有文章除特别声明外,均采用 BY-NC-SA 许可协议。转载请注明出处!
- 28 分钟阅读 - 13894 个词 阅读量 0Raspberry Pi-第3部分IoT Hello World(译文)
原文地址:https://www.codeproject.com/Articles/1116198/Raspberry-Pi-Part-IoT-Hello-World
原文作者:Mike Hankey
译文由本站 robot-v1.0 翻译
前言
*An IoT end-to-end Hello World tutorial using Node.js, Express, socket.io, and associated middleware and the ESP8266 WiFi adapter board. *
使用Node.js,Express,socket.io和关联的中间件以及ESP8266 WiFi适配器板的IoT端到端Hello World教程.
介绍(Introduction)
在本文中,我们将在Raspberry Pi系列文章的第三篇文章的基础上,为我称之为物联网的Hello World项目开发一个简单的解决方案.在我以前的文章中,我们讨论了初始设置Raspberry Pi的问题,在第二篇文章中,我们讨论了使用Mosquitto作为消息代理的问题.在本文中,我们将介绍服务器新的软件,中间件和固件程序包,以及新的硬件设备ESP8266-12e WiFi适配器.如果您还没有阅读我以前的文章,建议您先阅读它们,然后再继续.(In this, the third in the Raspberry Pi series of articles we will be building on previous articles to develop a simple solution for what I would call an Internet of Things Hello World project. In my previous articles we discussed intially setting up the Raspberry Pi and in the second article using Mosquitto as a message broker. In this article we will be introducing serveral new software, middleware and firmware packages as well as a new hardware device the ESP8266-12e WiFi adapter. If you haven’t read my previous articles I suggest you read them before continuing.)
- Raspberry Pi 2,第1个,共n个-初始设置(Raspberry Pi 2, 1 of n - Initial setup)
- Raspberry Pi 2,第2个,共n个-作为物联网消息代理的Pi(Raspberry Pi 2, 2 of n - The Pi as an IoT message broker)
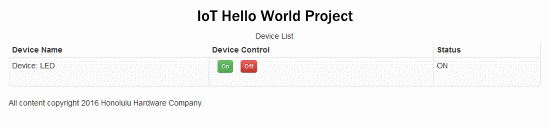
下图显示了非常粗糙的网页,该网页由我们将在此项目中创建的Web服务器提供.它会无线控制并显示连接到ESP8266-12e上gpio端口的LED的状态.尽管这是一个非常基础的项目,但它包含了更复杂的应用程序所需的所有组件.(The image below illustrates the very crude web page, served by our Web Server that we’ll be creating in this project. It will wirelessly control and display the status of an LED connected to gpio ports on the ESP8266-12e. Although this is a very basic project it contains all the components that would be needed for a more sophisticated application.)
 在整个系列中,我都使用过Raspberry Pi II,但出于这种困难,我将卡从RPi II中取出并插入到PiZero中.当PiZero尝试启动时,我最初遇到了一个问题,但问题出在那是我在RPi II上安装了一个拇指驱动器,而在我将其插入PiZero时,我没有插入它,效果很好.最重要的是,两个系统的硬件必须配置完全相同才能正常工作.我想我可以卸下拇指驱动器,并且可以工作,但是由于将驱动器用作开发环境,因此没有尝试.(I’ve used a Raspberry Pi II throughout this series but just for the heck of it I took the card out of the RPi II and inserted it into my PiZero. I initially had a problem when the PiZero tried to boot but the problem turned out to be that I had a thumb drive mounted on the RPi II and on the PiZero I hadn’t plugged it in, once I did plug it in it worked great. Bottom line both system’s hardware must be configured exactly the same for it to work. I guess I could have unmounted the thumb drive and it would have worked, but I didn’t try it as I use the drive as my development environment.)
目录(Table of Contents)
我们将在本文中介绍很多内容,因此我决定将本教程分为两个不同的领域:首先是ESP8266-12e和eLua语言的概述,mqtt消息传递和Web Server软件的简要概述,最后在第3.0节中详细介绍了项目本身的软件.(We will be covering a lot of ground in this article so I have decided to break this tutorial up into two distinct areas; the first will be an overview of the ESP8266-12e and eLua language, a brief overview of the mqtt messaging and Web Server software and finally go into detail in section 3.0 concerning the software for the project itself.)
- 1.0 ESP8266-12e WiFi适配器板(1.0 ESP8266-12e WiFi addapter board)
- 1.1 NodeMCU闪存(1.1 NodeMCU Flasher)
- 1.2 ESPlorer(1.2 ESPlorer)
- 1.2.1简单的眨眼应用(1.2.1 Simple Blink application)
- 2.0 RaspberryPi + Node.js(2.0 RaspberryPi + Node.js)
- 2.1安装和配置节点及依赖项(2.1 Install & Configure Node and dependenciese)
- 2.2创建一个项目(2.2 Create a Project)
- 2.3运行项目(2.3 Running the project)
- 3.0 IoT Hello World项目(代码)(3.0 IoT Hello World project (The Code))
- 3.1蚊子(3.1 Mosquitto)
- 3.2 Node.js(3.2 Node.js)
- 3.3 ESP8266-12e eLua代码(3.3 ESP8266-12e eLua Code)
- 3.4运行IoT Hello项目(3.4 Running the IoT Hello project)
- 3.5故障排除(3.5 Trouble Shooting)
- 4.0小结(4.0 Summary)
1.0 ESP8266-12e WiFi适配器板(1.0 ESP8266-12e WiFi addapter board)
ESP8266集成了一个基于Tensilica Xtensa LX106 SoC的32位RISC CPU,运行频率为80MHz.由上海制造(The ESP8266 incorporates a 32-bit RISC CPU based on the Tensilica Xtensa LX106 SoC running at 80MHz. Manufactured by the Shanghai based) 乐鑫公司(Espressif company) 它是一款低成本WiFi芯片,具有完整的TCP/IP堆栈和微控制器功能.(it is a low cost WiFi chip with full TCP/IP stack and Microcontroller capability.) ESP8266规格(ESP8266 Specifications)|描述(Description)|值(Value)| |-|-| |Voltage|3.3V不是5V(NOT 5V)| |目前的消费(Current consumption)|10uA-170mA(10uA - 170mA)| |最大的驱动能力(Maximum drive capabilites)|12mA| |可连接闪存(Flash memory attachable)|最大16MB(正常为512K)(16MB max (512K normal))| |Processor|Tensilica L106 32位(Tensilica L106 32bit)| |处理器速度(Processor Speed)|80MHz-160MHz| |RAM|32K + 80K(32K + 80K)| |GPIOs|17(多路)(17 (multiplexed))| |模拟到数字(Analog to Digital)|1个输入10位分辨率(1 input 10bit resolution)| |802.11支持(802.11 support)|b/g/n/d/e/i/k/r| |最大并发TCP连接数(Maximum concurrent TCP connections)|5|
该板有许多版本,具有各种功能,范围从仅几个gpio端口到通常在诸如Arduino之类的微控制器上都能找到的全套功能.操作系统是事件驱动的,而不是多任务的,因此在使用诸如tmr.delay之类的阻止代码时应格外小心.出厂时的设备支持旧的AT命令,您可能会或可能还不算老,无法记住Hayes调制解调器时代.尽管这些命令对于小型项目可能有用,但我认为我不会在生产环境中使用它.相反,NodeMCU的优秀人才已经开发了一种基于eLua的开源解释型语言,该语言对您想到的任何项目都具有强大的能力.他们也正在创建MicroPython版本,但是在撰写本文时,我认为它还没有准备好用于消费.(There have been many versions of this board manufactured with various capabilities ranging from just a couple of gpio ports to a full blown suite of functions that you would normally find on a microcontroller such as the Arduino. The Operating System is event driven and not multitasking so care should be taken when using blocking code such as tmr.delay. The device as shipped from the factory supports the old style AT commands that you may, or may not be old enough to rememeber from the days of the Hayes modem. While these commands may be useful for a small project I don’t think I would use it in a production environment. Instead the good people at NodeMCU have developed an open source interpreted language based on eLua that is more than capable for any project you have in mind. They are also in the process of creating a MicroPython version but as of this writing I don’t think it’s ready for comsumption yet.)
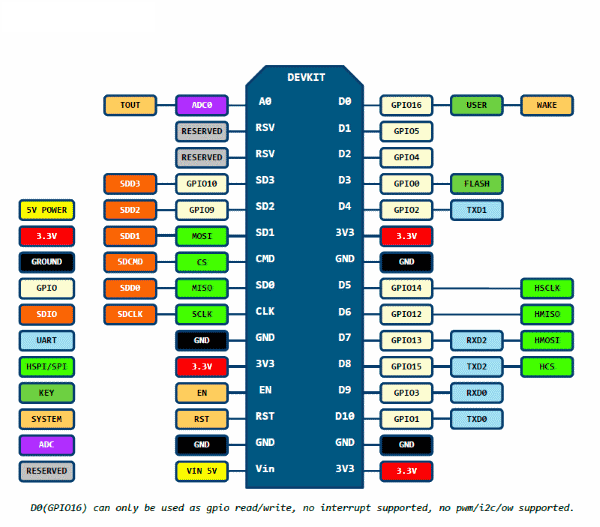
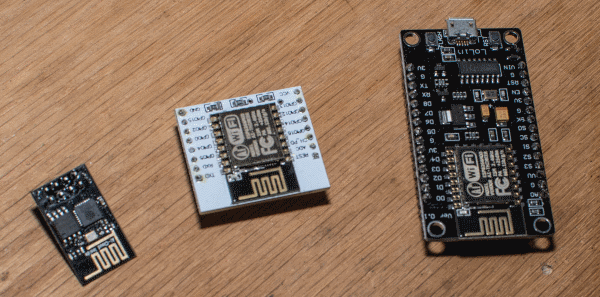 我们将用于此项目的开发板是ESP8266-12e NodeMCU DevKit,如右上图所示.该板集成了GPIO,PWM,I(The board we will be using for this project is the ESP8266-12e NodeMCU DevKit as shown in the image above on the far right. The board integrates GPIO, PWM, I)2(2)C,ADC,1-wire和SPI以及UART通过USB或板上引脚进行连接.我购买的版本使用的是CH340芯片而不是官方的FTDI芯片,因此,如果您确实在Windows计算机上,则需要检查版本并安装适当的Windows驱动程序.幸运的是,网络上有很多有关该板和大型社区的文档,例如(C, ADC, 1-wire and SPI as well as UART via USB or through pins on board. The version I purchased has the CH340 chip instead of the official FTDI chip so you will need to check the version you have and install the appropriate windows drivers, if you are indeed on a windows machine. Fortunately there is a lot of documentation on the web about this board and a large community such as) 一切nodeMCU(Everything nodeMCU) 愿意在那里分享知识的人.我还碰到了一本免费的书(that are willing to share there knowledge. I also ran across a free book) Kolban关于ESP8266的书(Kolban’s book on the ESP8266) 这是一个很好的参考.下面是该设备的引脚排列,如您所见,这些引脚是多路复用的,这意味着可以将它们配置为多种用途.(that is a excellent reference. Below is the pinout for the device and as you can see the pins are multiplexed meaning they may be configured for multiple purposes.)
1.1 NodeMCU闪存(1.1 NodeMCU Flasher)
为了使用NodeMCU固件,必须将其闪存到设备上,为此,我们需要下载(In order to utilize the NodeMCU firmware it must be flashed onto the device and for this we need to download the) ESP8266Flasher(ESP8266Flasher) 可执行文件. Flasher应用程序非常易于使用,并且在使用中有大量文档在现场.我们将固件从以下位置刷新到设备上(executible. The flasher application is fairly straight forward to use and there is plenty of documentation on site on it’s usage. We get the firmware to flash onto the device from) nodemcu-build.com(nodemcu-build.com) ,您可以在其中选择设备所需的功能,然后让他们为您构建设备.完成后,您会收到一封电子邮件,其中包含可以下载图像的链接.闪烁时,设备引脚gpio0/D3必须保持低电平.在ESP8266-1上,这是一个问题,但在ESP8266-12e上,这不是一个问题,因为我相信他们拥有板载硬件来感知何时刷新.无论如何,如果闪光灯不工作,这可能是原因.(, where you can pick what functionality you require for the device then have them build it for you. When they are done you will be emailed a link where the image can be downloaded. When flashing the device pin gpio0/D3 must be held low. On the ESP8266-1 this was an issue but on the ESP8266-12e this was not an issue as I believe they have the hardware on board to sense when it is being flashed. At any rate a heads up, if the flash isn’t working this may be the reason.)
1.2 ESPlorer(1.2 ESPlorer)
用最新的NodeMCU固件刷新设备后,我们需要某种方式对其进行编程.我强烈推荐开发IDE(Once we have the device flashed with the latest NodeMCU firmware we need some way of programming it. I highly recommend the development IDE) [ESPlorer由Victor Brutskiy(ESPlorer by Victor Brutskiy)](https://www.codeproject.comesp8266.ru/esplorerVictor Brutskiy ESPlorer) .它是一个免费的应用程序,用Java编写,同时支持AT命令和基于LUA的语言.它也可以选择在MicroPython中编程,但是我没有尝试过,所以我不知道它是否有效或该语言是否可用.(. It is a free application, written in Java that supports both the AT command and LUA based languages. It also has the option to program in MicroPython but I didn’t try it so I have no idea if it works or if the language is available yet.)
ESPlorer IDE是一个功能强大的工具,但我仅使用它提供的功能的一部分.我们将不介绍IDE的所有详细信息,而是介绍创建,将其保存为文件并运行的过程.(The ESPlorer IDE is a powerful tool but I only use a subset of the functionality that it provides. Instead of describing all the details of the IDE we will go through the process of creating, saving to the device as a file and running.)
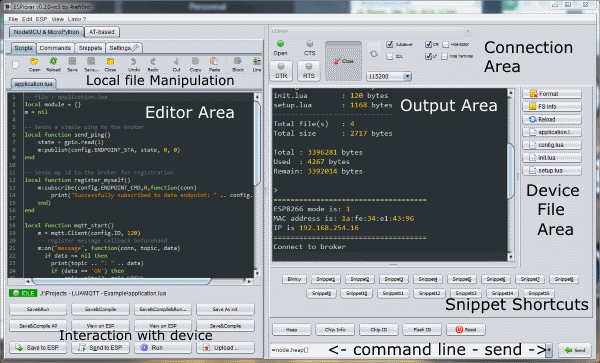 该设备在非易失性存储器中保留一个区域,该区域设置为平面文件系统,可以在其中存储要运行的文件.要在设备上格式化文件系统,请单击"格式化"按钮,请注意,这将清除文件区域,从而删除当前驻留在其中的所有文件.要获取有关文件系统的统计信息,请单击" FS Info"按钮,这将告诉您已保存了多少个文件以及其中的名称以及文件总大小,以及有多少个正在使用和可用.与其他按钮分组的最后一个按钮是"重新加载"按钮,该按钮显示/刷新按钮列表,其文件名位于重新加载按钮本身下方,单击该按钮将执行该文件.(The device keeps an area in non-volatile memory set up as a flat file system where files to be run may be stored. To format the file system on the device click the ‘Format’ button, caution this will clear the file area erasing all files that currently reside there. To get statistics on the file system click the ‘FS Info’ button, this will tell you how many files you have saved and there names as well as the total file area size and how much is in use and free. The last button grouped with the others is the ‘Reload’ button that displays/refreshes a list of buttons with file names below the reload button itself that when clicked will execute that file.)
警告(Caution)设备启动时,将在本地查找名为init.lua的文件,如果找到该文件,它将自动运行该文件.因此,在开发周期中,我建议您为主文件命名而不是init.lua,例如test.lua,否则您将不得不重新刷新设备.(When the device boots up it looks for a file locally named init.lua and if found automatically runs it. Therefore during the development cycle I would recommend naming the main file something other than init.lua, such as test.lua, otherwise you will have to reflash the device.)
我不会描述如何使用该应用程序或所有可用功能,而是会描述整个教程中的重要部分,以完成我们需要做的事情,如果您想了解有关该应用程序或如何使用它的更多信息,我将介绍留给您去Google,关于此应用程序已有很多文章,因此您应该不会有任何问题.(I won’t describe how to use the application or all the functionality available but instead will describe the important pieces throughout the tutorial to get done what we need to do and if you would like more information about the application or how to use it I will leave it to you to google, there has been a lot written about this application so you shouldn’t have any problems.)
该设备在非易失性存储器中保留一个区域,该区域设置为平面文件系统,可以在其中存储要运行的文件.要在设备上格式化文件系统,请单击"格式化"按钮,请注意,这将清除文件区域,从而删除当前驻留在其中的所有文件.要获取有关文件系统的统计信息,请单击" FS Info"按钮,这将告诉您已保存了多少个文件以及其中的名称以及文件总大小,以及有多少个正在使用和可用.与其他按钮分组的最后一个按钮是"重新加载"按钮,该按钮显示/刷新按钮列表,其文件名位于重新加载按钮本身下方,单击该按钮将执行该文件.(The device keeps an area in non-volatile memory set up as a flat file system where files to be run may be stored. To format the file system on the device click the ‘Format’ button, caution this will clear the file area erasing all files that currently reside there. To get statistics on the file system click the ‘FS Info’ button, this will tell you how many files you have saved and there names as well as the total file area size and how much is in use and free. The last button grouped with the others is the ‘Reload’ button that displays/refreshes a list of buttons with file names below the reload button itself that when clicked will execute that file.)
警告(Caution)设备启动时,将在本地查找名为init.lua的文件,如果找到该文件,它将自动运行该文件.因此,在开发周期中,我建议您为主文件命名而不是init.lua,例如test.lua,否则您将不得不重新刷新设备.(When the device boots up it looks for a file locally named init.lua and if found automatically runs it. Therefore during the development cycle I would recommend naming the main file something other than init.lua, such as test.lua, otherwise you will have to reflash the device.)
我不会描述如何使用该应用程序或所有可用功能,而是会描述整个教程中的重要部分,以完成我们需要做的事情,如果您想了解有关该应用程序或如何使用它的更多信息,我将介绍留给您去Google,关于此应用程序已有很多文章,因此您应该不会有任何问题.(I won’t describe how to use the application or all the functionality available but instead will describe the important pieces throughout the tutorial to get done what we need to do and if you would like more information about the application or how to use it I will leave it to you to google, there has been a lot written about this application so you shouldn’t have any problems.)
1.2.1简单的眨眼应用(1.2.1 Simple Blink application)
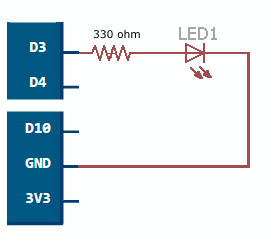
为了展示EPS8266设备的某些功能以及如何使用IDE,我们将创建一个简单的应用程序,使gpio0/D3上的LED闪烁设置次数.另外,每次通过循环时,当前cnt将被打印到终端.(To showcase some of the functionality of the EPS8266 device and how to use the IDE we’ll create a simple application to blink an LED on gpio0/D3 on/off a set number of times. Additionally each time through the loop the current cnt will be printed to the terminal.)
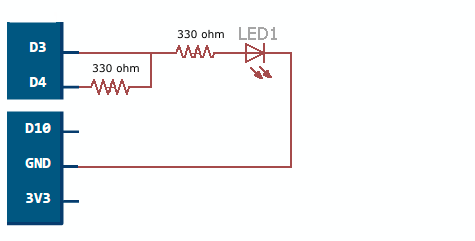
在开始编码之前,我们需要组装下图所示的非常简单的电路,该电路包括一个限流电阻和一个从端口D3到地的LED.所需电阻的值将取决于您选择的LED,并且可以根据从LED数据表中获得的值进行计算.您将需要知道正向压降(V(Before we can start coding we need to assemble the very simple circuit shown in the schematic below consisting of a current limiting resistor and an LED from port D3 to ground. The value of the resistor required will depend on the LED that you select and can be calculated from values that are obtained from the LED’s datasheet. You will need to know the forward voltage drop (V)F(f))和ODED的正向电流(i),由此可以通过R =(V() and the forward current (i) of the ODED and from this the resistance can be calculated by R = (V)s(s)-V(- V)F(f))/我在哪里V() / i where V)s(s)是电源电压.例如,如果我们有一个带V的LED(is the supply voltage. As an example if we have an LED with V)F(f)=分别为1.8V和i =30mA,电源电压为3.3V; R =(3.3V-1.8V)/.030 =50欧姆在我的示例中,我使用了一个330ohm的电阻,该电阻可以正常工作并点亮LED,但与使用一个计算得出的电阻相比,它只是一个微调.(= 1.8V and i = 30mA respectively with a supply voltage of 3.3V then; R = (3.3V - 1.8V) / .030 = 50ohm. I used a 330ohm resistor in my example which worked fine and lights the LED but it is just a tad dimmer than what it would have been had I used a resistor of the value calculated.)
 现在我们已经整理好了一切,我们可以专注于代码.从NodeMCU eLua语言后面的代码片段中可以看出,从语法上讲,它非常像Python,即使您不知道Python也应该很容易理解.(Now that we have things wired up we can concentrate on the code. As can be seen in the code snippet that follows the NodeMCU eLua language is very Python-ish syntactically and even if you don’t know Python should be fairly easy to understand.)
eLUA语言提供了更多功能(请参阅(There is a lot more functionality available in the eLUA language (See) NodeMCU固件文档(NodeMCU firmware documentation) ),我们将更深入地介绍实际的IoT Hello World应用程序.将代码输入到编辑器窗口后,我们可以在此处执行许多操作;() and we will go into greater detail when we get to the actual IoT Hello World application. Once the code has been entered into the editor window there are a number of things we can do from here;)
现在我们已经整理好了一切,我们可以专注于代码.从NodeMCU eLua语言后面的代码片段中可以看出,从语法上讲,它非常像Python,即使您不知道Python也应该很容易理解.(Now that we have things wired up we can concentrate on the code. As can be seen in the code snippet that follows the NodeMCU eLua language is very Python-ish syntactically and even if you don’t know Python should be fairly easy to understand.)
eLUA语言提供了更多功能(请参阅(There is a lot more functionality available in the eLUA language (See) NodeMCU固件文档(NodeMCU firmware documentation) ),我们将更深入地介绍实际的IoT Hello World应用程序.将代码输入到编辑器窗口后,我们可以在此处执行许多操作;() and we will go into greater detail when we get to the actual IoT Hello World application. Once the code has been entered into the editor window there are a number of things we can do from here;)
- Ctrl + s将文件保存到本地并保存到设备文件系统并运行它.(control+s to save the file locally and to the devices file system and run it.)
- 保存到ESP-将文件保存到设备并运行.(Save to ESP - saves the file to the device and runs it.)
- 发送到ESP-将其下载到设备并运行.(Send to ESP - downloads it to the device and runs it.)
- 将其保存到设备后,您可以单击"重新加载"按钮,然后将显示已保存在设备上的文件列表,然后您可以单击要运行的文件.(Once it has been saved to the device you may click on the Reload button and a list of files that have been saved on the device will appear, you can then click on the file you wish to run.)
- 最后,如果文件已保存到设备,则可以通过在右下角的文本框中输入命令并单击文本框右侧的"发送"按钮,将" dofile(" blinky_func.lua")“命令发送到设备.(Lastly if the file has been saved to the device you can send the ‘dofile(“blinky_func.lua”)’ command to the device by entering the command in the bottom right textbox and clicking on the Send button just to the right of the textbox.)
2.0 RaspberryPi + Node.js(2.0 RaspberryPi + Node.js)
我们现在将ESP8266 WiFi适配器放在一边,然后集中在Pi一边咬一口.我们将学习Node.js Express的基础知识以及稍后将在IoT Hello项目中使用的中间件.(We are going to put the ESP8266 WiFi adapter to the side for now and concentrating on the Pi side for a bite. We’re going to learn the basics of Node.js Express and the middleware that we will be using later in our IoT Hello project.) Node.js是基于Chrome的V8 JavaScript引擎构建的JavaScript运行时.虽然可以一起使用Node.js,但使用Express会容易得多. Express本身非常有限,本质上是一系列中间件函数调用.中间件定义;(Node.js is a JavaScript runtime built on Chrome’s V8 JavaScript engine. While it is possible to use Node.js along it will be a lot easier using Express. Express itself is very limited and is essentially a series of middleware function calls. Middleware definition;) 中间件功能是可以访问请求对象(req),响应对象(res)和应用程序的请求-响应周期中的下一个中间件功能的功能.下一个中间件功能通常由变量名next表示.(Middleware functions are functions that have access to the request object (req), the response object (res), and the next middleware function in the application’s request-response cycle. The next middleware function is commonly denoted by a variable name next.)#### 2.1安装和配置节点及其依赖项(2.1 Install & Configure Node and dependencies) 我们将通过获取核心应用程序Node.js和Node Package Manager(NOM)开始安装.在进行任何安装之前,我总是会进行更新/升级以使计算机保持最新状态,这是一种很好的做法.(We’ll start the installation by getting the core applications Node.js and the Node Package Manager (NOM). I always do the update/upgrades to get machine up to date before doing any installations, it’s a good practice to get into.) 因为我们将使用Express,所以我们需要使用包管理器来安装一些中间件.有两种方法可以配置用于开发Node.js应用程序的开发环境:第一种方法是将依赖项文件放在磁盘上的某个区域中,并在创建项目时使用链接访问全局区域中所需的模块.其次,依赖文件下载到本地目录中,并且仍然可以使用全局区域,但不是必需的.我使用链接到全局区域的第一种方法设置了我的环境,并且我将展示两种方法都必须执行的步骤.(Because we’ll be using Express we need to install some middleware using the package manager. There are two ways to configure the development environment for developing Node.js applications; the first method involves putting the dependency files in an area on disk and when a project is created, links are used to access the required modules in the global area. Secondly the dependency files are downloaded into the local directory and a global area may still be used but not necessary. I have my environment set up using the first method of linking to a global area and I’ll show the steps necessary to do it both ways.) 接下来是安装特定于应用程序的模块,当调用安装命令时,我们可以通过使用命令行参数来控制模块的位置.(Installing the application specific modules is next and we have the ability to control where the modules reside by using command line arguments when invoking the install commandls;) 如果未提供任何参数,则仅将文件复制到工作目录中.如果您以前将中间件文件下载到了全局区域,或者正在启动一个新项目并希望引用它们,请使用链接选项.(If no arguments are supplied the files are copied only into the working directory. If you previously downloaded the middleware files into the global area or are starting a new project and want to reference them use the link option.) 以下是我们将在此项目中使用的中间件模块的列表.(Below is a list of the middleware modules we will be using in this project.)
- ejs(ejs)-简单的模板语言,可让您使用纯JavaScript生成HTML标记.(- Simple templating language that let’s you generate HTML markup with plain JavaScript.)
- 人体解析器(body-parser)-解析传入的请求主体.(- Parses incoming request bodies.)
- mqtt(mqtt)-发布/订阅消息传递协议.(- Publish/Subscribe messaging protocol.)
- 摩根(morgan)-HTTP请求记录器.(- HTTP request logger.)
- 下午2(pm2)-在后台运行应用程序,提供负载平衡并保持进程正常运行.(- Runs the application in the background, provides load balanving and keeps the process alive.) 这一系列命令建立了到我们希望能够在全局区域中访问的模块的链接,此操作具有创建node_modules子目录的副作用.(This series of commands establishes links to the modules we want to be able to access in the global area this action has the side effect of creating the node_modules subdirectory.) 当我们想在本地安装模块时,我们使用install命令行参数,如果我们还想全局保存副本,则添加–save号.(When we want to install the modules locally we use the install command line argument and if we want to also save a copy globally add the –save arguemnt.)
2.2创建一个项目(2.2 Create a Project)
在将模块下载到工作副本之前,我们可能已经领先了一步,不是需要工作副本吗?(We may have gotten a little ahead of ourselves, before we can download module(s) to our working copy don’t we need a working copy?)
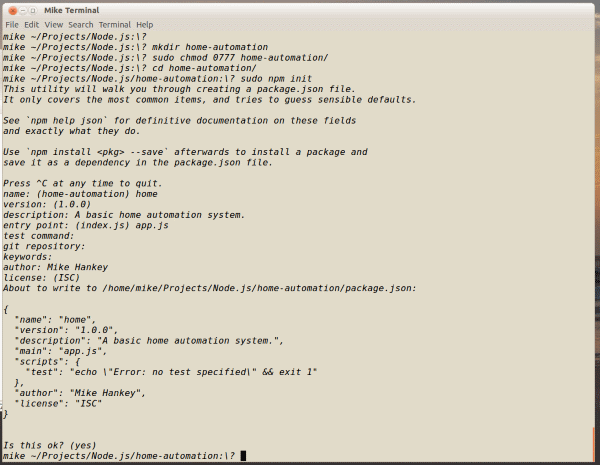
如果要进行大量的Node.js开发,那么创建应用程序环境或工作副本将成为第二天性.只需执行几个步骤,这是很容易的,其余步骤是自动化的.基本上,您创建一个目录,更改其安全权限,然后调用npm init来允许Node进行设置.下面显示的示例创建项目” home-automation"子目录并对其进行初始化.(Creating the application environment or working copy is something that will become second nature if you are to do a lot of Node.js development. It’s fairly easy to do just takes a few steps and the rest is automated. Basically you create a directory, change it’s security permissions and invoke npm init to allow Node to do the setup. The example shown below creates the project ‘home-automation’ subdirectory and initialize it.)
调用npm init时,应用程序会提示一系列问题,大多数情况下您可以接受默认值,但要记住在初始化期间用于入口点的名称,则需要在根目录中创建此文件.一个package.json文件是由init进程创建的,当您运行或调试应用程序或使用以下命令启动应用程序时,Visual Studio Code将使用您指定的入口点名称.(When npm init is invoked the application prompts for a series of questions and for the most part you can just accept the defaults, but remember the name you used for the entry point during the init, you will need to create this file in the root directory. A package.json file is created by the init process and the entry point name you specified will be used by Visual Studio Code when running or degugging the application or when starting the application using the)**sudo npm开始(sudo npm start)**命令.我不使用npm start方法,因为它需要花费额外的时间进行设置.如果我在Pi上进行开发,则不会使用Visual Studio Code,因此可以直接使用(command. I don’t use the npm start method as it takes extra time to set things up. If I’m developing on the Pi I won’t be using Visual Studio Code so I invoke directly using)须藤节点home-automation.js(sudo node home-automation.js).(.)
 注意,我将名称缩短为" home",并将入口点缩短为app.js.我之所以更改名称,只是因为我想要并且表明它们不需要相同,并且我更改了入口点,因为我不希望将其与具有其他扩展名的文件名索引混淆,例如; html,asp等.(Notice that I shortened the name to ‘home’ and the entry point to app.js. I chaged the name just because I wanted to and to show that they don’t need to be the same and I changed the entry point because I don’t want this to be confused with file name index that has other extensions such as; html, asp, etc..)
还有一种获取所需依赖模块的方法,这就是使程序包管理器很棒的原因.您可以通过提供一个依赖项组来进行反向工作,例如下面package.json文件中给出的示例;(There is one other way in which to get the dependency modules you need and this is what makes the package manager cool. You can work backwards by supplying a dependency group, such as the example given below in the package.json file;)
然后发出命令:(then issue the command:)
注意,我将名称缩短为" home",并将入口点缩短为app.js.我之所以更改名称,只是因为我想要并且表明它们不需要相同,并且我更改了入口点,因为我不希望将其与具有其他扩展名的文件名索引混淆,例如; html,asp等.(Notice that I shortened the name to ‘home’ and the entry point to app.js. I chaged the name just because I wanted to and to show that they don’t need to be the same and I changed the entry point because I don’t want this to be confused with file name index that has other extensions such as; html, asp, etc..)
还有一种获取所需依赖模块的方法,这就是使程序包管理器很棒的原因.您可以通过提供一个依赖项组来进行反向工作,例如下面package.json文件中给出的示例;(There is one other way in which to get the dependency modules you need and this is what makes the package manager cool. You can work backwards by supplying a dependency group, such as the example given below in the package.json file;)
然后发出命令:(then issue the command:)
sudo npm install npm将访问Web并下拉所需的模块,并将其放入本地node_modules目录中.我真的很喜欢这个系统,因为它不仅允许希望共享项目的用户包括包含依赖项组的package.json,而且最终用户还可以获取可用模块的正确版本.(npm will go to the web and pull down the modules it needs and put them in the local node_modules direcory. I really like this system because not only does it allows the user that wants to share a project to include the package.json that contains the dependency group but the end user can also get the correct version of the module that is available.)
2.3运行项目(2.3 Running the project)
在开发阶段,我在前台启动了应用程序,以便可以使用ctrl-c快速停止或重新启动它.(During the development phase I started the application in the foreground so that I could stop or restart it quickly using ctrl-c.)
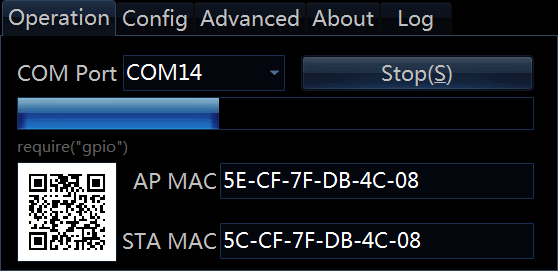
sudo node app.js 一旦项目完成并且可以投入生产,您将使用pm2实用程序在后台启动应用程序,如下图所示.(Once the project is complete and it’s time for it to go into production you would then use the pm2 utility to start the application in the background as illustrated in the image that follows.)
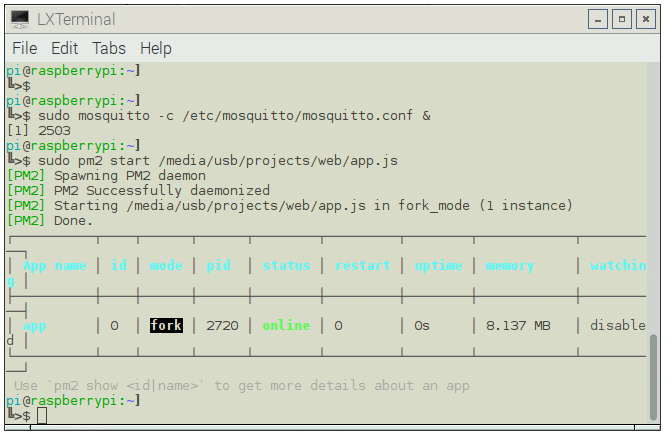 在上图中,您会注意到我在节点应用程序之前启动了mosquitto,它必须正在运行才能建立mqtt连接.如果您不熟悉mosquitto或将其配置为消息代理,请参阅我以前的有关设置消息代理的文章.(In the image above you will notice that I started mosquitto before the node application, it must be running to make an mqtt connection. Refer to my previous article concerning setting up the message broker, if you are unfamiliar with mosquitto or configuring it as a message broker.)
3.0 IoT Hello World项目(代码)(3.0 IoT Hello World project (The Code))
现在是时候将所有内容放在一起,并将其放入IoT Hello World项目.到目前为止,我们一直在使用mqtt作为消息传递协议,它非常强大,我们将继续使用它,但是我们缺少一项关键功能,那就是将数据推送到客户端的能力.我们将使用socket.io中间件来完成此任务.(Now it’s time to put all the pieces together and roll it into the IoT Hello World project. Up to this point we’ve been using mqtt as our messaging protocol, it is very powerful and we will continue to use it but we lack one key piece of functionality and that is the ability to push data to the client. We’ll be using the socket.io middleware to accomplish this.)
3.1蚊子(3.1 Mosquitto)
我们已经在上一篇文章中介绍了蚊子的知识,因此不会打死人.在/etc/mosquitto/mosquitto.conf文件中,您将需要修改内容,至少要确保正确设置了这些字段.准备运行mosquitto时,请参阅第2.3节.(We’ve already gone over the mosquitto stuff in my previous article so we won’t beat a dead horse. In the /etc/mosquitto/mosquitto.conf file you will need to modify the contents and at least be sure these fields are set correctly. Refer to section 2.3 when you are ready to run mosquitto.)
3.2 Node.js(3.2 Node.js)
app.js javascript文件是我们的Node.js Web服务器应用程序的入口点.在下面的摘录中,我们通过以下app.js为mqtt代理消息传递配置了回调方法.当用户连接时,将触发第一个回调,并且他们将立即订阅" node/1/state/“主题.当从mqtt客户端收到"状态"消息并将其传递到socket.io中间件的"发出"方法,该方法将"状态"消息推送到连接的客户端时,将触发第二个回调.(The app.js javascript file is the entry point for our Node.js web server application. In the snippet, from app.js that follows we configure our callback methods for our mqtt broker messaging. The first callback is triggered when a user connects and they are immediately subscribed to the ‘node/1/state/’ topic. The second callback is triggered when a ‘state’ message is recieved from the mqtt client and passed on to the socket.io middleware’s emit method that pushes the ‘state’ message out to connected clients.) 以下代码段中的部分客户代码是JavaScript代码,该代码在我们的双向协议或使用socket.io的推/拉协议中使用.第一次回调定义了客户端连接到服务器时采取的操作,它创建了另一个回调,该回调接收服务器发送的"状态"消息并更新” #testy"字段.是的,我不好称呼东西. jquery ready区域的下部是Button事件处理程序,它们仅将’cmd’消息传递到服务器.(The portion of the client code in the snippet below is the JavaScript code that is used in our bi-direction or push/pull protocol using socket.io. The first call back defines the action taken when the client connects to the server, it creates another callback that receives the ‘state’ message sent by the server and updates the ‘#testy’ field. Yeah I’m bad at naming stuff. The lower part in the jquery ready area are the Button event handlers that just pass the ‘cmd’ message on to the server.)
3.3 ESP8266-12e eLua代码(3.3 ESP8266-12e eLua Code)
当我开始为该项目寻找示例代码时,我很幸运,并且在foobarflier.io上从一位绅士那里发现了很多代码下降^如果您正在阅读这篇文章,谢谢您.(When I started looking for example code for this project I had a stroke of good luck and found pretty much a piece of drop in code from a gentleman at foobarflier.io…thanks man if you’re reading this.) 使用NodeMCU和MQTT的简单连接对象(Simple connected object with NodeMCU and MQTT) .我修改了代码以适应我的需要,并评论了其中的废话,但是固件编写得很好,因此mod最少且运行得很好.(. I modified the code to suite my needs and commented the crap out of it but the firmware was well written so the mods were minimal and went very well.)
在为ESP8266上电之前,我们需要为项目使用的LED和反馈回路布线.请记住,引脚号是固件用来引用端口的,而不是gpio号码.(Before powering up the ESP8266 we need to wire the LED and the feedback loop that we’ll use for our project. Remember that the pin numbers are what the firmware uses to reference the ports not the gpio numbers.)
 下载并解压缩文件后,启动ESPlorer并将Raspi-Part3 \ code \ lua目录中的文件加载到编辑器中;(Once you have downloaded and unzipped the files fire up ESPlorer and load the files in the Raspi-Part3\code\lua directory into the editor;)
-
config.lua-包含项目的配置设置.您将需要编辑该文件并替换;(config.lua - Contains the config settings for the project. You will need to edit this file and replace;)
- module.SSID-替换为您的SSID信息(module.SSID - Replace with your SSID informationion)
- module.HOST-主机IP地址(module.HOST - Host IP address)
- module.PORT-您将使用的端口号(module.PORT - Port number you’ll be using)
- module.CMD_PIN-ESP8266用于控制LED的gpio引脚.(module.CMD_PIN - ESP8266 gpio pin to use to control the LED.)
- module.STATE_PIN-ESP8266用于LED状态的gpio引脚.(module.STATE_PIN - ESP8266 gpio pin to use for the LED sate.)
-
setup.lua-与以下设备建立网络连接的固件(setup.lua - Firmware that establishes network connection to)
-
application.lua-建立mqtt连接并包含回调.(application.lua - Establishes mqtt connection and contains callbacks.)
-
test.lua-应用程序的入口点.(test.lua - Entry point for the application.) 现在将文件下载到设备中并运行test.lua模块,如果一切正常运行,您应该会看到连接消息.切记保留test.lua文件名不变,直到确定代码符合您的要求为止,然后将其名称更改为init.lua以使其自动启动.(Now download the files into the device and run the test.lua module, you should see the connection messages if everything is working as it should. Remember to leave the test.lua file name as it is until you are sure that the code is as you want it, then change the name to init.lua to have it auto start.)
3.4运行IoT Hello项目(3.4 Running the IoT Hello project)
由于我们已经在上一节中介绍了大多数内容,因此我相当快地完成了IoT Hello项目.唯一的新东西是socket.io东西,但事实证明,这对我们以前的东西来说不是重大改变.但是出于完整性的考虑,我将逐步执行启动和运行该项目所需的步骤.如果您有任何问题,请阅读下一节"故障排除".(Since we’ve covered most of this material in previous sections I have run through the IoT Hello project fairly quick. The only thing new was the socket.io stuff and it didn’t prove to be a significant change to waht we had before. But for the benefit of completeness I will run through the steps that need to be performed to get this project up and running. If you have any problems please read the next section on Trouble Shooting.)
- 如果尚未安装,请在Pi上安装Mosquitto,NPM和中间件.(On the Pi install Mosquitto, NPM and middleware, if you haven’t done so already.)
- 将下载文件解压缩到工作目录中.(Unzip the download file into a working directory.)
- 导航到code-> node-> IoT-Hello目录,并将其及其内容传输到Pi上的工作目录.(Navigate to the code->node->IoT-Hello directory, transfer it and it’s contents to a working directory on the Pi.)
- 在Pi上,编辑/etc/mosquitto/mosquitto.conf并替换网络信息.(On the Pi edit /etc/mosquitto/mosquitto.conf and replace the network information.)
- 开始蚊子(Start mosquitto)
- 从Pi上的终端导航到IoT-Hello目录,并调用sudo npm install命令以安装所需的中间件.(From a terminal on the Pi navigate to the IoT-Hello directory and invoke the sudo npm install command to install the required middleware.)
- 编辑app.js,您将需要使用网络信息来修改g_broker变量.(Edit app.js you will need to modify the g_broker variable with your network information.)
- 启动app.js(Start app.js)
- 在面包板上设置LED和相关的硬件.(Set up the LED and associated hardware on you breadboard.)
- 在PC上启动ESPlorer应用程序并连接到ESP8266-12e.(On the PC fire up the ESPlorer application and connect to the ESP8266-12e.)
- 将文件加载到code-> lua目录中.(Load the files in the code->lua directory.)
- 在config.lua中,根据需要修改SSID,HOST信息和其他信息.(In the config.lua modify the SSID, HOST information and other as needed.)
- 将文件下载到ESP设备并启动test.lua文件.(Download the files to the ESP device and start the test.lua file.)
- 启动您喜欢的浏览器,导航到app.js文件中指定的地址和端口,如果一切正常,您应该会看到本教程开始时显示的页面,并且能够单击按钮并控制LED和状态应更新.(Fire up your favorite browser, navigate to the address and port you specified in the app.js file and if everything worked you should see the page displayed at the beginning of this tutorial and be able to click on the buttons and control the LED and the state should update.) 我意识到要使整个过程正常运行涉及很多步骤,并且仅涉及一个简单的应用程序就涉及很多步骤,但是我认为整个过程相当简单.从最有利的方面来说,对于更复杂的应用程序,所有这些步骤(如果不是全部的话)都是必需的.(I realize there are a lot of steps involved in getting this whole thing working and is pretty involved for just a simple application but I believe the whole process is fairly straight forward. On the plus side most, if not all of these steps would be necessary for a more sophisticated application.)
3.5故障排除(3.5 Trouble Shooting)
因此,您按照指示进行操作,似乎不起作用.在开发该项目的过程中,我制定了一些调试技术,这些技术将继续进行.一个建议,mqtt_spy实用程序是您最好的朋友!(So you followed the instructions, to the letter and it doesn’t seem to work. During the course of developing this project I formulated some debugging techniques that I’ll pass on. One piece of advice, the mqtt_spy utility is your best friend!)
首先,请确保Mosquitto运行正常.我发现最好的方法是交互式运行它,(First let’s be sure that Mosquitto is running correctly. I found the best way to do this is to run it interactively,)
sudo mosquitto -c /etc/mosquitto/mosquitto.conf 如果它运行时没有给出错误消息,请启动mqtt_spy并发布/订阅任何主题,例如,“测试"并发布测试消息,然后查看它是否显示在订阅窗格中.如果是的话,那么mqtt的东西正在工作.如果您在启动时出错,或者测试消息没有通过检查/etc/mosquitto/mosquitto.conf中的设置来完成.一旦Mosquitto正常运行,您就可以继续前进,但除非继续前进,否则就不要继续前进.(if it runs without giving an error message fire up mqtt_spy and publish/subscribe to any topic, “test” for instance and publish a test message and see if it shows up in the subscription pane. If it does then the mqtt stuff is working. If you got errors on startup or the test message didn’t make it through check your settings in /etc/mosquitto/mosquitto.conf. Once Mosquitto is running properly you can move on but don’t move on unless it is.)
下一步是连接ESP8266 LED和环回,并运行固件.如果运行正常,则应该在ESPlorer输出窗格中看到连接信息.如果固件出错或似乎挂起,请检查config.lua文件中的设置.建立连接后,您可以启动mqtt_spy并在” node/1/cmd/“主题下发布” ON"或" OFF"消息以控制LED.同样,您可以订阅’node/1/state/‘主题以接收状态更新.(The next step is to get the ESP8266 LED and loopback wired up and the firmware running. If it is running correctly you should see the connection information displayed in the ESPlorer output pane. If the firmware gives errors or it seems to hang check the settings in config.lua file. Once you do get a connection established you can fire up mqtt_spy and publish an ‘ON’ or ‘OFF’ message under the ‘node/1/cmd/’ topic to control the LED. Likewise you can subscribe to the ‘node/1/state/’ topic to recieve state updates.)
如果一切正常,当您单击任一按钮检查app.js文件中的设置时,您无法访问该网页,或者它无任何作用,那实际上是唯一会出错的地方.如果您没有正确设置项目,那将是另一回事了,在这种情况下,您需要返回并重新阅读本教程的这一部分.(If you got all that working and you can’t access the web page or it doesn’t do anything when you click either of the buttons check the settings in the app.js file, that’s really the only thing that can functionally go wrong. If you didn’t set the project up correctly that’s another story and in that case you need to go back and re-read that section of the tutorial.)
最后但同样重要的一点是,如果一切正常,我叫Mike Hankey,如果不是,我叫Elmer Fudd.编码愉快!(And last but certainly not least if everything works correctly my name is Mike Hankey and if not my name is Elmer Fudd. Happy coding!)
4.0小结(4.0 Summary)
在开始这个项目之前,我做了很多研究,因为有很多未知数.我不知道LUA或Node.js,尽管我一直在考虑使用Node.js或SignalR做某事,但是我很快就排除了SignalR,因为我发现它令人困惑并且没有真正做到我想做的这样做,所以决定专注于Node.js,我很高兴自己做到了.坦率地说,我最大的坚持是,我认为将mqtt消息传递与网页集成起来很困难,但是在与Node.js一起工作了一段时间之后,我发现它与mqtt的配合非常好.而且,尽管Node.js是一个很棒的程序包,但我真的很喜欢在Node.js之上使用Express,并且事实是您只能加载所需的中间件,并且似乎有模块可以满足人们的需求.尽管名称不是很具启发性;咕unt声,杂技演员等.(I did a lot of research before starting this project because there were so many unknowns. I didn’t know LUA, or Node.js, although I had been looking at doing something with either Node.js or SignalR, I quickly ruled out SignalR as I found it confusing and didn’t really do what I thought I wanted to do with it so decided to concentrate on Node.js and I’m glad I did. Quite frankly my biggest hold up was that I thought integrating the mqtt messaging with a web page would be difficult but after working with Node.js for a while I found it played very nicely with mqtt. And although Node.js is a great package I really like working with Express on top of Node.js and the fact that you can load only the middleware you need and there seems to be modules to do about whatever a person could want. Although the names are not very disciptive; grunt, busboy, etc..) 我住在佛罗里达州中北部一个小镇上的服装店上面,在夏季,业务发展非常缓慢,因此我们不得不束紧腰带,而今年夏天我们不得不放弃的奢侈品之一就是互联网服务.但是在城里,我们有一个全新的带有WiFi的公共图书馆,所以我把我的Pi带到了那里,我想老太太把我带了新玩具的玩具踢了出去,他们大惊小怪并清理了桌子对我来说我可以在哪里工作.我发现Pi是解决我问题的非常便携式且价格合理的解决方案.(I live above an outfitters store in a very small town in North central Florida and during the summer months business gets very slow so we have to tighten our belts and one of the luxuries we had to give up this summer was our internet service. But in town we have a brand new public library that has WiFi so I take my Pi up there and I think the old ladies get a kick out of me bringing my new fangled toy to the library, they make a big fuss and clear a table for me where I can work. I’ve found the Pi to be a very portable and affordable solution to my problem.)
许可
本文以及所有相关的源代码和文件均已获得The Code Project Open License (CPOL)的许可。
新闻 翻译