RPI3 B +-Pi-land历险记第3部分(更新支持Pi1和2)(译文)
By robot-v1.0
本文链接 https://www.kyfws.com/pi/rpi-bplus-adventures-in-pi-land-part-updated-suppo-zh/
版权声明 本博客所有文章除特别声明外,均采用 BY-NC-SA 许可协议。转载请注明出处!
- 13 分钟阅读 - 6232 个词 阅读量 0RPI3 B +-Pi-land历险记第3部分(更新支持Pi1和2)(译文)
原文地址:https://www.codeproject.com/Articles/1165678/RPI-Bplus-Adventures-in-Pi-land-part-Updated-Suppo
原文作者:leon de boer
译文由本站 robot-v1.0 翻译
前言
Third in the series of frustrations and adventures with the Raspberry Pi
Raspberry Pi在挫折和冒险系列中排名第三
-
新版本2a源文件..一些小的调整(New version 2a source file .. few minor tweaks) 在此较旧的来源中,RGBA宏中的红色和蓝色下面的内容被颠倒了..对不起,您没有注意到(* In this older source below Red and Blue in the RGBA macro are reversed .. sorry didn’t notice*)
-
下载Pi1/Pi2/Pi3复合SD卡映像(800x600屏幕)(Download Pi1/Pi2/Pi3 composite SD card image (800x600 screen))
介绍(Introduction)
上一篇文章:(Previous article:)
- https://www.codeproject.com/Articles/1158245/More-Fun-frustration-and-laughs-with-the-Pi-Part-I(https://www.codeproject.com/Articles/1158245/More-Fun-frustration-and-laughs-with-the-Pi-Part-I)
好吧,这不是最初打算的文章,它应该是关于如何使用KeyBoard和Mouse启动USB集线器并运行裸机的.当我用Pi1实现这一目标时(按照我在上一篇文章中添加的最新屏幕截图),我得到了圣诞节礼物,它是Pi3 B +和Pi相机板的形状.(Well, this is not the article that was originally intended which was supposed to be on getting the USB hub up and running baremetal with the KeyBoard and Mouse. While I achieved that with the Pi1 (as per my updated screenshot added to my previous article), I got a present for Christmas in the shape of a Pi3 B+ and a Pi camera board.)
最终,我有机会接触到这样的板,立即去尝试我的代码,然后一切都变得糟透了.不仅我的Pi3特定代码不起作用,而且我也无法在Pi3上运行任何裸机代码,这为3个星期令人沮丧的工作奠定了基础.(Finally, having access to such a board, I immediately went to try out my code and it was then that all hell broke loose. Not only did my Pi3 specific code not work but I could not get any baremetal code running on the Pi3 at all and that set the stage for a very frustrating 3 weeks working out why.)
我还警告说,与许多Pi事物一样,还有一些我不知道的答案被未公开的细节所笼罩.(I also leave a warning that as with many Pi things, there as some answers I just don’t know that are shrouded in undisclosed detail.)
这是我运行代码的结果.我们有一些视觉木板细节和一些运行中的图形测试(如蕨类植物,矩阵雨,阴影)以及活动指示灯的闪烁….好的,我知道不是很令人兴奋.(This is the result of my running code. We have some visual board details and a few running graphics test (ifs fern, matrix rain, shading) as well as blinking the activity led …. okay, I know not very exciting.)
背景(Background)
Pi3 B +使用1.2GHz 64位四核ARMv8 CPU,但是Arm启动固件将CPU可靠地交付给您以32位模式运行,并且它运行的默认Linux发行版是32位.一旦一切正常,我确实发现将CPU转换为64位模式很简单,我可能会在后续阶段和另一篇文章中进一步介绍.在本文中,我们将使CPU以32位模式运行,因为这样做的目的是让一组代码可以在任何Pi版本上运行.(The Pi3 B+ uses a 1.2GHz 64-bit quad-core ARMv8 CPU, however the Arm startup firmware firmly delivers the CPU to you running in 32 Bit mode and the default linux distros it runs are 32 Bit. Once I got everything working, I did find it trivial to transfer the CPU into 64 bit mode and I may take that further at a latter stage and another article. For this article, we will have the CPU running in 32 bit mode as the intention is to have one set of code that will run on any of the Pi versions.) 据说Pi基金会已经使固件执行了特定的加载顺序,以从理论上使所有Pi版本兼容.我之所以这样说是因为,正如我们将要讨论的那样,我无法使其正常工作.有一些遗漏的细节.因此,固件启动顺序应该执行此加载顺序,进行一些内存改组,然后从地址0x8000启动(The Pi foundation has supposedly made the firmware do a specific load sequence with the view to theoretically make all Pi version compatible. I say supposedly because as we will discuss, I could not get it to work. There is some missing detail. So the firmware boot sequence is supposed to do this load sequence, do some memory shuffling and boot from address 0x8000) RPi3引导顺序:(RPi3 Boot sequence:)
- 检查(Check for)**kernel8.img(kernel8.img)**如果找到,请加载它并以64位模式启动.(and if found, load it and boot in 64bit mode.)
- 如果找不到,请检查(If not found, check for)**kernel8-32.img(kernel8-32.img)**如果找到,加载它并以32位模式启动(and if found, load it and boot in 32bit mode)
- 如果找不到,请检查(If not found, check for)**kernel7.img(kernel7.img)**如果找到,加载它并以32位模式启动(and if found, load it and boot in 32bit mode)
- 如果找不到,请检查(If not found, check for)**kernel.img(kernel.img)**如果找到,加载它并以32位模式启动(and if found, load it and boot in 32bit mode) 该顺序是正确且有效的,但对我来说不起作用的是从0x8000拿起处理器.我无法从该地址可靠地启动裸机映像.我尝试在互联网上尝试运行Pi3的几乎所有裸机代码,但都失败了.我本来以为板子已经死了,但是用树莓派图像磁盘进行了快速测试,它就变成了现实.甚至来自David Welch((That sequence is correct and worked but what would not work for me was picking up the processor from 0x8000. I could get no baremetal image reliably booted from that address. I tried almost every bit of baremetal code out on the internet that supposedly ran the Pi3 and all failed. I had actually thought the board was dead but a quick test with raspbian image disk and it burst into life. Even code from sites like David Welch () https://github.com/dwelch67/raspberrypi(https://github.com/dwelch67/raspberrypi) )不会拿起Pi3.到达论坛,很明显我并不孤单.我们中有些人无法使Pi3 B +起来.快速测试表明处理器从未启动过或从0x8000开始运行,或者如果固件没有正确将我的文件放入内存中.() would not pick the Pi3 up. Hitting the forums, it is clear I was not alone. There were a number of us who could not get the Pi3 B+ up. Testing quickly showed the processor just didn’t ever kick or start from 0x8000 or if it did the firmware had not put my file in memory correctly.) 更新:(Update:)Pi社区中的一些人对我表示例外,他们认为Pi3上的加载程序存在问题或错误,甚至可以说我基本上是骗子.他们坚持认为XYZ代码或存储库可以在Pi3上正常工作.可以说的是,我似乎对大多数从0x8000开始的代码感到困惑,并且在加载时非常不稳定.我没有任何理由花更多的时间来解决这个问题,因为加载程序没有提供我已经能够收集到的其他功能,而只是使用config.txt文件在0x0处启动了处理器.(Some in the Pi Community have taken exception to me suggesting that there is a problem or bug with the loader on the Pi3 even going so far as to basically call me a Liar. They insist that XYZ code or repository works on the Pi3 without problem. All can say is the boards I have seem to struggle with most code that starts at 0x8000 and is very flakey at loading. I don’t have any reason to spend many more hours to deal with the issue as the loader provides no extra features that I have been able to glean, over just starting the processor at 0x0 using the config.txt file.) 经过很多挫折后,我终于找到了一个站点,该站点的代码将提取Pi3并对其工作的每个样本进行处理.网站 ((After a lot of frustration, I finally found one site that the code from would pick up the Pi3 and infact every sample of his worked. The site () https://github.com/PeterLemon/RaspberryPi(https://github.com/PeterLemon/RaspberryPi) )由Peter Lemon AKA krom制作.他所有的代码都做了一个介绍() is by Peter Lemon AKA krom. What all of his code did was introduce a)**config.txt(config.txt)**通过以下几行将文件保存到SD卡上:(file onto the SD card with these lines:)
kernel_old=1
disable_commandline_tags=1
disable_overscan=1
framebuffer_swap=0
第一行是最重要的行.它告诉固件将处理器交付给要在内存地址启动的处理器(The first line is the most important line. It tells the firmware to deliver the processor for startup at the memory address) 0x0 .从0x0加载代码的那一刻起,一切都变得栩栩如生.老实说,我不知道这是否是固件的错误,它可能会很快修复或永久存在.彼得`莱蒙(Peter Lemon)并未详细说明他如何或为何知道这样做.我现在只能说这是必需的.因此,用于裸机的Pi3的SD卡最终会带有4个文件(. The moment I had my code loading from 0x0, everything burst into life. I honestly don’t know if this is a bug with the firmware which may be fixed soon or something permanent. Peter Lemon doesn’t detail how or why he knew to do this. All I can say is for now it is required. So your SD card for a Pi3 in baremetal ends up with 4 files on it being)bootcode.bin(bootcode.bin),(,)start.elf(start.elf),(,)**config.txt(config.txt)**和(and)kernel8-32.img(kernel8-32.img).的(. The)**kernel8-32.img(kernel8-32.img)**也可能是(could also be)kernel7.img(kernel7.img).如果您看一下上面的启动顺序,两者似乎没有真正的区别.我在用(. There appears to be no real difference between the two if you look at the boot sequence above. I am using)**内核8-32.img(Kernel8-32.img)**所以我知道这是一个Pi3文件(so I know it is a Pi3 file leaving)**kernel7.img(kernel7.img)**Pi2内核文件.(for Pi2 kernel files.)
更新(Updated):我被告知fixup.dat需要放在SD卡上,否则Pi3B将仅报告256MB内存.我们的播放样本都不会接近该内存量,因此如果您打算编写更大的代码,我将由您自己决定.(: I have been advised that fixup.dat needs to go on the SD card or the Pi3B will report only 256MB of memory. None of our play samples goes anywhere near that amount of memory so I will leave that up to you if you intend to write larger code.)
更新(Updated):新的合成SD映像包含3个内核文件,(: The new composite SD image contains 3 kernel files,)kernel.img(kernel.img)(Pi1),((Pi1),)kernel7.img(kernel7.img)(Pi2)和((Pi2) and)kernel8-32.img(kernel8-32.img)(Pi3). SD卡现在将有6个文件,但可以在放置它的任何Pi板上使用.((Pi3). The SD card will now have 6 files, but will work on any Pi board it is placed in.)

使用代码(Using the Code)
手臂工具已更新.它们已从上一篇文章中的5.4升至6.2.遇到麻烦时,我更新了工具以防万一((The arm tools have been updated. They have advanced to 6.2, from the old 5.4 in last articles. When I was having trouble, I updated my tools just in case () https://developer.arm.com/open-source/gnu-toolchain/gnu-rm/downloads(https://developer.arm.com/open-source/gnu-toolchain/gnu-rm/downloads) ).().) 根据之前的文章,我只是为我的编译设置了一个批处理文件,如下所示:(As per previous articles, I just setup a batch file for my compiling like this:)
g:\pi\gcc_pi_6_2\bin\arm-none-eabi-gcc -O2 -mfpu=neon-fp-armv8 -mfloat-abi=hard
-march=armv8-a+crc -mtune=cortex-a53 -nostartfiles -g3 -Wa,--defsym,BCM2837=1 start.s main.c -Wl,
-T,rpi3.ld -o kernel.elf -lc -lm
您可以在Pi3上看到与Arm8处理器匹配的处理器选项:(You can see the processor options matching the Arm8 processor on the Pi3:)
-mfpu=neon-fp-armv8 -mfloat-abi=hard -march=armv8-a+crc -mtune=cortex-a53
SRC 2a的更新:(UPDATE for SRC 2a:)新的源2a不需要将符号压入Start.S文件中,它会自动检测CPU类型和外围设备基址,并对所有内容进行校正.该代码中包含的批处理文件不会推送符号,因此请注意不要在原始和2a zip文件之间混合代码.(The new source 2a does not require the symbol to be pushed the Start.S file does all auto-detection of CPU type and Peripheral base address and corrects for everything. The batch file included in that code does not push the symbol so take care not to mix code between original and 2a zip files.)
有一条新命令将CPU推入(There is a new command that pushes the CPU to the assembler code in) Start.S :(:)
-Wa,--defsym,BCM2837=1
它推动"(It pushes “) BCM2837=1 进入汇编器(” into the assembler for) Start.S 它控制是否包括某些汇编程序块(更新:(which controls whether certain blocks of assembler are included (Update:) Pi1 BCM8235=1, Pi2 BCM8236 =1 ).这是准备再次将代码与以前文章中的标准Pi1代码重新结合在一起,因为我需要(). This is in preparation to again rejoin the code with the standard Pi1 code from the previous articles as I will need) start.S 根据我们要编译的Pi添加/删除代码.(to add/delete code depending on what Pi we are compiling for.)
Start.S 我们知道Pi2/Pi3是四核的,它会启动并将Core 1,2,3停滞到死循环中.在此示例中,仅核心0继续运行并运行到主代码中,因此它的确看起来像(is aware the Pi2/Pi3 are quad core and it starts and parks Core 1, 2, 3 into a deadloop. Only Core 0 continues on and runs into the main code in this example, so it really looks like a) Pi1 .同样,所有这些都已完成,因此我可以将Pi3代码合并回到较早的文章代码中.(. Again, all this is done so I can merge the Pi3 code back into the older article code.)
更高级的用户可能要打开(The more advanced users may want to open) Start.S 并查看在跳转到称为C的开始点之前运行的汇编代码(and look at the assembler code that is run before it jumps to the C start point called) kernel_main 在(in)main.c(main.c).(.)
更新:(UPDATED:)在原始代码中,要求在初始C代码中立即运行两个关键代码段.合并时(In the original code, there was a requirement to run two critical sections of code immediately in the initial C code. When merging) Start.S 有了运行Pi1/Pi2的能力,我就可以将这两个关键部分下移到汇编代码中.新的(with the ability to run the Pi1/Pi2, I was able to move these two critical sections down into the assembler code. The new) Start.S 都清除了(both clears the)**.BSS(.BSS)**并运行自动外围设备基础检测以及读取(and runs the automatic peripheral base detection as well as a new feature of reading the) CPUID 从Arm处理器中获取,并将结果放入两个全局变量中:(from the Arm processor and placing the results in two global variables:)
RPi_IO_Base_Addr  = Peripheral Base Address auto detected (0x3F000000 or 0x20000000)
RPi_CpuId = ARM processor CPUID
您可以像下面这样声明一个外部变量,以C代码访问它们:(You can access these in C code by declaring an external like so:)
extern uint32_t RPi_IO_Base_Addr;   // The base IO address auto-detected by Start.S
extern uint32_t RPi_CpuId;          // Detected CPU by Start.S
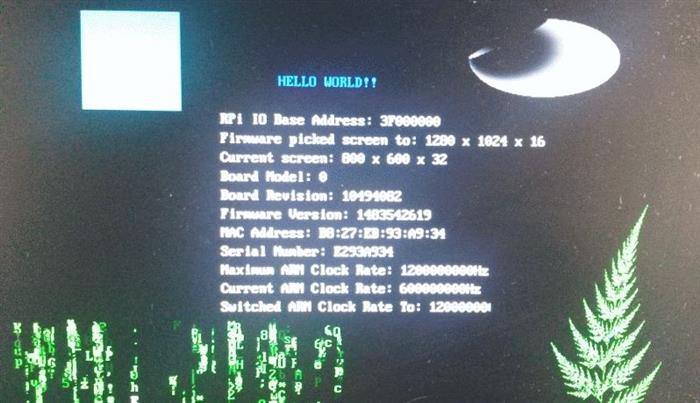
稍作修改的源现在将显示检测到的外设基地址以及CPU.(The slightly modified source will now display the detected peripheral base address as well as the CPU.)
这是我的那些细节(Here are those details from my) Pi3 B +:(B+:)
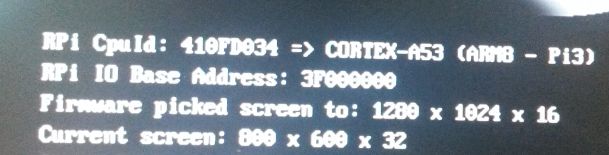
比较一下(Compare that to the) Pi1 细节:(details:)

SRC 2a的更新:(UPDATE for SRC 2a:)从技术上讲,由于所有的自动检测代码,Src 2a在单个Kernel.img中生成的Arm6代码将在每个PI上运行.但是,它在Pi2和3上的运行速度确实较慢,因为在为Arm6进行编译时,它没有使用可用的高级指令.如果您想尝试一下,则只有一个文件Kernel.img,您将看到这种行为.这是一个非常嵌入式的技巧,我们经常使用它来进行引导加载程序之类的操作,该程序将整理出我们正在处理的板等,然后为该板下载正确的图像文件.(Techically the Arm6 code produced by Src 2a in the single Kernel.img will run on every PI because of all the auto-detection code. It does however run slower on the Pi2 and 3 because it does not use the advanced instructions available to it when it was compiling for Arm6. If you want to try it you just have have only the one file Kernel.img and you will see that behaviour. This is a very embedded trick we would often use to have something like a bootstrap loader which would go in sort out what board etc we are dealing with and then download a correct image file for that board.) 如上所述,新的SD复合材料为每个Pi板提供3个内核,并且上述启动顺序将确保该卡可在任何Pi上使用.(As per the above, the new SD composite has 3 kernels for each of the Pi boards and the boot sequence discussed above will ensure the card will work on any Pi.) 我提供了3个批处理文件,(I have provided 3 batch files,)Pi1.bat(Pi1.bat)(建物((builds)kernel.img(kernel.img)),(),)Pi2.bat(Pi2.bat)(建物((builds)内核7.img(Kernel7.img))和() and)Pi3.bat(Pi3.bat)(建物((builds)内核8-32.img(Kernel8-32.img)),这将为每个不同的Pi板制作适当的内核映像文件.我复制我正在使用的任何版本() which will make the appropriate Kernel image file for each of the different Pi boards. I copy whichever version I am working on to)**make.bat(make.bat)我的编译器链接到的.(which my compiler links with.) 有一个特殊的链接文件"(There is a special linker file “)rpi3.ld(rpi3.ld)“设置起始地址,(” which sets the start address, the).BSS(.BSS)部分和(section and).结束(.end)**定义堆从哪里开始.这很简单,任何阅读GCC简单链接程序脚本的内容都会解释它的作用.(defining where the heap starts. It’s pretty straight forward and any reading of GCC simple linker scripts will explain what it does.) 我试图使这篇文章简短一些,因为它实际上只是一个临时报告,但是对于那些试图裸露Pi3的人来说可能很有用.(I have tried to keep this article brief as it is really just a temporary report, but it may be useful for those trying to specifically baremetal the Pi3.)
兴趣点(Points of Interest)
随着(With the) Pi3 ,现在我有进一步的了解,将来可能会做以下文章:(, I now have further things I may look at in future and do articles on:)
- 使用所有4个核心(Using all 4 cores)
- 64位编码(64 Bit coding)
- 裸机访问相机(Baremetal access to the Camera) 希望下一篇文章将按预期通过键盘和鼠标驱动程序对USB进行裸机访问,并在Pi1和Pi3上进行测试.(Hopefully, the next article will be as intended on baremetal access to the USB with keyboard and mouse drivers and tested on the Pi1 and Pi3.)
历史(History)
- 版本0.4:添加了具有扩展的自动检测代码的新版本2a src代码(Version 0.4: Added new version 2a src code with extended auto-detect code)
- 版本0.3:添加了来自Pi社区中有关0x8000加载和fixup.dat的异议.(Version 0.3: Objections about 0x8000 loading and fixup.dat from some in Pi Community added.)
- 0.2版:修改了代码以运行Pi1和2((Version 0.2: Code modified to run Pi1 & 2 ()
Start.S大量修改)(heavily modified)) - 版本0.1:初始版本(Version 0.1: Initial release)
旧代码(Old Code)
许可
本文以及所有相关的源代码和文件均已获得The Code Project Open License (CPOL)的许可。
ASM C Raspberry 新闻 翻译