使用Windows 10 IoT核心版在Raspberry Pi上使用Pixy Visual Sensor跟踪对象(译文)
By robot-v1.0
本文链接 https://www.kyfws.com/pi/tracking-objects-with-pixy-visual-sensor-on-raspbe-zh/
版权声明 本博客所有文章除特别声明外,均采用 BY-NC-SA 许可协议。转载请注明出处!
- 21 分钟阅读 - 10142 个词 阅读量 0使用Windows 10 IoT核心版在Raspberry Pi上使用Pixy Visual Sensor跟踪对象(译文)
原文地址:https://www.codeproject.com/Articles/1240471/Tracking-Objects-with-Pixy-Visual-Sensor-on-Raspbe
原文作者:Victor Dashevsky
译文由本站 robot-v1.0 翻译
前言
Processing the positioning information of visual objects detected by Pixy camera and received on Raspberry Pi via I2C, and using common design patterns in a C# program parsing robotics sensor data
处理由Pixy摄像机检测到并通过I2C在Raspberry Pi上接收到的视觉对象的位置信息,并在解析机器人传感器数据的C#程序中使用常见的设计模式
介绍(Introduction)
2015年发布的Microsoft Windows 10 IoT核心版为C#开发人员提供了新的机会,使他们可以使用Visual Studio和最受欢迎的单板计算机之一探索机器人技术的世界-(The release of Microsoft Windows 10 IoT Core in 2015 created new opportunities for C# developers to explore the world of robotics using Visual Studio and one of the most popular single board computers -) 树莓派.(Raspberry Pi.) 在本文中,我们将介绍将RPi与(In this article, we will go over my C# code that integrates RPi with) 魉(Pixy) -适用于物体跟踪的视觉传感器-由(- the vision sensor geared for objects tracking - designed by) 魅力实验室(Charmed Labs) .(.) 基于Pixy的简化数据检索(Based on Pixy’s simplified data retrieval) 协议(protocol) ,我将向您展示如何使用Windows 10 IoT核心版应用程序通过I2C总线在RPi上接收和解析有关视觉对象大小和位置的信息.除了实现解决方案的技术方面之外,我还将分享构建代码库的方法.我们将项目划分为不同的层,利用LINQ To Objects的功能来处理从Pixy接收的数据,并使用通用的设计模式为您工作.我希望学习.NET的机器人爱好者以及经验丰富的C#开发人员都可以在这里找到一些有趣的东西.(, I’ll show you how to receive and parse the information about visual object size and position on RPi over I2C bus using Windows 10 IoT Core application. In addition to implementing the technical side of the solution, I’ll share my approach to architecturing the codebase. We will break the project into distinct layers, leverage the power of LINQ To Objects for processing data received from Pixy and put common design patterns to work for you. I am hoping that both robotic enthusiasts learning .NET as well as seasoned C# developers new to robotics will find something of interest here.)
背景(Background)
我们中的许多人在某些时候首次涉足机器人技术时,必须选择我们第一个使用的传感器.尽管我还没有开始使用Pixy,但对于有经验的程序员而言,Pixy是一个合理的首选.它正在处理大量视觉信息,以每秒50次的紧凑格式向您提供对象定位数据.仅需花费$ 69就能跟踪程序中的视觉对象,真是太酷了!(Many of us when we first dive into robotics at some point have to pick our very first sensor to play with. Although I have not started with Pixy, for moderately experienced programmers, Pixy makes a reasonable first choice. It is crunching lots of visual info to deliver object positioning data to you in a compact format 50 times per second. Being able to track a visual object in your program with an investment of only $69 is pretty cool!) 我一年多以前在Raspberry PI 2和Visual Studio 2015上完成了该项目,但是现在,您可以使用RPI 3 Model B +和VS2017.在撰写本文时,Pixy(I completed this project over a year ago on Raspberry PI 2 and Visual Studio 2015 but these days you can use RPI 3 Model B+ and VS 2017. At the time of this writing, Pixy) CMUcam5(CMUcam5) 我使用的仍然是设备的最新版本.(that I used remains the latest version of the device.) 对于Windows 10 IoT核心版和C#的机器人爱好者,我想补充一点,微软免费提供的开发框架使您能够掌握与众多专业程序员用来构建企业软件和商业网站的技术相同的技术.使用VS.NET并应用面向对象的编程原理,您可以构建一个大型的组织良好的系统以进行增长.我们可以使用标准设计模式,NuGet软件包,代码库和即用型解决方案,从而将实验性应用程序的方式扩展到其原始范围之外.如果你考虑(For robotics enthusiasts new to Windows 10 IoT Core and C#, I’d like to add that the freely available development framework provided by Microsoft enables mastering the same technology as what numerous professional programmers use to build enterprise software and commercial web sites. Using VS.NET and applying Object Oriented Programming principles, you can build a large well organized system positioned for growth. Standard design patterns, NuGet packages, code libraries and ready-to-use solutions are available to us allowing to extend an experimental app way beyond its original scope. If you consider) 关注点分离(separation of concerns) ,在设计的早期阶段就将逻辑隔离在各层中,并使各层之间的耦合松散,您将在未来的几年中享受不断发展的项目.无论是专业还是业余爱好构建机器人应用程序,都仍然如此.(, segregation of logic within layers and loose coupling between them early in your design, you will be enjoying your growing project for years to come. This remains true whether building robotics apps professionally or as a hobby.)
使用Pixy视觉传感器(Using Pixy Visual Sensor)
Pixy以解释的格式将带有预设颜色签名的多个视觉对象的坐标直接传递给RPi(Pixy delivers coordinates of several visual objects with preset color signature straight to the RPi in the format explained) 这里(here) .(.)
有几种使用此信息的方法.您可以找到在屏幕上显示对象框的代码示例,以及使用两个伺服电机使Pixy跟随对象的示例.我构建了后者,但是伺服控制超出了本文的范围.(There are several ways to use this information. You can find code samples that display object boxes on the screen and samples that make Pixy follow your object using two servo motors. I built the latter but servo control goes beyond the scope of this article.)
本文附带的源代码旨在将对象的坐标和大小提供给自主机器人.根据预设的对象大小,到Pixy捕获的对象的距离以及从其坐标转换的对象角度,RPi然后可以向电机驱动器发送信号以接近该对象.因此,我们将仅跟踪单个对象,但是您可以根据需要更改此逻辑.(The source code included with this article is intended for feeding coordinates and size of an object to an autonomous robot. Based on preset object size, the distance to an object captured by Pixy and object angle translated from its coordinates, the RPi could then send signals to the motor drive to approach the object . Therefore, we will only be tracking a single object but you can alter this logic to your needs.)
这是安装在我的机器人上的"平移和倾斜"机制上的Pixy图片:(Here is a picture of Pixy attached to Pan and Tilt mechanism mounted on my robot:)
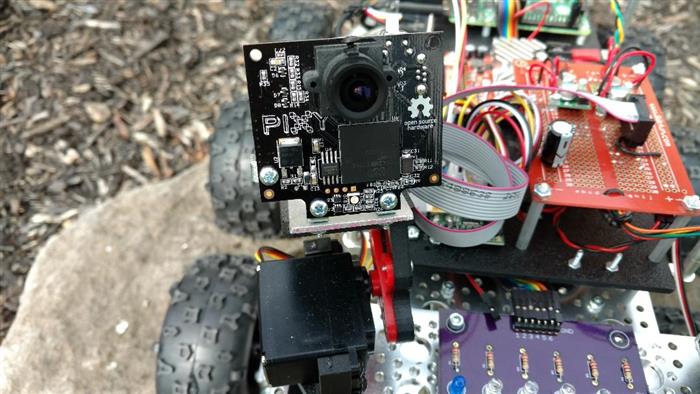
Pixy最多可以存储7种不同的颜色签名,从而可以跟踪7种具有独特颜色的不同对象.由于在此应用程序中,我们仅对单个对象感兴趣,并且由于照明的显着变化会对Pixy的颜色过滤算法产生不利影响,因此我将全部7个(Pixy can store up to 7 different color signatures in effect enabling tracking of 7 different objects with unique colors. Since in this application, we are only interested in a single object and because significant changes in lighting has an adverse effect on Pixy’s color filtering algorithm, I am using all 7 for) 培训小精灵(training Pixy) 在7种不同光照条件下对同一物体的照射(on the same object under 7 different light conditions.)
先决条件(Prerequisites)
您将需要以下内容:(You will need the following:)
- Pixy相机-可以购买(Pixy camera - you can buy it on) 亚马孙(Amazon) ,(,) 机器人商店(RobotShop) 要么(or) 英国威廉希尔(SparkFun) 只需$ 69(for $69)
- 具有电源和连接线的Raspberry RPi2或3(Raspberry RPi2 or 3 with a power supply and connection wires)
- Visual Studio 2015或2017(Visual Studio 2015 or 2017)
随附的源代码被包装到可立即构建的Visual Studio解决方案中,但是,它不应成为您的第一个Windows 10 IoT核心项目.那些愿意尝试的人将已经有一个工作项目,其中包含针对ARM处理器体系结构构建的通用Windows平台(UWP)应用程序,并经过验证可在Raspberry Pi上运行.请注意,我的代码假定使用的是抬头应用程序(请参阅(The attached source code is wrapped into a ready-to-build Visual Studio solution, however, it is not expected to be your first Windows 10 IoT Core project. Those willing to experiment would already have a working project containing Universal Windows Platform (UWP) application built for ARM processor architecture and verified to work on Raspberry Pi. Note that my code assumes a headed application (see comments on the)
Timer类型).(type).) 如果您还没有使用RPi和Windows IoT Core,则"(If you haven’t played with RPi and Windows IoT Core yet, then “) 你好,眨眼(Hello, Blinky) “是一个受欢迎的首次项目.如果您在(” is a popular first time project. If you don’t find it at) 这个连结(this link) ,看看(, look it up at) https://developer.microsoft.com/zh-CN/windows/iot/samples(https://developer.microsoft.com/en-us/windows/iot/samples) .(.) 还有许多其他示例指导开发人员为RPi创建他们的第一个Windows 10 IoT核心应用程序.例如,请查看以下文章-(There are many other examples guiding developers through creating their very first Windows 10 IoT Core application for RPi. For example, check out the following article -) 使用C#为Windows 10 IoT构建您的第一个应用程序(Building Your First App for Windows 10 IoT using C#) .(.)
将Pixy连接到Raspberry Pi(Connecting Pixy to Raspberry Pi)
我强烈建议使用带状电缆连接您的Pixy,而不是面包板跳线.将Pixy放置在"平移和倾斜"机制上时,它要安全得多.(I strongly recommend using a ribbon cable for connecting your Pixy as opposed to breadboard jumper wires. It is far more secure when it comes to placing your Pixy on Pan and Tilt mechanism.) Uxcell IDC插座10针扁平带状电缆(Uxcell IDC Socket 10 Pins Flat Ribbon Cable) 对我来说效果很好.(works quite well for me.) 在我的机器人中,我将接头连接器焊接到了原型板上,在其中创建了I2C集线器以及5V电压并为所有I2C设备接地. SDA和SCL通过焊接到原型板上的跳线连接到PRi的GPIO 2和3.电源由带有5V稳压器的独立NiMH电池供电,尽管仅使用Pixy即可使用RPis.(In my robot, I soldered a header to a prototype board where I created I2C hub along with 5V and ground for all my I2C devices. SDA and SCL are connected to PRi’s GPIO 2 and 3 via jumper wires soldered to the prototype board. Power is supplied by a separate NiMH battery with 5V voltage regulator although for playing with just Pixy, you can simply use RPis.) Pixy I2C连接管脚:(Pixy I2C connection pinouts:)
| 1个(1) | 2电源(2 Power) |
|---|---|
| 3 | 4 |
| 5个SCL(5 SCL) | 6地(6 Ground) |
| 7 | 8 |
| 9个SDA(9 SDA) | 10 |
分层设计(Layered Design)
实现分为三层:(The implementation is split into 3 layers:)
- 资料存取层(Data Access Layer)-从数据源接收原始数据.该层主机(- receives raw data from data source. This layer hosts)
PixyDataReaderI2C类.(class.) - 资料库(Repository)-从源接收的数据转换为对象块实体数据模型.这是通过以下方式完成的(- translates data received from the source into object block entity data model. This is accomplished via)
PixyObjectFinder.(.) - 应用逻辑(App Logic)-查找感兴趣的最大对象并使用确定目标对象(- finds biggest objects of interest and determines the target object using)
CameraTargetFinder.(.) 在包含许多不同传感器的大型系统中,我将这些层隔离到单独的项目中,或者至少隔离到单独的项目文件夹中.(In a large system involving many different sensors, I’d segregate these layers into separate projects or, at least, into separate project folders.)
控制流(Control Flow)
数据访问层完成了处理每个计时器事件以查找任何匹配对象的艰苦工作.另一方面,App Logic仅对成功的匹配感兴趣.(The Data Access Layer does the hard work of handling every timer event looking for any matching objects. The App Logic on the other hand is only interested in successful matches when such occur.)
信息通过通用委托实现的2个回调从底层流到顶层.以下流程进行了总结,但是一旦您查看了每个图层的详细信息,您就想重新访问此部分.请注意,较高级别的对象不会直接在较低级别上创建对象,而是使用接口.(Information flows from the bottom layer to the top via 2 callbacks implemented via generic delegates. The following flow sums it up but you’d want to revisit this section once you review the details of each layer. Note that higher level objects do not directly create objects at a lower level but use interfaces instead.)
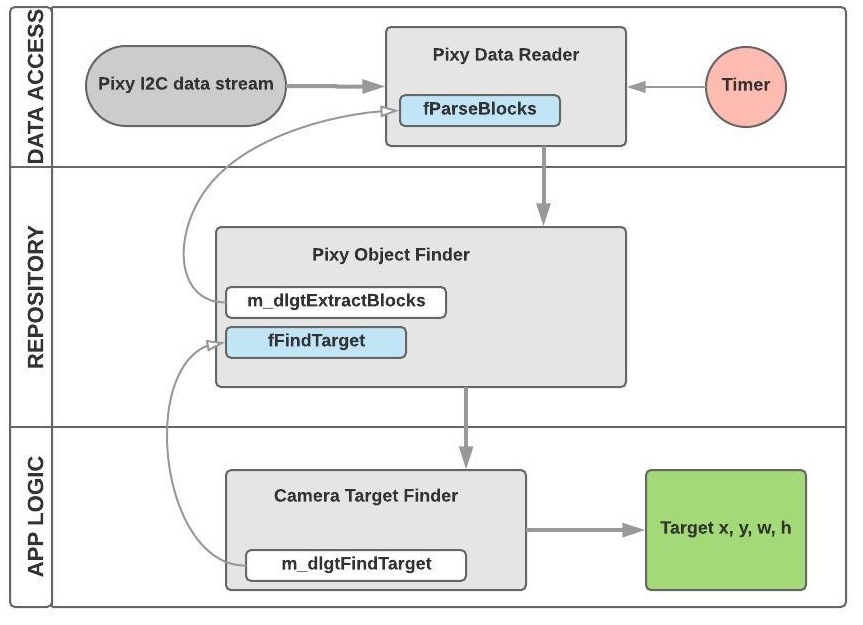
- 相机目标查找器通过(Camera Target Finder passes)
m_dlgtFindTarget通过以下方式委托给Pixy Object Finder(delegate to Pixy Object Finder via)fFindTarget - Pixy对象查找器通过(Pixy Object Finder passes)
m_dlgtExtractBlocks通过以下方式委托给Pixy Data Reader(delegate to Pixy Data Reader via)fParseBlocks - Camera Target Finder创建读取器和对象查找器的实例,然后启动Pixy Object Finder(Camera Target Finder creates instances of the reader and object finder, then starts Pixy Object Finder)
- Pixy Object Finder调用Pixy Data Reader创建计时器并开始收听设备(Pixy Object Finder calls Pixy Data Reader to create a timer and starts listening to the device)
- 读取数据后,Pixy Data Reader会调用(When data has been read, Pixy Data Reader invokes)
m_dlgtExtractBlocks在Pixy Object Finder中(通过(in Pixy Object Finder (via)fParseBlocks)将数据转换为颜色签名对象() to translate data into color signature objects) m_dlgtExtractBlocks调用(invokes)m_dlgrFindTarget在"相机目标查找器"中(通过(in Camera Target Finder (via)fFindTarget)提取每种颜色签名的最大对象并确定目标坐标.() to extract biggest objects of each color signature and determine the target coordinates.) 当与接口结合使用时,这种类型的流程将我们的类与它们的依赖项解耦,以便可以通过对我们类的源代码进行最少或根本没有更改的方式来替换或更新这些依赖项.在下面的更多内容.(When used in combination with interfaces, this type of flow decouples our classes from their dependencies so that the dependencies can be replaced or updated with minimal or no changes to our classes' source code. More on this below.)
数据模型和接口(Data Model and Interfaces)
像素对象块包括x/y坐标及其宽度/高度.此外,我们希望跟踪检测到的时间:(Pixy Object Block includes x/y coordinates and its width/height. In addition, we want to keep track of time when it was detected:)
public class CameraObjectBlock
{
    public int signature = -1;
    public int x = -1;
    public int y = -1;
    public int width = -1;
    public int height = -1;
    public DateTime dt;
}
Camera Data Reader接口为更高级别定义了一个签名,以与对Reader实现的依赖脱钩.尽管我们不打算在这里使用其他阅读器,但这为扩展留出了空间,因此,如果我们决定使用其他阅读器,(Camera Data Reader interface defines a signature for the higher level to decouple from dependency on the Reader implementation. While we have no intention of using other readers here, this leaves room for expansion so if we ever decide to use another) Reader ,则高层逻辑不必更改以实例化其他类,因为其他(, the higher level logic will not have to change to instantiate a different class because that other) Reader 仍然符合已建立的接口.(would still conform to the established interface.)
接下来,我们为Pixy Object Finder定义一个接口.将所有接口与实现分开放置是一个好主意.这样,您可以拥有一个由数据模型和操作组成的独特域,有效显示应用程序执行的功能以及所处理的数据类型:(Next, we define an interface for Pixy Object Finder. It’s a good idea to keep all interfaces together separate from their implementation. That way, you can have a distinct domain consisting of data model and operations in effect showing what functions the application performs and what type of data it is dealing with:)
public interface ICameraDataReader
{
    void Init(Func<byte[], int> fParseBlocks);
    Task Start();
    void Stop();
    void Listen();
    int GetBlockSize();    // bytes
    int GetMaxXPosition(); // pixels
    int GetMaxYPosition(); // pixels
}

public interface ICameraObjectFinder
{
    void Start();
    void Stop();
    List<CameraObjectBlock> GetVisualObjects();
}

public abstract class CameraDataReader
{
     protected CameraDataReader(ILogger lf)
     {}
}

public abstract class CameraObjectFinder
{
    protected CameraObjectFinder(ICameraDataReader iCameraReader,
                   Func<List<CameraObjectBlock>, bool> fFindTarget,
                   ILogger lf)
    { }
}

public interface ILogger
{
    void LogError(string s);
}
二(Two) abstract 已创建类来强制执行特定的构造函数参数.(classes have been created to enforce particular constructor parameters.)
资料存取层(Data Access Layer)
Pixy每1/50处理一个图像帧(Pixy processes an image frame every 1/50)日(th)一秒钟.这意味着您每20毫秒就可以完整更新一次所有检测到的对象的位置((of a second. This means that you get a full update of all detected objects’ positions every 20ms () PIXY_INTERVAL_MS = 20 ).看到(). See) http://cmucam.org/projects/cmucam5(http://cmucam.org/projects/cmucam5) 了解更多信息.(for more information.)
PixyDataReaderI2C 类工具(class implements) IPixyDataReader 接口:(interface:)
public class PixyDataReaderI2C : CameraDataReader, ICameraDataReader
{
    // We are creating DispatcherTimer so that you could add some UI should you choose to do so.
    // If you are creating a headless background application then use ThreadPoolTimer.
    private DispatcherTimer m_timerRead = null;
    private Windows.Devices.I2c.I2cDevice m_deviceI2cPixy = null;
    private Func<byte[], int> m_fParseBlocks = null;

    private const int PIXY_INTERVAL_MS = 20; // PIXY runs every 20 millisecons
    private const int BLOCK_SIZE_BYTES = 14;

    private int m_maxNumberOfExpectedObjects = 50;
    public int MaxNumberOfExpectedObjects {
    get { return m_maxNumberOfExpectedObjects; }
    set { m_maxNumberOfExpectedObjects = value; }
}
    public int m_sizeLeadingZeroesBuffer = 100; // PIXY data buffer may contain leading zeroes
    // Lens field-of-view: 75 degrees horizontal, 47 degrees vertical
    // The numbers for x, y, width and height are in pixels on Pixy's camera.
    // The values range from 0 to 319 for width and 0 to 199 for height.
    public int GetMaxXPosition() { return 400; }
    public int GetMaxYPosition() { return 200; }

    private ILogger m_lf = null;

    public PixyDataReaderI2C(ILogger lf) : base(lf)
    {
        m_lf = lf;
    }

    public void Init(Func<byte[], int> fParseBlocks)
    {
        // This method is required because the reader is created by the factory - at the higher
    // level where the Parse Blocks method is unavailable.
        m_fParseBlocks = fParseBlocks;
    }
数据读取器采用通用委托(The data reader takes generic delegate) fParseBlocks 允许调用更高级别的翻译方法而无需我们更改更低级别的逻辑,以防翻译人员改变.(to allow invocation of higher level translation method w/out having us alter lower level logic, should the translator ever change.)
由于我的RPi通过I2C与Pixy通信,因此我们首先要从OS检索设备选择器,然后使用它来枚举I2C控制器.最后,使用设备设置对象,获得设备的句柄:(Since my RPi is communicating with Pixy via I2C, we are first retrieving a device selector from the OS and then using it to enumerate I2C controllers. Finally, using the device settings object, we obtain a handle to our device:)
public async Task Start()
{
    try
    {
        string deviceSelector = Windows.Devices.I2c.I2cDevice.GetDeviceSelector();

        // Get all I2C bus controller devices
        var devicesI2C = await DeviceInformation.FindAllAsync(deviceSelector).AsTask();
        if (devicesI2C == null || devicesI2C.Count == 0)
            return;

        // Create settings for the device address configured via PixyMon.
        var settingsPixy = new Windows.Devices.I2c.I2cConnectionSettings(0x54);
        settingsPixy.BusSpeed = Windows.Devices.I2c.I2cBusSpeed.FastMode;

        // Create PIXY I2C Device
        m_deviceI2cPixy = await Windows.Devices.I2c.I2cDevice
            .FromIdAsync(devicesI2C.First().Id, settingsPixy);
    }
    catch (Exception ex)
    {
        m_lf.LogError(ex.Message);
    }
}
接下来,我们将设置一个计时器和一个处理程序,以将原始数据从Pixy读入(Next, we are setting up a timer and a hander to read raw data from Pixy into) dataArray 并打电话(and call) m_fParseBlocks 翻译:(to translate it:)
public void Listen()
{
    if (m_timerRead != null)
        m_timerRead.Stop();

    m_timerRead = new DispatcherTimer();
    m_timerRead.Interval = TimeSpan.FromMilliseconds(PIXY_INTERVAL_MS);
    m_timerRead.Tick += TimerRead_Tick;
    m_timerRead.Start();
}

private void TimerRead_Tick(object sender, object e)
{
    try
    {
        if (m_deviceI2cPixy == null)
            return;

        byte[] dataArray = new byte[MaxNumberOfExpectedObjects * BLOCK_SIZE_BYTES
                + m_sizeLeadingZeroesBuffer];
        m_deviceI2cPixy.Read(dataArray);
        m_fParseBlocks(dataArray);
    }
    catch (Exception ex)
    {
        m_lf.LogError(ex.Message);
    }
}
请注意,我们可以利用计时器代替计时器(Note that instead of timers, we could utilize) async /(/) await -异步设计模式-构建替代方案(- asynchronous design pattern - to build an alternative) Reader .这样(. Such) Reader 可能已通过类工厂(如"应用逻辑层"部分中所述)注入到流程中.(could have been injected into the flow via Class Factory as explained in the App Logic Layer section.)
我的代码假定使用带头的应用程序,但是如果要在无头的应用程序中运行它,则将计时器类型从(My code assumes headed application but if you are going to run it within a headless app, then change the timer type from) DispatcherTimer 至(to) ThreadPoolTimer .请参阅源代码中的相应注释.(. Please see the corresponding note in the source code.)
储存库层(Repository Layer)
一般来说,我们使用(Generally speaking, we use a) Repository 通过将源数据转换为实体模型(业务逻辑使用的数据结构)来将数据检索逻辑与业务或应用程序逻辑分开.这个附加的封装层称为存储库模式.在我们的用例中,翻译器处理来自数据源的原始数据以提取感兴趣的可视对象.这是在(to separate data retrieval logic from the business or application logic through translating source data into the entity model - data structure utilized by the business logic. This additional encapsulation layer is known as the Repository Pattern. In our use case, the translator processes raw data from the data source to extract visual objects of interest. This is accomplished in) PixyObjectFinder 将Pixy字节流转换为具有x/y/w/h属性的对象:(that converts Pixy byte stream into objects with x/y/w/h properties:)
public class PixyObjectFinder : CameraObjectFinder, ICameraObjectFinder
{
    const UInt16 PixySyncWord = 0xaa55;
    const int BlockRetentionSeconds = 3;

    private ICameraDataReader m_pixy = null;
    private ILogger m_lf = null;
    public Object m_lockPixy = new Object();
    private Func<List<CameraObjectBlock>, bool> m_fFindTarget;
    private Func<byte[], int> m_dlgtExtractBlocks;

    private List<CameraObjectBlock> m_pixyObjectBlocks = new List<CameraObjectBlock>();
    public List<CameraObjectBlock> GetVisualObjects() { return m_pixyObjectBlocks;  }
Pixy对象查找器(Pixy Object Finder)
PixyObjectFinder 将缓冲区从Pixy对象块格式转换为我们检测到的对象的实体模型,以便App Logic仅处理其自己的格式,并且与基础源无关.(translates the buffer from the Pixy object blocks format into our entity model of detected objects so that the App Logic would only deal with its own format and remain agnostic to an underlying source.)
PixyObjectFinder 用户(users the) Start Pixy初始化并在数据访问层中启动其计时器的方法.(method for initializing Pixy and launching its timer within the data access layer.)
public void Start()
{
    m_pixy.Init(m_dlgtExtractBlocks);
    // Initialize Pixy I2C device.
    Task.Run(async () => await m_pixy.Start());
    // Launch Pixy listener
    m_pixy.Listen();
}
翻译基本上是在(The translation is essentially implemented in) m_dlgtExtractBlocks 通过参数传递给Pixy数据读取器(that is being passed to Pixy data reader as a parameter via) m_pixy.Init(m_dlgtExtractBlocks) .(.)
public PixyObjectFinder(ICameraDataReader ipixy,
                        Func<List<CameraObjectBlock>, bool> fFindTarget,
                        ILogger lf) : base(ipixy, fFindTarget, lf)
{
    m_pixy = ipixy;
    m_fFindTarget = fFindTarget;
    m_lf = lf;

    m_dlgtExtractBlocks = delegate (byte[] byteBuffer)
    {
        lock (m_lockPixy)
        {
            if (byteBuffer == null || byteBuffer.Length == 0)
                return 0;

            try
            {
                // Convert bytes to words
                int blockSize = ipixy.GetBlockSize();
                int lengthWords = 0;
                int[] wordBuffer = ConvertByteArrayToWords(byteBuffer, ref lengthWords);
                if (wordBuffer == null)
                    return 0;

                // 0, 1     0              sync (0xaa55)
                // 2, 3     1              checksum(sum of all 16 - bit words 2 - 6)
                // 4, 5     2              signature number
                // 6, 7     3              x center of object
                // 8, 9     4              y center of object
                // 10, 11   5              width of object
                // 12, 13   6              height of object

                // Find the beginning of each block
                List<int> blockStartingMarkers = Enumerable.Range(0, wordBuffer.Length)
                    .Where(i => wordBuffer[i] == PixySyncWord)
                    .ToList<int>();

                // Drop blocks that are more than BlockRetentionSeconds old
                m_pixyObjectBlocks=m_pixyObjectBlocks.SkipWhile
                                                (p => ((TimeSpan)(DateTime.Now - p.dt))
                    .Seconds > BlockRetentionSeconds).ToList();

                // Extract object blocks from the stream
                blockStartingMarkers.ForEach(blockStart =>
                {
                    if (blockStart < lengthWords - blockSize / 2)
                        m_pixyObjectBlocks.Add(new CameraObjectBlock()
                        {
                            signature = wordBuffer[blockStart + 2],
                            x = wordBuffer[blockStart + 3],
                            y = wordBuffer[blockStart + 4],
                            width = wordBuffer[blockStart + 5],
                            height = wordBuffer[blockStart + 6],
                            dt = DateTime.Now
                        });
                });

                m_fFindTarget(m_pixyObjectBlocks);
                // Reset the blocks buffer
                m_pixyObjectBlocks.Clear();
            }
            catch (Exception e)
            {
                m_lf.LogError(e.Message);
            }
        }
        return m_pixyObjectBlocks.Count;
    };
}
PixyObjectFinder 正在服用(is taking) fFindTarget 通用委托来调用更高级别的处理器,该处理器将检测到的对象转换为目标坐标.(generic delegate to invoke higher level processor which converts detected objects to target coordinates.)
m_pixyObjectBlocks 数组包含检测到的对象.转换遵循上面代码片段中指定的Pixy流格式.(array contains detected objects. The conversion follows Pixy stream format specified in the above code snippet.)
有关Pixy数据格式的更多详细信息,请参见(For more details on Pixy data format, see) Pixy串行协议(Pixy Serial Protocol) .请注意,串行和I2C以相同的流格式传递Pixy数据.(. Note that Serial and I2C deliver Pixy data in the same stream format.)
另外,我在单次读取操作之后在阵列中累积块,以在更长的时间段(即,长于20 ms)中平滑目标检测.这是由(In addition, I am accumulating blocks in the array beyond a single read operation to smooth target detection over a longer time period, i.e., longer that 20 ms. It is being done by) SkipWhile 掉落比(dropping objects older than) BlockRetentionSeconds .(.)
解析数据流(Parsing the Data Stream)
上面的finder方法必须首先将输入的字节流转换为16位字并将它们放置在整数数组中.我们将在该数组中找到检测到的对象的x,y,宽度和高度.(The above finder method must first convert the input stream of bytes into 16-bit words and place them in an array of integers. It is that array where we are going to find x, y, width and height of the detected objects.)
ConvertByteArrayToWords –(-) PixyObjectFinder private 方法-将从Pixy I2C设备接收的字节流转换为16位字:(method - converts the byte stream received from Pixy I2C device into 16-bit words:)
private int[] ConvertByteArrayToWords(byte[] byteBuffer, ref int lengthWords)
{
    // http://cmucam.org/projects/cmucam5/wiki/Pixy_Serial_Protocol
    // All values in the object block are 16-bit words, sent least-signifcant byte
    // first (little endian). So, for example, to send the sync word 0xaa55, you
    // need to send 0x55 (first byte) then 0xaa (second byte).
    try
    {
        // Skip leading zeroes
        byteBuffer = byteBuffer.SkipWhile(s => s == 0).ToArray();
        if (byteBuffer.Length == 0)
            return new int[0];

        // Convert bytes to words
        int length = byteBuffer.Length;
        lengthWords = length / 2 + 1;
        int[] wordBuffer = new int[lengthWords];
        int ndxWord = 0;
        for (int i = 0; i < length - 1; i += 2)
        {
            if (byteBuffer[i] == 0 && byteBuffer[i + 1] == 0)
                continue;

            // convert from little endian
            int word = ((int)(byteBuffer[i + 1])) << 8 | ((int)byteBuffer[i]);

            if (word == PixySyncWord && ndxWord > 0 && PixySyncWord == wordBuffer[ndxWord - 1])
                wordBuffer[ndxWord - 1] = 0; // suppress Pixy sync word marker duplicates

            wordBuffer[ndxWord++] = word;
        }
        if (ndxWord == 0)
            return null;

        return wordBuffer;
    }
    catch (Exception e)
    {
        m_lf.LogError(e.Message);
        return null;
    }
}
如您所见,我不得不调整解析器以跳过潜在的前导零和重复的同步字.如果您使用的是RPi 3和/或较新的UWP Tools SDK,则可能不必处理这些问题.(As you can see, I had to tweak the parser to skip potential leading zeroes and duplicate sync words. If you are using RPi 3 and/or a newer UWP Tools SDK, you may not have to deal with these issues.) 这是从Pixy接收到字节缓冲区的单个对象块字节序列的示例:(Here is an example of a single object block byte sequence received from Pixy into the byte buffer:)
00-00-00-00-55-AA-55-AA-BB-01-01-00-3D-01-73-00-04-00-06-00-00-00-
您应该能够通过以下方式在调试器中查看字节缓冲区(You should be able to review the byte buffer in your debugger via) BitConverter.ToString(byteBuffer) .(.)
应用逻辑层(App Logic Layer)
Target Finder根据存储库层提供的选定对象确定目标.在此层中,我们应用称为(The Target Finder determines the target based on the selected objects provided by the Repository layer. It is here in this layer that we apply a creation design pattern called) Factory 创建和保留较低级别对象的实例.(to create and retain instances of lower level objects.)
类工厂(Class Factory)
这种模式有助于使我们的类脱离负责定位和管理依赖项生命周期的职责.请注意,我们的类工厂如何只在内部调用构造函数时公开接口.数据读取器和对象查找器均已创建并存储在此处.我们使用构造函数依赖注入实例化它们,这使我们可以通过在类工厂中创建读取器和查找器的其他实现来灵活地放置它们.(This pattern helps decouple our classes from being responsible for locating and managing the lifetime of dependencies. Note how our class factory only exposes interfaces while calling constructors internally. Both the Data Reader and the Object Finder are created and stored here. We instantiate them using constructor dependency injection which gives us flexibility of dropping in other implementations of readers and finders by creating them in the Class Factory.)
通过使用(By using a) Factory ,我们采用了控制反转的原理,该原理将对象之间的直接依赖关系替换为对抽象的依赖关系,即接口.尽管这个概念远远超出了我的示例,但您经常需要一个简单的类工厂.(, we apply the principle of Inversion of Control which replaces direct dependencies between objects with dependencies on abstraction, i.e., interfaces. While this concept goes way beyond my example, quite often, a simple class factory is all you need.)
的(The) Create 函数正在传入通过委托完成的用于计算目标的方法(function is passing in the method for calculating the target which is accomplished via delegate) Func<List<CameraObjectBlock>, bool> fFindTarget
public class MyDeviceClassFactory
{
    private ICameraDataReader m_cameraDataReaderI2C = null;
    private ICameraObjectFinder m_cameraObjectFinder = null;

    private ILogger m_lf = new LoggingFacility();
    public ILogger LF { get { return m_lf; } }

    public void Create(Func<List<CameraObjectBlock>, bool> fFindTarget)
    {
        if (m_cameraObjectFinder != null)
            return;

        m_cameraDataReaderI2C = new PixyDataReaderI2C(m_lf);
        m_cameraObjectFinder = new PixyObjectFinder(m_cameraDataReaderI2C, fFindTarget, m_lf);
    }

    public ICameraDataReader CameraDataReader { get { return m_cameraDataReaderI2C; } }
    public ICameraObjectFinder CameraObjectFinder { get { return m_cameraObjectFinder; } }
}
目标查找器(Target Finder)
该项目的顶部是(At the top of this project is) CameraTargetFinder 筛选预选对象以查找单个对象(目标)的类.它忽略面积小于(class that filters the pre-selected objects looking for a single object - the target. It ignores objects with an area smaller than) minAcceptableAreaPixels ,按大小排序其余对象,并从顶部开始排序.它可能会应用其他过滤器.最后,它调用(, orders the remaining objects by size and takes one from the top. It can potentially apply other filters. Finally, it calls) SetTargetPosition 目标位置和大小(以像素为单位).(with the target position and size in pixels.)
public class CameraTargetFinder
{
    private const int minAcceptableAreaPixels = 400;

    private MyDeviceClassFactory cf = new MyDeviceClassFactory();
    private Func<List<CameraObjectBlock>, bool> m_dlgtFindTarget;
    private Action<int, int, int, int> m_fSetTarget;

    public CameraTargetFinder(Action<int, int, int, int> fSetTarget)
    {
        m_dlgtFindTarget = delegate (List<CameraObjectBlock> objectsInView)
        {
            try
            {
                if (objectsInView.Count == 0)
                    return false;

                objectsInView = GetBiggestObjects(objectsInView);

                // Select the biggest signature. We are only interested in a single object
                // because all signatures represent same object under different light conditions.
                CameraObjectBlock biggestMatch = (from o in objectsInView
                                                  where o.width * o.height > minAcceptableAreaPixels
                                                  select o)
                                                .OrderByDescending(s => s.width * s.height)
                                                .FirstOrDefault();

                if (biggestMatch == null || biggestMatch.signature < 0)
                    return false;

                m_fSetTarget(biggestMatch.x, f.CameraDataReader.GetMaxYPosition() - biggestMatch.y,
                        biggestMatch.width, biggestMatch.height);
                return true;
            }
            catch (Exception e)
            {
                cf.LF.LogError(e.Message);
                return false;
            }
        };

        m_fSetTarget = fSetTarget;
    }
最终的视觉对象列表通常包含许多误报,即与目标对象具有相同颜色特征的微小对象.除了(The resulting visual object list often contains a lot of false positives, i.e., tiny objects with the same color signature as the desired target. Besides) 进行调整(making adjustments) 为了提高准确性,我们通过致电将其删除(to improve accuracy, we drop them by calling) GetBiggestObjects() 仅保留每个颜色签名的最大尺寸对象.此方法首先通过颜色签名对它们进行分组,然后在每个颜色中找到最大大小并仅返回这些对象.(to only retain the max size objects for each color signature. This method first groups them by color signature, then finds the maximum size within each and returns these objects only.)
private List<CameraObjectBlock> GetBiggestObjects(List<CameraObjectBlock> objectsInView)
{
    // Find the biggest occurrence of each signature, the one with the maximum area
    List<CameraObjectBlock> bestMatches = (from o in objectsInView
                     group o by o.signature into grpSignatures
                     let biggest = grpSignatures.Max(t => t.height * t.width)
                     select grpSignatures.First(p => p.height * p.width == biggest))
             .ToList();

    return bestMatches;
}
GetBiggestObjects 该方法是使用LINQ在机器人应用程序中处理数据的一个很好的例子.请注意,与机器人示例代码中经常发现的嵌套循环相比,查询代码的紧凑性和简洁性如何. Python开发人员想在这里发表评论,即使使用不同的语法/谓词,集成查询的功能也可供他们使用.(method is a great example of using LINQ for processing data in robotic apps. Note how compact and clean the query code is comparing to nested loops often found in robotics sample code. Python developers would want to comment here that the power of integrated queries is available to them too albeit with different syntax/predicates.)
App Logic将启动相机并通过(The App Logic starts the camera and initiates target tracking via the) StartCamera 方法:(method:)
public void StartCamera()
{
    try
    {
        cf.Create(m_dlgtFindTarget);
        cf.CameraObjectFinder.Start();
    }
    catch (Exception e)
    {
        cf.LF.LogError(e.Message);
        throw e;
    }
}
在项目中使用代码(Using the Code in Your Project)
首先,你必须(First off, you have to) 教(teach) 像素化一个对象.(Pixy an object.)
接下来,创建一个实例(Next, create an instance of) PixyTagetFinder 传入用于处理目标坐标的处理程序.这是一个例子:(passing in a handler for processing target coordinates. Here is an example:)
// Test
public class BizLogic
{
    CameraTargetFinder ctf = new CameraTargetFinder(delegate (int x, int y, int w, int h)
    {
        Debug.WriteLine("x: {0}, y: {1}, w: {2}, h: {3}", x, y, w, h);
    });
    public void Test()
    {
        ctf.StartCamera();
    }
}
如果知道目标物体的实际大小,则可以将高度和宽度转换为到目标的距离,同时将x和y转换为摄像机和目标之间的角度,以便控制器可以相应地转动伺服电机,以始终指向目标相机对准目标.(If you know the actual size of your target object, you can convert height and width to the distance-to-target while converting x and y to angles between the camera and the target so that your controller could turn servo motors accordingly to always point the camera to the target.)
为了运行我的源代码,您只需添加(In order to run my source code, you could simply add)**PixyCamera.cs(PixyCamera.cs)**文件添加到您的项目中,并且-为了测试代码-将上述示例工作到(file to your project and - for testing the code - work the above sample into the) MainPage 您的应用程序的功能.(function of your application.)
如果您想使用附带的解决方案,请在Visual Studio中将目标平台设置为ARM,(If you’d rather use the attached solution, then set the target platform to ARM in the Visual Studio,)建造它(build it,)部署到RPi并在调试模式下运行. Pixy相机初始化后,将您的预设对象放在相机前面.当Pixy检测到对象时,其LED指示灯将点亮,并且对象定位数据将出现在Visual Studio输出窗口中,例如:(deploy to RPi and run in the debug mode. Once Pixy camera initializes, bring your preset object in front of the camera. When Pixy detects the object, its LED indicator will light up and object positioning data will appear in the Visual Studio Output window, for example:)

结论(Conclusion)
使用Pixy和熟悉的Visual Studio环境跟踪对象是一项非常有意义的项目,尤其是当对象在RPi等小型计算机上的自治系统中运行时.当基础程序井井有条并遵循其他开发人员认可的设计模式时,这会更加有趣.值得我们花费时间来适当地构建和不断重构解决方案,以适应项目的增长.(Tracking an object using Pixy and the familiar Visual Studio environment is a very rewarding project, especially when it runs in an autonomous system on a small computer like RPi. It’s even more fun when the underlying program is well organized and follows design patterns recognized by other developers. It’s worth our time to properly structure and continuously refactor a solution keeping up with project growth.) 随意在您的个人或商业项目中使用该代码.我的20磅重6轮摩托车在Pixy的引导下进行了充分的测试.(Feel free to use the code in your personal or commercial projects. It has been well tested by my 20-pound 6-wheeler being guided by Pixy.)
有用的资源(Useful Resources)
- Pixy(CMUcam5):快速,易于使用的视觉传感器(Pixy (CMUcam5): a fast, easy-to-use vision sensor)
- 适用于开发人员的Microsoft Windows 10核心资源(Microsoft Windows 10 Core resources for developers)
许可
本文以及所有相关的源代码和文件均已获得The Code Project Open License (CPOL)的许可。
C# Raspberry .NET VS2013 repository IoT UWP I2C CORE 新闻 翻译