Zukuno |物联网的个人助手(译文)
By robot-v1.0
本文链接 https://www.kyfws.com/pi/zukuno-a-personal-assistant-for-the-iot-zh/
版权声明 本博客所有文章除特别声明外,均采用 BY-NC-SA 许可协议。转载请注明出处!
- 29 分钟阅读 - 14439 个词 阅读量 0Zukuno |物联网的个人助手(译文)
原文地址:https://www.codeproject.com/Articles/1115510/Zukuno-A-personal-assistant-for-the-IoT
原文作者:Mitchell J.
译文由本站 robot-v1.0 翻译
前言
Learn how to setup a Raspberry Pi as a wifi router, track public transport with GTFS, install & use Django, and combine CMUsphinx, Webview, and Microsoft’s speech API in an Android app. We’ll also control Sonos speakers, build a security camera, and consume some API’s (including the CodeProject API)
了解如何将Raspberry Pi设置为wifi路由器,使用GTFS跟踪公共运输,安装和使用Django以及在Android应用中将CMUsphinx,Webview和Microsoft的语音API结合在一起.我们还将控制Sonos扬声器,构建安全摄像头,并使用一些API(包括CodeProject API)
- 下载zukuno-py.zip(Download zukuno-py.zip)
- 下载zukuno-html.zip(Download zukuno-html.zip)
- 下载zukuno-droid.zip(Download zukuno-droid.zip)
查看支持语音的声音控制的简短演示:(Check out a brief demo of voice-enabled sound control:)

图.1.我在制作^.^原型时的GUI的GIF屏幕截图(.GIF screencast of my GUI while I was prototyping ^.^) 目录(Table of Contents)
-
-
建立我们的前端(Building our Frontend)
-
[扩展我们的系统]使用SoCo Python库(*[Expanding our system] Using the SoCo Python library*)
-
[扩展我们的系统]设置安全摄像头(*[Expanding our system] Setting up a security camera*)
介绍(Introduction)
您好,欢迎阅读我的最新CodeProject文章!(Hello and welcome to my latest CodeProject article!) 我上一次在CodeProject上写文章的时候(去年10月),我还在读高中.从那时起,我就开始在大学学习数学和IT,并且通常忙于撰写文章:-(然而,几周前我完成了第一学期的学习后,我知道要休息几周我的第二个学期开始了,所以我考虑写另一篇CodeProject的文章,然后我检查了Code Project,发现有一个IoT竞赛!受Google Home和Amazon Alexa发行的启发,我以为我要启用语音功能自动化尝试-因此这个项目诞生了:cool:(The last time I wrote an article here on CodeProject (it was October last year), I was still in high-school. Since then, I’ve since started studying Mathematics and IT at university, and have been generally too busy to write articles :-( However, after I finished my first semester of study a few weeks ago, I knew had a few weeks break before my second semester began, so I considered writing another CodeProject article. Then I checked Code Project and saw that there was an IoT competition on! Feeling inspired by the release of Google Home and Amazon Alexa, I thought I’d give voice-enabled home automation a try - and thus this project was born :cool:) 在本文中,我将向您展示如何构建自己的个人助理.我们首先将Raspberry Pi配置为wifi路由器.之后,我们将安装Apache和Django,对我们的UI进行原型设计,并围绕几个API构建我们自己的包装器.然后,我们将构建一个使用我们构建的API的Android应用,并通过结合CMUsphinx和Microsoft的Bing Voice API将语音识别和合成添加到我们的应用中.然后,我将向您展示如何使用另一个Raspberry Pi和USB网络摄像头来创建实时安全提要.我们将在本文的结尾处演示如何使用Python的SoCo库控制SONOS声音系统的演示,并展望该项目将来的扩展可能性.(In this article, I’m going to show you how you too can build your own personal assistant. We’ll start by configuring a Raspberry Pi as a wifi router. After that, we will install Apache & Django, prototype our UI, and build our own wrappers around several API’s. We will then build an Android app that consumes the API’s we built, and add voice recognition and synthesis to our app by combining CMUsphinx and Microsoft’s Bing Voice API. I will then show you how to use another Raspberry Pi and a USB webcam to create a real-time security feed. We’ll conclude the article with a demo of how to control your SONOS sound system with Python’s SoCo library, and take a look at future expansion possiblities for this project.) 为什么要进行家庭语音自动化?我认为语音自动化是一个很酷的研究领域,因为它可以以多种方式应用.例如,我创建的(Zukuno)个人助理可以轻松地进行优化,以使残障人士(四肢瘫痪,失明等)可以通过声音更好地控制周围环境.它也可以扩展到工业环境中以自动化设备并监控IoT服务.语音技术的固有灵活性使本文的类别选择颇具挑战性.(Why home voice automation? I think voice automation is a cool area of research because it can be applied in a wide variety of ways. For example, the personal assistant that I have created (Zukuno) could easily be optimized to give people with disablities (quadriplegia, blindness, etc) greater control of their surroundings through their voice. It could also be extended in industrial environments to automate equipment and monitor IoT services. The innate flexibility of voice technologies made it somewhat challenging to choose a category for this article.) 无论如何,足够的介绍.让我们开始编码吧!(Anyway, enough introduction. Let’s get coding!)
我们需要什么(What we’ll need)
要建立我们的个人助理,我们将需要:(To build our personal assistant, we will need:)
-
两个Raspberry Pi(一个用于主wifi路由器,一个用于控制安全摄像机)(Two Raspberry Pi’s (one for the master wifi router, one for controlling the security camera))
-
两张8GB或更大的micro SD卡(Two 8GB or greater micro SD cards)
-
USB扬声器(A USB speaker)
-
USB相机(A USB camera)
-
电源(Power supplies)
-
可用的以太网端口(用于主wifi路由器)(An available ethernet port (for the master wifi router))
-
基于Android的智能手机或平板电脑(旧版本可以使用.我们用它来显示GUI并处理麦克风输入)(An Android-based smartphone or tablet (an old one will do. We use this to display our GUI and handle microphone input))
-
HDMI电缆和支持HDMI的屏幕(不是必不可少的,但是在对rPi进行故障排除时非常有用)(An HDMI cable and an HDMI enabled screen (not essential, but very useful when troubleshooting your rPi’s))
-
如果您未使用最新型号的Raspberry Pi(型号3),则需要Wifi-USB适配器才能完成此项目.(If you’re not using the latest model Raspberry Pi’s (model 3), then you will need Wifi-USB adaptors to complete this project.) 有用的有:(Useful to have:)
-
中级编程经验(An intermediate amount of programming experience)
-
很多耐心(Lots of patience)
-
几个周末的业余时间(A few weekends of spare time)
鸟瞰图(Bird’s Eye View)

[图2 ..([Fig 2.])我们项目的鸟瞰图.(A bird’s eye view of our project.) 我们整个系统的核心组件是单个Raspberry Pi 3.Raspberry Pi 3通过以太网端口连接到我的主要家庭网络,既是wifi路由器又是Apache/Django服务器,并为Zukuno优化的IoT提供了中央API设备访问.通过使用放置在Zukuno安装整个目标空间中战略位置的Android平板电脑,Zukuno能够侦听命令并显示视觉输出. Raspberry Pi附带的USB扬声器为Zukuno提供了集中式音频输出,不过如果需要,可将平板电脑/设备配置为提供本地化输出.(The core component of our entire system is a single Raspberry Pi 3. Connected to my main home network via ethernet port, the Raspberry Pi 3 is both a wifi router and an Apache/Django server, and provides a central API for Zukuno-optimized IoT devices to access. By utilizing Android tablets placed in stragetic locations throughout the target space of a Zukuno installation, Zukuno is able to listen for commands and display visual output. A USB speaker attached to the Raspberry Pi provides Zukuno with a centralized audio ouput, although the tablets/devices could be configured to provide localized output if needed.) 使用壁挂式平板电脑的优势在于,它们可以提供足够的麦克风质量,一流的视听输出以及可以在其中执行CPU密集型任务(例如语音识别)的本地环境.如果仅在Pi上执行语音识别,则添加到系统中的每个房间都会大大增加Pi上的CPU负载,最终使整个系统无法工作.(The advantage of using wall-mounted tablets is that they provide adequate microphone quality, superb audio-visual output, as well as a local environment on which to perform CPU-intensive tasks such as voice recognition. If voice recognition was performed solely on the Pi, the CPU load on the Pi would dramatically increase with every room addded to the system, eventually rendering the entire system unworkable.)
Raspberry Pi入门(Getting Started with the Raspberry Pi)
设定(Setting it up)
Raspberry Pi于2009年5月首次创建,现已进入第三次正式迭代.直到今年5月,我才买过Raspberry Pi,主要是因为它们的购买力有限.但是,当Raspberry Pi 3带有内置WiFi时,我终于有动力购买它了.我很高兴我最终做到了,因为否则我将永远无法写这篇文章:-)(First created in May 2009, the Raspberry Pi is now in its third official iteration. Until May this year, I had never bought a Raspberry Pi, mainly because they seemed to limited. However, when the Raspberry Pi 3 arrived with inbuilt WiFi, I was finally motivated to purchase one. I’m glad I eventually did, because otherwise I would never have been able to write this article :-))
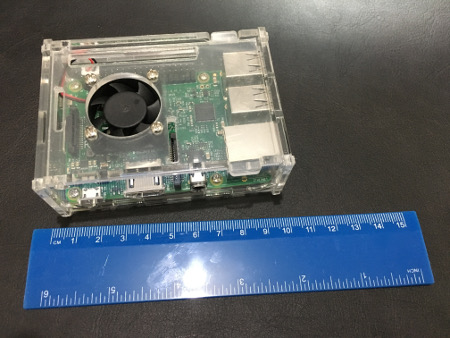
[图3.]([Fig 3.])我的Raspberry Pi 3,放在盒子里,带刻度尺(My Raspberry Pi 3, inside a case, with a ruler for scale) 我强烈建议您为Raspberry Pi装一个保护套,因为它们很小,很容易被大物件损坏.(I highly recommend you get a case for your Raspberry Pi since they are very small and easily damaged by large objects.)
下载并刻录Raspbian映像(Downloading & burning a Raspbian image)
这是相当直截了当的.实际上,此过程的简单性是Raspberry Pi(以及其他IoT设备)的主要卖点之一:如果您搞砸了安装,则很容易取出SD卡,对其进行映像,然后使用完全干净的操作系统从头开始设置Pi.(This is fairly straightfoward to do. In fact, the simplicity of this process is one of the major selling points of the Raspberry Pi (and, for that matter, other IoT devices): if you ever mess up your installation, it is very easy to remove the SD card, re-image it, and start your Pi from scratch with a completely clean OS.) 前往(Head over to) 官方Raspbian下载页面(the official Raspbian download page) 下载Raspbian.(to download Raspbian.) 下载Raspbian映像后,将8gb或更大容量的MicroSD卡插入计算机.如有必要,请使用适配器.然后,解压缩图像文件,并使用(Once you’ve downloaded your Raspbian image, insert a 8gb or greater MicroSD card into your machine. Use an adapter if necessary. Then, unzip the image file, and use the) Win32DiskImager(Win32DiskImager) 将图像刻录到SD卡.(to burn the image to your SD card.)
第一次启动(Booting for the first time)
首次启动Pi时,应确保您具有能够产生至少5A输出的微型USB充电器.我个人发现,树莓派通常可以在稍少的功率下运行良好,例如由手机充电器产生的功率,尽管在低功率下运行CPU密集型任务时,树莓派有时会耗尽.(To boot your Pi for the first time, you should make sure you have a micro-USB charger capable of producing at least 5A output. I have personally found that the Pi generally runs fine on slightly less power, for example that generated by a phone charger, although it will sometimes brown out while running CPU-intensive tasks on a low power supply.)
首先将成像的SD卡插入Raspberry Pi下方的卡槽中. (可选)通过将活动的以太网电缆插入以太网端口将Pi连接到Internet.如果您有支持HDMI的显示器,请抓住HDMI电缆,然后将Pi插入显示器.完成所有操作后,将微型USB充电器插入Pi的电源连接器中.您的Raspberry Pi将自动启动,并且文本输出流将淹没您的屏幕.(Begin by inserting your imaged SD card into the card slot underneath the Raspberry Pi. Optionally, connect your Pi to the internet by plugging an active ethernet cable into the ethernet port. If you have an HDMI-enabled monitor, grab an HDMI cable and plug your Pi into your monitor. Once all of that is done, insert the micro-USB charger into the power connector on the Pi. Your Raspberry Pi will automatically boot, and a stream of text output will flood your screen.)
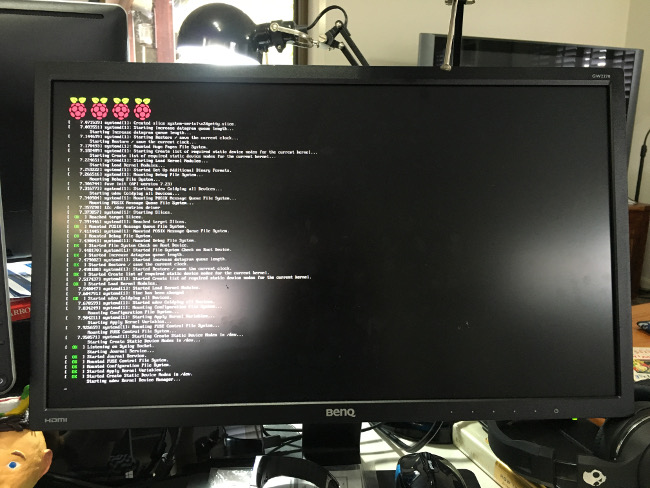
[图4.]([Fig 4.])我的Raspberry Pi 3启动.(My Raspberry Pi 3 booting.)
修改密码(Changing your Password)
Raspberry Pi的默认登录名是" pi"(用户名,无引号)和" raspberry"(密码,无引号).(The default login for your Raspberry Pi is “pi” (username, no quotes) and “raspberry” (password, no quotes).) 我强烈建议您将密码更改为令人难忘且安全的密码,然后再继续操作.许多人跳过此步骤,以为"我会做对",但是我知道有一些人已经学到了为什么此步骤很重要的艰辛方法.去做就对了.(I highly recommend changing your password to something memorable and secure before continuing any further. A lot of people skip this step, thinking “I’ll be right”, but I know of several people who have learnt the hard way why this step is important. Just do it.) 要更改密码,请输入以下命令:(To change your password, enter this command:)
$ sudo passwd
系统将提示您输入当前密码(树莓派),然后您可以选择一个新密码.(You will be prompted to enter your current password (raspberry), after that you will be able to choose a new password.) 完成后,尝试输入(Once you’re done, try entering)
$ startx
玩Raspbian随附的GUI.您需要将USB鼠标插入Pi才能使用GUI.花一点时间来熟悉操作系统.(to play with the GUI that comes with Raspbian. You’ll need to plug a USB mouse into the Pi to use the GUI. Take a little while to familarize yourself with the operating system.)
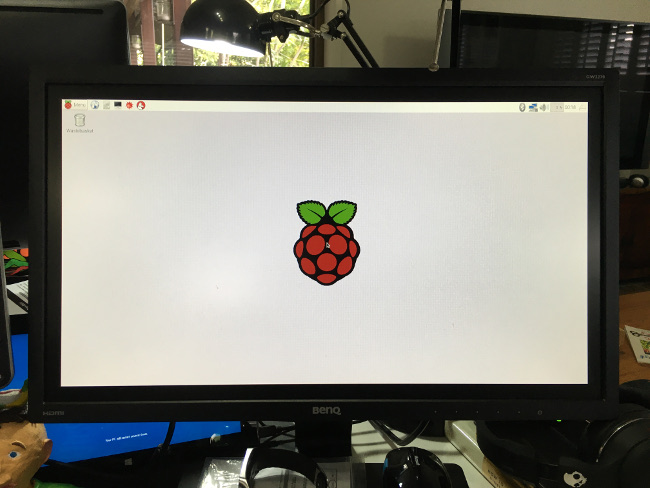
[图5.]([Fig 5.])Raspbian GUI(The Raspbian GUI)
创建一个WiFi接入点(Creating a WiFi access point)
您无需编写任何代码即可使用Pi进行的最酷的操作之一就是将其配置为充当WiFi路由器.这是激发您的IoT胃口的好方法,并且是建立我们的个人助理的关键一步.(One of the coolest things you can do with your Pi without writing any code is configuring it to act as a WiFi router. It’s a great way to whet your IoT appetite, and is a crucial step towards building our personal assistant.)
安装hostapd和dnsmasq(Installing hostapd and dnsmasq)
在线上有许多教程,介绍如何将Raspberry Pi设置为wifi服务器.由于编写时间不同,许多代码彼此冲突,所以我想我应该分享在运行Raspbian Jesse的Raspberry Pi 3上使用我的方法(使用内置的WiFi硬件).(There are a number of tutorials online on how to set up your Raspberry Pi as a wifi server. Due to the differing times at which they were written, many of them conflicted with each other, so I thought I’d share the method that worked for me on the Raspberry Pi 3, running Raspbian Jesse (using the inbuilt WiFi hardware).) 首先打开终端并安装以下两个软件包:hostapd和dnsmasq(Start by cracking open a terminal and installing these two packages: hostapd and dnsmasq)
$ sudo apt-get update
$ sudo apt-get install hostapd dnsmasq
组态(Configuration)
打开/etc/network/interfaces进行编辑:(Open up /etc/network/interfaces for editing:)
$ sudo nano /etc/network/interfaces
编辑它,使其看起来像这样:(Edit it so that it looks something like this:)
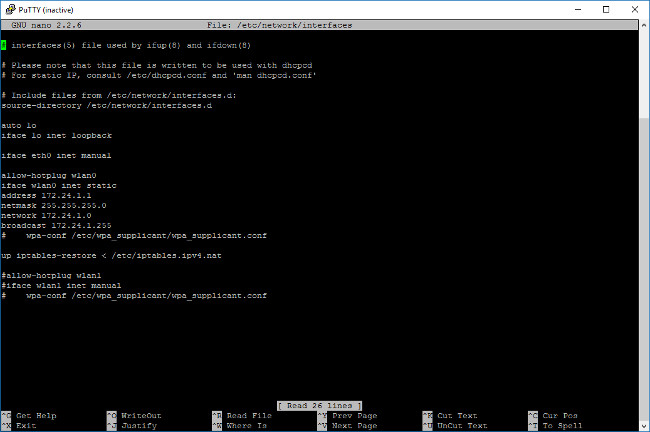
[图6.]([Fig 6.])编辑/etc/network/interfaces(Editing /etc/network/interfaces) 之后,在/etc/hostapd/hostapd.conf中创建一个新的配置文件:(After that, create a new onfiguration file at /etc/hostapd/hostapd.conf:)
$ sudo nano /etc/hostapd/hostapd.conf
输入此内容:(Enter this content:)
interface=wlan0
driver=nl80211
ssid=Pi3-AP #name of your new wifi hotspot
hw_mode=g
channel=6
ieee80211n=1
wmm_enabled=1
ht_capab=[HT40][SHORT-GI-20][DSSS_CCK-40]
macaddr_acl=0
auth_algs=1
ignore_broadcast_ssid=0
wpa=2
wpa_key_mgmt=WPA-PSK
wpa_passphrase= {YOUR DESIRED WIFI PASSWORD GOES HERE}
rsn_pairwise=CCMP
确保选择wifi密码并替换(Make sure you choose a wifi password and replace) {YOUR DESIRED WIFI PASSWORD GOES HERE} 具有正确的值.我知道将密码存储为纯文本是一种可怕的安全做法,但是不幸的是,这是hostapd的工作方式. Hostapd是一个开源项目,因此,如果您对此感到担忧,则可以随时分叉他们的代码并实现适当的密码哈希处理.(with the correct value. I know it’s terrible security practice to store passwords in plain text, but unfortunately this is the way hostapd works. Hostapd is an open-source project, so if you’re concerned about this, you can always fork their code and implement proper password hashing.)
现在按顺序运行以下命令:(Now run these commands in order:)
$ sudo service dhcpcd restart
$ sudo ifdown wlan0; sudo ifup wlan0
$ sudo /usr/sbin/hostapd /etc/hostapd/hostapd.conf
此时,您应该可以使用智能手机/笔记本电脑预览您的Wifi网络.但是,由于我们尚未配置dnsmasq,因此您将无法连接或访问Internet.(At this point you should be able use your smartphone/laptop to preview your Wifi network. However, you won’t be able to connect or access the internet, because we haven’t configure dnsmasq yet.)
$ sudo nano /etc/dnsmasq.conf
然后将该文件的内容更改为此:(Then change the contents of that file to this:)
interface=wlan0
listen-address=172.24.1.1
bind-interfaces
server=8.8.8.8 # Use Google's DNS servers.
domain-needed
bogus-priv
dhcp-range=172.24.1.50,172.24.1.150,24h
现在,要启用IPv4转发,请打开/etc/sysctl.conf:(Now, to enable IPv4 forwarding, open up /etc/sysctl.conf:)
$ sudo nano /etc/sysctl.conf
取消注释的行(Uncomment the line that says) net.ipv4.ip_forward=1 通过从行首删除#. Ctrl-X,y,Enter保存.(by removing the # from the start of the line. Ctrl-X, y, Enter to save.)
现在输入以下命令:(Now enter the following commands:)
$ sudo iptables -t nat -A POSTROUTING -o eth0 -j MASQUERADE
$ sudo iptables -A FORWARD -i eth0 -o wlan0 -m state --state RELATED,ESTABLISHED -j ACCEPT
$ sudo iptables -A FORWARD -i wlan0 -o eth0 -j ACCEPT
$ sudo sh -c "iptables-save > /etc/iptables.ipv4.nat"
$ sudo nano /etc/rc.local
刚好高于线(Just above the line) exit 0 ,添加以下文本行:(, add the following line of text:)
iptables-restore < /etc/iptables.ipv4.nat
如果您对上述步骤有任何疑问,请尝试使用Google搜索,或参考我以前写过的文章:(If you have any trouble with the above steps, try googling, or reference the articles I used to write this:)
- http://raspberrypihq.com/how-to-turn-a-raspberry-pi-into-a-wifi-router/(http://raspberrypihq.com/how-to-turn-a-raspberry-pi-into-a-wifi-router/)
- https://frillip.com/using-your-raspberry-pi-3-as-a-wifi-access-point-with-hostapd/(https://frillip.com/using-your-raspberry-pi-3-as-a-wifi-access-point-with-hostapd/)
检查您的连接(Check your connection)
使用以下方法重新启动Pi:(Reboot your Pi with:)
$ sudo reboot
如果一切顺利,Pi加载完成后,您就可以将其他设备连接到新的WiFi网络了!(If all went well, once your Pi has finished loading, you should be able to connect other devices to your new WiFi network!)
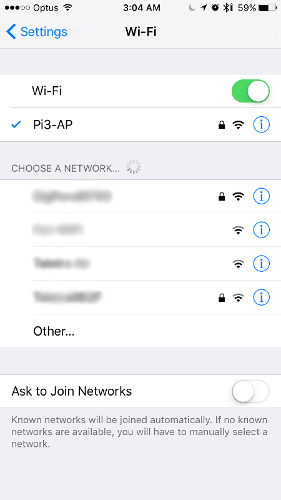
[图7.]([Fig 7.])iPhone已连接到我的Pi3-AP网络(iPhone connected to my Pi3-AP network)
通过PuTTY连接(Connecting via PuTTY)
现在您已经建立了网络,将您的PC连接到它.如果您还没有腻子,(Now that you have set up your network, connect your PC to it. If you don’t already have PuTTY,) 从官方网站下载(download it from an official site) ,然后运行它.(, then run it.)
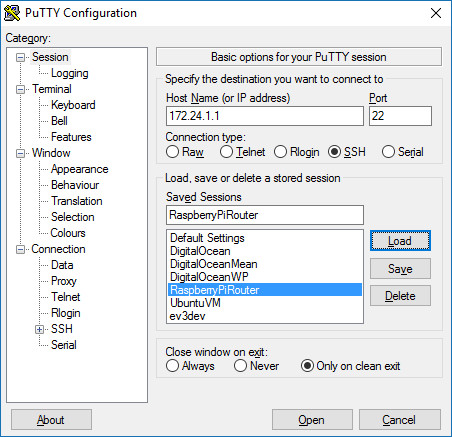
[图8.]([Fig 8.])油灰(PuTTY)
输入您的Raspberry Pi的详细信息(IP地址:172.24.1.1,端口:22,就这样!),然后单击"打开".(Enter in the details for your Raspberry Pi (IP address: 172.24.1.1, Port: 22, that’s it!), then click “Open”.)
[图9.]([Fig 9.])使用PuTTY SSH进入我们的新Raspberry Pi WiFi路由器(Using PuTTY to SSH into our new Raspberry Pi WiFi router)
现在我们可以从桌面远程访问终端了,我们真的不再需要使用Raspbian GUI.如果愿意,您可以从显示器上断开Pi的连接,然后将Pi安全地塞入附近的角落,该角落可以访问电源和以太网.初学者应注意,他们不使用其WiFi密码通过PuTTY访问其Pi,而应使用其设置的Raspbian帐户的密码.(Now that we can access a terminal remotely from our desktop, we don’t really need to use the Raspbian GUI anymore. If you wish, you can disconnect your Pi from your monitor and tuck your Pi safely away in a nearby corner where it can access power and ethernet. Beginners should note that they do not use their WiFi password to access their Pi through PuTTY, instead they should use the password to their Raspbian account that they set with) passwd 本文前面.(earlier in this article.)
设置我们的工作流程(Setting up our Workflow)
吉特(Git)
Git是一个非常流行的文件管理和版本控制系统,通常与独立服务相关联(Git is an immensely popular file management and versioning system, often associated with the independent service) 的GitHub(GitHub) ,尽管存在许多其他基于Git的服务,并且许多人运行自己的Git服务器.(, although many other Git-based services exist, and many people run their own Git servers.) 对于本文的其余部分,我们将使用Git将代码推送并部署到Raspberry Pi.(For the rest of this article, we will be using Git to push and deploy our code to our Raspberry Pi.)
Visual Studio程式码(Visual Studio Code)
Visual Studio程式码(Visual Studio Code) 是一个出色的现代文本编辑器,我强烈建议在本文中使用.还有其他文本编辑器,您可以根据需要使用它们,但是我坚信要学习适应各种文本编辑器,以便您能以开放的心态为每个任务选择最佳工具.例如,尽管我建议本文使用VS代码,但我不会使用VS代码来编辑2GB .csv文件. Windows上的Vim,Nano或什至Notepad ++之类的东西更适合该任务.(is a brilliant modern text editor that I highly recommend using for this article. There are alternative text editors, which you can use if you wish, but I am a firm believer in learning to adapt to all sorts of text editors so that you can pick the best tool for each task with an open mind. For example, although I recommend VS code for this article, I wouldn’t use VS code to edit a 2GB .csv file. Something like Vim, Nano, or perhaps even Notepad++ on Windows would be better suited to that task.)
创建和使用存储库(Creating & using repositories)
要在Raspberry Pi的Git中创建一个新的存储库,请使用PuTTY将SSH SSH到您的Pi中,并创建一个名为" GitTest"的新目录.(To create a new repository in Git on your Raspberry Pi, SSH into your Pi with PuTTY, and create a new directory called “GitTest”.)
$ mkdir GitTest
然后输入该目录.(Then enter that directory.)
$ cd GitTest
现在,初始化一个新的git repo:(Now, initialize a new git repo:)
$ git init
$ git add .
$ git commit -m "First Commit"
要推送到远程存储库(例如GitHub上的存储库),请执行以下操作:(To push to a remote repository, such as one on GitHub, do the following:)
$ git remote add origin URL-of-your-remote-repository
$ git remote -v
$ git push -u origin master
进行本地更改后,您可以通过以下操作将其推送到存储库中:(After you’ve made local changes, you can simply push them to a repo through the following:)
$ git push
同样,可以将远程更改下拉到本地存储库中:(Likewise, remote changes can be pulled down to a local repo:)
$ git pull
建立我们的后端(Building our Backend)
Zukuno分为两个部分:一个通过Apache动态地为参与的平板电脑提供服务的UI,以及一个由该UI使用的,由Django驱动的API,这使所有事情都变了.在本节中,我们将重点介绍构建Zukuno的后端API.(Zukuno is split into two parts: a UI served dynamically through Apache to participating tablets, and a Django-powered API consumed by the UI that makes everything tick. In this section, we will focus on building a Zukuno’s backend API.)
安装和配置Apache(Installing & Configuring Apache)
首先安装Apache软件包:(Start by installing the Apache package:)
$ sudo apt-get install update
$ sudo apt-get install apache
安装完成后,启动Apache服务:(After installation completes, start the Apache service:)
$ sudo service apache start
现在,您可以通过在计算机上打开Chrome并导航到来测试服务器(You can now test your server by opening Chrome on your computer and navigating to)172.24.1.1(172.24.1.1)(Raspberry Pi的IP地址). Apache欢迎页面应该会打招呼.我们的WiFi路由器现在也成了服务器:cool:((the IP address of your Raspberry Pi). You should be greeted by the Apache welcome page. Our WiFi router is now a server too :cool:)
通过Apache服务器提供的文件位于Raspberry Pi上的/var/www/.导航到此位置,创建git存储库并将其推送到GitHub,然后将其克隆到您的桌面.然后,每当您对桌面存储库进行更改时,都可以使用以下命令将其推送到GitHub:(Files served through the Apache server are located at /var/www/ on your Raspberry Pi. Navigate to this location and create and push a git repository to GitHub, then clone it to your Desktop. Then, whenever you make changes to your desktop repo, you can push them to GitHub with) git push 并将它们加载到您的Raspberry Pi中(and load them into your Raspberry Pi with) git pull .(.)
安装和配置Django(Installing & Configuring Django)
我们正在慢慢开始接触该构建的更高级部分.与Apache一起安装Django有点棘手.我强烈推荐(We are slowly starting to get to the more advanced parts of this build. Installing Django alongside Apache is somewhat tricky. I highly recommend) 按照官方文件(following the official documentation) 为此,也许设置了一个虚拟环境来工作,等等:-)(for doing so, perhaps setting up a virtual environment to work in, etc :-)) 您可以使用以下命令测试Django的安装:(You can test your Django isntallation using the following command:)
$ python -m django --version
假设您已经了解了Django,让我们为我们的项目创建一个新文件夹:(Asssuming you’ve got Django covered, let’s create a new folder for our project:)
$ cd ../
$ mkdir django
$ cd django
$ mkdir zukuno
$ cd zukuno
现在让我们创建一个新的Django项目:(Now let’s create a new Django project:)
$ django-admin startproject zukuno
现在我们已经完成了这一步,请确保我们拥有刚刚创建的所有文件:(Now that we’ve done that, let’s ensure that we own all the files that we just created:)
$ sudo chown -R $USER:$USER .
现在,我们将具有以下结构的目录:(We will now have a directory with the following structure:)
zukuno/
    manage.py
    zukuno/
        __init__.py
        settings.py
        urls.py
        wsgi.py
让我们启动服务器.浏览到包含manage.py的文件夹,然后运行以下命令:(Let’s start our server. Navigate into the folder containing manage.py, then run the following command:)
sudo python manage.py runserver 0.0.0.0:8000
的(The) 0.0.0.0:8000 最后告诉django使用端口8000接受外部连接.(on the end tells django to accept external connections, using port 8000.)
[图10.]([Fig 10.])在我们的Raspberry Pi上运行Django(Running Django on our Raspberry Pi)
现在,如果您在连接到Raspberry Pi网络的设备上加载http://172.24.1.1:8000/,您将看到类似图11的内容(摘自我们Android应用程序的早期版本,我们将在后面讨论) ).(Now, if you load http://172.24.1.1:8000/ on a device connected to the Raspberry Pi’s network, you will see something like Fig 11 (taken from a very early build of our Android app, which we’ll discuss later).)

[图11.]([Fig 11.])默认的Django欢迎页面,运行在我们稍后将介绍的Android应用的早期版本中(The default Django welcome page, running inside an early build of the Android app we’ll cover later) 要正常关闭服务器,请在终端处于活动状态时按Ctrl-C.不幸的是,我发现有时候Django无法完全退出,阻塞了端口8000,导致服务器无法重启.如果您遇到这种情况,请使用以下命令强制清除端口,以便重新启动服务器:(To close the server gracefully, push Ctrl-C while the terminal is active. Unfortunately, I have found that sometimes Django fails to exit completely, blocking port 8000 such that the server cannot be restarted. If this happens to you, use this command to force-clear the port so you can restart the server:)
$ sudo fuser -k 8000/tcp
消费GTFS供稿(Consuming a GTFS feed)
GTFS简介(Introduction to GTFS)
根据(According to) Google的官方文件(Google’s official documentation) GTFS Realtime(通用公交提要规范)是一种"提要规范,允许公共运输机构向应用程序开发人员提供有关其车队的实时更新".(, GTFS Realtime (General Transit Feed Specification) is a “feed specification that allows public transportation agencies to provide realtime updates about their fleet to application developers”.) GTFS,作为通用协议,(GTFS, as a general protocol, also) 需要几个静态文件(requires several static files) 实时数据不可用时供参考.(for reference whenever real-time data is unavailable.) 在构建此项目时,我从以下来源引用了GTFS数据:(When building this project, I referenced GTFS data from the following sources:)
- https://translink.com.au/about-translink/open-data(https://translink.com.au/about-translink/open-data)
- https://gtfsrt.api.translink.com.au/(https://gtfsrt.api.translink.com.au/)
安装Google的Python包装器(Installing Google’s Python wrapper)
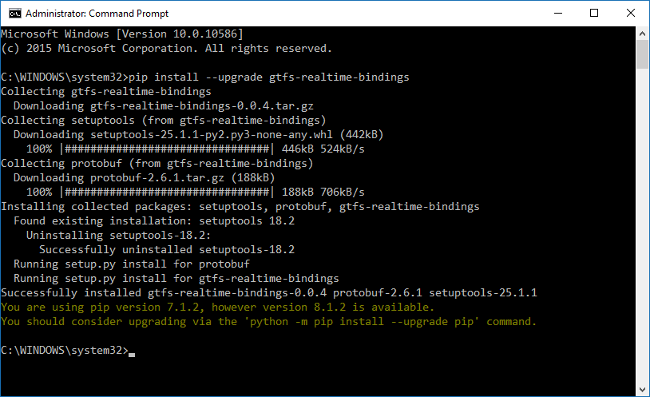
[图12.]([Fig 12.])在Windows上安装gtfs-realtime-bindings.(Installing gtfs-realtime-bindings on Windows.) 对我们来说幸运的是,我们不需要花很多时间为该协议构建提要解析器.相反,我们可以使用(Fortunately for us, we don’t need to spend ages building a feed parser for this protocol. Instead, we can use) Google的预建python包(Google’s pre-built python package) .(.) 安装它实际上只需要一行:(Installing it takes literally one line:)
$ pip install --upgrade gtfs-realtime-bindings
尝试一下(Trying it out)
在Raspberry Pi的主目录中创建一个名为gtfs-test.py的新文件:(Create a new file called gtfs-test.py in your home directory on your Raspberry Pi:)
$ nano gtfs-test.py
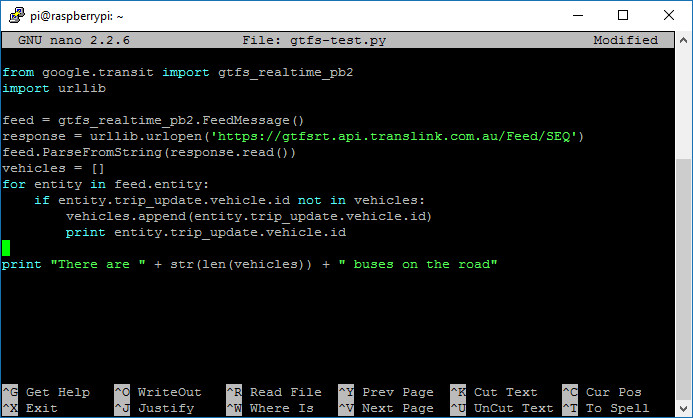
[图13.]([Fig 13.])将GTFS库与以下代码结合使用(Using the GTFS library with the code below) 让我们尝试一些简单的事情.将以下代码添加到文件中:(Let’s try something simple. Add the following code to the file:)
from google.transit import gtfs_realtime_pb2
import urllib

feed = gtfs_realtime_pb2.FeedMessage()
response = urllib.urlopen('https://gtfsrt.api.translink.com.au/Feed/SEQ')
feed.ParseFromString(response.read())
vehicles = []
for entity in feed.entity:
    if entity.trip_update.vehicle.id not in vehicles:
        vehicles.append(entity.trip_update.vehicle.id)
        print entity.trip_update.vehicle.id

print "There are " + str(len(vehicles)) + " buses on the road"
保存并退出.然后使用运行文件(Save and exit. Then run the file using)
$ python gtfs-test.py
生成的输出的最后一行将类似于以下内容:(The last line of the generated output will be something along the lines of this:)
There are 974 buses on the road
我们刚刚收集了唯一的车辆标识符,并使用它们的总数来计算当前有多少辆公交车在运行::(We have just collected the unique vehicle identifiers and used their total to calculate how many buses are active right now :cool:)
我们的代码(Our code)
首先,请停止Django进程(如果正在运行),然后导航至Django项目中包含manage.py的文件夹.到达那里后,运行以下命令:(To get started, stop the Django process if it’s running, then navigate to the folder containing manage.py in your Django project. Once you’re there, run the following:)
$ python manage.py startapp gtfs
这将创建一个新的" app" gtfs,类似于Django项目的子模块.在nano中打开gtfs/views.py并将其更改为以下内容:(This will create a new “app”, gtfs, which is like a submodule of a Django project. Open gtfs/views.py in nano and change it to the following:)
from django.shortcuts import render
from google.transit import gtfs_realtime_pb2
import urllib

# Create your views here.

from django.http import HttpResponse, JsonResponse

def index(request):
    feed = gtfs_realtime_pb2.FeedMessage()
    response = urllib.urlopen('https://gtfsrt.api.translink.com.au/Feed/SEQ')
    feed.ParseFromString(response.read())
    trip_updates = []
    for entity in feed.entity:
        if entity.HasField('trip_update'):
            for stop_update in entity.trip_update.stop_time_update:
                if stop_update.stop_id == '<the stop you wish to use>':
                    delay = stop_update.arrival.delay
                    append = " ahead"
                    if delay < 0:
                        delay = delay * -1;
                        append = " late"
                    if delay < 60:
                        delay = "30 seconds" + append
                    else:
                        delay = str(delay / 60) + " minutes" + append

                    trip_update = {
                        'route_id': entity.trip_update.trip.route_id,
                        'time': stop_update.arrival.time,
                        'delay': delay,
                        'vehicle_id': entity.trip_update.vehicle.id
                    }
                    trip_updates.append(trip_update)

    trip_updates.sort()

    #json_output = jsonpickle.encode(trip_updates, unpicklable=False)
    return JsonResponse(trip_updates, safe=False)
要找到屋外的停靠站,请参考GTFS标准中提供的静态文件.您应该可以查找街道名称并找到匹配的站点.(To find the stop outside your house, refer to the static files available as part of the GTFS standard. You should be able to look up your street name and find a matching stop.) 上面的代码基本上是JSON简化程序.它从实时提要中获取巨大的JSON响应,提取我们想要的一小部分信息,然后以不同的JSON结构返回.(The code above is basically a JSON simplifier. It takes the huge JSON response from the real-time feed, extracts the tiny bit of information that we want, and returns it in a different JSON structure.)
未来的改进(Future Improvements)
我上面编写的代码示例只是非常简单的示例说明.例如,我可以跟踪这些数据几个月,然后应用机器学习算法来尝试了解何时发生运输延误,为什么发生延误以及如何避免延误.但是,我只有这么多时间来从事这个项目,所以我现在必须保持现状.(The code samples I have written above are only a very simple demonstration of what is possible here. For example, I could track this data for a few months, then apply machine-learning algorithms in an attempt to understand when transport delays happen, why they happen, and how one can avoid them. However, I only have so much time to work on this project, so I have to leave this as-is for now.)
使用Microsoft的TTS引擎(Using Microsoft’s TTS engine)
为什么要使用这个引擎?(Why this engine?)
我选择使用Microsoft Speech API是因为:(I chose to use Microsoft’s Speech API because:)
- 每月有合理的免费配额(It has a reasonable free quota per month)
- 足够准确(It is adequately accurate)
- 它比我尝试过的其他替代品更易于使用(It was easier to use than other alternatives that I tried)
获取API访问密钥(Getting an API access key)
要获得在编译示例代码或构建自己的应用程序时要使用的API密钥集,请转到(To get an API keyset to use when compiling my sample code, or when building your own apps, head over to) https://www.microsoft.com/cognitive-services/zh-CN/speech-api(https://www.microsoft.com/cognitive-services/en-us/speech-api)
尝试一下(Trying it out)
首先,我们定义一些关键参数:(First, we define some key parameters:)
clientId = "<insert>"
clientSecret = "<insert>"
ttsHost = "https://speech.platform.bing.com"
params = urllib.urlencode({'grant_type': 'client_credentials', 'client_id': clientId, 'client_secret': clientSecret, 'scope': ttsHost})
headers = {"Content-type": "application/x-www-form-urlencoded"}
AccessTokenHost = "oxford-speech.cloudapp.net"
path = "/token/issueToken"
之后,我们联系Microsoft的服务器以请求访问令牌:(After that, we contact Microsoft’s servers to request an access token:)
conn = httplib.HTTPSConnection(AccessTokenHost)
conn.request("POST", path, params, headers)
response = conn.getresponse()
data = response.read()
conn.close()
accesstoken = data.decode("UTF-8")
ddata=json.loads(accesstoken)
access_token = ddata['access_token']
既然有了访问令牌,我们就可以用要查询的文本查询服务器:(Now that we have are access token, we can query their servers with our text to be dictated:)
body = "<speak version='1.0' xml:lang='en-us'><voice xml:lang='en-us' xml:gender='Female' name='Microsoft Server Speech Text to Speech Voice (en-US, ZiraRUS)'>" + text_to_dictate + "</voice></speak>"
headers = {"Content-type": "application/ssml+xml",
            "X-Microsoft-OutputFormat": "riff-16khz-16bit-mono-pcm",
            "Authorization": "Bearer " + access_token,
            "X-Search-AppId": "99aab5c6fd784c0dac57d1fe01059c3c", #"07D3234E49CE426DAA29772419F436CA",
            "X-Search-ClientID": "099a0afb96044b298daeb6ce9cc131ce", #"1ECFAE91408841A480F00935DC390960",
            "User-Agent": "TTSForPython"}
conn = httplib.HTTPSConnection("speech.platform.bing.com")
conn.request("POST", "/synthesize", body, headers)
response = conn.getresponse()
data = response.read()
conn.close()
最后,我们将记录保存到本地磁盘中:(Finally, we save the recording to our local disk:)
file = open("/home/pi/response.wav", "w")
file.write(data)
file.close()
我们的代码(Our code)
我在应用程序中使用的代码与上面的代码几乎相同,只是我将其包装在一个函数中并在该函数周围创建了一个类,以便Django视图应用程序可以在需要时调用它:(The code that I used in my application is almost identical to the code above, except I wrapped it in a function and created a class around it, so that my Django view app could call it whenever necessary:)
from voice import tts

response = "I've paused the music."
tts.getDictation(response); # Use Microsoft Speech API to dictate the input
player = subprocess.Popen(["omxplayer", "-o", "local", "/home/pi/response.wav"], stdin=subprocess.PIPE
建立我们的前端(Building our Frontend)
我的前端方法(My Approach to Frontend)
我决定将Zukuno的前端构建为Webapp.这有几个正面和负面影响.这种方法的一个积极效果是,将更新推送到GUI非常容易-我要做的就是更新Raspberry Pi上的文件,并且更改将自动流到每个访问这些文件的设备上.不幸的是,这种方法的负面影响是我在设计和响应能力方面受到严重限制,这主要是由于Android的WebView组件的性能极差.(I decided to build the frontend of Zukuno as a webapp. This had several positive and negative effects. One positive effect of this approach was that it was very easy to push updates to the GUI - all I had to do was update the files on the Raspberry Pi, and the changes would automatically flow to every device accessing those files. Unfortunately, one negative effect of this approach was that I was severely limited in terms of design and responsiveness, mainly due to the extremely poor performance of Android’s WebView component.)
使用Android Studio(Using Android Studio)
如果您想今天构建现代的Android应用程序,建议使用(If you want to build modern Android apps today, I recommend using) Android Studio(Android Studio) .自2014年12月发布第一个稳定版以来,它一直在稳步改进-如今,它是迄今为止开发本机Android应用程序的最佳Android IDE.(. Since the first stable release came out in December 2014, it has steadily been improving - and today it is by far the best Android IDE out there for developing native Android apps.)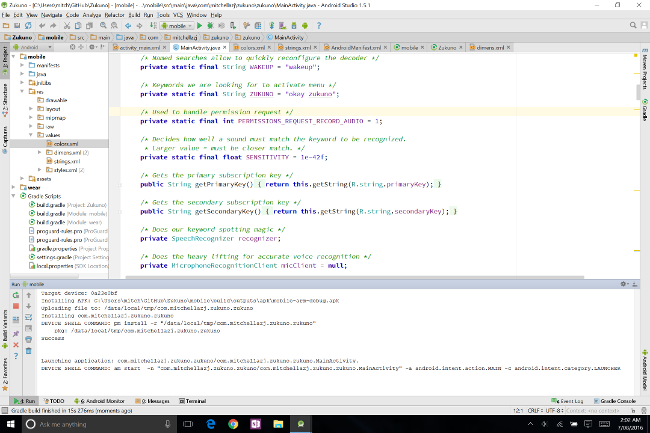 [图14.]([Fig 14.])Android Studio(Android Studio)
使用WebView(Using WebView)
WebView损坏(WebView is broken)
如前所述,我们的应用程序使用Android的WebView组件显示Zukuno UI.不幸的是,WebView在很大程度上已损坏且无法维护,因此有时会遭受性能问题并表现出异常情况.在接下来的几节中,我将解释我想到的一些变通方法.(As I mentioned earlier, the our app uses Android’s WebView component to display the Zukuno UI. Unfortunately, WebView is largely broken and unmaintained, and as a result can sometimes suffer performance issues and behave unexpectedly. In the next few sections, I’m going to explain a few workarounds I came up with.)
启用触摸事件(Enabling touch events)
我在使用WebView时遇到的一种奇怪的行为是,几乎不可能从Web应用程序中的Javascript代码接收onClick事件,甚至onTouch事件.我仍然没有找到一个干净的解决方法;虽然我确实找到了以下骇人听闻的解决方案:(One bizarre type of behaviour that I encountered while using WebView was that it was almost impossible to recieve onClick events, or even onTouch events, from Javascript code within the webapp. I still have not found a clean workaround for this; although I did find the following hackish solution:)
main_view.setOnTouchListener(new View.OnTouchListener() {
    @Override
    public boolean onTouch(View v, MotionEvent event) {
        if (event.getPointerCount() > 1) {
            return true;
        }

        switch (event.getAction()) {
            case MotionEvent.ACTION_DOWN: {
                m_downX = event.getX();
                // send the click event
                main_view.loadUrl("javascript:$(document.elementFromPoint(" + event.getX() + ", " + event.getY() + ")).click()");
            }
            break;

            case MotionEvent.ACTION_MOVE:
            case MotionEvent.ACTION_CANCEL:
            case MotionEvent.ACTION_UP: {
                // prevent horizontal scrolling
                event.setLocation(m_downX, event.getY());
            }
            break;
        }

        return false;
    }
});
定影性能(Fixing performance)
开箱即用的CSS动画和变换在WebView中是可怕的.我发现这些更改有所帮助.动画还远远不够完美,但至少现在可以观看了.(Out-of-box CSS animations and transforms are horrible in WebView. I found that these changes helped a little. Animations are still far from perfect, but at least they are now watchable.)
main_view.setLayerType(View.LAYER_TYPE_HARDWARE, null);
main_view.getSettings().setAppCacheEnabled(false);
main_view.getSettings().setCacheMode(WebSettings.LOAD_NO_CACHE);
main_view.getSettings().setJavaScriptEnabled(true);
main_view.setVerticalScrollBarEnabled(false);
main_view.setHorizontalScrollBarEnabled(false);
通过Java脚本进行通信(Communicating through Javascript)
WebView组件的一种赎回质量是它确实很容易支持Javascript通信.尽管在我使用过的其他平台(CefSharp,C#WebBrowser控件等)中,JavaScript一直很难工作,但在Android的WebView中它确实可以工作.(One redeeming quality of the WebView component is how easily it does support Javascript communication. Although in other platforms I’ve used (CefSharp, C# WebBrowser contorl, etc), Javascript has been a pain to get working, in Android’s WebView it just works.) Java-> Javascript(Java -> Javascript)
main_view.loadUrl("javascript:alert('triggered')");
Javascript-> Java(Javascript -> Java) Java:(Java:)
public class HelloWorld {
    Context ctx;

    HelloWorld(Context c) {
        ctx = c;
    }

    public void fooBar() {
        //do something
    }
}

//In onCreate()
main_view.addJavascriptInterface(new HelloWorld(this), "HelloWorldPortal");
然后,在Javascript中:(Then, in Javascript:)
HelloWorldPortal.fooBar();
在WebView中构建自己的GUI(Building our own GUI within WebView)
结构体(Structure)
HTML的结构如下:(The structure of our HTML is as follows:)
<html>
<head>
    <title>Alex</title>
    <link href="https://fonts.googleapis.com/css?family=Roboto+Slab:400,300,700" rel="stylesheet" type="text/css">
    <link rel="stylesheet" href="style.css" />
</head>
<body>
    <div id="mic">
        <img src="img/mic.png" />
        <div class="spinner">
            <div class="bounce1"></div>
            <div class="bounce2"></div>
            <div class="bounce3"></div>
        </div>
    </div>
    <div id="rec-text">
        <span></span>
        <div class="circle-waiter"></div>
    </div>
    <div id="response"></div>
    <div id="shade"></div>
    <!--<div id="header"></div>-->
    <div id="space">
        <div id="left-space">
            <img src="http://172.24.1.73:8081">
        </div>
        <div id="right-space"></div>
    </div>
    <div id="times">
        <h1>Upcoming Buses</h1>
        <div id="sched">
            <div class="entry">
                <span class="service">P205</span>
                <span class="time"><span>ETA</span>6:00am</span>
                <span class="data">
                    <div>
                        <span class="late">3 minutes late</span>
                        <span class="details">to City, George St.</span>
                    </div>
                </span>
            </div>
... lots of entries ...
        </div>
    </div>
    <script src="jquery.min.js"></script>
    <script src="main.js"></script>
</body>
</html>
消耗我们构建的API(Consuming the API’s we built)
播放激活/去激活声音效果非常简单:(Playing activation/deactivation sound effects is very easy:)
$.get("http://172.24.1.1:8000/voice/?p=up-listening"); //Activated!
$.get("http://172.24.1.1:8000/voice/?p=down-finished"); //De-activated!
发送其他信息的方式如下:(Sending other information is done like so:)
$.get("http://172.24.1.1:8000/voice/?p=" + rec, function(result) {
    showResponse(result);
    setTimeout(function() {
        StopRecognizing();
    }, 2000);
});
以下代码更新了实时总线供稿:(The following code updates the live bus feed:)
function getTripData() {
    is_collecting = true;
    console.log("Collecting data");
    $.getJSON("http://172.24.1.1:8000/gtfs/", function(result){
        is_collecting = false;
        console.log("Parsing data");

        $('#sched').html('');
        data = result;
        $.each(result, function(i, field){
            $('#sched').append(generateTripSchema(field.route_id, formatAMPM(field.time), field.delay));
        });
    });
}

function generateTripSchema(route_id, eta, delay) {
    var template = `
            <div class="entry">
                <span class="service">` + route_id + `</span>
                <span class="time"><span>ETA</span>` + eta + `</span>
                <span class="data">
                    <div>
                        <span class="late">` + delay + `</span>
                        <span class="details">to City, George St.</span>
                    </div>
                </span>
            </div>
        `;
    return template;
}
[扩展我们的系统]使用SoCo Python库([Expanding our system] Using the SoCo Python Library)
使用SoCo来控制我家的Sonos系统非常简单.(Using SoCo to control my home’s Sonos system was amazingly simple.)
安装(Installation)
pip install soco
用法(Usage)
import soco

# Pause everything
zone_list = list(soco.discover())
for zone in zone_list:
    zone.pause()

# Play Mozart
zone_list = list(soco.discover())
for zone in zone_list:
    zone.play_uri('https://ia802300.us.archive.org/18/items/MozartCompleteWorksBrilliant170CD/Volume%201%28CD01%29%20Symphonies%20KV%2016-19-19A-22-43-45.mp3')
而已!我要做的就是在(That’s it! All I needed to do was call these functions in the) voice 只要检测到相应的意图,即可使用Django应用.(Django app whenever a corresponding intent was detected.)
[扩展我们的系统]设置安全摄像头([Expanding our system] Setting up a security camera)
我对该项目所做的最后一个扩展是添加"安全摄像机".(One last extension I made to this project was adding a “security camera”.) 为此,我使用了第二个Raspberry Pi,一个USB摄像头,一个有源USB集线器以及一个名为Motion的软件包.(To do this, I used a second Raspberry Pi, a USB camera, a powered USB hub, and a package called Motion.) 安装运动很容易:(Installing motion is easy:)
$ sudo apt-get install motion
安装完成后,打开/etc/motion.conf:(Once it has finished installing, open up /etc/motion.conf:)
$ sudo nano /etc/motion.conf
然后查找有关本地主机连接的部分,并将所有内容设置为关闭,以便您可以从主机Pi外部访问流.之后,重新启动Pi,您应该一切顺利.(Then hunt down the section referring to localhost connections and set everything to off, so that you can access the stream from outside the host Pi. After that, reboot the Pi, and you should be good to go.)
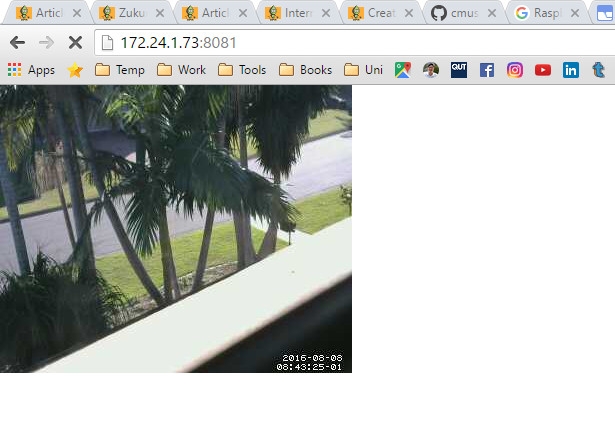
[图16 ..([Fig 16.])通过浏览器访问我们的安全摄像机(Accessing our security camera through the browser)
结论(Conclusion)
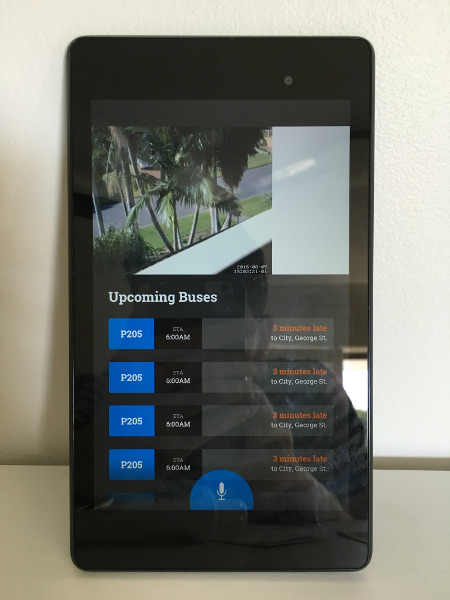
[图17.]([Fig 17.])接近我的应用程序的当前版本(Close to the current version of my app) 感谢您阅读全文!(Thanks for reading til the end!) Zukuno仍在进行中,我在这里介绍的只是其功能的框架.在接下来的几个月中,我想逐步将越来越多的API添加到Zukuno的代码库中,以便它可以展开翅膀并开始完全实现其作为物联网个人助手的目标.通过构建到目前为止的工作,我学到了很多东西,我希望本文能够激发人们尝试为IoT构建自己的应用程序.我个人认为,像Zukuno这样具有语音功能的应用程序具有巨大的潜力,可以帮助残疾人(遭受四肢瘫痪,失明等)控制周围环境并获得更大的独立性.(Zukuno is still very much a work in progress, and what I have presented here is only a skeleton of what it is capable of. Over the next few months, I’d like to gradually add more and more API’s into Zukuno’s codebase, so that it can spread its wings and start fully living up to it’s goal of being the personal assistant for the Internet of Things. I learnt a lot by building what I’ve done so far, and I hope that this article inspires people to try building their own apps for the IoT. I personally believe that voice-enabled apps like Zukuno have enormous potential in helping disabled people (sufferring fom quadriplegia, blindness, etc) take control of their surroundings and achieve greater independence.) 最后,我希望您喜欢这篇文章:-)请在下面的论坛中发表您的任何评论.我很想听听您的意见.(In conclusion, I hope you enjoyed this article :-) Please leave any comments you may have in the forum below. I’m keen to hear your feedback.)
历史(History)
- 2016年7月8日首次发布(7/8/16 First published)
许可
本文以及所有相关的源代码和文件均已获得The Code Project Open License (CPOL)的许可。
HTML Python Java Android automation IoT speech 新闻 翻译