精灵编辑器2.0(译文)
By robot-v1.0
本文链接 https://www.kyfws.com/games/sprite-editor-2-0-zh/
版权声明 本博客所有文章除特别声明外,均采用 BY-NC-SA 许可协议。转载请注明出处!
- 38 分钟阅读 - 18955 个词 阅读量 0精灵编辑器2.0(译文)
原文地址:https://www.codeproject.com/Articles/152318/Sprite-Editor-2-0
原文作者:Christ Kennedy
译文由本站 robot-v1.0 翻译
前言
build, edit and animate your own sprites in .Net
在.Net中建立,编辑和设置自己的精灵动画 源代码(source code)
-
下载sprite_Editor_C_2008.zip-217.83 KB(Download sprite_Editor_C_2008.zip - 217.83 KB)
-
下载Sprite_Demo_2.0.zip-1.9 MB(Download Sprite_Demo_2.0.zip - 1.9 MB)
-
下载ForceColor.zip-153.05 KB(Download ForceColor.zip - 153.05 KB)
-
下载GraphicsEditor_C_2008.zip-77.81 KB(Download GraphicsEditor_C_2008.zip - 77.81 KB) 精灵(sprites)
-
下载astronaut_sprite.zip-1.92 MB(Download astronaut_sprite.zip - 1.92 MB)
-
下载forklift_sprite.zip-2.47 MB(Download forklift_sprite.zip - 2.47 MB)
-
下载moonbuggy_sprite.zip-2.7 MB(Download moonbuggy_sprite.zip - 2.7 MB)
-
下载sprite_Smurf.zip-1.57 MB(Download sprite_Smurf.zip - 1.57 MB)
Sprite Editor 2.0:有什么新功能?(Sprite Editor 2.0 : what’s new?)
你们中许多人可能已经读过第一本书(Many of you may have already read the first) 精灵编辑器(Sprite Editor) 我大约一年前发表的文章.从那时起,我一直在研究和关闭它,同时插入其他项目,并且该类及其编辑器都有了很大的改进. Sprite本身仍以与以往相同的方式工作,我将向您介绍有关Sprite的内部工作原理的第一篇文章,但此处将总结如下:Sprite是由图像组成的可动画图形叫(article which i published about a year ago. Since then i’ve been working on it on and off while plugging away at other projects and both the class and its editor have improved quite a bit. The sprites themselves still work much in the same way as they always have and I’ll refer you to the first article for the details about the inner workings of the sprites but will summarize here as follows : a sprite is an animatable figure consisting of images called)**四肢(limbs)**通过铰接的关节连接在一起(linked together by articulating joints called)铰链(hinges).(.) 一个典型的精灵可能包含一个躯干,躯干上有多个从属肢体,例如手臂,腿和一个通过肩部,臀部和颈部铰链与之相连的头部.精灵的肢体数量没有限制,奴隶肢体的深度也没有任何限制,因此您可以拥有一个完整的类人动物精灵,手臂附着在躯干上,前臂附着在手臂上,手附着在手臂上.前臂和手指附着在手上.(A typical sprite may consist of a torso with several slave limbs such as arms, legs and a head linked to it via shoulder, hip and neck hinges. There is no limit to the number of limbs a sprite can have neither is there any limit to the depth of slave limbs so that you can have a complete humanoid sprite with arms attached to a torso, forearms attached to the arms, hands attached to the forearms and fingers attached to the hands.) 这是我将要讨论的一些新改进:(Here are some of the new improvements I’ll be talking about :)
- 加载时间减少到微秒(load time reduced to microseconds)
- 每次旋转的图像数量可变(variable number of images per rotation)
- RAM和文件缓存系统可增强性能(RAM & file caching system for performance enhancement)
- 单负载精灵共享-减少了同一精灵的多个实例的内存需求(single-load sprite sharing - reduced memory requirements for multiple instances of the same sprite)
- Sprite-composite-独立的Sprite在运行时动态链接在一起(sprite-composite - independent sprites dynamically linked together at run-time)
- 固定肢体(stationary limb)
- 形式精灵(form-sprite)
- 新的编辑器功能可提供更人性化的开发环境(new Editor features for a more user-friendly development environment)
建立你的第一个精灵(Building your first sprite)
首先,让我们完成构建第一个精灵的过程.要遵循此示例,您需要下载(First let’s go through the process of building our first sprite. To follow along with this example you’ll need to download the) 源代码(source code) 以及(as well as the) sprite_Smurf(sprite_Smurf) .zip文件,其中包含所有蓝精灵图像以及现有的Smurf精灵,如果您不愿意做任何有趣的事情.(.zip file which contains all the smurf-images along with an existing Smurf-sprite if you don’t quite feel up to doing any of the fun stuff.)
现在您需要做的是启动编辑器,然后单击(What you need to do now is launch the Editor and click the)文件新精灵(File-New Sprite)菜单选项,将弹出下面的表格.在这里,您可以决定精灵每四分之一圈旋转将拥有多少张图像.由于.Net语言固有的位图功能使您可以轻松地将图像旋转90度,因此sprite类只需要在图像的前四分之一圈内旋转图像,然后快速动态生成其余图像.每四分之一圈有16张图像,这意味着圆周围将有64个角度,每5.5°会为您提供一个新角度,您可能会发现这个角度是足够的,但是只要您喜欢使用(menu option which will bring up the form seen below. This is where you get to decide how many images your sprite will have per quarter rotation. Because the Bitmap functions native to the .Net languages allow you to easily rotate an image by turns of 90° the sprite class only needs rotate an image through its first quarter rotations and then quickly generate the rest of the images on the fly. Sixteen images per quarter turn means that there’ll be 64 angles around the circle giving you a new angle about every 5.5° which you’ll probably find adequate but can change whenever you like using the)每次旋转的肢体设置数字图像(Limb-set num images per rotation)菜单选项.(menu option.)
输入新精灵的名称,然后按Enter.(Type in the name of your new sprite and press enter.)
![]()
接下来,您需要添加一些分支.请记住,每当添加新肢体时,它将被附加到您当前选择的任何肢体上,但是由于我们只是开始使用,因此第一个肢体将被附加到您看不见的称为"主肢"的肢体上,有点像幕后绿野仙踪.点击(Next you’ll want to add a few limbs. Remember that whenever you add a new limb it will be attached to whatever limb you’ve currently got selected but since we’re only getting started the first limb will be attached to a limb you can’t see called the Master-Limb, its sort of like the Wizard of Oz behind the curtain. Click the)肢体创建新(Limb-Create New)菜单选项,将出现以下表格.现在您知道您已经不在堪萨斯州了!(menu option and the following form will appear. and now you know you’re not in Kansas anymore!)
![]()
此时,您需要输入新肢体的名称.您连接到主肢的第一个肢将是其他所有分支的分支,因此在大多数类人动物类型的角色中,我建议您将其设为躯干.这不是规则,但是如果您将第一个肢体的脚放在脚上,那么所有其他肢体都将离开脚部分支,这可能是您想要的,但是当身体在脚趾中跟随脚部时,它将开始看起来很奇怪-轻拍夹具,稍后将头部向所有方向扭曲.(At this point you’ll want to type in the name of the new limb. The first limb you attach to your master-limb will be the one off of which everything else branches so in most humanoid type characters I’d suggest you make this the torso. This isn’t a rule but if you make one of the feet the first limb then all other limbs will branch away from the foot, this may be what you want but it will start to look peculiar when the body follows the foot in a toe-tapping jig that sends the head and all the rest contorting in every direction later.)
从躯干开始.(Start with the torso.)
![]()
输入新肢体的名称,选择一个新肢体图像,然后输入其铰链的名称.如果您遵循一些简单的肢体命名指导原则,并且保持一致,那么以后您会更轻松.如果有许多个人资料小精灵,您会发现谈论它变得不那么混乱(Type in the name of the new limb, select a new limb image then enter the name of its hinge. It’ll make things easier for you later if you stick to a few simple limb-naming guide-lines and you stay consistent. In the case of many profile sprites you’ll find it less confusing to talk about the)**远臂(far-arm)**和(and the)**近臂(near-arm)**而不是(rather than the)**左臂(left-arm)**和(and the)**右臂(right-arm)**因为当精灵在镜子中翻转时,这些将向后.输入部分名称后,在Limb-Name文本框中按Enter键,编辑器将尝试找到您想要的文件,如果找不到正确的文件或根本不尝试,则必须执行此操作通过单击图像并自己查找文件可以手动进行操作,但是当您在铰链名称文本框中按Enter键时,您将像单击此表单底部的"确定"按钮一样继续操作.(because these will be backwards when the sprite is flipped in a mirror. Press the ‘Enter’ key in the Limb-Name textbox after typing a partial name and the editor will try to locate the file you mean, if it doesn’t get it right or doesn’t try at all you’ll have to do it manually by clicking the image and finding the file yourself but when you press the Enter-key in the hinge-name textbox you’ll be proceeding as if you had clicked the ok button at the bottom of this form.)
现在我们已经在屏幕上看到了躯干,您将不得不考虑重命名新精灵的第一个配置.简而言之,配置是您的子画面在其中的一系列位置(Now that we’ve got the torso on the screen you’ll have to consider renaming your new sprite’s first configuration. Briefly, a configuration is a series of positions in which your sprite has been)**配置.(configured.)**您可以将精灵的四肢放置在所需的任何角度,并在配置中添加步骤,以使您构建的生物看上去像动画卡通一样运动.您可以根据需要进行任意配置,例如步行,运球或跳舞.标有文字的文本框(You can position the limbs of your sprite at any angle you want and add steps to your configuration so that the creature you’ve built appears to move like an animated cartoon. You can have as many configurations as you want such as walk, dribble or dance. The textbox labelled)名称(Name)在"配置"组框中,您可以在其中键入所需的名称,然后按Enter键,该名称也将出现在顶部附近的组合框中.(in the Configurations groupbox is where you type in the name you want and when you press the enter-key that name will also appear in the combo-box near the top called)所选配置(Selected Configuration).(.)
![]()
现在,我们准备添加另一个分支.让我们把脾气暴躁的他的头还给我!首先,您必须选择要连接头部的肢体.由于我们只在屏幕上显示躯干肢体,而且无论如何这可能是显而易见的选择,因此躯干就是您要寻找的肢体.您可以通过以下方式来选择肢体:在鼠标悬停在其上时,在屏幕上单击它,从屏幕顶部附近的组合框中选择它,或者从左侧的列表框中选择它.选择好躯干后,转到(Now we’re ready to add yet another limb. Let’s give Grumpy his head back! First you’ll have to select the limb onto which the head will be attached. Since we’ve only got the torso limb on the screen, and that would likely be the obvious choice anyway, the torso is the limb you’re lookin' for. You can select a limb by either clicking it on the screen when your mouse goes over it, picking it out of the combo box near the top of the screen or by selecting it from the listbox on the left. Once you’ve got the torso selected go to the)肢体创造新(limb-create new)菜单选项.(menu option again.)
这次,您将看到在新铰链名称文本框下方的图像中显示了躯干肢体.如果您想要的主肢没有出现在此处,因为您没有将新肢连接到正确的主肢上,因此必须中止此表格,然后重试.您会注意到,在标记为"使用与…相同的图像"之前,这里没有出现一个新的组合框.由于肢体图像需要旋转16倍,45倍或Δεx,因此有时旋转一个肢体更容易,然后将相同的旋转图像重新用于使用完全相同的图像的后续肢体.您可以通过从此组合框中选择已经旋转过的原始图像来完成此操作.(This time you’ll see that the torso limb appears in the image below the new-hinge-name text box. If the master limb you wanted does not appear here its because you’re not attaching your new limb to the right master and will have to abort this form and try again. You’ll notice that there’s a new combo-box that didn’t appear here before labelled “use same image as:”. Because the limb images need to be rotated 16x, 45x or ??x its sometimes easier to rotate one limb and then reuse the same rotated images for subsequent limbs that use the exact same image. You can do this by selecting the original already rotated image out of this combo box.)![]()
将Grumpy的头从硬盘驱动器上取下,键入此新肢体的名称及其铰链名称,然后单击"确定"按钮.(Get Grumpy’s head off the hard-drive, type in the name of this new limb as well as its hinge name and click the ok button.)
![]()
当新肢形式消失时,您将看到下面的图像.您再也看不到躯干了,因为脾气暴躁的蓝精灵的头太大了,它完全覆盖了躯干,一定是基因.我们要做的是将颈部铰链放置在躯干上的某个位置,然后将头部放置在相对于颈部的某个位置,因为现在精灵编辑器的头部-颈部躯干都紧贴在屏幕中间.(When the new-limb form disappears you’ll see the image below. You can’t see the torso anymore because Grumpy-smurf’s head is so big it covers the torso completely, must be the genes. What we have to do is position the neck hinge somwhere on the torso and then position the head somewhere relative to the neck because right now the sprite-editor has the head-neck-torso all caught up together right in the middle of the screen.)
首先,点击(First off, click the)滑鼠套装(Mouse Set)按钮在下面圈出.(button circled below.)
![]()
出现以下形式.这是头部的主肢图像.我们仍然选择了前肢,并且您单击的按钮允许您设置头部的主铰链的主肢位置:这只是说"在哪里贴脖子"的一种令人困惑的方式.脖子铰链需要放置在相对于躯干的某个位置,因此请单击脖子所属的躯干的图片,这种形式将消失.(The following form should appear. This is an image of the head’s master-limb. We’ve still got the head-limb selected and the button you clicked allows you to set the head’s master-hinge’s master limb position : that’s just a confusing way of saying ‘where to stick the neck’. The neck-hinge needs to be positioned somewhere relative to the torso so click on the torso’s picture where the neck belongs and this form will disappear.)
![]()
更好,但是显然我们还没有完成.现在单击下一步(That’s better, but obviously we’re not done yet. Now click the next)滑鼠套装(Mouse Set)这里显示的第二个分组框中的按钮再次盘旋,您将设置头部的主铰链从属肢体位置:“头部所在的位置!"(button in the second groupbox shown here circled again and you’ll be setting the head’s master hinge’s slave limb position : ‘where the head’s at!')
您将颈部相对于躯干定位,现在需要将头部相对于颈部定位.这样,脖子跟随躯干,头部跟随脖子.主人和仆人,主人去向所有仆人.(you positioned the neck relative to the torso and now you need to position the head relative to the neck. This way the neck follows the torso and the head follows the neck. Master and servant, where the master goes all the servants follow.)
![]()
将出现下面的表格,单击脖子所属的脾气暴躁的蓝精灵的头部的图像,该表格将消失.(The form below will appear, click on the image of Grumpy smurf’s head where the neck belongs and this form will disappear.)
![]()
还是不对,是吗?您现在必须转过头来使脾气暴躁.他并不总是喜欢那样,但不必担心他一直都很脾气暴躁.(Still not right, eh?!? You now have to turn Grumpy’s head around so that its on straight. He doesn’t always like that but don’t worry he’s grumpy all the time.)
为此,只需单击(To do this just click the)设定角度(set Angle)此处的按钮为您盘旋,然后旋转鼠标滚轮以旋转选定的肢体,在本例中为Grumpy的头部.或者,如果右键单击鼠标,将显示一个上下文菜单,其中包含一些选项,包括(button here circled for you and spin the mouse-wheel to rotate the selected limb, in this case Grumpy’s head. Alternately, if you right-click your mouse a context menu will appear with a few options including)设定角度(set Angle)和(and)设置角度控制.(set Angle Control.)设置的角度控制选项允许您使用鼠标滚轮(默认设置)或使用原始(The set Angle Control options allow you to either use the mouse-wheel (default setting) or resort to the original)鼠标位置(Mouse-Pos)该设置可让您将鼠标移动到所需的任何位置,有时速度更快,但鼠标滚轮可提供更高的精度.(setting which lets you move the mouse to any position you like, sometimes this is faster but the mouse-wheel allows better precision.)
![]()
我们在这里,再多一点…(here we are, just a little more…)
![]()
一旦脾气暴躁的人的头放在他的肩膀上,我们就可以开始增加其他四肢.让我们先添加左臂并调用它(once Grumpy’s head is on his shoulders we can start adding the other limbs. Let’s start by adding the left arm and calling it)**远臂.(far-arm.)**当您完成所有步骤后,可能看起来像这样,您会问自己:“为什么Grumpy的手臂伸出他的胸部?“答案很简单:“他被十几岁的变种忍者神龟殴打了”!(When you’ve gone through all the steps it might look something like this and you’ll ask yourself “why is Grumpy’s arm sticking out of his chest?” and the answer is simple “He got beat-up by the Teenaged Mutant Ninja Turtles” of course!)
![]() .(.)
所以现在你知道了…(so now you know…)
在这里我们讨论绘制顺序和需要绘制肢体的顺序.您可以从下面的图像中看到,如果我们先绘制躯干,然后绘制头部,然后绘制远端臂,那么该"远端臂"将出现在前面.要纠正此问题,我们需要重新排序绘制这些肢体的顺序.通常,您需要按此顺序绘制精灵的四肢(This is where we talk about the draw-sequence and the order in which limbs need to be drawn. You can see from the image below that if we draw the torso first, the head second and the far-arm last then this “far-arm” will appear at the front. To correct this we need to re-order the sequence in which these limbs get drawn. Typically you’ll want to draw a sprite’s limbs in this order)
.(.)
所以现在你知道了…(so now you know…)
在这里我们讨论绘制顺序和需要绘制肢体的顺序.您可以从下面的图像中看到,如果我们先绘制躯干,然后绘制头部,然后绘制远端臂,那么该"远端臂"将出现在前面.要纠正此问题,我们需要重新排序绘制这些肢体的顺序.通常,您需要按此顺序绘制精灵的四肢(This is where we talk about the draw-sequence and the order in which limbs need to be drawn. You can see from the image below that if we draw the torso first, the head second and the far-arm last then this “far-arm” will appear at the front. To correct this we need to re-order the sequence in which these limbs get drawn. Typically you’ll want to draw a sprite’s limbs in this order)
- 远臂(far arm)
- 远腿(far leg)
- 躯干(torso)
- 头(head)
- 近腿(near leg)
- 近臂(near arm)
并更改绘制四肢的顺序,我们将注意力转向屏幕左侧的大白名单框.此列表框使您可以控制子画面的绘制顺序或四肢的绘制顺序.要进行更改,您必须选择要在列表中上/下移动的肢体,然后旋转鼠标滚轮使其定位.(and to change the order in which the limbs are drawn we turn our attention to that big white list box on the left side of the screen. This list-box allows you to control the draw-sequence of your sprite, or the order in which the limbs are drawn. To make the changes you’ll have to select the limb you want to move up/down the list and spin the mouse-wheel to get it into position.)
当您将Grumpy的远端臂移到位时,您会立即看到差异.(when you’ve moved Grumpy’s far-arm into place you’ll instantly see the difference.)

现在您知道自己在做什么,看看是否可以再次将ol’grumpy放回原处!(now that you know what you’re doing see if you can put ol’grumpy here back together again!)

构型(Configurations)
配置可能应该更恰当地称为"动画”,但是当我第一次想到这个想法时,我比任何可销售的命名想法都更了解事物的内部构造,并且为动画的每个步骤配置所有铰接角度确实是我一直在想的一切,所以现在我们都被这个词所困扰.只需习惯一下:配置实际上只是动画.而已.每个配置都包含步骤,每个步骤都包含Sprite中所有铰链的值.当您从一个配置步骤转到下一个配置步骤时,铰链角度值将设置为您在配置中编程的值.为此,您可以将精灵的四肢以任何角度放置在您要进行的步骤中,当您准备好后,只需单击(Configurations should probably more aptly be called “Animations” but when I first came up with the idea i was more conscious of the inner-workings of the thing than any marketable naming ideas and configuring all the hinge angles for each step of the animation was really all i was thinking about and so now we’re both stuck with the word. Just get used to it : configurations are really just animations. That’s it. Each configuration consists of steps, and each step consists of values for all the hinges in your sprite. When you go from one configuration step to the next the hinge angle values are set to the values which you programmed in your configuration. To do this you position the sprite’s limbs at whatever angle you want them for the step you’re working on and when you’re ready you just click the)加(add)配置步骤在下面圈出,下一步即可进行编辑.完成所有步骤的配置后,您可以通过按(configuration step circled below and the next step will be ready for you to edit. When you’ve got all your steps configured you can watch your animation by pressing the)动画(animation)按钮.(button.)
您可以使用鼠标右键单击上下文菜单方便地完成所有这些操作.(You can do all this conveniently using the right-mouse click context menu.)
![]()
在项目中使用精灵(Using the Sprites in your project)
我将谈论(I’ll talk about the) sprite-composites 再过一会儿,但现在,我们将帮助您开始使用已有的功能.要将一个精灵实例化到您的项目中,您首先必须包括以下三个文件以及您想要的精灵.sp3文件.(in a little while but for now we’ll get you started with what you’ve got. To instantiate a sprite into your project you’ll first have to include the following three files along with your intended sprite .sp3 file(s).)
- classSprite.cs(classSprite.cs)
- classMath.cs(classMath.cs)
- PerPixelAlphaForm.cs(PerPixelAlphaForm.cs) 别忘了ol’Grumpy!(and don’t forget ol’Grumpy!) 然后,在您的代码中,创建一个sprite-maker并使用它加载您的sprite.(Then, in your code, you create yourself a sprite-maker and use it to load your sprite.)
classSpriteMaker cSpriteMaker = new classSpriteMaker();
classSprite cSpriteSmurf = cSpriteMaker.loadSprite(strFileDirectory + "smurf.sp3");
当您准备好获取子画面的图像时,可以调用如下所示的子画面类的便捷图像获取器函数(when you’re ready to get an image of your sprite you call the sprite class’s handy image getter function shown below)
public classBmpAndPtTLInfo getImageOnBitmap
           (int intConfigurationIndex,
            int intStep,
            double Angle,
            double dblDisplaySize,
            enuMirror eMirror,
            ref classSpriteLimb limStationary,
            bool bolForceRebuild)
我们知道子画面可以面对的方向是固定的,因为每次旋转只有太多图像,该值对于单个子画面中的所有肢体都是固定的,但是可以随子画面的不同而变化.我们还知道一个Sprite具有的配置数量,每个配置具有的步骤数量,并且只有四个可能的镜像.有了这些值,重建缓存文件仅是存储一个(We know there’s a fixed number of directions the sprite can be facing in since there are only so many images per rotation, this value is fixed for all limbs within a single sprite but can vary from sprite to sprite. We also know the number of configurations a sprite has, the number of steps each configuration has and there are only four possible mirrors. Armed with these values rebuilding the cache file is simply a matter of storing a) -1 在每个可能的图像的索引位置.(in every possible image’s index location.)
假设所有这些值都是整数,则该类使用该函数(Given that all of these values are whole numbers the class uses the function)
long getImageIndex(int intConfig, int intStep, enuMirror eMirror, int dir, int intLimbIndex)
{
return (long)(lngConfigIndexStart[intConfig]
                + lngSizeIndex * (intStep * intNumDir * intNumMirror * intNumLimbs
                                    + (int)eMirror * intNumDir * intNumLimbs
                                    + dir * intNumLimbs
                                    + intLimbIndex));
}
唯一地映射出此特定图片的每个图像索引的位置.这样,每当要缓存新图像时,它都会查看文件的大小,并将该值记录在该特定图像的适当索引位置中,然后在文件中附加新图像.尽管图像是随机生成的,并且按要求以任何顺序生成,但随着图像的进入,文件的索引部分会被填充,并且在测试以查看我们要查找的图像是否在缓存中时,我们会测试索引的值大于(to uniquely map out where each image’s index will be for this particular sprite. This way whenever it wants to cache a new image it looks at the size of the file and records that value in the appropriate index location for this particular image and then appends the file with the new image. Though the images are generated randomly and in any order as required the index portion of the file gets filled out as the images come in and when testing to see if the image we’re looking for is in the cache we test the index for a value greater than the) -1 我们使用对其进行了初始化,然后返回一个新生成的图像(如果不存在),或者从文件中获取它.(we initialized it with then come back with a freshly generated image if its not there or go and fetch it off the file if it is.)
精灵位图信息(sprite bitmap information)
功能(the function) getImageOnBitmap() 返回如下所示的类的变量:(returns a variable of the class shown below :)
public class classBmpAndPtTLInfo
{
    public Bitmap bmp;
    public classMath.classDoubleCartesian dptTL = new classMath.classDoubleCartesian();
    public classConfigStepLimbPosition[] limbPositions;
    public classConfigStepHingePosition[] hingePositions;
    public classCacheTreeNodeKeys cKey;
    public bool bolRamCached = false;
}
这些信息将帮助您将图像准确地放置在屏幕上所需的位置.您可能已经发现我没有用太粗体的字体提及图像大小的事实.好吧,我要去.关于” getImage"调用的其他所有内容都可以用整数来描述,但是图像大小的范围是(This information is what will help you put the image on the screen exactly where you want it. You may have already picked out the fact that I didn’t mention the image size with too bold a font. Well, I’m about to. Everything else about the “getImage” call can be described with whole numbers but the image size is a value ranging around) 1.0 .大于1的结果将导致输出图像大于原始图像,小于1的结果将导致输出图像小于原始图像,但变化范围无限,因此不容易像其他图像那样进行索引映射参数呢.因此,(. Anything bigger than one will result in an output image bigger than the original, anything smaller than a one will result in an output image smaller than the original but the variations have an infinite range and therefore do not lend themselves easily to index mapping like the other parameters do. Therefore, the) 1.0 该图像是唯一存储在硬盘驱动器缓存中的图像,然后在检索该图像时,将调整该图像的位图大小,并在(image is the only image that is stored onto the hard-drive’s cache and then when it is retrieved this image’s bitmap is resized and the values in the) limbPositions[] 和(and the) hingePositions[] 在进入屏幕之前也要进行调整.这听起来可能需要做很多工作,但是调整图像大小和将笛卡尔变量乘以某种因素要比重新生成整个子画面容易得多.(are also adjusted before going to the screen. This may sound like a lot of work but its much easier to resize an image and multiply a bunch of cartesian variables by some factor than to generate the entire sprite all over again.)
肢体和铰链位置相对于(The limb and hinge positions are relative to the)固定肢体(stationary limb).固定肢体是其他所有事物围绕其运动的肢体.默认情况下,固定肢体始终是您添加到精灵中的第一个肢体,或更确切地说,是先前未曾提及的臭名昭著的Master-Limb-所附着的肢体.但是关于新的精灵类的一个有趣的功能是能够将精灵相对于任何肢体定位.您可能会用安吉丽娜朱莉(Angelina Jolie)的精灵跳到墙上并抓住壁架然后将自己抬起,然后进行游戏,但是如果您尝试通过相对于躯干定位她的位置来进行动画处理,则她的手不一定一定会一直处于该壁架上.她挂的.但是,如果您让她跳了起来,然后在她从窗台摆动时将其锁定为固定的肢体,那么您就会知道她的手在哪里,其余的就在后面.(*. and the stationary limb is the limb about which every thing else moves. By default the stationary limb is always the first limb you added to your sprite, or more exactly the limb to which that is attached that infamous and never seen -Master-Limb- mentioned earlier. but an interesting feature about the new sprite class is the ability to position the sprite relative to any limb. you may make a game with a sprite of Angelina Jolie jumping onto a wall and grabbing a ledge then pulling herself up but if you try to animate that by locating her position relative to her torso then her hand may not necessarily always be on that ledge from which she's hanging. but if you make her jump and then lock the hand as the stationary limb while she swings from the ledge then you know where her hand goes and the rest just follows.*) 您在PC上进入<古墓丽影>有多远?我被困在她到处乱跑的某个地方,无处可去,然后我感到无聊,玩了<德军总部>.(*how far did you get in Tomb Raider on your PC? i got stuck at some point where she was running around and there wasn't anywhere to go, then i got bored and played Wolfenstein.*) 向右移动...(*moving right along...*) 因此,从调用子画面的get-image函数获得的位图信息告诉您需要了解的最重要的信息:相对于此位图左上角的静止肢体在哪里?如果劳拉克罗夫特(Laura Croft)的手应该放在屏幕上像素(100,100)的壁架上,并且您已将手设置为固定臂,则返回的位图需要告诉您左上角和右上角的距离(100,100),您需要绘制该手才能使其完全位于您想要的位置.幸运的是,您友好的位图信息销售代表将其包括在价格中:(so, the bitmap information that you get from calling the sprite’s get-image function tells you the most important thing you need to know : where is your stationary limb relative to the top left of this bitmap. If Laura Croft’s hand is supposed to be on the ledge at pixel (100,100) on your screen and you’ve got the hand set as the stationary-limb then the bitmap you get back needs to tell you how far up and to the left of (100,100) you need to draw it for the hand to be exactly where you want it to be. luckily, your friendly bitmap-info sales rep included it in the price :) ptTL . ptTL代表” point-top-left",是从您刚交给您的位图的左上角到子画面的固定肢体位置的距离.(. ptTL stands for “point-top-left” and is the distance from the top-left of the bitmap it just handed you to the location of your sprite’s stationary limb.)
巴达冰!巴达繁荣!(bada-bing! bada-boom!)
然后,在以下内容的bitmap-info数组中为您提供其余四肢和铰链的位置(then, the locations of the rest of your limbs and hinges are provided for you in the bitmap-info array of) limbPositions[] 和(and) hingePositions[] 除了这些不是相对于屏幕的左上角.这些值是相对于固定肢体的.而且由于一切都围绕着固定的四肢,所以您应该知道那在哪里,这使得它变得更加简单,容易,而且没有任何步骤可以在四肢得到想要的东西时添加它的所在位置.因此您可以看到,所有这些值都记录了(except these are not relative to the top-left of the screen. These values are relative to the stationary limb. and since everything is centered around this stationary limb then you should be knowing where that is which makes it a simpler and easier no step to add the where its at when the limb’s got to get what it was you was looking for it. so you can see that with all these values recorded for a) 1.0 大小的图像,您只需要将它们乘以绘图大小因子,然后便可以重新设置图像大小.(sized image you just need to multiply them by the draw-size factor and when you’ve resized your image all is right with the world again.)
雪碧复合材料(Sprite Composites)
我一直在努力(I’ve been working on) 火星任务(Mars Mission) 现在已经有一段时间了,并且已经为Sprite开发了这项新功能.一段时间以来,我一直想找到一种将多个Sprite粘贴在一起的简便方法,以便它们可以像单个Sprite一样工作,但具有自己的单独配置.一个简单的例子就是一艘太空飞船作为一个精灵,另外两个单独的精灵组成了起落架.轮船可以做一件事情,而起落架则可以做其他事情,它们都可以独立工作,但是用起落架获得这种船的图像就像您用一个"获取图像"调用那样简单.雪碧.但这还不够好,因为有时候我可能想让宇航员在船外进行EVA,而不必担心宇航员相对于某个星球的位置,而只在宇航员走动时才移动船关于他或她的公司在与一艘绝望的Nausicaan海盗船进行了特别讨厌的争吵之后擦洗了腹板,该船突然从船首驶下.(for a while now and have since developed this new feature for the sprites. For a while now I’d been wanting to find an easy way to stick multiple sprites together so that they could work as if they were a single sprite but with their own separate configurations. A simple example of this would be a space ship as one sprite and two other separate sprites to make up the landing-gear. The ship can be doing one thing while the landing-gear does something else and they all work independently yet getting an image of such a ship with its landing gear is as simple as a single “get-image” call you’d make with a sprite. But that still wouldn’t be good enough because sometimes I might want to allow an astronaut to go on an EVA outside the ship and not have to worry about the location of that astronaut relative to some planet but only move the ship while that astronaut goes about his or her business scrubbing the ventral plating after some particularly nasty brawl with a desperate Nausicaan pirate ship that suddenly appeared off the port-bow.)
甚至像花花公子一样平凡的东西进入他的跑车,然后在仍然坐在驾驶员座位上的情况下抓住他的工具箱.这听起来像是一件容易的事,也许您有一个我从未想到过的简单解决方案,但这就是我所做的:我发明了Sprite-composite!子画面合成是包装中的子画面.该包装器具有与其类似的复合材料数组以及sprite-composite-elements的另一个数组.精灵合成元素就像合成元素,但并不完全一样,它们有点像精灵世界的world弱.这些sprite-composite-elements可以从sprite本身中窃取雷声,因为它们可以位于合成物中并成为更大物体的一部分,但是它们不能拥有自己的其他Composite-elements(也没有Composites)并像它们那样锁住它们随行人员可能会紧贴碧昂丝.不,雪碧复合元素只是想做的事情.夫,就是全部.(or even something as mundane as a dude getting into his sports car and then grabbing his tool-box while still at the driver’s seat. This may sound like an easy thing to do and maybe you have a simple solution which i hadn’t thought of but here’s what i did : i invented the sprite-composite! A sprite composite is a sprite inside a wrapper. This wrapper has an array of composites just like it as well as another array of sprite-composite-elements. The sprite composite elements are like composites but not quite, they’re kind of like the wimps of the sprite world. These sprite-composite-elements steal the thunder from the sprites themselves in that they can sit inside a composite and be part of something bigger but they can’t have other composite-elements of their own (nor composites neither) and latch onto them like an entourage may cling to Beyonce. Nope, Sprite-composite-elements are just wannabes. wimps, is all.)
(更新:尽管我对Sprite-composites的所有赞美我显然都对这项创新大加赞赏,但在我的项目中实现了它们的使用后,我发现它们不必要地变慢并妨碍了我的工作的流畅性.尽管它们旨在有助于构建复杂的由Sprite生成的动画角色,当与多于几个移动的生物打交道时,由于它们的整体性能较慢,Sprite合成不足.)((update : despite all the praise about Sprite-composites that i apparently lavished on myself for this innovation, after implementing their use in my project I’ve found them to be needlessly slow and hamper the fluidity of my work. Although they were intended to facilitate the building of complex sprite generated animation characters the sprite-composite is less than adequate when dealing with more than just a few moving creatures because of their slow overall performance.))
让我重新开始.您有复合材料.复合材料具有复合材料阵列.复合材料还具有sprite-composite-elements数组.的(let me start over. You have composites. Composites have arrays of composites. composites also have arrays of sprite-composite-elements. the) getCompositeImage() 收集所有这些信息并将它们放到一个图像中,然后将该图像返回给您,并提供所有您想知道的信息,以了解其作为低复合Sprite元素,甚至是世俗的合成本身,停留在别人的形象中.(takes all of these and puts them together into a single image and returns that image back to you with all the information you ever wanted to know about the where and hows of what its like to be a lowly composite-sprite-element, or even a worldly composite itself, stuck inside someone else’s image.)
想到这一点,sprite-composite元素可能只是一个过渡阶段,可能不会成为下一版" The Sprites World"的切入点,无论如何,Howard Cosell都不会.因此,我只想说,如果您想认真对待子画面的运动,那就进入复合材料吧!(come to think of it, sprite-composite-elements may only be a passing phase and may not make the cut for the next edition of “The Wide World of Sprites”, not if Howard Cosell were here anyway. and so let me just say that if you want to get serious about the sport of sprites, get into the composites!)
四!(Four!)
让我们再用他的跑车来描述那个家伙.首先,因为我们知道我们的家伙将要坐在跑车的"内部"而不是后面,所以我们需要绘制汽车的背景,然后是男子,然后是前轮和车轮.但是,这一切必须足够灵活才能动态地进行更改,因此您不能仅仅将其锁定在适当的位置.您需要将跑车分为两部分或两个复合材料,其中一个包含在另一个内部.然后,您有可能由一个或多个复合物组成的花花公子,或者说,花花公子的身体是一个复合物,而花花公子的功夫动作人物手臂是第二个复合物.现在,我们的球员已经决定,如果Ken离开Barbie,那将是最好的选择,因为他再也无法忍受她的抱怨了,而Britney的计划涉及在CBS大楼外怂恿某人的汽车.听起来不那么有趣!因此,肯(Ken)华尔兹骑到了他的Malibu芭比跑车上,然后上车.然后,在他开车离开时,他意识到他已经忘记了他的工具包,回到了芭比娃娃的车道上,伸出手去抓紧他的装备.(let’s describe that dude with his sports-car again. first of all, since we know that our dude is going to want to sit “inside” the sports car and not behind it we need to draw the back-drop of the car, then the dude, then the front and the wheels. But this all has to be flexible enough to change dynamically so you can’t just lock it all into place. You need a sports car in two parts, or two composites, one contained inside the other. Then you have your dude which may or may not be made up of one or more composites, let’s say dude’s body is one composite and then dude’s Kung-Fu chop action figure arm is a second composite. Now, our player has decided it would be best if Ken left Barbie because he just can’t take her whining anymore and Britney’s got a plan that involves egging someone’s car outside the CBS building. doesn’t that sound like fun! So, Ken waltzes over to his Malibu Barbie Sports-Car and gets in. Then as he’s driving away he realizes that he’s forgotten his tool-kit, backs into Barbie’s driveway, reaches out and goes away clutching his gear.)
让我们来回顾一下这个逐个播放…(let’s recap this play-by-play…)
我们的两个汽车复合材料已经采用了Ken和他的功夫握把的形式,又添加了两个复合材料,然后Ken已经被两个汽车部件复合材料紧密地夹在中间,从这个已经令人迷惑的小世界中伸出手来,抢夺了另一个奴隶复合工具套件,用于将奴隶复合臂连接到他的奴隶复合体,现在这只是复杂得多的芭比跑车的琐碎部分.(our two composite composite of a car has taken in two more composites in the form of Ken and his Kung-fu grip then Ken, already snugly sandwiched between two car-parts-composites reaches out from inside this already confusing little world and snatches yet another slave composite tool-kit for his slave-composite-arm attached to his slave-composite body that is now only a trifling part of the much more complex Barbie sports car.)
然后,当他到达目的地时,仍然紧紧抓住他从车上跳下来的工具箱,主人又一次离开了芭比过热的发动机,呼啸着停在了虫子和别克之间.你有主意吗?(then, when he gets to where he’s going, still clutching on to his tool kit he hops out of the car, master once more leaving Barbie’s over-heated engine purring contently parked between a bug and a buick. are you getting the idea?)
有一段时间,有三个单独的子画面合成物.这辆车(由两种复合材料组成),肯(也由两种复合材料组成)和套件(可能由一堆材料组成,但我们只说一种复合材料).然后Ken跳进汽车,成为自己夹在中间的汽车复合材料的一部分(必须有一个复合材料绘制序列,就像单个子画面的肢体绘制序列一样,并且此复合材料绘制序列在运行时需要灵活!)当他在这辆汽车复合材料内部时,他本人是汽车的奴隶,但他却抓住工具从自己身体的奴隶复合材料手中.添加到基础汽车复合材料的每个复合材料都必须连接到原始材料的某个点,并且它们都从那里分支.后机箱的位置恰好在前机箱上,Ken整齐地塞在这两个机箱之间,并且手臂的位置相对于他的肩膀,工具套件的位置相对于手臂的手.手臂可以为所有芭比娃娃的朋友自由旋转和弯曲(别忘了小甜甜!),尽管肯坐在车内时抓住了工具包,但该工具包并不是汽车的直接奴隶,而是肯(Ken)的手的奴隶,所以当他下车时,工具包随他一起去了,汽车就坐在那儿,闲着地等待着大卡车,因为芭比忘了告诉他,她有一大堆未付的停车罚单.确实是一个难题!(for a while there there were three separate sprite composites. The car (made up of two composites), Ken (also made up of two composites) and the took-kit (potentially made up of a bunch but let’s just say, one composite). Then Ken jumps into the car and becomes part of the car’s composite sandwiching himself (there has to be a composite draw sequence much like the limb draw sequence of the individual sprite and this composite draw-sequence needs to be flexible during run-time!) and while he’s inside this car-composite, himself a slave to the car, he grabs the tool-kit in his body’s slave composite’s hand. Every composite added to the base car-composite has to be connected to some point of the original and they all branch off from there. The back-chassis is positioned just so on the front chassis, Ken is neatly tucked between these two and his arm is positioned relative to his shoulder and the tool kit is positioned relative to the arm’s hand. The arm is free to rotate & flex for all of Barbie’s friends (and don’t forget Britney!) and then though Ken grabbed the tool kit while sitting inside the car, the tool-kit is not a direct slave to the car but a slave to ken’s hand so that when he steps out of the car, the tool-kit goes with him and the car just sits there and idles waiting for the impound truck because Barbie forgot to tell him that she’s got a bunch of unpaid parking tickets. what a conundrum indeed!)
![]()
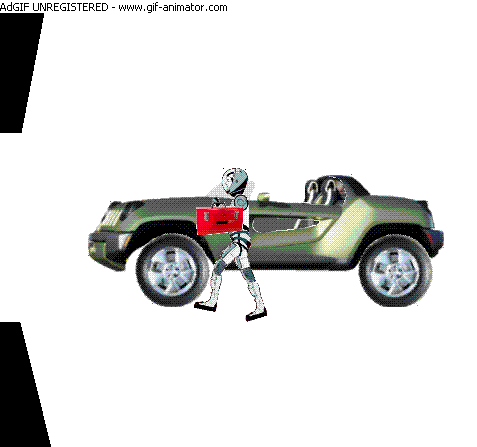
看一看我在火星任务项目中到目前为止工作的过程中放在一起的动画gif:(have a look at some animated gifs I put together while playing around with what I’ve got working so far in my Mars Mission project :) 越野车(moon-buggy) ,(,) 走走(walk about) 和(and) 叉车(fork-lift) .这些在我的计算机上似乎完全呆滞,所以我不保证它们的质量,但是无论如何都要看一下.(. These appear totally sluggish on my computer so I’m not going to vouch for their quality but have a look anyway.)
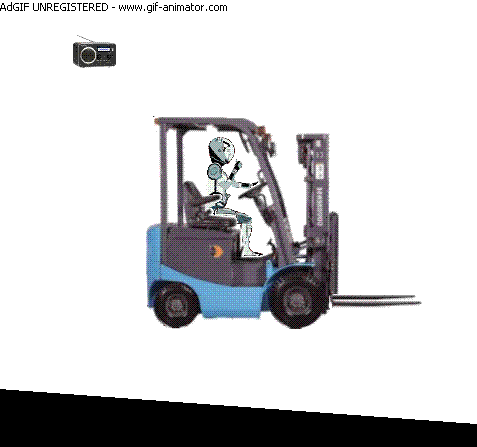
使用复合材料(Using Composites)
使用复合材料比编写(Using a composite is nowhere near as complicated as writing the) classSpriteComposite 是.(was.)
这是从"火星任务"中获取的一些示例代码,向您展示了如何使用弱小的sprite-composite-elements.我现在正在削减这些,但它们实际上还不错.唯一的问题是它们无法像其他任何复合材料一样从复合材料中移除并自行徘徊.看一看 …(Here’s some sample code taken from Mars Mission that shows you how to use the wimpy sprite-composite-elements. I’m cutting these down right now but they’re actually pretty good. The only thing wrong with these is that they cannot be removed from the composite and wander off on their own like any other composite could. have a look …)
Sprite.classSprite cSprAstronaut = Sprite.classSprite.spriteMaker.loadSprite(classRotatedImage.strWorkingDirectory + "astronaut female.sp3");
cSprCom_Body = new Sprite.classSpriteComposite(ref cSprAstronaut);

Sprite.classSprite cSprArm = Sprite.classSprite.spriteMaker.loadSprite(classRotatedImage.strWorkingDirectory + "astronaut arm.sp3");

cSprCom_Body.cMasterSCE.addSlave(ref cSprArm, (int)enuAstronaut_female_Limbs.shouldernear, 1);
cSCE_Arm = cSprCom_Body.cMasterSCE.cSlaves[0];
cSCE_Arm.bolAngleTracksMaster = false;
标头(the header for the) addSlave() 显示在这里(is shown here)
public void addSlave(ref classSprite cSprite_NewSlave, int intIndexMasterLimbLink, double dblDrawSizeRelativeToMaster)
您可以在此处看到如何使用同一个Sprite-Maker加载两个Sprite,将主体制成复合材料,然后此复合材料的主Sprite-Composite-Element接收第二个Sprite(手臂),将主体的肩膀肢体作为肢体它本身具有附加功能,并且由于精灵主体和精灵臂均是一前一后地生成的,因此将相对于主对象的draw-size-relative设置为1.0.当然,有一个等效的(You can see here how both sprites are loaded using the same sprite-maker, the body is made into a composite and then this composite’s master sprite-composite-element takes in the second sprite (arm) referencing the body’s shoulder limb as the limb onto which it attaches itself and since both the sprite-body and the sprite-arm were generated to work in tandem the draw-size-relative-to-master is set to 1.0. There is, of course, an equivalent) removeSlave() 功能,但是,如前所述,没有主元素的合成精灵元素就像一个空的沙盒.或实际上,它更像一堆没有盒子的沙子.但是,不是一个海滩.(function but, as mentioned before, a composite-sprite-element without a master is like an empty sand-box. or actually, its more like a pile of sand without a box. but, just not a beach.)
好吧,足够了.(alright, enough of that.)
雪碧复合材料(Sprite Composites)
害怕了吗?不会的复合材料温暖而友好.他们只吃灰尘,永远不会大惊小怪.他们喜欢散步,小猫和拥抱.(scared yet? don’t be. Composites are warm and friendly. They only eat dust and don’t never never fuss. They like long walks, kittens and cuddling.)
看看(have a look at the) getComposite() 在MarsMission的功能中(function in MarsMission’s) classResource Moon Buggy与铲车和反铲一起被制成雪碧复合材料. (是的,我说"反铲"!这是什么?!?)(where the Moon Buggy is built into a sprite-composite along with the fork-lift and backhoe. (yes, i said “Backhoe”! what of it?!?))
public static Sprite.classSpriteComposite getComposite(enuResources eResource, ref Sprite.classSprite cSprite)
{
if (cSprite == null) return null;

switch (eResource)
{
case enuResources.MoonBuggy:
    Sprite.classSpriteComposite cRetVal_MoonBuggy = new Sprite.classSpriteComposite(ref cSprite);
    Sprite.classSprite cSprMoonBuggy_BackChassis= Sprite.classSprite.spriteMaker.loadSprite(classResource.strWorkingDirectory + "MoonBuggy_BackChassis.sp3");
    Sprite.classSpriteComposite cSprCom_MoonBuggyBackChassis = new classSpriteComposite(ref cSprMoonBuggy_BackChassis);

    Sprite.classSpriteLimb limBackChassisPin = cSprite.getLimbByName("BackChassis_Pin");
    cRetVal_MoonBuggy.addSlaveComposite(ref cSprCom_MoonBuggyBackChassis, 0, limBackChassisPin.intMyLimbID);
    cSprCom_MoonBuggyBackChassis.myDrawSequenceIndex =0;

    return cRetVal_MoonBuggy;

case enuResources.ForkLift:
    Sprite.classSpriteComposite cRetVal_ForkLift = new Sprite.classSpriteComposite(ref cSprite);
    return cRetVal_ForkLift;

case enuResources.Backhoe:
    Sprite.classSpriteComposite cRetVal_Backhoe = new Sprite.classSpriteComposite(ref cSprite);

    // add crane
您可以看到它并不难.只要看看MoonBuggy.该资源已经有一个精灵,因此在(You can see it’s not so hard. Just look at the MoonBuggy. The resource already has a sprite so its referenced in the) classSpriteComposite 实例化,然后将后机箱作为一个单独的精灵加载,然后将其制成自己的复合文件,然后将该复合文件添加到第一个(instantiation then the back-chassis needs to be loaded as a separate sprite before its made into a composite of its own and then that composite is added to the first one with the) addSlaveComposite() 仅当我们找到名为" backChassis_Pin"的肢体后,才调用.(call only after we’ve located the limb called “backChassis_Pin” which the back-chassis sprite references when trying figure out its position inside the bigger picture.)
类似地,当"肯"跳进他的月球车时,他被添加到车辆的复合材料中并放入驾驶员的座椅.看下面的代码:(Similarly, when “Ken” jumps into his moon-buggy he is added to the vehicle’s composite into the driver’s seat. Have a look at the code below :)
void PerformAction_EnterVehicle()
{
if (cVehicle != null)
{
// add astronaut to vehicle sprite
cVehicle.cObjCon.addAstronaut(ref cMyReference);
bool bolDriver = cVehicle.cObjCon.cAstronauts.Length == 1;

Sprite.classSpriteLimb limPin = bolDriver
              ? cVehicle.cSprComposite.cMasterSCE.cSprite.getLimbByName("SeatDriverPin")
              : cVehicle.cSprComposite.cMasterSCE.cSprite.getLimbByName("SeatPassengerPin");

cVehicle.cSprComposite.addSlaveComposite(ref cSprCom_Body, 0, limPin == null ? 0 : limPin.intMyLimbID);

double dblSizeRelativeToMaster = dblDrawSizeFactor / cVehicle.dblDrawSizeFactor;
cVehicle.cSprComposite.cComposites[cSprCom_Body.intMyCompositeIndex].cMasterSCE.dblSizeRelativeToMaster = dblSizeRelativeToMaster;

cSCE_Arm.dblSizeRelativeToMaster = dblSizeRelativeToMaster;
if (cHandTool != null)
cHandTool.cSprComposite.cMasterSCE.dblSizeRelativeToMaster = cHandTool.dblDrawSizeFactor / cVehicle.dblDrawSizeFactor;


switch (cVehicle.eResource)
{
    case enuResources.MoonBuggy:
        cSprCom_Body.cMasterSCE.intConfigurationIndex = (int)enuAstronaut___female_Configurations.Sitting_Vehicle_reclined;
        cVehicle.cSprComposite.cComposites[cSprCom_Body.intMyCompositeIndex].myDrawSequenceIndex = 1;
        break;

    case enuResources.Backhoe:
        cVehicle.cSprComposite.cComposites[cSprCom_Body.intMyCompositeIndex].myDrawSequenceIndex = 2;
        break;

    default:
    case enuResources.ForkLift:
        cSprCom_Body.cMasterSCE.intConfigurationIndex = (int)enuAstronaut___female_Configurations.Sitting_Vehicle_Up;
        cVehicle.cSprComposite.cComposites[cSprCom_Body.intMyCompositeIndex].myDrawSequenceIndex = 0;
        break;
}
cSCE_Arm.Angle = 0;
cSprCom_Body.cMasterSCE.intConfigurationStep = 0;
cCDO.cCDP.eMirror = cVehicle.cCDO.cCDP.eMirror;
cCDO.dptPos = cVehicle.cCDO.dptPos.Copy();
}
}
除了在上面的上一段代码中将moonbuggy的后机箱drawsequenceindex设置为零外,其余大部分基本上与将后机箱放到moonbuggy上相同,并且如果Ken进入他的moonbuggy,则必须采取复合绘画顺序将他放在后底盘之后但在前底盘之前,夹在钱中.您可以在Switch()中看到这一点,在月球越野车的情况下,Ken的合成物的MyDrawSequenceIndex设置为1,这会迫使越野车合成物的前机箱将自身置于#2绘制序列(在0和1之后).然后,当Ken离开越野车时,需要先从越野车中移除两个复合材料,然后才能与Britney见面.(most of this is basically the same as putting the back-chassis onto the moonbuggy except that the moonbuggy’s back-chassis drawsequenceindex was set to zero in the previous stretch of code above and in the case of Ken getting into his moonbuggy he has to take a composite-draw-sequence that puts him after the back-chassis but before the front chassis, sandwiched in the money. You can see this here in the Switch() where, in the case of the moon-buggy, Ken’s composite has its MyDrawSequenceIndex set equal to 1 which forces the front-chassis of the buggy’s composite to place itself at the #2 draw sequence (after 0 and 1). Then when Ken leaves the buggy his two composites need to be removed from the buggy before he can meet up with Britney.)
复合位图信息(Composite Bitmap Information)
复合位图信息相当复杂,但使用起来仍然比较轻松.由于每个复合物都可以由在每个方向上分支出的任意数量的复合物组成,因此,当要求知道谁知道哪里的任何一个复合物上的任何一个肢体的位置时,这将非常困难.我们可以看一下在将所有这些一起编译的过程中使用的各个sprite位图信息实例,但它们仅与各自的位图有关,而与每个肢体相对于车辆或其他所有物体所处的中心人物的位置无关内置的.您不必将自己与所需的其他事物混淆,而不必将其与另一种复杂的事物相提并论,而将其与一个类似于sprite-bitmap-info的东西相混淆,它将回答您所有的问题,而无需您花钱.为此,我们首先将所有合成图片图像信息整理到(The composite bitmap information is considerably more complex yet still relatively painless to use. Since each composite can be made up of any number of composites branching out in every direction this makes it difficult when asking for the position of any one limb on any one composite sticking out who knows where. We could look at the individual sprite bitmap information instances that were used in the process of compiling all of these together but they relate only to their individual bitmaps and not the position of each limb relative to the vehicle or central figure upon which all the others are built. Instead of adding and subtracting and messing your head with another complexity you don’t need to confuse yourself with what you need is a single sprite-bitmap-info-like thing that will answer all your questions without charging you an arm for it. To do this we first collate all the composite-sprite-image information at the) Draw() 阶段.然后使用合成索引,spriteCompositeElement索引和肢体索引将它们全部插入到三叉树中,以唯一地映射出我们想要哪个精灵的哪个肢体,然后告诉我们我们需要什么.(stage. Then these are all inserted into a ternary tree using the composite index, spriteCompositeElement index, and limb index to uniquely map out which limb on which sprite we want and it then tells us what we need.)
这是精灵合成的代码(here’s the code from the sprite composite’s) Draw() 函数,用于对单个复合材料及其所有sprite-composite元素的点信息进行整理,然后再对其所有从属复合材料进行整理,然后将其整理为一个所需的图像.(function that collates the point information for a single compositie and all of its sprite-composite-elements before doing the same with all its slaves composites and collating those into the one image called for.)
cMyCompositeCbmp.dptTL = dptTL;
cMyCompositeCbmp.cCPIArray = new classCompositePointInfo[2 * intTotalLimbs];
int intIndex = 0;
for (int intSCECounter = 0; intSCECounter < cSpriteCompositeElementArray.Length; intSCECounter++)
{
    classSpriteCompositeElement cSCE = cSpriteCompositeElementArray[intSCECounter];
    for (int intLimbCounter = 0; intLimbCounter < cSCE.cBmp.limbPositions.Length; intLimbCounter++)
    {
        classMath.classDoubleCartesian dptLimbOnComposite = new classMath.classDoubleCartesian
            (
                recSCEDest[intSCECounter].Left + cSCE.cBmp.dptTL.X + cSCE.cBmp.limbPositions[intLimbCounter].dpt.X - dptTL.X,
                recSCEDest[intSCECounter].Top + cSCE.cBmp.dptTL.Y + cSCE.cBmp.limbPositions[intLimbCounter].dpt.Y - dptTL.Y
            );
        cMyCompositeCbmp.cCPIArray[intIndex++] = new classCompositePointInfo(dptLimbOnComposite, 0, intSCECounter, intLimbCounter, enuCompositePointType.Limb);

        classMath.classDoubleCartesian ptHingeOnComposite = new classMath.classDoubleCartesian
            (
                recSCEDest[intSCECounter].Left + cSCE.cBmp.dptTL.X + cSCE.cBmp.hingePositions[intLimbCounter].dpt.X - dptTL.X,
                recSCEDest[intSCECounter].Top + cSCE.cBmp.dptTL.Y + cSCE.cBmp.hingePositions[intLimbCounter].dpt.Y - dptTL.Y
            );
        cMyCompositeCbmp.cCPIArray[intIndex++] = new classCompositePointInfo(ptHingeOnComposite, 0, intSCECounter, intLimbCounter, enuCompositePointType.Hinge);
    }
}
然后,如果此复合材料也具有从属复合材料,则我们求助于三叉树.(Then, if this composite has slave composites as well we resort to the ternary tree.)
for (int intCompositeCounter = 0; intCompositeCounter < cComposites.Length; intCompositeCounter++)
{
if (cComposites[intCompositeCounter].cMasterSCEComposite == this || cComposites[intCompositeCounter] == this)
{
    cDrawCompositeInfo[intCompositeCounter].drecDraw.X -= dptNewTL.X;
    cDrawCompositeInfo[intCompositeCounter].drecDraw.Y -= dptNewTL.Y;

    // build composite hinge/limb info
    for (int intCPICounter = 0; intCPICounter < cDrawCompositeInfo[intCompositeCounter].cCbmp.cCPIArray.Length; intCPICounter++)
    {
        classMath.classDoubleCartesian dptLimb = new classMath.classDoubleCartesian
                            (
                            (cDrawCompositeInfo[intCompositeCounter].drecDraw.Left + cDrawCompositeInfo[intCompositeCounter].dptTL.X + cDrawCompositeInfo[intCompositeCounter].cCbmp.cCPIArray[intCPICounter].dpt.X) - cCBmp.dptTL.X,
                            (cDrawCompositeInfo[intCompositeCounter].drecDraw.Top + cDrawCompositeInfo[intCompositeCounter].dptTL.Y + cDrawCompositeInfo[intCompositeCounter].cCbmp.cCPIArray[intCPICounter].dpt.Y) - cCBmp.dptTL.Y
                            );

        classCompositePointInfo cCPI = new classCompositePointInfo(dptLimb,
                                        cComposites[intCompositeCounter].intMyCompositeIndex,
                                        cDrawCompositeInfo[intCompositeCounter].cCbmp.cCPIArray[intCPICounter].intSpriteCompositeElementIndex,
                                        cDrawCompositeInfo[intCompositeCounter].cCbmp.cCPIArray[intCPICounter].intLimbIndex,
                                        cDrawCompositeInfo[intCompositeCounter].cCbmp.cCPIArray[intCPICounter].ePointType);
        if (cCBmp.InsertPointInfoIntoTernaryTree(ref cCPI))
        {
            cCBmp.cCPIArray[intIndex++] = cCPI;
        }
因此,当我们想知道肢体在哪里时,我们需要通过(and so when we want to know where a limb is we need to get in the know with the composite-bitmap-info via the) classCompositeBitmapInfo 使用(using the) getCPI() 函数调用.由于复合材料可以由任意数量的子图形组成,每个子图形都具有不同的步骤和配置,因此潜在的组合是无限的,因此无法像我们在单个子图形的情况下那样唯一地映射每个实例有一定数量的可能性.这意味着缓存信息变得更加复杂.因为它是Sprite组合,因此您可以在RAM中缓存单个实例,并且只有在最近一次调用要求该组合中包含的每个Sprite完全相同的一组配置,台阶,角度和镜像时,才会返回并使用该实例.除此之外,每次都使用缓存的精灵图像重新绘制所有内容.(function call. Since the composites may consist of any number of sprites each having a variety of steps and configurations the potential combinations are limitless and there is, therefore, no way to uniquely map out every instance such as we did in the case of the individual sprites which each had a definite and finite number of possibilities. Which means that caching the information becomes a bit more complicated. As it is the sprite composites allow you to cache a single instance in RAM and it will be returned and used only if the most recent call asked for the exact same set of configurations, steps, angles and mirrors for every sprite contained inside that composite. Aside from that everything is redrawn every time using cached sprite images.)
这是调用合成精灵的draw的示例:(here’s an example of a call to the composite-sprite’s draw :)
Bitmap bmpAstronaut = cAstronaut.cSprCom_Body.drawComposite(cAstronaut.cCDO.dblAngle, cAstronaut.dblDrawSizeFactor / classGameState.dblZoom, cAstronaut.cSprCom_Body.cMasterSCE.Mirror).bmp;
Point ptScreen = classLandscape.getPointScreen(cAstronaut.cCDO.dptPos.Add(cAstronaut.cCDO.dptDrawShift), dptGameReference, ptScreenReference);
g.DrawImage(bmpAstronaut, new Point(ptScreen.X - cAstronaut.cSprCom_Body.dptTL.intX, ptScreen.Y - cAstronaut.cSprCom_Body.dptTL.intY));
撇开MarsMission的需要将游戏世界的位置转换为现实世界的屏幕位置,我们在这里所做的就是使合成图像被绘制到位图上(putting the MarsMission’s need to translate the game-world location to a real-world screen-location aside, all we’re doing here is causing an image of the composite to be drawn onto the bitmap) bmpAstronaut 然后计算出宇航员躯干(主肢)的位置并绘制位图(and then a position is calculated for the astronaut’s torso(master limb) and the bitmap is drawn) dptTL 远离我们想要的躯干位置.或者,不只是使用(away from the position we want the torso to be. Alternately, instead of using just the) ().bmp 从我们收到的bitmap-info对象上(on the bitmap-info object we received from the) drawComposite() 打电话给我们(call we get the) ptTL 的信息,但由于主体精灵在这种情况下是主体,因此这两个值将相同.(info of it but since the body-sprite is the master in this case those two values would be the same.)
表单精灵(Form Sprite)
我没有谈论表单精灵,但是您可以下载之前的文章(I didn’t talk about the form-sprites but you can download an earlier article) 雪碧表:我爱你杰西卡!(Form Sprite : I Love You Jessica!) 尽管我不确定该文章中包含的示例sprite是否可以与新的编辑器一起使用,但请看一下.本质上,form-sprite使用(for a look though I’m not sure the sample sprite included in that article will work with the new editor. Essentially, the form-sprite uses the) PerPixelAlphaForm.cs 通过在其周围模制一个表格来生成一个看上去可以在桌面上看起来"无表格"的子画面,以使观看者愚弄到根本没有任何表格.看一看.(to generate a sprite that can walk apparently “form-free” on your desk-top by molding the form around it so as to fool the viewer into believing there is no form at all. have a look.)
编辑器升级功能(Editor Upgrade Features)
编辑器中有一些新的次要细节,您可能会自己注意到.最有用的一种可能是用于设置角度的鼠标滚轮选项.每季度旋转一次的图像数量和可变的数量确实使简化更精确地定义配置变得容易.您可以设置背景,轮廓,铰链点,肢体点的颜色.选择显示或隐藏中心十字标记或旋转精灵角度水平滚动条.(there’s a few new minor details to the editor which you’ll probably notice on your own. The most useful one is probably the mouse-wheel option for setting the angle. That and the variable number of images per quarter rotation really make it simple to more precisely define your configurations. You can set the colors of the background, outline, hinge points, limb points. Choose to show or hide the center cross marker or the rotate sprite angle horizontal scroll bar.) 由于缓存文件在编辑器中引起了如此大的麻烦,因此我不得不向Sprite-maker添加" Purge All Files",以便它们不再引起所有这些问题.除了编辑器外,实际上没有任何人需要使用该功能.(Since the caching files were causing such a fuss in the editor I had to add a “Purge All Files” to the sprite-maker so that they stop causing all those problems. There’s really no need for anyone to use the function aside from the Editor.)
图形编辑器和强制颜色(Graphics Editor & Force Color)
图形编辑器和Force-Color项目是额外的应用程序,可用于帮助您处理潜在的精灵图像. Graphics-Editor所没有的其他任何图形编辑器都具有的一种功能是一种整洁的泛洪填充,它允许您设置区域的轮廓泛洪极限,然后泛洪一个区域,直到您的泛洪达到边界限制.为此,请转到油漆桶徽标,然后切换填充类型,直到鼠标光标左侧的圆形正方形变成正方形内的圆形正方形(在正方形周围出现边框),然后单击要设置为洪水极限的颜色(通过单击正方形的边框,单击正方形的边界,即可确定正方形的周长),然后单击圆圈以设置洪水的颜色(通过单击图标中的圆圈),然后在洪水时一种颜色,它不仅会更改您单击的颜色,还会更改彩色限制内包含的所有颜色.例如.在多色图像中制作一个红色圆圈,然后在圆圈内部单击,您的洪水将被红色包围.非常适合剪切图像.(The graphics editor and Force-Color projects are extra applications that you can use to help you manipulate a potential sprite’s images. The one thing which the Graphics-Editor has which no other graphics editor available has is a neat kind of flood-fill which allows you to set the outline flood-limit of a region and then flooding an area until your color-flood reaches the border limits. To do this you go to the paint-bucket logo and switch the type of fill until the circle-square to the left of the mouse-cursor turns into a circle square inside a square (a border appears around the square) then you click the color you want to set as your flood limit (the perimeter of the square, by clicking the border of the square) and you click the circle to set the color of your flood(by clicking the circle in the icon) and then when you flood a color it will not only change the color that you click but all colors contained inside the colored-limit. E.g. make a red circle in a multi-color image and click inside the circle, your flood will be bounded by the red. Its great for cutting out images.) Force-Color是另一种.它没有附带说明手册,但其想法是您设置"极限颜色",如果您未设置"保持颜色",则设置"强制颜色",然后设置是否拒绝"较浅"或"否".将比限制颜色"暗"的任何颜色"暗"或"浅"强制设置为拒绝的颜色(请注意,该按钮标记了单击该按钮会发生的情况,因此"拒绝较浅"按钮表示"单击此按钮,我会拒绝较浅但如果您不这样做,即使我看起来好像在说-reject lighter-",我也会拒绝更深的颜色,令人困惑,我知道).两者都不是特别友好的用户,并且我不会写有关它们的文章,但是如果您与他们一起玩,它们会为您效劳,而他们所做的却很少.至少他们为我做.(Force-Color is another one. It doesn’t come with an instruction manual but the idea is you set a ‘limit color’, a ‘force color’ if you’ve you’ve not set ‘keep color’ and then whether you’re rejecting “lighter” or “darker” any color “darker” or “lighter” than the limit is forced to the rejected color (note the button marks what will happen if you click it so “reject lighter” button says “click this and I’ll reject lighter but if you don’t I’ll reject darker even if i look like i’m saying -reject lighter-”, confusing, i know). neither is particularly user-friendly and i won’t write an article about them but if you play with them they’ll work for you, for what little they do do. at least they do for me.)
未来升级(Future upgrades)
我仍在考虑允许在配置步骤的编辑过程中修改铰链径向坐标,以使这些变化成为动画的一部分.尽管现在可以使用带有子画面的一组复杂的旋转和挂钩沿直线路径移动对象,因为它们具有保持铰链角度不变并允许铰链的径向坐标半径增大和缩小的附加灵活性,这将有助于执行某些操作,现在很难实现.(I’m still thinking about allowing the hinge radial coordinates to be modified during the editing of the configuration steps to make these variations part of the animation. Though its now possible to move objects along a straight path using a complicated set of swivels and hitches with the sprites as they are the added flexibility of keeping a hinge’s angle intact and allowing the hinge’s radial coordinate’s radius to grow and shrink would facilitate some actions which are now only achieved with great difficulty.) 我正在努力…(I’m workin’ on it…) 但接下来,我想我将为肯制造拖拉机割草机.那会很有趣!(but next I think I’ll make tractor mower for Ken. that’ll be fun!)
更新资料(Update)
2011年3月29日-(March 29, 2011 -)
- 修复了与复制配置功能有关的错误(fixed bugs dealing with the Copy-Configuration feature)
- 修复了缓存文件保存中的错误,该错误已重新保存并不必要地添加到文件中(fixed bug in cached-file save which was re-saving and appending to the file needlessly)
- 添加(added)**重命名精灵(rename sprite)**文件菜单中的功能(feature in the File menu)
许可
本文以及所有相关的源代码和文件均已获得The Code Project Open License (CPOL)的许可。
C# Windows 新闻 翻译