[译]使用Visual Studio 2010安装项目为C#Windows应用程序创建MSI/安装程序包
By robot-v1.0
本文链接 https://www.kyfws.com/applications/creating-an-msi-setup-package-for-csharp-windows-zh/
版权声明 本博客所有文章除特别声明外,均采用 BY-NC-SA 许可协议。转载请注明出处!
- 14 分钟阅读 - 6941 个词 阅读量 0[译]使用Visual Studio 2010安装项目为C#Windows应用程序创建MSI/安装程序包
原文地址:https://www.codeproject.com/Articles/568476/Creating-an-MSI-Setup-Package-for-Csharp-Windows
原文作者: Akhil Mittal
译文由本站 robot-v1.0 翻译
前言
In this article I would like to explain a step by step process to create a windows application and a setup installer for the same in a very simple manner, that is easy to understand and follow knowing that there are a number of other ways to do the same thing.
在本文中,我将逐步解释创建Windows应用程序和安装程序的过程,该过程非常简单,这很容易理解,并且了解到还有许多其他方法可以执行此操作.一样.
介绍(Introduction)
Microsoft提供了多种方法来为Windows应用程序创建安装项目.(There are number of ways provided by Microsoft to create a setup project for windows application.)
但是,当我开始创建一个时,除了对如何开始以及从何处开始的疑问和困惑之外,我一无所获.我发现有很多文章说明如何创建安装项目,但是有些文章行不通,有些文章没有实际示例.(But when I started to create one, I got nothing but queries and confusions of how to start and where to start. There are numerous articles I found explaining to create a setup project, but some did not work, and some did not have a live example to follow.)
我撰写本文的推动力是我的质量控制团队,他们接受了主要的测试应用程序,并且还全力以赴地验证了我的安装安装程序.猜猜是什么,他们也成功地发现了其中的错误.(The driving force for me to write this article is my QC team, who accept the main application for testing, and who also verified my setup installer with their 100% effort. And guess what, they successfully found bugs in that too.)
在本文中,我将逐步解释创建Windows应用程序和安装程序的过程,该过程非常简单,这很容易理解,并且了解到还有许多其他方法可以执行此操作.一样.(In this article I would like to explain a step by step process to create a windows application and a setup installer for the same in a very simple manner, that is easy to understand and follow knowing that there are a number of other ways to do the same thing.)
开始表演(Start the Show)
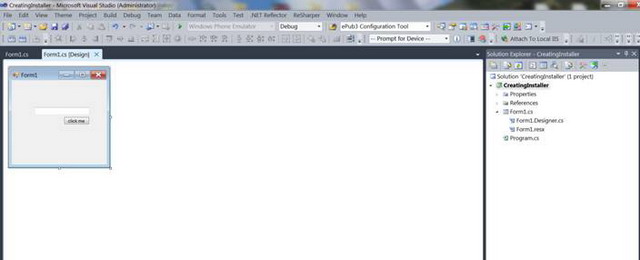
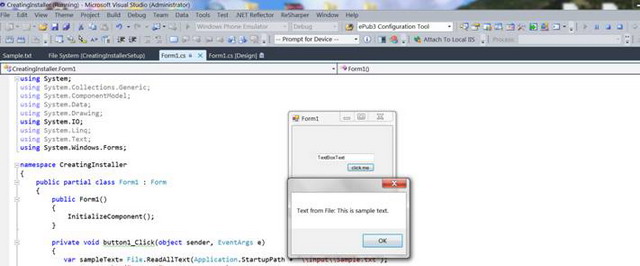
首先,我们创建一个简单的单窗体Windows应用程序,其中只有一个文本框和一个按钮.(First, let’s create a simple one form windows application, with only a text box and a button.)
创建Windows应用程序只是为了安装它.(Creating a windows application is just for the sake of having one to install.)
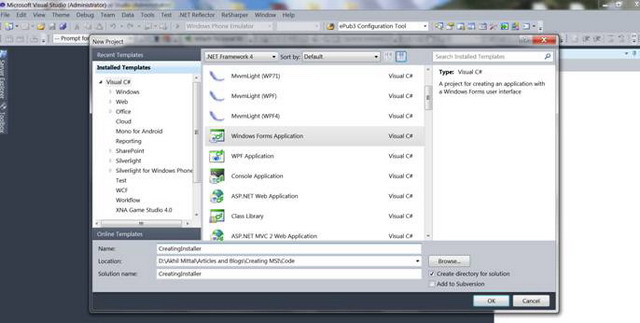
我给Windows应用程序起了个名称CreatingInstaller,显然您可以选择自己的名称.(I gave the name CreatingInstaller to my windows application, obviously you can choose your own.)
在我的解决方案中添加一个新的Windows窗体应用程序,并在默认窗体中添加一个文本框和按钮,结果如下图所示.根据需要装饰控件属性.(Adding a new Windows Form Application in my solution and adding a text box and button to the default form resulted in the figure as shown below. Decorate the control properties however you want.)
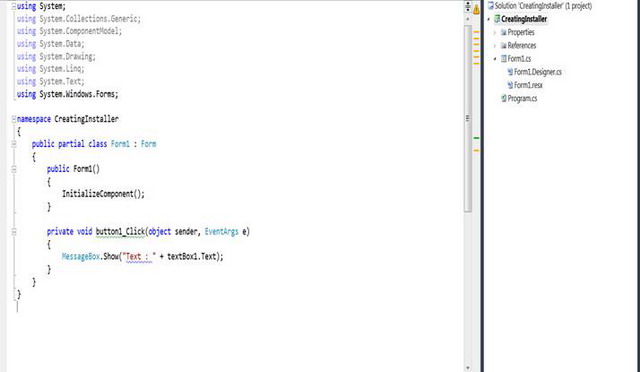
只想写几行代码,所以我绑定了按钮的click事件以显示文本框的文本(Just wanted to write few lines of code, so I binded the button’s click event to show text box’s text)
主要目标(Primary Objective)
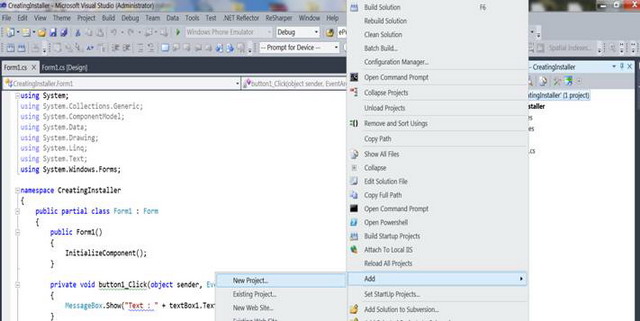
到现在为止还挺好.现在,我们为同一Windows应用程序创建一个安装程序.右键单击该解决方案,然后将新项目添加到您的解决方案中,如下图所示:(So far so good. Now let’s create an installer for the same windows application. Right click on the solution and add a new project to your solution like in following figure:)
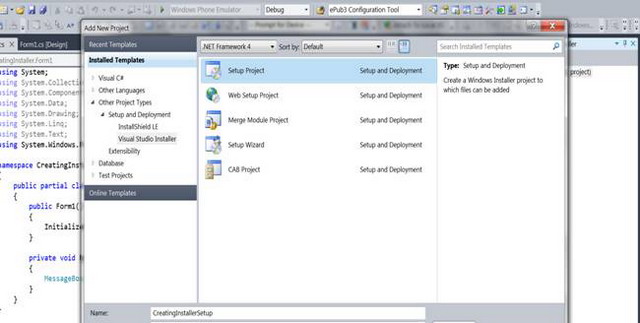
并通过添加一个安装项目(And add a setup project by)其他项目类型->安装和部署-> Visual Studio安装程序(Other project Types->Setup and Deployment->Visual Studio Installer)
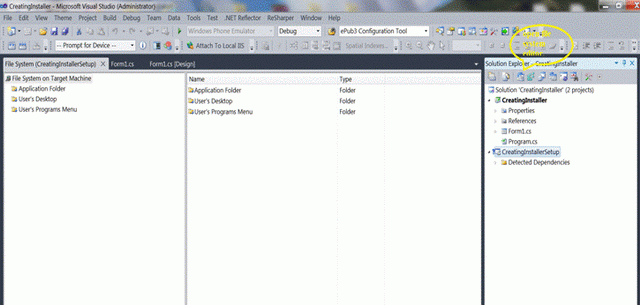
该项目将被添加到解决方案中.现在,通过单击项目打开文件系统编辑器,然后选择打开文件系统编辑器的选项,如下图所示:(The project will be added to the solution. Now open the file system editor by clicking on the project and select the option to open file system editor, like in below figure:)
您将看到应用程序文件夹,用户的桌面和用户的程序菜单.(You’ll get to see Application Folder, User’s Desktop and User’s Program Menu.)
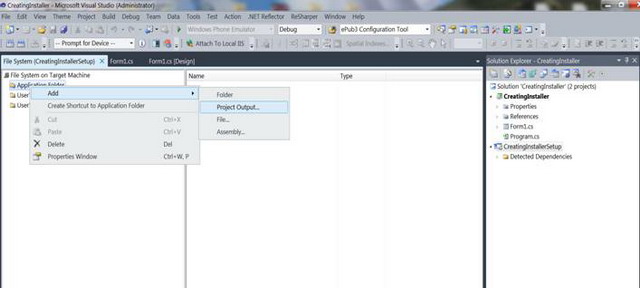
右键单击"应用程序文件夹",然后添加一个输出项目. Out项目指定我们要创建安装程序的项目,如下图所示:(Right click on Application Folder and add an output project. Out project specifies the project we are creating an installer to, like in the following figure:)
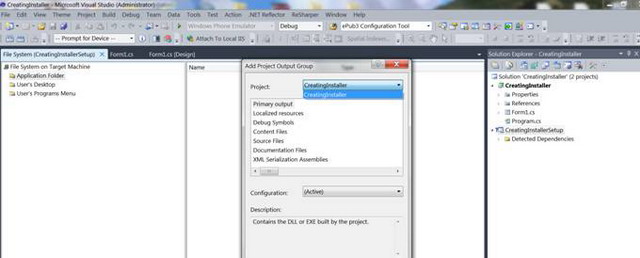
在添加输出项目窗口中选择CreationInstaller(即Windows应用程序项目名称),然后选择它作为主要输出,如下所示,然后单击"确定".(Select CreatingInstaller (i.e. the windows application project name) in the add output project window and select it as a primary output as shown below and click OK.)
主输出将如下所示添加,其类型定义为Output.(The Primary output will be added as shown below, having type defined as Output.)

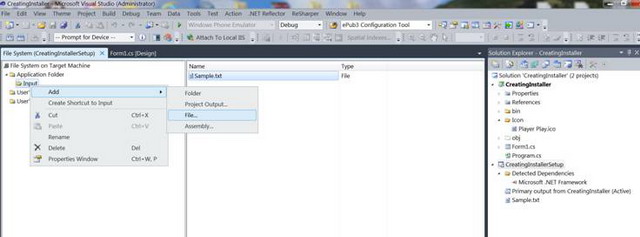
同时,让我们向Windows应用程序添加更多功能.让我们阅读一个文件,并在单击按钮时在消息框中显示其输出.因此,只需添加一个文本文件.我叫它(In the meanwhile, let’s add some more functionality to our windows application. Let’s read a file and show its output in a message box upon a button click. Therefore, just add a text file. I called it)**Sample.txt(Sample.txt)**到(to the)**bin \ debug \ Input(bin\debug\Input)**文件夹,输入是我创建的用于放置txt文件的自定义文件夹.(folder, input is the custom folder I created to place my txt file.)
编写几行代码只是为了从启动路径中读取txt文件.就我而言(Write a few lines of code just to read the txt file from the Startup path. In my case)bin \ debug(bin\debug),也可能是(, it could also be)**bin \释放(bin\release)**根据项目构建,并指定文件夹名称和文件名称以读取内容.我选择将txt文件保留在启动路径中,以便可以解释在安装时如何创建文件和文件夹.现在我们还需要这个Input文件夹和一个(as per the project build, and specify the file folder name and file name to read the content. I chose to keep my txt file at the startup path so that I could explain how we can create files and folders at the time of installation. Now we also need this Input folder and a)**Sample.txt(Sample.txt)**文件在安装时位于已安装的应用程序的位置.(file at the time of installation to be located at the location of installed application.)
对于文件操作,我添加了名称空间(For file operations I added the namespace) System.IO 尽管没有必要这样做.(though it is unnecessary to do so.)

因此,运行该应用程序将显示两个消息框,一个接一个显示文本框文本和来自(Therefore, running the application will show two message boxes, one after the other showing text box text and text from)**Sample.txt(Sample.txt)**文件.(file.)

现在,必须在我们的安装项目中实现此文件夹创建逻辑,以便在安装应用程序时,它具有运行该应用程序所需的所有先决条件,例如Input文件夹和(Now this folder creation logic has to be implemented in our setup project, so that when the application installs, it has all the pre-requisites required to run the application, like the Input folder and the)**Sample.txt(Sample.txt)**文件.(file.)
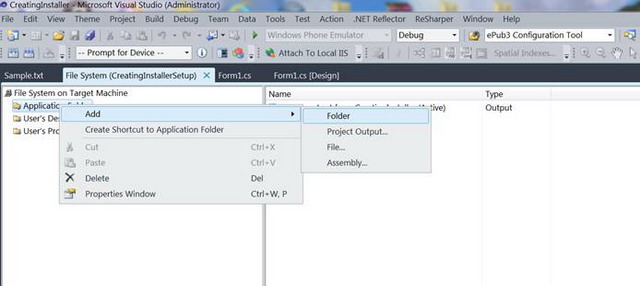
因此,右键单击文件系统编辑器中的"应用程序文件夹",然后添加一个文件夹.该文件夹将在"应用程序文件夹"下方创建,并命名该文件夹(So, right click on Application Folder in File system editor and add a folder. The folder will be created just below the Application Folder, name that folder)输入项(Input).(.)
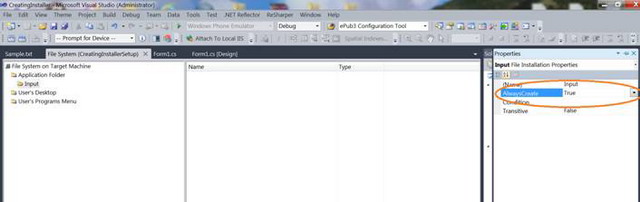
右键单击文件夹,选择属性,然后将Always Create属性标记为True.这意味着在新的构建版本发布后,无论何时我们运行安装程序,都将始终创建该文件夹.(Right-click on folder, select properties, and mark the Always Create property to True. That means the folder will always be created whenever we run the installer, after a fresh build release.)
创建快捷方式(Create Shortcuts)
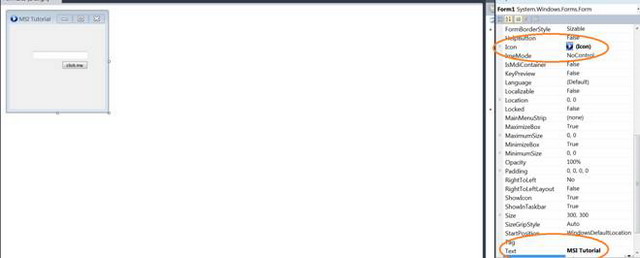
您可以装饰表单以向其中添加图标,并且在安装时也需要该图标才能为我们的应用程序创建快捷方式图标.将图标添加到表单中,如下图所示:(You can decorate your form to add an icon to it, and that icon will also be required at the time of installation to create a shotcut icon to our application. Add an icon to the form like in below mentioned figure:)
是时候添加了(Time to add the)**Sample.txt(Sample.txt)**文件.右键单击创建的"输入"文件夹并向其添加文件,浏览找到(file. Right click the Input folder created and Add file to it, browse for the)**Sample.txt(Sample.txt)**我们之前创建的Windows应用程序项目中的文件.(file in the Windows Application project we created earlier.)
要创建应用程序的快捷方式,请在中间窗口窗格中右键单击"主要输出",然后选择"创建主要输出的快捷方式",将该快捷方式命名为CreationInstaller.(To create a shortcut to the application, right click on Primary output in middle window pane and select Create shortcut to Primary output, name that shortcut as CreatingInstaller.)
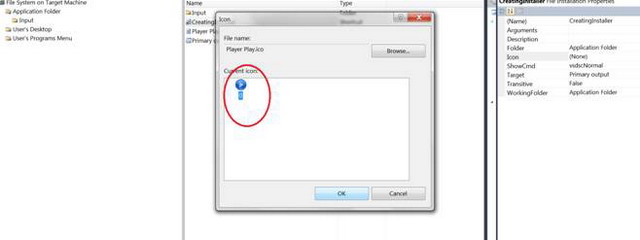
通过右键单击选择快捷方式的属性并向其添加图标.启动应用程序时,将在桌面上创建此图标.下图说明了如何添加图标.(Select the properties of the shortcut, by right clicking it and add an icon to it. This icon will be created on the desktop when the application launches. The below figures explain how to add an icon.)

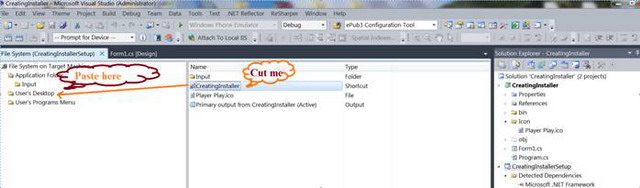
剪切在"应用程序文件夹"中创建的快捷方式,并将其粘贴到"用户的桌面文件夹"下.(Cut the shortcut created at Application Folder and Paste it under User’s Desktop Folder.)
要在"用户程序"菜单中创建快捷方式,请在"用户程序菜单"中添加一个新文件夹.这将在该文件夹中程序的菜单位置中创建.与创建桌面快捷方式时一样,创建一个指向主要输出的新快捷方式.以下三个图像描述了该过程:(For shortcuts to be created at the User’s Program Menu, add a new folder to the User’s Program Menu. This will be created at the program’s menu location in that folder. Create a new shortcut pointing to the primary output as we did when we created a desktop shortcut. The three images below describe the process:)
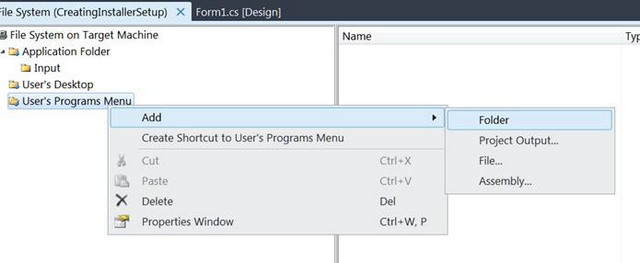
将文件夹命名为CreationInstaller.(Name the folder CreatingInstaller.)
右键单击中间窗口窗格以创建新的快捷方式.(Right click on middle window pane to create a new shortcut.)

选择快捷方式源以选择主要输出.(Select shortcut source to primary output selected.)
还要为快捷方式添加图标,就像桌面快捷方式一样.(Also add icon to shortcut, as done for Desktop shortcut.)

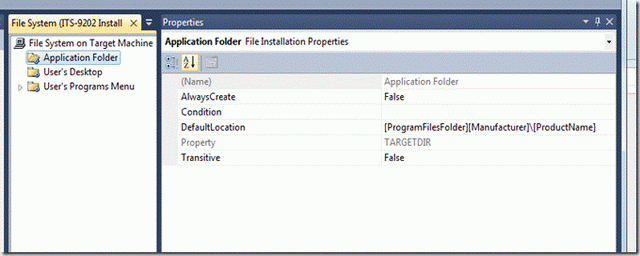
右键单击"应用程序"文件夹以设置安装应用程序的位置的属性.(Right click Application folder to set the properties of where to install the application.)
卸载(Uninstall)
我们始终可以从控制面板的"程序和功能"列表中卸载应用程序,但是如何创建自己的卸载程序?这也位于程序菜单下,因此我们不必打扰控制面板.(We always have an option to uninstall the application from the control panel’s Programs and Features list, but how about creating our own uninstaller? That is also under the programs menu so we do not have to disturb the control panel.)
第1步(Step 1)
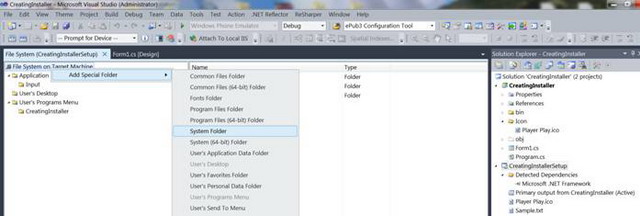
右键单击目标计算机上的文件系统,然后添加特殊文件夹->系统文件夹,如下图所示.(Right click on File System on target Machine and Add Special Folder->System Folder as shown in below figure.)
第2步(Step 2)
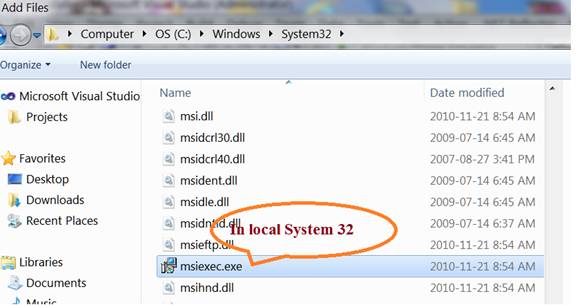
右键单击新创建的系统文件夹,然后浏览到(Right click on the newly created system folder and browse for the)**可执行文件(msiexec.exe)**本地文件(file in the local)**系统Windows32(System.Windows32)**夹.该文件负责根据指定的某些参数安装和卸载应用程序.(folder. This file takes responsibility to install and uninstall the application based on certain parameters specified.)
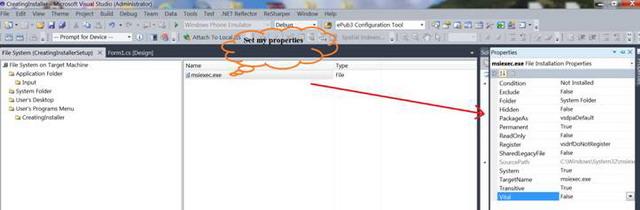
完全按照图中所示设置文件的属性:(Set the properties of the file exactly as shown in the figure:)
第三步(Step 3)
现在,在用户程序菜单下创建一个新的快捷方式,并将其来源指向(Now create a new shortcut under the User’s program Menu and point its source to)**微执行器(msiexec)**如下所示.您可以在快捷方式中添加更多图标和名称.我给它起了"卸载"的名字.(as shown below. You can add more icons and a name to your shortcut. I have given it the name “Uninstall.")

第4步(Step 4)
通过选择安装项目按F4键.我们看到一个属性列表,我们可以根据外部安装需求对其进行自定义,例如产品名称,作者,安装位置.由于它们非常易于理解和设置,因此我不会对此进行深入讨论.(Press F4 key by selecting the setup project. We see a list of properties, which we can customize as per out installation needs, like Product name, Author, Installation location. I’ll not go into a deep discussion about all of this, as they are quite easy to understand and set.)
只需记下下面属性列表中显示的产品代码即可.我们将需要产品代码作为参数(Just take a note of the product code shown below in the list of properties. We would need product code as a parameter to)**微执行器(msiexec)**进行卸载.(for uninstallation.)

第5步(Step 5)
右键单击"卸载"快捷方式,然后设置arguments属性,如下图所示:(Right click the Uninstall shortcut and set the arguments property as shown in below figure:)
/x {product code} /qr

/x is for uninstalltion.
您可以在以下位置获取参数的完整详细列表及其使用(You can get the whole detailed list of parameters and their use at) http://technet.microsoft.com/zh-CN/library/cc759262(v=ws.10).aspx(http://technet.microsoft.com/en-us/library/cc759262(v=ws.10).aspx) .选择您喜欢的任何一个.(. Chose whichever one you like.)

第6步(Step 6)
保存所有并重建安装项目.(Save all and Rebuild the setup project.)
任务完成!(Job Done!)
现在,您的设置已准备就绪,可以安装Windows应用程序了.(Now our setup is ready to install our windows application.)
只需浏览安装项目的调试文件夹位置.我们发现一个(Just browse the debug folder location of Setup project. We find an)**微星(msi)**和一个(and a)安装程序(setup.exe).您可以运行任何一个以启动安装程序.(. You can run either to initiate setup.)
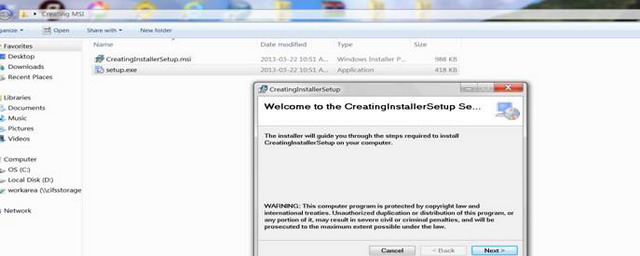
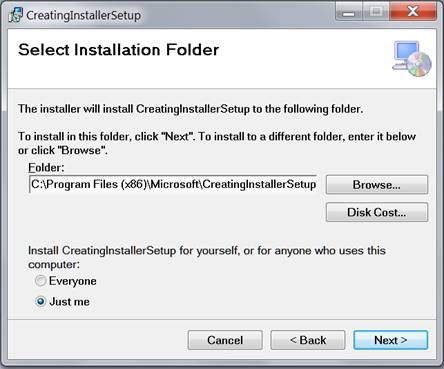
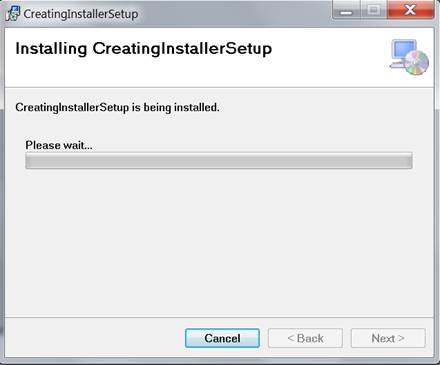
当我们开始时,我们看到了一个安装向导,其中的屏幕欢迎用户,询问安装位置(默认位置已设置).(When we started we saw a setup wizard with screens that welcomed the user, asked for the location to install (while the default location was already set.))
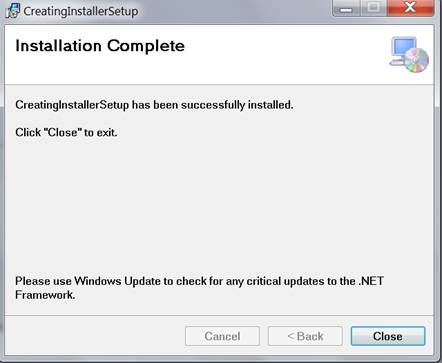
完成向导后,单击关闭按钮.(After completing the wizard, click the close button.)
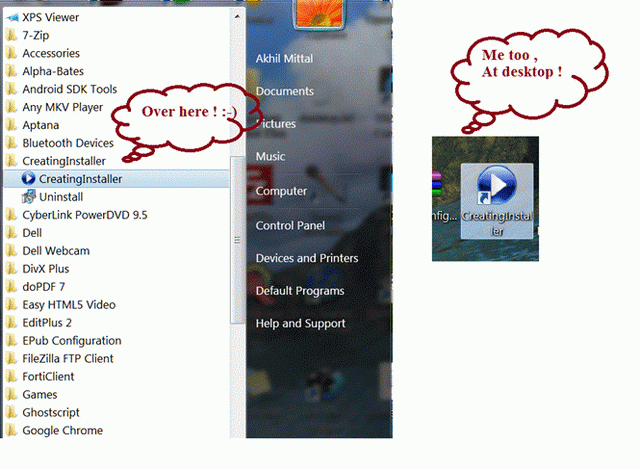
现在工作已经完成,我们可以看到在桌面和"用户程序"菜单中创建的应用程序的快捷方式,如下图所示.(Now that the job is done we can see our shortcuts to the application created at desktop and User’s Program Menu like in below given figure.)
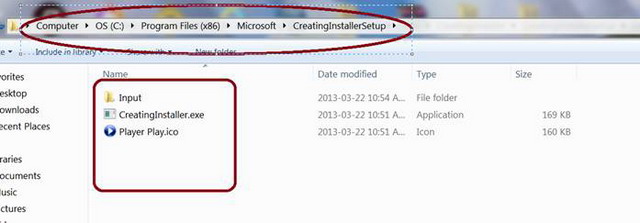
现在,如果我们导航到安装位置,我们还可以看到创建的Input文件夹和(Now if we navigate out to the installation location we can also see the Input folder created and the)**Sample.txt(Sample.txt)**文件放在里面.(file resting inside it.)
运行该应用程序,然后查看输出.(Run the application and see the output.)
单击卸载以删除该应用程序.向导启动,如下所示:(Click on uninstall to remove the application. The wizard launches as shown below:)

自定义动作(Custom Actions)
只是想一眼我们可以在创建设置时定义的自定义动作.(Just wanted to give a glimpse of Custom Actions we can define, while creating the setup.)
自定义操作是除安装和卸载时的默认功能以外,还包含自定义功能的操作.例如,我的质量控制团队报告了一个错误,该错误在运行应用程序时同时在后台卸载应用程序时,该应用程序仍保持运行状态.按照它们的指示,它应该在卸载过程中显示一条消息或关闭.很难向他们解释其原因,因此我选择在设置项目中实现他们的愿望.(Custom actions are the actions which contain customized functionality apart from default one at the time of installation and uninstallation. For example, my QC team reported a bug that when running the application while simultaneously in background uninstalling the application, the application still keep on running. As per them it should show a message or close during the uninstallation. It was hard to explain to them the reason for this, so I opted for implementing their desire in the setup project.)
- 只需将安装程序类添加到我们先前创建的Windows应用程序中即可.当我们打开安装程序类时,我们可以看到为每个自定义操作指定的事件,即安装,卸载,回滚,提交.(Just add an installer class to the windows application we created earlier. When we open the installer class we can see the events specified for each custom action i.e. for Installation, Uninstallation, Rollback, Commit.)

我需要编写卸载代码,因此我写了几行代码即可满足需求.(My need was to write code for the uninstallation, so I wrote few lines to fulfill the need.)
该代码包含在卸载时查找正在运行的EXE名称的逻辑.如果与我的应用程序EXE名称匹配,它将终止该进程.不再赘述.只想解释自定义操作的用法.(The code contains the logic to find the running EXE name at the time of uninstallation. If it matches my application EXE name, it kills the process. Not going into more details to it.Just want to explain the use of custom actions.)
using System;
using System.Collections;
using System.Collections.Generic;
using System.ComponentModel;
using System.Configuration.Install;
using System.Diagnostics;
using System.Linq;


namespace CreatingInstaller
{
    [RunInstaller(true)]
    public partial class Installer1 : System.Configuration.Install.Installer
    {
        public override void Install(IDictionary savedState)
        {
            base.Install(savedState);
            //Add custom code here
        }


        public override void Rollback(IDictionary savedState)
        {
            base.Rollback(savedState);
            //Add custom code here
        }

        public override void Commit(IDictionary savedState)
        {
            base.Commit(savedState);
            //Add custom code here
        }


        public override void Uninstall(IDictionary savedState)
        {
            Process application = null;
            foreach (var process in Process.GetProcesses())
            {
                if (!process.ProcessName.ToLower().Contains("creatinginstaller")) continue;
                application = process;
                break;
            }

            if (application != null && application.Responding)
            {
                application.Kill();
                base.Uninstall(savedState);
            }
        }

    }
}
- 选择"自定义动作编辑器"后,点击(Click on the Custom Actions Editor after selecting the)创建InstallerSetup(CreatingInstallerSetup)项目.(project.)
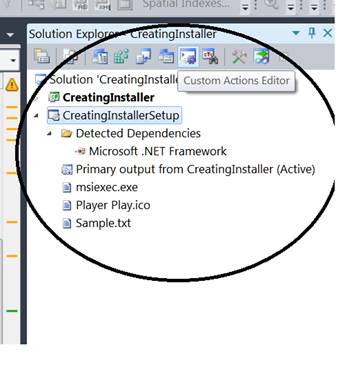
- 我们在左侧窗口中看到自定义操作编辑器窗格.右键单击它以添加自定义操作,然后在"应用程序文件夹"中选择主要输出.(We see the custom action editor pane on left window. Right click it to add a custom action and select the primary output in the Application Folder.)

- 我们现在看到主要输出已添加为自定义操作.在卸载时,我的自定义操作将被触发,并且在卸载该应用程序时将其关闭.(We see primary output added as custom actions now. at the time of uninstallation my custom action will be fired and the application will be closed while uninstalling it.)

.NET Framework(.NET Framework)
如果安装计算机没有.NET框架怎么办?我们可以指定安装随附的我们自己的软件包,以便我们的应用程序不依赖于客户端计算机的.NET框架,而是指向我们提供给它运行的软件包.(What if the installation machine does not have a .NET framework? We can specify our own package supplied with installation so that our application does not depend on the .NET framework of the client machine, but points to the package we supplied to it to run.)
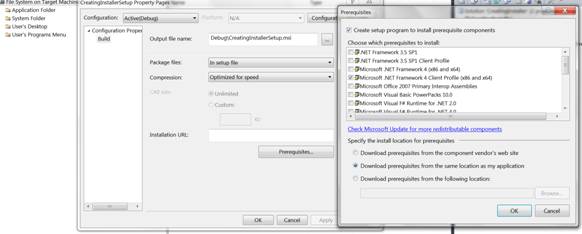
右键单击安装项目,以打开属性窗口.(Right click on Setup project, to open properties window.)
在这里,我们可以指定应用程序安装的先决条件.只需单击"先决条件"按钮,然后在打开的先决条件窗口中,选中需要遵循的.NET Framework应用程序的复选框,然后选择数字2的单选按钮(即,从与我的应用程序相同的位置下载先决条件).但请保存该项目并重新构建.(Here we can specify pre-requisites for the application to install. Just click on Prerequisites button and in the opened prerequisites window, select the checkbox for the .NET Framework application that needs to follow, and select the radio button at number 2 (i.e. Download prerequisites from the same location as my application.) Press OK, but save the project and re-build it.)
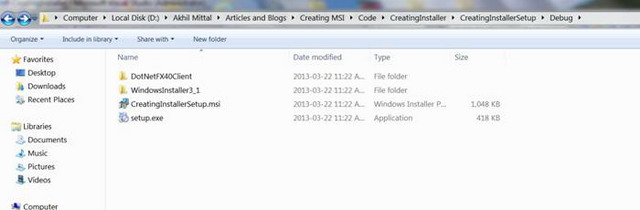
现在,当我们浏览Setup项目的Debug文件夹时,由于我们刚才执行的操作,又看到了两个文件夹.(Now when we browse the Debug folder of the Setup project we see two more folders as a result of the actions we performed just now.)
现在,必须将整个程序包提供给客户端计算机以安装应用程序.(Now this whole package has to be supplied to the client machine for the installation of the application.)
现在从重新安装应用程序(Now re-install the application from)安装程序(setup.exe),然后使用快捷方式启动它.(, and launch it using shortcuts.)
结论(Conclusion)
本教程介绍了创建安装项目的基本步骤.不过,我没有很深入地解释注册表或许可协议.要理解和掌握本主题,有很多事情要做.但是,本文只是开发人员开始设置和部署的开始.编码愉快!(The tutorial covers the basic steps for creating the installation project. I did not go very deep explaining the registry or license agreements though. There are many things to be explored to understand and master this topic. However, this article was just a start for a developer to play around with setup and deployments. Happy Coding!)
许可
本文以及所有相关的源代码和文件均已获得The Code Project Open License (CPOL)的许可。
C# Windows VS2010 Visual-Studio Dev installer msi 新闻 翻译