UNITY 3D –游戏编程–第2部分(译文)
By robot-v1.0
本文链接 https://www.kyfws.com/games/unity-d-game-programming-part-zh/
版权声明 本博客所有文章除特别声明外,均采用 BY-NC-SA 许可协议。转载请注明出处!
- 16 分钟阅读 - 7653 个词 阅读量 0UNITY 3D –游戏编程–第2部分(译文)
原文地址:https://www.codeproject.com/Articles/876478/UNITY-D-Game-Programming-Part
原文作者:Vahe Karamian
译文由本站 robot-v1.0 翻译
前言
The second article in a series to discuss Unity 3D and how to get started with your own 3D projects.
该系列的第二篇文章讨论Unity 3D以及如何开始自己的3D项目.
介绍(Introduction)
在本系列的第二篇文章中,我们将继续扩展对环境的了解,并开始演示更多的编码和脚本.如果您尚未这样做,请花一点时间(In the second article in the series, we will continue on expanding our knowledge of the environment and also start demonstrating more coding and scripting. If you have not already done so, please take a moment and)读:(read:)
-
Unity 3D –游戏编程–第2部分(Unity 3D – Game Programming – Part 2)
Unity 3D网络文章:(Unity 3D Networking Article(s):)
-
Unity 3D-网络游戏编程(Unity 3D - Network Game Programming) Unity 3D Leap Motion和Oculus Rift文章:(Unity 3D Leap Motion and Oculus Rift Article(s):)
-
Unity 3D-Leap Motion集成(Unity 3D - Leap Motion Integration) 在第1部分中,我们从Unity 3D环境的基础知识入手.感受一下IDE以及将在整个项目中使用的不同部分.我们还介绍了如何使用设计器中的工具将不同的变换应用于选定的游戏对象:定位,旋转和缩放.最后,我们研究了如何创建第一个脚本,并使用该脚本在多维数据集的Y轴上应用了旋转变换.(In Part 1 we started by the very basics of the Unity 3D environment. Getting a feel of the IDE and the different sections which you will be working with throughout your project. We also covered how to use the tools in the designer to apply different transformation to a selected Game Object: positioning, rotation and scaling. We finally looked at how to create our first script and using the script apply a rotation transform on the Y-Axis of our cube.) 在本系列的第二部分中,我们将研究通过编码对给定对象进行的更多转换.我们还将研究如何创建对于场景中的对象渲染至关重要的光源.没有照明,您的场景或关卡就不会那么吸引人.(In the second part of the series, we will look at more of the transformation of a given object through coding. We will also look at how to create light sources that are crucial for the rendering of your objects in the scene. Without lighting, your scene or level will not look as attractive.) 现在,了解这些概念很重要,这样您就可以更好地控制要创建的环境.(Now, it is important to understand these concepts so that you have a better control of the environment you want to create.)
游戏编程简介:使用C#和Unity 3D(Introduction to Game Programing: Using C# and Unity 3D*) (Paperback)*)(平装)( 要么(or*) (eBook)*)(电子书)( 是为帮助对计算机科学和游戏编程领域感兴趣的个人而设计和开发的.它旨在说明计算机编程的概念和基础.它使用简单游戏的设计和开发来说明和应用这些概念.(is designed and developed to help individuals that are interested in the field of computer science and game programming. It is intended to illustrate the concepts and fundamentals of computer programming. It uses the design and development of simple games to illustrate and apply the concepts.) [ 
](http://www.lulu.com/commerce/index.php?fBuyContent=18159441) 书号:9780997148404(ISBN: 9780997148404) 版本:第一版(Edition: First Edition) 发行人:Noorcon Inc.(Publisher: Noorcon Inc.) 英语语言(Language: English) 274页(Pages: 274) 装订:装订完美的平装本(彩色)(Binding: Perfect-bound Paperback (Full Color)) 尺寸(英寸):6宽x 9高(Dimensions (inches): 6 wide x 9 tall) -
 |
||电子书(ePUB)(eBook (ePUB))
书号(ISBN):9780997148428(ISBN: 9780997148428)
版本:第一版(Edition: First Edition)
发行人:Noorcon Inc.(Publisher: Noorcon Inc.)
英语语言(Language: English)
|
||电子书(ePUB)(eBook (ePUB))
书号(ISBN):9780997148428(ISBN: 9780997148428)
版本:第一版(Edition: First Edition)
发行人:Noorcon Inc.(Publisher: Noorcon Inc.)
英语语言(Language: English)
| 大小:9.98 MB(Size: 9.98 MB) |
|---|
|
|可从:(Available From:) 


 |
|
Windows Phone 8.x演示:(Windows Phone 8.x Demo:)
我提供了一个免费的电话应用程序,您可以在Windows Phone上下载和预览演示.要下载移动应用程序,请点击以下链接:(I have provided a free phone application that you can download and preview the demos on your Windows Phone. To download the mobile application, follow the link:) CodeProjectArticleSample(CodeProjectArticleSample)
![]() 代码项目文章示例移动应用(Code Project Articles Sample Mobile App)
代码项目文章示例移动应用(Code Project Articles Sample Mobile App)
文章代码和视觉效果的实时预览:(Live Preview of Article Code and Visuals:)
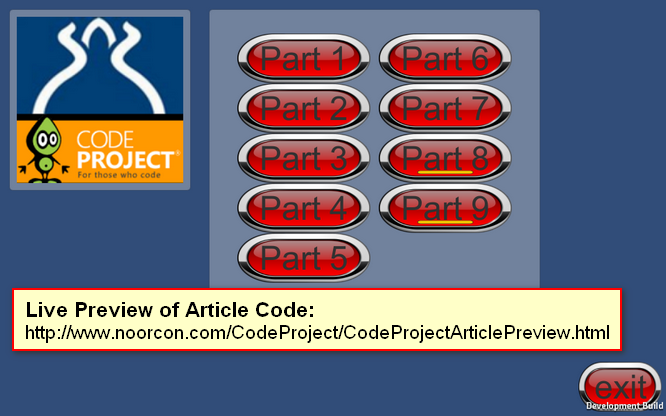 链接到实时预览:(Link to live preview:) http://www.noorcon.com/CodeProject/CodeProjectArticlePreview.html(http://www.noorcon.com/CodeProject/CodeProjectArticlePreview.html)
背景(Background)
如果您还没有这样做,请花一点时间阅读(If you have not already done so, please take a moment and read) Unity 3D –游戏编程简介–第1部分(Unity 3D – Game Programming Introduction – Part 1) .(.) 假定本文的读者通常熟悉编程概念.还假定读者具有C#语言的理解和经验.还建议本文的读者也熟悉面向对象的编程和设计概念.我们将根据需要在本文中简要介绍它们,但是由于它们完全是单独的主题,因此我们将不对其进行详细介绍.我们还假设您有学习3D编程的热情,并且具有3D图形和矢量数学的基本理论概念.(It is assumed that the reader of this article is familiar with programming concepts in general. It is also assumed that the reader has an understanding and experience of the C# language. It is also recommended that the reader of the article is familiar with Object-Oriented Programming and Design Concepts as well. We will be covering them briefly throughout the article as needed, but we will not get into the details as they are separate topics altogether. We also assume that you have a passion to learn 3D programming and have the basic theoretical concepts for 3D Graphics and Vector Math.) 最后,本文使用Unity 3D版本4.6.1,这是截至初始发布日期的最新公共发行版.该系列中讨论的大多数主题都将与旧版本的游戏引擎兼容,也许还与应该在今年某个时候发布的新版本兼容.但是,有一个主题与当前版本的游戏引擎相比在当前4.6.1版本中有显着差异,那就是UI(用户界面)管道.这是由于引擎中的新UI架构远远优于我们在此版本之前所拥有的.首先,我对新的UI架构感到非常满意.(Lastly, the article uses Unity 3D version 4.6.1 which is the latest public release as of the initial publication date. Most of the topics discussed in the series will be compatible with older versions of the game engine, and perhaps also the new version which is supposed to be release sometime this year. There is however, one topics which is significantly different in the current 4.6.1 version compared to the older version of the game engine, and that is the UI (User Interface) pipeline. This is due to the new UI architecture in the engine which is far superior to what we had prior to this release. I for one, am very happy with the new UI architecture.)
使用项目文件(Using Project Files)
下载文章系列的项目/源代码:(Downloading the project/source code for article series:) 下载源(Download source) .(.) 随着每篇连续的文章的提交,项目/源代码也将不断扩展.新的项目文件和源文件将包括该系列中的较早部分.(With each consecutive article that is submitted, the project/source code will be also expanding. The new project files and source files will be inclusive of older parts in the series.)
对象的位置,旋转和比例(Position, Rotation and Scale of an Object)
场景/关卡中的每个游戏对象都有一个"变换".该组件用于存储和操纵给定对象的位置,旋转和比例.作为游戏开发人员,您需要熟悉Transform以及该API提供的许多操作和属性.(Every game object in a scene/level has a Transform. This component is used to store and manipulate the position, rotation and scale of a given object. As a game developer you will need to become familiar with the Transform and the many operations and properties that is has available through the API.)
**注意:(NOTE:)**为了熟悉Transform的所有不同变量,函数等^,您需要阅读Unity 3D提供的Scripting API文档.我不会在这里列出它们,因为这毫无意义.(To get familiar with all of the different variables, functions, and etc… of the Transform you will need to look into the Scripting API documentation provided by Unity 3D. I will not be listing them here, as it will be senseless.)
如前所述,理解Transform非常重要,这样您就可以根据需要操纵场景/级别.(As stated, it is very important to understand the Transform so that you can manipulate your scene/level as desired.)
假设我们要以以下方式创建三个多维数据集原语:cube1将位于原点(0,0,0),cube2将位于(3,0,0),而cube3将位于(- 3,0,0).此时,我们将使用设计器来创建基本体.稍后,我将演示如何通过代码动态创建基元.(Let’s say that we want to create three cube primitives in the following fashion: cube1 will be located at the origin (0,0,0), cube2 will be created at (3,0,0) and cube3 will be created at (-3,0,0). At this time, we will use the designer to create our primitives. Later on I will demonstrate on how to create the primitives dynamically, through code.)
使用菜单工具栏,选择GameObject-> 3D Object-> Cube.您将需要执行三次此操作,并且每次将创建一个多维数据集并将其放置在(0,0,0)处.使用"层次结构"窗口,选择第一个多维数据集. “检查器"窗口将加载所选多维数据集的所有属性.将名称更改为Cube1,并确保位置矢量位于(X,Y,Z)的(0,0,0)处.(Using the menu toolbar, select GameObject->3D Object->Cube. You will need to perform this action three times, and each time a cube will be created and placed at (0,0,0). Using the Hierarchy window, select the first cube. The Inspector window will load all of the properties for the selected cube. Change the name to Cube1, and make sure the Position vector is at (0,0,0) the (X,Y,Z).)
**注意:(NOTE:)**如果此时您迷路了,请参阅本系列的第1部分.我们将在第1部分中介绍基础知识.(If you are lost at this point, refer to Part 1 of the series. We cover the basics in Part 1.)
重复相同的过程,以将Cube2放置在(3,0,0)和将Cube3放置在(-3,0,0).您的场景应如下所示:(Repeat the same procedure to make Cube2 be positioned at (3,0,0) and Cube3 positioned at (-3,0,0). Your Scene should look something like the following:)
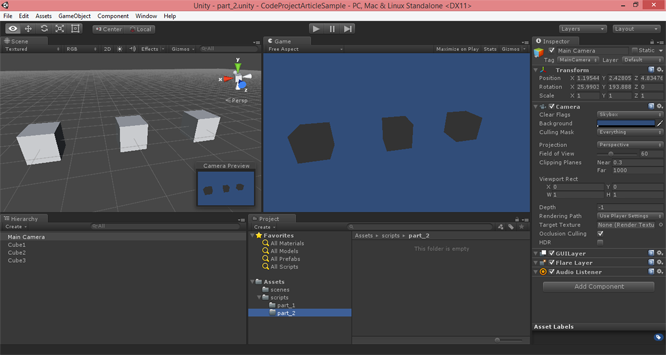
图1-三个多维数据集基元(Figure 1-Three Cube Primitives) **注意:(NOTE:)**根据透视图的位置和方向,您可能需要进行调整以使其看起来像图1中的样子.(Depending on the position and orientation of your perspective view, you might have to adjust to make it look like what I have in Figure 1.) 现在,让我们说我们希望三个立方体分别按以下顺序在不同的轴上旋转:Cube1将绕其Y轴旋转,Cube2将绕其X轴旋转,Cube3将绕其Z-轴旋转.轴.为此,我们需要创建三个脚本,每个脚本代表一个游戏对象的旋转.(Now, let’s say that we want our three cubes to rotate on different axis each in the following order: Cube1 will be rotating around it’s Y-Axis, Cube2 will be rotating around it’s X-Axis, and Cube3 will be rotating around it’s Z-Axis. To achieve this, we would need to create three scripts each representing the rotation for one of the Game Objects.) 在项目窗口中,右键单击以打开上下文菜单.选择创建-> C#脚本.这将为您创建一个C#文件.将其命名为cube1Rotate.cs.对Cube2和Cube3重复相同的过程.您应该具有三个脚本,分别称为cube1Rotate.cs,cube2Rotate.cs和cube3Rotate.cs.(In your Project window, right-click to get the Context Menu up. Select Create->C# Script. This will create a C# file for you. Name it cube1Rotate.cs. Repeat the same procedure for Cube2 and Cube3. You should have three scripts called cube1Rotate.cs, cube2Rotate.cs, and cube3Rotate.cs.) 双击cube1Rotate.cs文件以在Mono Develop编辑器或您选择的编辑器中将其打开.在里面(Double-Click cube1Rotate.cs file to open it in the Mono Develop edit, or the editor of your choosing. In the)更新()(Update())我们需要实现的功能将应用Y轴旋转.(function we need to implement that will apply the Y-Axis rotation.) 立方体1 Y轴旋转:(Cube1 Y-Axis Rotation:)
using UnityEngine;
using System.Collections;

public class cube1Rotate : MonoBehaviour {

 // Use this for initialization
 void Start () {

 }

 // Update is called once per frame
 void Update () {
  // Rotate our game object around it's y-axis
  this.transform.Rotate (new Vector3 (0, 1, 0), 1);
 }
}
要对Cube2和Cube3应用适当的旋转,我们需要打开适当的脚本文件并使用相同的(To apply the proper rotation for Cube2 and Cube3, we would need to open the appropriate script file and use the same)转变(Transform)函数调用(function called)旋转()(Rotate())但传递不同(but pass in a different)矢量3(Vector3)目的.所以对于X轴旋转(object. So for X-Axis rotation it would be)**Vector3(1,0,0)(Vector3(1,0,0))**对于Z轴旋转,(and for the Z-Axis rotation it would be)Vector3(0,0,1)(Vector3(0,0,1)).(.) Cube2 X轴旋转:(Cube2 X-Axis Rotation:)
using UnityEngine;
using System.Collections;

public class cube2Rotate : MonoBehaviour {

 // Use this for initialization
 void Start () {

 }

 // Update is called once per frame
 void Update () {
  // Rotate our game object around it's x-axis
  this.transform.Rotate (new Vector3 (1, 0, 0), 1);
 }
}
Cube3 Z轴旋转:(Cube3 Z-Axis Rotation:)
using UnityEngine;
using System.Collections;

public class cube3Rotate : MonoBehaviour {

 // Use this for initialization
 void Start () {

 }

 // Update is called once per frame
 void Update () {
  // Rotate our game object around it's z-axis
  this.transform.Rotate (new Vector3 (0, 0, 1), 1);
 }
}
**注意:(NOTE:)不要忘记将每个C#脚本与其各自的GameObject相关联.(Do not forget to associate each C# script with its respective GameObject.) 现在,在这一点上,如果您是最倾向于开发的人员之一,您可能正在考虑自己,是否真的需要为每个GameObject创建一个单独的脚本文件?如果我的场景/关卡中有数百个GameObject,该怎么办.我要怎么办(Now, at this point, if you are one of the more inclined developers, chances are you are thinking to yourself, do we really need to create a separate script file for each GameObject? What if I have hundreds of GameObjects in my scene/level. What am I going to do?) 好吧,对您问题的简短回答是,(Well, the short answer to your questions is,)没有(no),则无需为每个GameObject创建单独的脚本文件.(, you do not need to create a separate script file for each GameObject.) 让我们看一个更高级的场景.让我们创建一个脚本,该脚本将创建三个附加的多维数据集基元,并将它们放置在现有多维数据集上方两个单位.也就是说,我们将创建一个位于(0,2,0)的Cube1',一个位于(3,2,0)的Cube2’和一个(-3,2,0)的Cube3'.(Let’s look at a more advanced scenario. Let’s create a script which will create three additional cube primitives, and place them two units above the existing cubes. That is, we will create a Cube1’ positioned at (0,2,0), a Cube2’ positioned at (3, 2, 0), and a Cube3’ positioned at (-3, 2, 0).)
using UnityEngine;
using System.Collections;

public class dynamicPrimitives : MonoBehaviour {

 private GameObject cube1; // represents our Cube1'
 private GameObject cube2; // represents our Cube2'
 private GameObject cube3; // represents our Cube3'

 // Use this for initialization
 void Start () {

  // initialize our Cube1 primitive and place it at location (0,2,0)
  this.cube1 = GameObject.CreatePrimitive (PrimitiveType.Cube);
  this.cube1.transform.localPosition = new Vector3 (0, 2, 0);

  // initialize our Cube2 primitive and place it at location (3,2,0)
  this.cube2 = GameObject.CreatePrimitive (PrimitiveType.Cube);
  this.cube2.transform.localPosition = new Vector3 (3, 2, 0);

  // initialize our Cube3 primitive and place it at location (-3,2,0)
  this.cube3 = GameObject.CreatePrimitive (PrimitiveType.Cube);
  this.cube3.transform.localPosition = new Vector3 (-3, 2, 0);

 }

 // Update is called once per frame
 void Update () {

  // apply the y-axis transform to Cube1'
  this.cube1.transform.Rotate(new Vector3(0,1,0), 1);

  // apply the x-axis transform to Cube2'
  this.cube2.transform.Rotate(new Vector3(1,0,0), 1);

  // apply the z-axis transform to Cube3'
  this.cube3.transform.Rotate(new Vector3(0,0,1), 1);
 }
}
上面显示的清单中发生了几件事.首先,您会注意到我们已经宣布了三个私有(Several things are happening in the listing shown above. First, you will notice that we have declared three private)游戏对象(GameObject)代表我们的多维数据集的变量.接下来,您会注意到我们已经使用了(variables that will represent our cubes. Next you will notice that we have used the)开始()(Start())函数来进行多维数据集的初始化.因此,让我们讨论一个多维数据集,其余的将应用相同的概念.(function to do our initialization of the cubes. So let’s discuss one of the cube’s and the same concept will apply to the rest.)
我们的Cube1’由cube1 GameObject定义.默认情况下为空.如果您从第1部分中回想起,则Start()函数只会在开始或您的游戏或模拟时被调用一次,因此,我们想在Start()函数中初始化/实例化原语.我们可以使用(Our Cube1’ is defined by the cube1 GameObject. By default this is null. If you recall from Part 1, the Start() function will be called only once upon the start or your game or simulation, therefore we would like to initialize / instantiate our primitives in the Start() function. We can do this by using the)**GameObject.CreatePrimitive(PrimitiveType.Cube)(GameObject.CreatePrimitive(PrimitiveType.Cube))**功能.(function.)CreatePrimitive()(CreatePrimitive())是将实例化我们的原始函数的函数,并且(is the function that will instantiate our Primitive, and)PrimitiveType.Cube(PrimitiveType.Cube)是一个内部枚举,将传递给该函数以实例化Cube原语.最后,将新创建的GameObject分配给名为cube1的变量.(is an internal enum that will be passed to the function to instantiate the Cube primitive. Lastly, the newly created GameObject is assigned to our variable called cube1.)
默认情况下,每个图元将在位置(0,0,0)处实例化,因此下一步是我们使用Transform将我们的GameObject重新定位到3D世界中所需的位置.在这种情况下,对于Cube1',我们要将其放置在(0,2,0).因此,我们需要将新实例化的多维数据集的localPosition矢量更改为新的Vector3(0,2,0).这代表了GameObject的位置.(By default, each primitive will be instantiated at location (0,0,0), so the next step is for us to use the Transform to relocate our GameObject to the desired location in the 3D world. In this case, for Cube1’ we want to place it at (0,2,0). Therefore we will need to change the localPosition vector of the newly instantiated cube to a new Vector3(0,2,0). This represents the position of the GameObject.)
您将需要将此新创建的脚本附加到场景中的对象上,以便在运行时执行.此时,连接到哪个GameObject都无关紧要.继续,将此脚本附加到相机.(You will need to attach this newly created script to an object in the scene to be executed during runtime. At this point, it doesn’t matter which GameObject it gets attached to. Go ahead and attach this script to your camera.)
**注意:(NOTE:)**由于脚本没有修改它所附接的GameObject,因此不会对其产生任何影响.(Since the script is not modifying the GameObject it is attached to, it will not have any effect on it.)
运行场景时,它将类似于以下内容:(When you run your scene, it will look something like the following:)
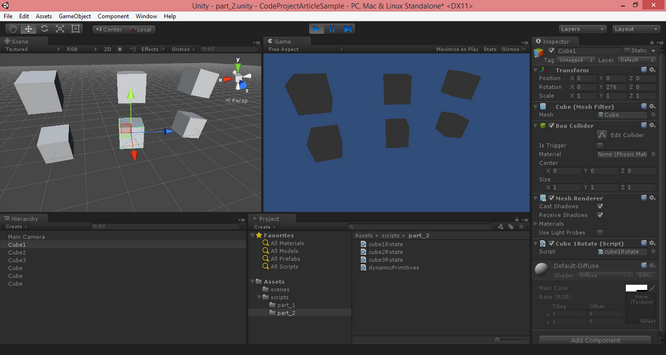
图2:运行脚本的屏幕截图(Figure 2-Screenshot of Running Script) 到现在为止,您应该足够习惯在设计时并通过代码动态创建GameObjects.您还应该在设计时以及通过代码来适应GameObject的定位和旋转.接下来,我们将讨论场景照明.(By now you should be comfortable enough to create GameObjects at design time and dynamically through code. You should also be comfortable with the positioning and rotation of the GameObject at design time as well as through code. Next, we will be discussing lighting the scene.)
灯光,相机,动作!(Lights, Camera, Action!)
Unity 3D为您提供了四种光源.进入细节和照明理论不在本文讨论范围之内.但重要的是要知道照明是场景中非常重要的方面.毕竟,相机在没有照明的情况下将如何看待周围环境?(There are four light sources available to you in Unity 3D. To get into the details and the theory of lighting is outside of the scope of this article. But it is important to know that lighting is a very important aspect of your scene. After all, how will the camera see its surrounding without lighting?) 四种类型:(The four type:)
-
定向光(Directional Light)
-
点光源(Point Light)
-
聚光灯(Spotlight)
-
区域灯(Area Light)
我将在以后的文章中讨论不同的光源.现在,让我们为场景创建一个点光源.为此,请从主工具栏中选择GameObject-> Light-> Point Light.点光源将放置在您的活动场景中.继续,然后从"层次结构"窗口中选择"点光源对象”,并将(X,Y,Z)的"位置"矢量属性更改为(0,1.5,3.5).注意您的场景和游戏视图现在变亮了.在设计时,您应该具有下图所示的内容:(I will discuss the different light sources in future articles. For now, let’s create a Point Light for our scene. To do so, from the main toolbar, select GameObject->Light->Point Light. A Point Light will be placed in your active scene. Go ahead and select the Point Light Object from the Hierarchy window, and change the Position vector properties for (X,Y,Z) to (0, 1.5, 3.5). Notice how you scene and your Game View have now lighten up. You should have something like the following figure at design time:)
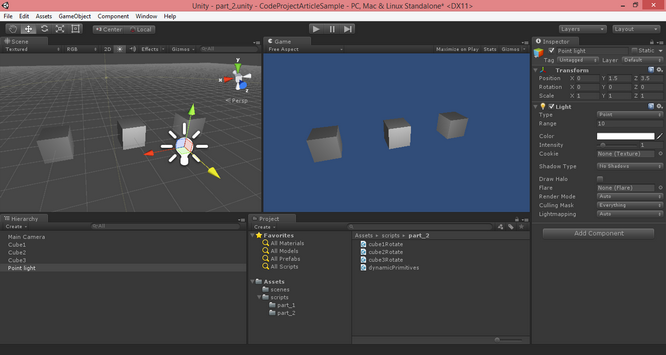
图3-设计时的照明(Figure 3-Lighting at Design Time)
如下图所示,在运行时,假设您已将最新脚本应用于场景:(And the following figure at runtime, given you have applied the latest script to the scene:)
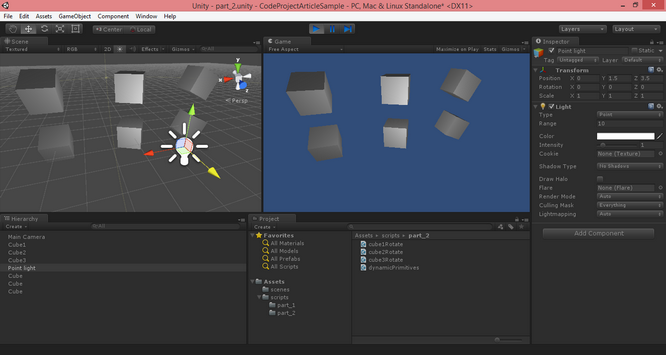
图4-运行时照明(Figure 4-Lighting at Runtime) 我现在想停止本系列的第2部分.(I would like to stop Part 2 of the series at this point.)
兴趣点(Points of Interest)
自己动手做更多的事情,确保您了解我们到目前为止所涉及的内容.另外,如果您是C#的新手,请确保您已阅读基础知识并获得尽可能多的练习.(Practice more on your own, make sure that you understand what we have covered so far. Also, if you are new to C#, make sure you do reading on the basics and get as much practice as possible.)
历史(History)
这是系列文章的第二篇,我将慢慢为Code Project社区做出贡献.(This is the second article of a series which I would slowly contribute to the Code Project community.)
-
Unity 3D –游戏编程–第2部分(Unity 3D – Game Programming – Part 2)
Unity 3D网络文章:(Unity 3D Networking Article(s):)
-
Unity 3D-网络游戏编程(Unity 3D - Network Game Programming) Unity 3D Leap Motion和Oculus Rift文章:(Unity 3D Leap Motion and Oculus Rift Article(s):)
许可
本文以及所有相关的源代码和文件均已获得The Code Project Open License (CPOL)的许可。
C# .NET Mobile iPhone Windows VS2010 Visual-Studio Dev Design Architect 新闻 翻译