UNITY 3D –游戏编程–第3部分(译文)
By robot-v1.0
本文链接 https://www.kyfws.com/games/unity-d-game-programming-part-2-zh/
版权声明 本博客所有文章除特别声明外,均采用 BY-NC-SA 许可协议。转载请注明出处!
- 17 分钟阅读 - 8254 个词 阅读量 0UNITY 3D –游戏编程–第3部分(译文)
原文地址:https://www.codeproject.com/Articles/877371/UNITY-D-Game-Programming-Part-2
原文作者:Vahe Karamian
译文由本站 robot-v1.0 翻译
前言
The third article in a series to discuss Unity 3D and how to get started with your own 3D projects.
该系列的第三篇文章讨论Unity 3D以及如何开始自己的3D项目.
介绍(Introduction)
在本系列的第三篇文章中,我们将继续扩展我们对环境的总体了解.我们还将看一下如何处理来自键盘的用户输入.我们需要能够以某种方式处理用户输入并将这些输入内部转换为所需的动作或输出.如果您尚未这样做,请花一点时间阅读:(In the third article in the series, we will continue on expanding our knowledge of the environment in general. We would also take a look at how to process user input from the keyboard. We need to be able to somehow handle user input and internally convert these inputs to desired actions or outputs. If you have not already done so, please take a moment and read:)
-
Unity 3D –游戏编程–第3部分(Unity 3D – Game Programming – Part 3)
Unity 3D网络文章:(Unity 3D Networking Article(s):)
-
Unity 3D-网络游戏编程(Unity 3D - Network Game Programming) Unity 3D Leap Motion和Oculus Rift文章:(Unity 3D Leap Motion and Oculus Rift Article(s):)
-
Unity 3D-Leap Motion集成(Unity 3D - Leap Motion Integration) 在本系列的第一部分中,我们从Unity 3D环境的基础知识入手.感受一下IDE以及将在整个项目中使用的不同部分.我们还介绍了如何使用设计器中的工具将不同的变换应用于选定的游戏对象:定位,旋转和缩放.最后,我们研究了如何创建第一个脚本,并使用该脚本在多维数据集的Y轴上应用了旋转变换.(In the first part of the series we started by the very basics of the Unity 3D environment. Getting a feel of the IDE and the different sections which you will be working with throughout your project. We also covered how to use the tools in the designer to apply different transformation to a selected Game Object: positioning, rotation and scaling. We finally looked at how to create our first script and using the script apply a rotation transform on the Y-Axis of our cube.) 在本系列的第二部分中,我们研究了通过编码对给定对象进行的更多转换.我们还研究了如何创建对于场景中的对象渲染至关重要的光源.(In the second part of the series, we looked at more of the transformation of a given object through coding. We also looked at how to create light sources that are crucial for the rendering of your objects in the scene.) 在本系列的第3部分中,我们将研究如何处理用户输入,并根据输入采取特定的操作.在这一点上,我们将只专注于用户的键盘输入.未来的文章将涵盖其他类型的输入.(In Part 3 of the series we will look at how to process user input and based on the input take particular actions. At this point we will only concentrate on the keyboard input from the user. Future articles will cover other types of input.)
游戏编程简介:使用C#和Unity 3D(Introduction to Game Programing: Using C# and Unity 3D*) (Paperback)*)(平装)( 要么(or*) (eBook)*)(电子书)( 是为帮助对计算机科学和游戏编程领域感兴趣的个人而设计和开发的.它旨在说明计算机编程的概念和基础.它使用简单游戏的设计和开发来说明和应用这些概念.(is designed and developed to help individuals that are interested in the field of computer science and game programming. It is intended to illustrate the concepts and fundamentals of computer programming. It uses the design and development of simple games to illustrate and apply the concepts.) [ 
](http://www.lulu.com/commerce/index.php?fBuyContent=18159441) 书号:9780997148404(ISBN: 9780997148404) 版本:第一版(Edition: First Edition) 发行人:Noorcon Inc.(Publisher: Noorcon Inc.) 英语语言(Language: English) 274页(Pages: 274) 装订:装订完美的平装本(彩色)(Binding: Perfect-bound Paperback (Full Color)) 尺寸(英寸):6宽x 9高(Dimensions (inches): 6 wide x 9 tall) -
 |
||电子书(ePUB)(eBook (ePUB))
书号(ISBN):9780997148428(ISBN: 9780997148428)
版本:第一版(Edition: First Edition)
发行人:Noorcon Inc.(Publisher: Noorcon Inc.)
英语语言(Language: English)
|
||电子书(ePUB)(eBook (ePUB))
书号(ISBN):9780997148428(ISBN: 9780997148428)
版本:第一版(Edition: First Edition)
发行人:Noorcon Inc.(Publisher: Noorcon Inc.)
英语语言(Language: English)
| 大小:9.98 MB(Size: 9.98 MB) |
|---|
|
|可从:(Available From:) 


 |
|
Windows Phone 8.x演示:(Windows Phone 8.x Demo:)
我提供了一个免费的电话应用程序,您可以在Windows Phone上下载和预览演示.要下载移动应用程序,请点击以下链接:(I have provided a free phone application that you can download and preview the demos on your Windows Phone. To download the mobile application, follow the link:) CodeProjectArticleSample(CodeProjectArticleSample)
![]() 代码项目文章示例移动应用(Code Project Articles Sample Mobile App)
代码项目文章示例移动应用(Code Project Articles Sample Mobile App)
文章代码和视觉效果的实时预览:(Live Preview of Article Code and Visuals:)
 链接到实时预览:(Link to live preview:) http://www.noorcon.com/CodeProject/CodeProjectArticlePreview.html(http://www.noorcon.com/CodeProject/CodeProjectArticlePreview.html)
背景(Background)
假定本文的读者通常熟悉编程概念.还假定读者具有C#语言的理解和经验.还建议本文的读者也熟悉面向对象的编程和设计概念.我们将根据需要在本文中简要介绍它们,但是由于它们完全是单独的主题,因此我们将不对其进行详细介绍.我们还假设您有学习3D编程的热情,并且具有3D图形和矢量数学的基本理论概念.(It is assumed that the reader of this article is familiar with programming concepts in general. It is also assumed that the reader has an understanding and experience of the C# language. It is also recommended that the reader of the article is familiar with Object-Oriented Programming and Design Concepts as well. We will be covering them briefly throughout the article as needed, but we will not get into the details as they are separate topics altogether. We also assume that you have a passion to learn 3D programming and have the basic theoretical concepts for 3D Graphics and Vector Math.) 最后,本文使用Unity 3D版本4.6.1,这是截至初始发布日期的最新公共发行版.该系列中讨论的大多数主题都将与旧版本的游戏引擎兼容,也许还与应该在今年某个时候发布的新版本兼容.但是,有一个主题与当前版本的游戏引擎相比在当前4.6.1版本中有显着差异,那就是UI(用户界面)管道.这是由于引擎中的新UI架构远远优于我们在此版本之前所拥有的.首先,我对新的UI架构感到非常满意.(Lastly, the article uses Unity 3D version 4.6.1 which is the latest public release as of the initial publication date. Most of the topics discussed in the series will be compatible with older versions of the game engine, and perhaps also the new version which is supposed to be release sometime this year. There is however, one topics which is significantly different in the current 4.6.1 version compared to the older version of the game engine, and that is the UI (User Interface) pipeline. This is due to the new UI architecture in the engine which is far superior to what we had prior to this release. I for one, am very happy with the new UI architecture.)
使用代码(Using the code)
下载文章系列的项目/源代码:(Downloading the project/source code for article series:) 下载源(Download source) .(.) 随着每篇连续的文章的提交,项目/源代码也将不断扩展.新的项目文件和源文件将包括该系列中的较早部分.(With each consecutive article that is submitted, the project/source code will be also expanding. The new project files and source files will be inclusive of older parts in the series.)
Unity 3D中的输入处理-输入管理器(Input Processing in Unity 3D - Input Manager)
您编写的每个程序,无论该程序是电话应用程序,Web应用程序,游戏还是嵌入式系统,都需要某种输入.通常,每个程序都需要某种输入和某种输出.输出是用户看到的内容,输入是用户输入或给予程序以基于某种算法生成输出的内容.(Each program you write, whether the program is a phone application, a web application, a game or an embedded system, needs some sort of an input. In general every program needs some sort of an input and some sort of an output. The output is what the users sees, and the input is what the user enters or gives to the program to generate the output based on some algorithm.) Unity 3D也不例外.游戏引擎需要能够处理来自不同来源的输入:(Unity 3D is no different. The game engine needs to be able to process inputs from different sources:)
-
键盘(Keyboard)
-
老鼠(Mouse)
-
游戏杆(Joystick(s))
Unity 3D通过输入管理器管理其输入.通过从主菜单栏中选择"编辑"->“项目设置”->“输入”,可以访问"输入管理".(Unity 3D manages its inputs through the Input Manager. The Input Manage is accessible by selecting Edit->Project Settings->Input from the main menu bar.)
|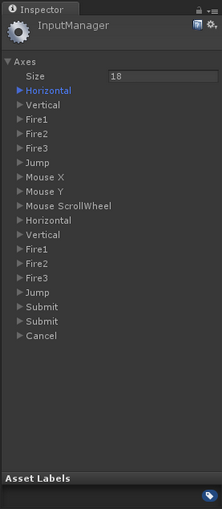
图1-输入管理器(Figure 1-Input Manager)
|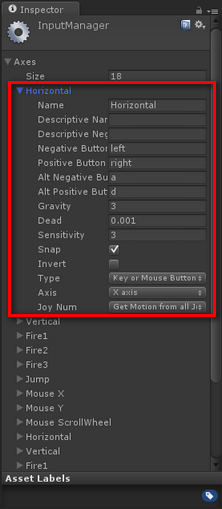
图2水平配置(Figure 2-Horizonal Configuration)
|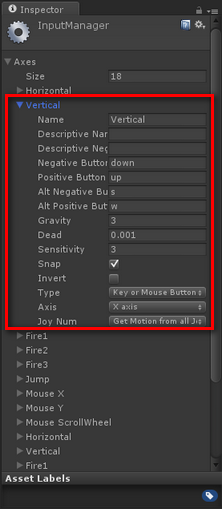
图3垂直配置(Figure 3-Vertical Configuration)
图1列出了游戏引擎中定义的所有开箱即用的输入配置.让我们继续扩展第一个输入定义,即(Figure 1 lists all of the out of the box Input configurations defined in the game engine. Let’s go ahead and expand the first Input Definition called)卧式(Horizontal).查看图2,您会注意到在"水平轴"输入配置下定义的属性.以下是输入配置的属性,需要注意:(. Looking at Figure 2, you will notice the attributes that are defined under the Horizontal Axis input configuration. The following are the properties of the input configuration that are important to take a note of:)
-
名称:(Name:)轴的名称,如"输入管理器"中定义的.您可以在C#代码中引用该名称,以根据需要检测和执行操作.(the name of the axis as defines in the Input Manager. This is the name that you can refer to in your C# code for to detect and perform an operation as desired.)
-
正面按钮:(Positive Button:)定义将提供正方向/力的主按钮.(defines the primary button that will provide the positive direction / force.)
-
负片按钮:(Negative Button:)定义将提供负方向/力的主按钮.(defines the primary button that will provide the negative direction / force.)
-
Alt.正面按钮:(Alt. Positive Button:)与肯定按钮相同,但定义了辅助输入入口.(same as the positive button, but defines a secondary input intake.)
-
Alt.负片按钮:(Alt. Negative Button:)与否定按钮相同,但定义了辅助输入口.(same as the negative button, but defines a secondary input intake.)
-
类型:(Type:)定义输入源来自哪里; (键盘/鼠标/操纵杆).(defines where the input source is coming from; (Keyboard/Mouse/Joystick).)
-
轴:(Axis:)力应施加在世界上哪个轴上.(which axis in the world should the force be applied to.)
在这一点上,我们将不修改任何配置.我只是想向您展示输入管理器的外观,并简要概述这些属性.(At this point we are not going to modify any of the configurations. I just wanted to show you how the Input Manager looked like and give you a brief overview of the properties.)
Unity 3D中的输入处理-键盘输入(Input Processing in Unity 3D - Keyboard Input)
回想一下第2部分,我们想要动态创建多维数据集原语并将其相对于设计时多维数据集放置.为了实现这一点,我们必须创建一个新脚本并将其附加到场景中任何活动的游戏对象上.我们将脚本附加到了camera对象.(Recall from Part 2, we wanted to dynamically create our cube primitives and place them relative to the design time cubes. In order to achieve this, we had to create a new script and attach it to any active Game Object in the scene. We attached our script to the camera object.) **注意:(NOTE:)这样做是安全的,因为我们的脚本不会与它所附加的对象进行交互.(It was safe to do so because our script does not interact with the object it is attached to.) 结果是,当我们运行程序时,将立即创建图元并在场景中显示它们.(The result was that when we run the program, the primitives would be immediately created and displayed in the scene.) 现在,我们考虑以下情形,如果我们只想在按下键盘上的特定键之后才想要创建基元,那该怎么办?(Now let’s consider the following scenario, what if we wanted to create the primitives only after a specific key was pressed on the keyboard, let’s say the)空格键(Space Bar).(.)
using UnityEngine;
using System.Collections;

public class createPrimitivesFromInput : MonoBehaviour {

 private GameObject cube1; // represents our Cube1'
 private GameObject cube2; // represents our Cube2'
 private GameObject cube3; // represents our Cube3'

 private bool PRIMITIVES_CREATED;

 // Use this for initialization
 void Start () {
  this.PRIMITIVES_CREATED = false;
 }

 // Update is called once per frame
 void Update () {

  if (Input.GetKey (KeyCode.Space)) {
   this.CreateMyPrimitives();
  }

  if (PRIMITIVES_CREATED) {
   // apply the y-axis transform to Cube1'
   this.cube1.transform.Rotate(new Vector3(0,1,0), 1);

   // apply the x-axis transform to Cube2'
   this.cube2.transform.Rotate(new Vector3(1,0,0), 1);

   // apply the z-axis transform to Cube3'
   this.cube3.transform.Rotate(new Vector3(0,0,1), 1);
  }
 }

 // This function will be called when the Space Bar on the keyboard is pressed
 void CreateMyPrimitives(){

  // check to see if the object is null before instantiating
  if (this.cube1 == null) {
   // initialize our Cube1 primitive and place it at location (0,2,0)
   this.cube1 = GameObject.CreatePrimitive (PrimitiveType.Cube);
   this.cube1.transform.localPosition = new Vector3 (0, 2, 0);
  }

  // check to see if the object is null before instantiating
  if (this.cube2 == null) {
   // initialize our Cube2 primitive and place it at location (3,2,0)
   this.cube2 = GameObject.CreatePrimitive (PrimitiveType.Cube);
   this.cube2.transform.localPosition = new Vector3 (3, 2, 0);
  }

  // check to see if the object is null before instantiating
  if (this.cube3 == null) {
   // initialize our Cube3 primitive and place it at location (-3,2,0)
   this.cube3 = GameObject.CreatePrimitive (PrimitiveType.Cube);
   this.cube3.transform.localPosition = new Vector3 (-3, 2, 0);
  }

  this.PRIMITIVES_CREATED = true;
 }
}
上面的清单是对我们在其中创建的脚本的修改(The listing above is a modification of the script we created in) 第2部分(Part 2) 系列中的.让我们分解一下脚本:(of the series. Let’s breakdown the script:)
-
我们需要检测用户是否按下了空格键.这是在(We need to detect if the Space Bar is pressed by the user. This is done in the)更新()(Update())使用功能(function using the)输入项(Input)对象和(object and the)GetKey()(GetKey())函数,即Input.GetKey(KeyCode.Space).我们传递给函数的参数是空格键的枚举表示,(function, i.e., Input.GetKey (KeyCode.Space). The parameter that we pass into the function is an enum representation of the Space Bar,)键码空间(KeyCode.Space).(.)
-
然后,我们需要通过检查由(Then we need to detect if the key is pressed by checking the value passed back by the)GetKey()(GetKey())功能.如果为true,那么我们将调用一个已定义的新函数,称为(function. If true, then we will call a new function that we have defined called)CreateMyPrimitives()(CreateMyPrimitives()).(.)
-
在里面(In the)CreateMyPrimitive()(CreateMyPrimitive())函数,我们将检查原语是否为null,如果为null,则将其实例化.(function, we will check to see if the primitives are null, and if so, then we will instantiate them.)
-
在里面(In the)更新()(Update())函数,我们检查一下是否已初始化基元,如果已初始化,则将旋转相应地应用于每个基元.(function, we check to see if the primitives have been initialized, and if so, we then apply the rotation to each primitive accordingly.)
别忘了(Don’t forget that the)更新()(Update())程序运行时连续执行该功能.因此,如果多次按下空格键,我们将遇到问题.我们将在按下空格键时实例化图元多次,从而导致混乱.(function is continuously executed while the program is running. Therefore, if the Space Bar is pressed several time, we are going to run into a problem. We will be instantiating the primitives as many times as the Space Bar is being pressed, resulting in chaos.)
为了防止这种情况的发生,我们将引入一个新的布尔变量,称为(In order to prevent this from happening, we will introduce a new boolean variable called)PRIMITIVES_CREATED(PRIMITIVES_CREATED)这将用于控制是否需要实例化原语. PRIMITIVES_CREATED的初始值设置为false,这是在(which will be used to control if we need to instantiate the primitives or not. The initial value of the PRIMITIVES_CREATED is set to false, and this is done in the)开始()(Start())功能.(function.)
**注意:(NOTE:)**请记住(Remember that the)开始()(Start())函数仅在开始时执行一次!(function gets executed only once at the start!)
因此,当按下空格键时,(So when the Space Bar is pressed, the)CreateMyPrimitives()(CreateMyPrimitives())函数被调用,并且原语被实例化.再次注意,在实例化它们之前,我们正在检查原始变量是否为null.最后,我们将(function is called, and the primitives are instantiated. Again, notice, that we are checking to see if the primitive variables are null before we instantiate them. Finally we set the)PRIMITIVES_CREATED(PRIMITIVES_CREATED)变量为true.(variable to true.)
现在,在(Now, in the)更新()(Update())函数,我们必须先检查是否已初始化基元,然后才能将旋转应用于Transform.(function, we have to check and see if the primitives are initialized before we can apply our rotation to the Transform.)

图4-运行新脚本的屏幕截图(Figure 4-Screenshot of Running New Script) 我们可以改善此代码吗?我们当然可以.这是另一个可以完全满足我们需求的清单.(Can we improve this code? Sure we can. Here is another listing that will do exactly what we want.)
using UnityEngine;
using System.Collections;

public class createPrimitivesFromInput : MonoBehaviour {

 private GameObject cube1; // represents our Cube1'
 private GameObject cube2; // represents our Cube2'
 private GameObject cube3; // represents our Cube3'

 private bool PRIMITIVES_CREATED;

 // Use this for initialization
 void Start () {
  this.PRIMITIVES_CREATED = false;
 }

 // Update is called once per frame
 void Update () {

  if (!this.PRIMITIVES_CREATED) {
   if (Input.GetKey (KeyCode.Space)) {
    this.CreateMyPrimitives();
   }
  }else{
   // apply the y-axis transform to Cube1'
   this.cube1.transform.Rotate(new Vector3(0,1,0), 1);

   // apply the x-axis transform to Cube2'
   this.cube2.transform.Rotate(new Vector3(1,0,0), 1);

   // apply the z-axis transform to Cube3'
   this.cube3.transform.Rotate(new Vector3(0,0,1), 1);
  }
 }

 // This function will be called when the Space Bar on the keyboard is pressed
 void CreateMyPrimitives(){

  if (!this.PRIMITIVES_CREATED) {

   // initialize our Cube1 primitive and place it at location (0,2,0)
   this.cube1 = GameObject.CreatePrimitive (PrimitiveType.Cube);
   this.cube1.transform.localPosition = new Vector3 (0, 2, 0);

   // initialize our Cube2 primitive and place it at location (3,2,0)
   this.cube2 = GameObject.CreatePrimitive (PrimitiveType.Cube);
   this.cube2.transform.localPosition = new Vector3 (3, 2, 0);

   // initialize our Cube3 primitive and place it at location (-3,2,0)
   this.cube3 = GameObject.CreatePrimitive (PrimitiveType.Cube);
   this.cube3.transform.localPosition = new Vector3 (-3, 2, 0);

   this.PRIMITIVES_CREATED = true;

  }
 }
}
如您所见,新清单得到了改进,因为我们使用一个变量来检测是否创建了原语,并以此为基础执行操作.(As you can see, the new listing is improved as we are using one variable to detect if the primitives are created or not and based on that perform our operations.)
使用键盘输入进行旋转(Using Keyboard Input to Apply Rotation)
现在,让我们更进一步.让我们继续来定义一些输入键值,以按以下顺序处理动态创建的基元的旋转:(Now, let’s go a step further. Let’s go ahead and define some input key values to handle the rotation for the dynamically created primitives in the following order:)
-
键A将负责在Y轴上旋转Cube1’.(Key A will be responsible to rotate Cube1’ on the Y-Axis.)
-
键B将负责在X轴上旋转Cube2’.(Key B will be responsible to rotate Cube2’ on the X-Axis.)
-
键C将负责在Z轴上旋转Cube3’.(Key C will be responsible to rotate Cube3’ on the Z-Axis.)
我们将需要修改代码以处理三种新的输入类型,如下所示:(We would need to modify our code to handle the three new input types as follows:)
using UnityEngine;
using System.Collections;

public class createPrimitivesFromInput : MonoBehaviour {

 private GameObject cube1; // represents our Cube1'
 private GameObject cube2; // represents our Cube2'
 private GameObject cube3; // represents our Cube3'

 private bool PRIMITIVES_CREATED;

 // Use this for initialization
 void Start () {
  this.PRIMITIVES_CREATED = false;
 }

 // Update is called once per frame
 void Update () {

  if (!this.PRIMITIVES_CREATED) {
   if (Input.GetKey (KeyCode.Space)) {
    this.CreateMyPrimitives();
   }
  }else{
   // apply the y-axis transform to Cube1'
   if(Input.GetKey(KeyCode.A)){
    this.cube1.transform.Rotate(new Vector3(0,1,0), 1);
   }

   // apply the x-axis transform to Cube2'
   if(Input.GetKey(KeyCode.B)){
    this.cube2.transform.Rotate(new Vector3(1,0,0), 1);
   }

   // apply the z-axis transform to Cube3'
   if(Input.GetKey(KeyCode.C)){
    this.cube3.transform.Rotate(new Vector3(0,0,1), 1);
   }
  }
 }

 // This function will be called when the Space Bar on the keyboard is pressed
 void CreateMyPrimitives(){

  if (!this.PRIMITIVES_CREATED) {

   // initialize our Cube1 primitive and place it at location (0,2,0)
   this.cube1 = GameObject.CreatePrimitive (PrimitiveType.Cube);
   this.cube1.transform.localPosition = new Vector3 (0, 2, 0);

   // initialize our Cube2 primitive and place it at location (3,2,0)
   this.cube2 = GameObject.CreatePrimitive (PrimitiveType.Cube);
   this.cube2.transform.localPosition = new Vector3 (3, 2, 0);

   // initialize our Cube3 primitive and place it at location (-3,2,0)
   this.cube3 = GameObject.CreatePrimitive (PrimitiveType.Cube);
   this.cube3.transform.localPosition = new Vector3 (-3, 2, 0);

   this.PRIMITIVES_CREATED = true;

  }
 }
}
注意,(Notice, that the)更新()(Update())函数是放置执行输入和输出逻辑的地方.在上面的清单中,代码检查是否已初始化基元,如果为true,则它将检查用户的输入.根据键值,它将适当的旋转应用于游戏对象.(function is where you place the logic to perform your Input and Output. In the listing above, the code checks to see if the primitives have been initialized, and if true, then it will check for input from the user. Based on the key value it will apply the appropriate rotation to the Game Object.)
需要考虑的事情:在新代码中,原语不会像在第2部分中那样连续旋转.它们也不会同时同步旋转!(Something to think about: in the new code, the primitives will not rotate continuously as they did in Part 2. They also will not rotate in-synch at the same time!)
仅当按下与图元旋转相关的特定键时,每个图元才会独立旋转.例如,如果您按A键,则Cube1’将连续旋转,直到您停止按它为止.它将停止在您从钥匙上抬起手指的最后一个旋转角度!(Each primitive will rotate independently only when the specific key associated to its rotation is pressed. For instance, if you press the A key, Cube1’ will continuously rotate until you stop pressing it. It will stop at the last rotation angle where you lifted your finger from the key!)

图5-捕获旋转新输入的屏幕截图(Figure 5-Screenshot Capturing New Input for Rotation)
使用键盘输入应用翻译(Using Keyboard Input to Apply Translation)
继续对脚本进行改进,现在让我们使用以下键将Cube1的前进,后退和左右移动:(Continuing on our script improvement, let’s now use the following keys to move Cube1’ forward, backward, and to either side:)
-
上箭头键(Up Arrow Key)将负责在Z轴上移动Cube1’.(will be responsible to move Cube1’ on the Z-Axis.)
-
向下键(Down Arrow Key)将负责在Z轴上向后移动Cube1’.(will be responsible to move Cube1’ backward on the Z-Axis.)
-
左方向键(Left Arrow Key)将负责将"多维数据集1"移到X轴的左侧.(will be responsible to move Cube1’ to the left on the X-Axis.)
-
右方向键(Right Arrow Key)将负责将"多维数据集1"移到X轴的右侧.(will be responsible to move Cube1’ to the right on the X-Axis.)
为了实现这一点,我们将需要修改我们的(In order to achieve this, we will need to modify our)更新()(Update())功能如下:(function as follows:)
using UnityEngine;
using System.Collections;

public class createPrimitivesFromInput : MonoBehaviour {

 private GameObject cube1; // represents our Cube1'
 private GameObject cube2; // represents our Cube2'
 private GameObject cube3; // represents our Cube3'

 private bool PRIMITIVES_CREATED;

 // Use this for initialization
 void Start () {
  this.PRIMITIVES_CREATED = false;
 }

 // Update is called once per frame
 void Update () {

  if (!this.PRIMITIVES_CREATED) {
   if (Input.GetKey (KeyCode.Space)) {
    this.CreateMyPrimitives();
   }
  }else{
   // apply the y-axis transform to Cube1'
   if(Input.GetKey(KeyCode.A)){
    this.cube1.transform.Rotate(new Vector3(0,1,0), 1);
   }

   // apply the x-axis transform to Cube2'
   if(Input.GetKey(KeyCode.B)){
    this.cube2.transform.Rotate(new Vector3(1,0,0), 1);
   }

   // apply the z-axis transform to Cube3'
   if(Input.GetKey(KeyCode.C)){
    this.cube3.transform.Rotate(new Vector3(0,0,1), 1);
   }

   // code for the movement of Cube1' forward
   if(Input.GetKey(KeyCode.UpArrow)){
    this.cube1.transform.Translate(Vector3.forward * Time.deltaTime);
   }
   // code for the movement of Cube1' backward
   if(Input.GetKey(KeyCode.DownArrow)){
    this.cube1.transform.Translate(Vector3.back * Time.deltaTime);
   }
   // code for the movement of Cube1' left
   if(Input.GetKey(KeyCode.LeftArrow)){
    this.cube1.transform.Translate(Vector3.left * Time.deltaTime);
   }
   // code for the movement of Cube1' right
   if(Input.GetKey(KeyCode.RightArrow)){
    this.cube1.transform.Translate(Vector3.right * Time.deltaTime);
   }
  }
 }

 // This function will be called when the Space Bar on the keyboard is pressed
 void CreateMyPrimitives(){

  if (!this.PRIMITIVES_CREATED) {

   // initialize our Cube1 primitive and place it at location (0,2,0)
   this.cube1 = GameObject.CreatePrimitive (PrimitiveType.Cube);
   this.cube1.transform.localPosition = new Vector3 (0, 2, 0);

   // initialize our Cube2 primitive and place it at location (3,2,0)
   this.cube2 = GameObject.CreatePrimitive (PrimitiveType.Cube);
   this.cube2.transform.localPosition = new Vector3 (3, 2, 0);

   // initialize our Cube3 primitive and place it at location (-3,2,0)
   this.cube3 = GameObject.CreatePrimitive (PrimitiveType.Cube);
   this.cube3.transform.localPosition = new Vector3 (-3, 2, 0);

   this.PRIMITIVES_CREATED = true;

  }
 }
}

图6-翻译对象的屏幕截图(Figure 6-Screenshot of Translation of Object) 现在,您已经了解了如何在Unity 3D中处理键盘输入,并根据输入执行操作.(So now you have seen how to handle keyboard input in Unity 3D, and based on the input perform an action.)
兴趣点(Points of Interest)
使用您拥有的新技能,尝试考虑游戏或模拟所需的用户输入的不同方面.一个人将如何管理更多动作并处理多个输入?请对该主题进行一些阅读,然后下载本文中的源代码以进行更多练习.接下来,我们将(Using the new skills you have, try to think about the different aspects of user inputs your game or simulation is going to need. How will one manage more actions and handle multiple inputs? Do some reading on the subject and download the source code in this article to practice more. Next we will)演示(demonstrate)如何创建一些简单的用户界面元素.(how to create some simple User Interface elements.)
历史(History)
这是系列文章的第三篇,我将慢慢为Code Project社区做出贡献.(This is the third article of a series which I would slowly contribute to the Code Project community.)
-
Unity 3D –游戏编程–第3部分(Unity 3D – Game Programming – Part 3)
Unity 3D网络文章:(Unity 3D Networking Article(s):)
-
Unity 3D-网络游戏编程(Unity 3D - Network Game Programming) Unity 3D Leap Motion和Oculus Rift文章:(Unity 3D Leap Motion and Oculus Rift Article(s):)
许可
本文以及所有相关的源代码和文件均已获得The Code Project Open License (CPOL)的许可。
C# Mobile XBox iPhone Windows VS2010 Visual-Studio Dev Design Architect 新闻 翻译