为Raspberry Pi开发.NET应用程序:第2部分(译文)
By robot-v1.0
本文链接 https://www.kyfws.com/pi/developing-net-applications-for-the-raspberry-pi-p-zh/
版权声明 本博客所有文章除特别声明外,均采用 BY-NC-SA 许可协议。转载请注明出处!
- 11 分钟阅读 - 5166 个词 阅读量 0为Raspberry Pi开发.NET应用程序:第2部分(译文)
原文地址:https://www.codeproject.com/Articles/5268922/Developing-NET-Applications-for-the-Raspberry-Pi-P
原文作者:Jonathan Nethercott
译文由本站 robot-v1.0 翻译
前言
A framework for developing Raspberry Pi .NET applications including unit tests, mocking and dependency injection
开发Raspberry Pi .NET应用程序的框架,包括单元测试,模拟和依赖项注入
A simple but realistic Raspberry Pi .NET solution that demonstrates project layout, unit testing and best practices. Development is on a machine capable of running Visual Studio Code, which is connected remotely via SSH to a Raspberry Pi.
一个简单但现实的Raspberry Pi .NET解决方案,演示了项目布局,单元测试和最佳实践.开发是在能够运行Visual Studio Code的计算机上进行的,该计算机通过SSH远程连接到Raspberry Pi.
介绍(Introduction)
可以在.NET中为Raspberry Pi编写应用程序,就像在任何其他环境中一样.编写良好的.NET(和C#)代码的优点在于,可以实现更具伸缩性和可维护性的解决方案.在本文中,我将描述可用于创建此类解决方案的项目结构.这将包括单元测试,模拟和依赖注入.该应用程序将是一个简单的应用程序,但是解决方案结构将实现任何大型开发项目的两个关键目标:(Applications can be written in .NET for the Raspberry Pi just as they can for any other environment. The advantages of well written .NET (and C#) code is that much more scalable and maintainable solutions are possible. In this article, I will describe a project structure that can be used to create such solutions. This will include unit testing, mocking and dependency injection. The application will be a simple one, but the solution structure will enable two key aims of any large development project:)
- 该代码应尝试实现(The code should attempt to achieve)关注点分离(separation of concerns).(.)
- 该代码应适用于(*The code should lend itself to*)重构(*refactoring*).(*.) 这两个原则将在本文后面进行演示.我将使用(Both of these principles will be demonstrated later in the article. I will be using the*) .NET Core IoT Libraries).NET核心物联网库( 这是Microsoft与Raspberry Pi等平台上的低级设备接口的官方解决方案.(which is Microsoft’s official solution to interfacing with low level devices on platforms such as the Raspberry Pi.)
背景(Background)
第1部分:在Raspberry Pi上轻松设置.NET Core和使用VS代码进行远程调试(Part 1: Easy Set Up of .NET Core on Raspberry Pi and Remote Debugging with VS Code) 在上一篇文章中,我描述了如何设置开发环境,该环境将使使用自动部署和调试的远程Raspberry Pi易于开发.那篇文章包括几个简单的程序.本文将以该文章为基础,并说明如何创建更现实,更大的解决方案.(In a previous article, I described how to setup a development environment that would make it easy to develop for a remote Raspberry Pi using automated deployment and debugging. That article included a couple of simple programs. This article will build on that article and show how a more realistic, larger solution could be created.)
问题描述(Problem Description)
我为此示例解决方案选择了一个简单的问题.对此的要求已经很完善,但这是有意的.解决方案结构是重要的部分,并且通过解决一个简单的问题,这有望使焦点集中在解决方案上.(I have chosen a simple problem for this example solution. The requirements of this are very made up, but this is intentional. The solution structure is the important part and by having a simple problem, this hopefully will enable the focus to be on the solution.)
因此出现了问题:将有两个按钮开关和两个LED.我们将创建一个控制台应用程序,使每个LED都可以打开或关闭.这些按钮可以识别短按的时间.我们还将有两种测试模式-一种持续使LED闪烁直到长按按钮2为止,另一种显示消息以表明按下哪个按钮的信息,长按按钮2也会终止该模式.(So the problem: There will two push button switches and two LEDs. We will be creating a console application that will enable each LED to be turned on or off. The buttons will recognise short of long presses. We will also have two test modes - one to blink the LEDs continually until button 2 is long pressed, and another one to display messages saying which button was pressed, which will also be terminated by long pressing button 2.)
我已将开关和LED连接到以下GPIO引脚:(I have connected the switches and LEDs to the following GPIO pins:)
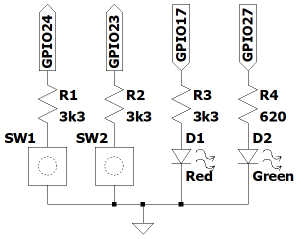
显然,这是一个人为的例子.一个更现实的解决方案将对输入和输出有所帮助,并且可能包括更复杂的设备.在撰写本文时,IOT项目包括70多个与温度,加速度计,光传感器等设备以及许多有线和无线设备的接口.(Obviously, this is a contrived example. A more realistic solution would do something with the inputs and outputs and would likely include more sophisticated devices. At the time of writing, the IOT project included over 70 interfaces to devices such as temperature, accelerometer, and light sensors as well as lots of wired and wireless devices.)
解决方案结构(Solution Structure)
顶层结构如下所示:(The top level structure looks like this:)
> .vscode
> Doc
> RpiBlinkButtonApp
> RpiBlinkButtonLib
> RpiBlinkButtonLibTests
> Scripts
.gitignore
有三个代码文件夹,(There are three code folders,)RpiBlinkButtonApp(RpiBlinkButtonApp),(,)**RpiBlinkButtonLib(RpiBlinkButtonLib)和(and)RpiBlinkButtonLibTests(RpiBlinkButtonLibTests).在更大的解决方案中,可能会有更多的图书馆项目,并且每个图书馆都应该有自己的图书馆(. In a larger solution, there are likely to be more library projects, and each library should have its own) Tests 项目.可能还有更多(project. There may be more) Application 项目.另外,请注意,我尚未为(projects. Also, note that I have not included unit tests for the) App 项目,但对于真正的解决方案,也应对此项目进行单元测试.(project, but for a real solution, there should be unit tests for this project as well.)
的(The).vscode(.vscode)**和(and)**剧本(Scripts)**文件夹基于上一篇文章,并且包含用于远程部署和调试的脚本和配置.(folders are based on the previous article, and include scripts and configuration to enable remote deployment and debugging.)
关注点分离(Separation of Concerns)
其中一个(One of the) 关键目标(key objectives) 本文中的方法是(of the approach in this article is)关注点分离(separation of concerns).这对于较大的解决方案很重要,在这种解决方案中,通常不可能或不希望为了整个解决方案而必须理解整个解决方案.为此,需要有清晰的抽象层.一个明显的第一抽象层是实际的(. This is important in a larger solutions where it is often not possible or desirable to have to comprehend the entire solution in order to work on it. To achieve this, there needs to be clear abstraction layers. An obvious first abstraction layer is the actual)物联网图书馆(iot library)本身.值得看一下该存储库中的代码,但理解所有内容以使用它并不是必需的.(itself. It is worthwhile looking at the code in that repository, but it shouldn’t be essential to understand all of it in order to use it.)
我们的第一个抽象是拥有一个图书馆项目.在该项目中,我选择创建两个控制器类.的(Our first abstraction is to have a library project. Within that project, I have chosen to create two controller classes. The)LED控制器(LED controller)该类封装了两个LED-我选择了一个红色和绿色的LED.有两种方法可以打开或关闭红色或绿色LED.的(class encapsulates both LEDs - I have chosen to have a red and green LED. There are two methods to turn either the red or Green LED on or off. The)按钮控制器(button controller)有两个按钮,并且这些按钮稍微复杂一些(例如,要求对开关进行反跳操作),因此控制器使用了另一类,(has two buttons, and as these are slightly more complicated (requiring debouncing of the switches for example), the controller uses another class,) GpioButton .但是,使用按钮控制器应该很容易,我决定提供该事件(. Using the button controller should be easy however, and I have decided to provide the event) ButtonPressed 有一个(which has an) EventArgs 描述发生了什么类型事件的参数(短按或长按按钮1或2).(argument that describes what sort of event happened (button 1 or 2 short or long pressed).)
重构(Refactoring)
该代码应该适合重构.与项目开始时一成不变的设计不同,现代代码应随着项目的进行不断地重构.包括VS Code在内的IDE提供了使这一过程变得更容易的工具,但我们还需要确保代码的复杂性不会失控,因为一旦发生这种情况,就很难进行重构,并且在某些情况下变得不可能.(The code should lend itself to refactoring. Unlike in the old days when a design was set in stone at the beginning of the project, modern code should be continuously refactored as the project progresses. IDEs including VS Code provide tools to make this easier, but we also need to make sure that the complexity of the code doesn’t get out of hand, because once this has happened, it gets difficult to refactor, and in some case becomes impossible.) 重构的另一个关键部分是确信重构不会破坏任何内容.这是进行良好单元测试的关键原因之一.(Another key part of refactoring is being confident that the refactoring has not broken anything. This is one of the key reasons for having good unit tests.)
单元测试,模拟和依赖注入(Unit Testing, Mocking and Dependency Injection)
库中的每个类都有其自己的测试类.理想情况下,我们只想测试该类并把对其他类的调用存根.最好的方法是模拟被调用的类.我已经使用了Moq,可以通过NuGet轻松安装.模拟的关键部分是使用依赖注入和控制反转.他们在这里的主要思想是,我们将实例化的对象传递给我们的类,而不是将类创建对象本身.这样,我们就可以传递模拟对象而不是真实对象.一个例子是(Each class in the library has its own test class. Ideally, we only want to test the class and stub out calls to other classes. The best way to do this is by mocking the called classes. I have used Moq for this, which can be easily installed via NuGet. A key part of mocking is using dependency injection and inversion of control. They key idea here is that we pass instantiated objects to our classes rather than the class creating the objects itself. By doing this, we are able to pass mocked objects rather than real objects. An example of this is) CreateMockedObjects() 在里面(in the) ButtonControllerTests :(:)
private MockButtonCollection CreateMockObjects()
{
    var mockObjects = new MockButtonCollection();

    mockObjects.Button1 = new Mock<GpioButton>(null);
    mockObjects.Button2 = new Mock<GpioButton>(null);
    mockObjects.GpioDriver = new Mock<GpioDriver>();

    // Mock the methods to setup a pin
    mockObjects.GpioDriver.Protected().Setup<bool>("IsPinModeSupported", ItExpr.IsAny<int>(),
                                                   ItExpr.IsAny<PinMode>()).Returns(true);

    // Create a ButtonController
    mockObjects.GpioController = new GpioController(PinNumberingScheme.Logical,
                                                      mockObjects.GpioDriver.Object);

    mockObjects.ButtonController = new ButtonController(mockObjects.GpioController,
                                      mockObjects.Button1.Object, mockObjects.Button2.Object);

    // Initialize the button controller
    mockObjects.ButtonController.Initialize();

    return mockObjects;
}
另一个例子是(Another example is the) DateTimeProvider 我们传递给的课程(class which we pass to the) GpioButton 类.可以如下模拟:(class. This can be mocked as follows:)
var mockDateTime = new Mock<IDateTimeProvider>();

var dateNow = DateTime.UtcNow;

mockDateTime.SetupSequence(m => m.UtcNow)
  .Returns(dateNow)
  .Returns(dateNow.AddMilliseconds(20))
  .Returns(dateNow.AddMilliseconds(30));
这使我们可以返回特定值,在这种情况下,是第一次调用(This allows us to return specific values, in this case, the first call to) UtcNow() 获取当前时间,随后的调用获取时间+ 20ms,然后+ 30ms.然后,我们可以在(gets the current time, subsequent calls get the time +20ms and then +30ms. We then have control of code like this in the) GpioButton :(:)
else if ((_dateTime.UtcNow - PressedStart).TotalMilliseconds >= LONG_PRESS_DURATION)
{
  longReleaseAction();
}
依赖项注入的问题之一是使用不可模拟的第三方类.一个很好的例子是(One of the problems with dependency injection is using third party classes that aren’t mockable. A good example of this is the) GpioController .为了使一个类是可模拟的,它需要从一个接口派生(例如(. In order for a class to be mockable, it needs to either be derived from an interface (for example) IList ),或者它需要具有虚拟方法.的() or it needs to have methods that are virtual. The) GpioController 没有任何一个,所以我们不能创建一个模拟(doesn’t have either of these, so we can’t create a mock) GpioController .幸运的是(. Fortunately, the) GpioController 构造函数确实需要一个(constructor does take a) GpioDriver 作为参数.这使我们可以创建一个模拟(as a parameter. This allows us to create a mock) GpioDriver .然后,我们可以拨打(. We can then make calls to the) GpioController 那会叫我们模拟(that will call our mock) GpioDriver .一个简单的例子是(. A simple example of this is the) LedControllerTests 在这里我们可以检查(where we can check the) SetLed() 方法实际上写入正确的(method actually writes to the correct) gpio pin :(:)
public void SetLed_ShouldCall_DriverWriteMethod(string method, int pin, bool on)
{
  // Given I have created a mock Gpio driver
  var mockDriver = new Mock<GpioDriver>();

  // And I have mocked the methods to write to a pin
  mockDriver.Protected().Setup<bool>("IsPinModeSupported", ItExpr.IsAny<int>(),
                                                  ItExpr.IsAny<PinMode>()).Returns(true);
  mockDriver.Protected().Setup<PinMode>("GetPinMode", ItExpr.IsAny<int>())
                        .Returns(PinMode.Output);

  // And created a LedController
  var gpioController = new GpioController(PinNumberingScheme.Logical, mockDriver.Object);
  var ledController = new LedController(gpioController);
  ledController.Initialize();

  // When I call the controller - e.g. led.SetRed(true)
  typeof(LedController).GetMethod(method).Invoke(ledController, new object[] { on });

  // Then I expect the pin to be written to
  mockDriver.Protected().Verify("Write", Times.Once(), ItExpr.Is<int>(p => p == pin),
                  ItExpr.Is<PinValue>(m => m == (on ? PinValue.High : PinValue.Low)));
}
最佳做法是(Best practice is to have) Setup() 接受任何输入的方法(使用(methods that accept any input (using) IsAny )和() and) Verify() 检查特定参数的方法(使用(methods that check for specific parameters (using) Is ).().)
运行代码(Running the Code)
有两个步骤可以运行或调试程序.假设按照这些文章的第1部分设置了Raspberry Pi,则需要两个步骤.这些步骤是:(There are two steps to running or debugging the program. Assuming that the Raspberry Pi is setup as per Part 1 of these articles, there are two steps required. These steps are:)
- 设置Raspberry Pi名称(通过(Set Raspberry Pi name (via)Ctrl Shift P(Ctrl Shift P))())
- 从菜单或活动栏(通常位于左侧)运行(Run, either from the menu or the activity bar which is usually on the left hand side)
兴趣点(Points of Interest)
使用Raspberry Pi C#代码与处理任何其他C#代码一样容易.我们拥有重构,智能感知等所有可用工具,这些工具使我们比在Raspberry Pi上尝试编写Raspberry Pi应用程序容易得多.(Working on the Raspberry Pi C# code is just as easy as working on any other C# code. We have all the tools available to us like refactoring, intellisense, etc. that make writing Raspberry Pi applications much easier than if we tried to do it on the Raspberry Pi itself.)
我在这里没有介绍它,但是显然,我们可以包含其他任何.NET应用程序中都将包含的功能,例如实体框架,具有广泛支持的Web应用程序等.(I haven’t covered it here, but obviously, we can include features that we would include in any other .NET application, such as entity framework, web apps with swagger support, etc.)
在.NET中为Raspberry Pi进行开发与在Python,JavaScript和C ++中进行开发(在使用此处描述的Raspberry Pi设置在VS Code中都应该可以进行开发)不同,在.NET中,C#代码在开发机器上,而对于其他语言,源通常位于目标计算机上.我想无论哪种方式都没关系(尽管您可能有自己的偏好),但是了解这一点可以使事情更清楚.(Developing in .NET for the Raspberry Pi is different from developing in Python, JavaScript and C++ (which should all be possible in VS Code with the Raspberry Pi setup described here) in that with .NET, the C# code is on the development machine, whereas for the other languages, the source is (usually) on the target machine. I guess it doesn’t matter either way (although you may have your own preference), but understanding this makes it clearer what is going on.)
从理论上讲,我们可以在开发机器上本地运行代码(无论是Linux,MacOS还是Windows).但是,gpio调用将不起作用(如果尝试使用,则会发现它们抛出"不支持"的异常).但是应该可以创建一个模拟器(Theoretically, we can run the code locally on our development machine (whether that is Linux, MacOS or Windows). However, the gpio calls won’t work (if you try it, you’ll find they throw a “not supported” exception). But it should be possible to create a simulator that a) GpioDriver 与沟通.但是,这超出了本文的范围!(communicates with. That is beyond the scope of this article though!)
历史(History)
- 25(25)日(th)2020年5月:初始版本(May, 2020: Initial release)
许可
本文以及所有相关的源代码和文件均已获得The Code Project Open License (CPOL)的许可。
C# .NET Dev Architect 新闻 翻译