PiRex –基于Raspberry Pi的远程控制机器人(译文)
By robot-v1.0
本文链接 https://www.kyfws.com/pi/pirex-remote-controlled-raspberry-pi-based-robot-zh/
版权声明 本博客所有文章除特别声明外,均采用 BY-NC-SA 许可协议。转载请注明出处!
- 35 分钟阅读 - 17484 个词 阅读量 0PiRex –基于Raspberry Pi的远程控制机器人(译文)
原文地址:https://www.codeproject.com/Articles/1237052/PiRex-remote-controlled-Raspberry-Pi-based-robot
原文作者:Andrew Kirillov
译文由本站 robot-v1.0 翻译
前言
The article describes the PiRex robot controllable from either a web browser or a dedicate client application by using REST API.
本文介绍了可以使用REST API从Web浏览器或专用客户端应用程序控制的PiRex机器人.

介绍(Introduction)
去年我确实发布了(Last year I did publish the) cam2web(cam2web) 开源项目,旨在通过HTTP以MJPEG流形式传输摄像机.尽管开发该程序是为了支持多种平台,但最初的目标是从Raspbery Pi传输流摄像机,以便可以远程观看.该项目本身可以用于家庭安全,物联网设备等许多方面.但是,最初,它是另一个项目的第一步-构建远程控制机器人.(open source project, which is aimed for streaming cameras over HTTP as MJPEG streams. Although being developed to support number of platforms, the very original target was to stream camera from Raspbery Pi, so it could be watched remotely. That project by itself can be used for a number of things like home security, IoT devices, etc. However, originally it was started as the first step for another project - building a remote controlled robot.) 我过去曾做过一些业余机器人项目.但是,这些是基于某些专用控制器的,这使得它们有些昂贵.这次计划是使用或多或少的常规组件,这些组件可以从其他电子/机器人/物联网项目中重复使用,并降低总价格.(I did some hobby robotics projects in the past. However, those were based on some specialized controllers, which was making them a bit costly. This time the plan was to use more or less conventional components, which could be reused from other electronics/robotics/IoT projects and to keep the total price down.) 我想到的想法很简单-建造一个远程控制机器人,该机器人带有一个摄像头,因此可以从"机器人的眼睛"中远程看到.显然,它应该能够移动,因此车轮和马达是必须的.另外,可以使用一些传感器,例如超声波距离传感器.(The idea I had in mind was simple enough - to build a remote controlled robot, which has a camera on board and so allows seeing from the “robot’s eyes” remotely. Obviously it was supposed to be able to move around, so wheels and motors is a must. Additionally some sensors could be of use, like ultra sonic distance sensor, for example.) 另一个想法是开发一些可重用的软件,该软件可用于控制按照类似规格构建的机器人.它应该允许直接从Web浏览器进行一些简单的机器人控制,或者允许开发专门的客户端应用程序以提供更高级的控制并添加其他功能,例如计算机视觉.(Another idea was to develop some reusable software, which could be of use to control robots built to the similar spec. It should allow either some simple robot control directly from a web browser or development of specialized client applications to provide more advanced control and adding extra features, like computer vision, for example.) 因此,决定基于Raspberry Pi板构建机器人.它的价格相对较低,并提供足够的电源和连接性,以处理将创意付诸实践的所有其他电子设备.(And so it was decided to build the robot based on a Raspberry Pi board. It comes for a relatively small price and provides enough power and connectivity to handle all the other electronics required for turning the idea into action.) 那个名字叫(As for the name, it was called)派雷克斯(PiRex).这是与孩子们一起散步进行简短头脑风暴的结果.为什么选择PyRex?好吧,正如我最小的孩子所说-它是基于Pi的Rex.不,它看起来并不可怕(. This was a result of brief brain storming with kids over a walk. Why PiRex? Well, as my youngest said - it is a Rex based on Pi. No, it does not look anyway scary as) 霸王龙(Tyrannosaurus Rex) .但是这个名字被卡住了.(. But the name just got stuck.)
快速预览(Quick preview)
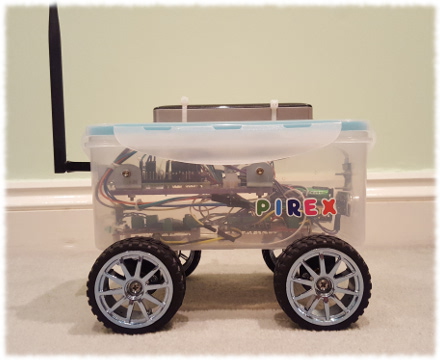
在详细介绍构建过程和开发的软件之前,最好快速预览一下最终结果.这是它最终的外观.(Before going into details of the building process and the software developed, it would be nice to have a quick preview of the final result. Here is the way it did look in the end.)

没什么特别的-只是一个轮式机器人.是的,它实际上不是雷克斯.带有轮子的午餐盒更多,配备照相机,距离传感器,Wi-Fi天线和电池模块.(Nothing too fancy - just a wheeled robot. And yes, it is not really a Rex. More of lunch box on wheels, equipped with camera, distance sensor, Wi-Fi antenna and a battery module.) 另外,这是一个快速视频演示,显示了从Web浏览器和专用.NET客户端应用程序对PiRex机器人的控制. Web UI使一切变得简单-在Raspberry Pi上运行软件,即可通过您选择的Web浏览器控制机器人.尽管客户端应用程序允许使用游戏手柄设备进行更灵活的控制,例如,以及集成不同的图像处理SDK来处理来自机器人的视频.(Also, here is a quick video demo, showing control of the PiRex robot from a web browser and from a dedicated .NET client application. The web UI makes it all simple - run the software on Raspberry Pi and the robot is ready to be controlled from the web browser of your choice. While the client application allows more agile control with game pad devices, for example, and integration of different image processing SDKs to process video coming from the bot.)
GitHub项目(GitHub project)
所有开发的软件都发布在(All of the developed software is published on) 的GitHub(GitHub) .因此,如果有人想重复构建步骤并开始使用机器人,那么这里就是快速入门,它为您进行任何自定义奠定了基础.(. So, if anyone would like to repeat the building steps and start playing with the robot, it is all there for a quick start, providing the base for any customizations in mind.)
硬件(Hardware)
在开始编写/编译任何代码之前,让我们首先构建机器人.为此,我们最好首先获得所有零件,以便我们可以估算总成本并考虑如何将所有零件放在一起.当然,事情可以迭代地完成,随着事情的进展添加新的组件.但是,这可能会导致项目的完全重建,有时甚至超过一次,这既是时间又是金钱(或者只是金钱)(Before we start with writing/compiling any code, let’s get the robot built first. For that we better get all the parts first, so that we could estimate the total cost and think about how to put these all together. Of course things can be done iteratively, adding new components as things progress. However, it may result in a complete rebuild of the project, sometimes even more than once, which is time and money (or just money)2(2)).我们最好避免的问题是从几个我们认为最关键的组件开始,用它构建一些东西,然后意识到没有足够的空间容纳下一个组件,或者所有电子设备的电池电量不足我们需要的,否则最终组装件会变得很重,而所选的电动机根本无法做很多事情.(). The issue we’d better avoiding is to start with few components we think are the most critical, build something with it and then realize that there is not enough space to fit the next component, or there is not enough of battery power for all electronics we need, or the final assembly gets heavy enough and chosen motors simply cannot do much.) 在获得最终工作结果时,这些错误中有多少发生在我身上?二.首先,不能将所有内容放入最初计划的紧凑设计中.然后发现首选电动机太便宜且没有足够的动力来使机器人运动.(How many of those mistakes happened to me while getting to the final working result? Two. First, could not fit everything into a compact design initially planned. And then found the motors of the first choice were too cheap and did not have enough power to get the robot moving.)
材料清单(Bill of materials)
以下是用于构建PiRex机器人的组件列表及其价格估计(基于亚马逊或其他更合适的在线商店):(Below is the list of components, which were used for building the PiRex robot, and their price estimate (based on Amazon or any other on-line shops which fit better):)
- 树莓派板(Raspberry Pi board) –(-)32.00英镑(32.00£).(.)
- Raspberry Pi摄像头模块(Raspberry Pi Camera Module) –(-)20.00英镑(20.00£).(.)
- 4 x 6V 60 RPM电机,DiddyBorg v1车轮和安装套件(4 x 6V 60 RPM Motor, DiddyBorg v1 Wheel & Mounting Kit) –(-)60.00英镑(60.00£).是的,看起来像一项投资.但这是一个简单的事实-好的电动机并不便宜;廉价的电机不好.避免任何(. Yes, looks like an investment. But it is a simple fact - good motors are not cheap; cheap motors are not good. Avoid any) 便宜的塑料(cheap plastic) 针对Arduino项目-不会或多或少地承受严重的负载.(aimed for Arduino projects - it will not carry any more or less serious load.)
- 带天线的USB Wi-Fi模块(USB Wi-Fi Module with Antenna) –(-)10.00英镑(10.00£).强烈建议使用带天线的模块而不是没有天线的模块,因为信号质量可能会导致通信问题.(. The module with antenna is strongly preferred over the one without it, since signal quality may cause nasty communication issues.)
- 手机/平板电脑便携式充电器(Portable charger for phones/tablets) ,5V输出-仅用于为Raspberry Pi板供电.我所拥有的那个似乎不再可用.所以假设一下(, 5V output - used for powering Raspberry Pi board only. The one I’ve got does not seem to be available any more. So assume something for about)20.00英镑(20.00£).(.)
- L293D步进电机驱动器(L293D Stepper Motor Driver) .通常以5包的价格出售(. Usually comes in packs of 5 for about)2.00英镑(2.00£).(.)
- HC-SR04超声波距离传感器(HC-SR04 Ultrasonic Distance sensor) -价格略有不同,我们假设(- price varies a bit, let’s assume)4.00英镑(4.00£).(.)
- Raspberry Pi映像的8 GB微型SD卡-左右(8 GB micro SD card for Raspberry Pi image - around)**6.00英镑(6.00£)**取决于型号.(depending on model.)
- Raspberry Pi相机线(Raspberry Pi camera cable) –(-)4.50英镑(4.50£).根据事物的构建方式,这可能是可选组件.对于我的设置,默认电缆太短了,因此需要更长的电缆.(. This might be an optional component depending on how things are built. The default cable was a bit too short for my set-up, so a longer one was required.)
- 4 x AA电池为电动机供电.有可充电的金霸王,可能会花费大约(4 x AA batteries to power motors. Got rechargeable Duracell, which may cost around)8.00英镑(8.00£).(.)
- 4 x AA 6V电池盒(4 x AA 6V Battery Holder Case) .关于(. About)**1.00英镑(1.00£)**两个.(for two.)
- PCB电路板原型(Prototyping PCB Circuit Boards) .关于(. About)**5.00英镑(5.00£)**一包20个(for a pack of 20.)
- 16针IC插座(16-Pin IC Socket) 可能会方便使用,避免在焊接时油炸电机驱动器芯片-(may come handy to avoid frying the motor driver chip when soldering - under)**1.00英镑(1.00£)**一包5个(for a pack of 5.)
- USB Micro B分支板(USB Micro B Breakout Board) 从电源获得5V并将其直接导向Raspberry Pi-(to get 5V from power supply and direct it to Raspberry Pi - Aroud)4.00英镑(4.00£).您不太可能设法将Raspberry Pi直接连接到电源,因为它可能完全隐藏在设置中.因此,在外部某处安装微型USB分支板可能会很有帮助.另外,在电源和Pi之间设置一个开关按钮更加清洁-避免拉扯任何电缆来打开/关闭机器人.(. It is unlikely you manage to connect Raspberry Pi directly to power supply, because it may be well hidden in your setup. So having a micro USB breakout board somewhere on the outside may help a lot. Plus, having a switch button between the power supply and the Pi is much cleaner – avoids pulling any cables to switch the robot on/off.)
- PCB安装螺丝接线端子(PCB Mount Screw Terminal Blocks) –(-)**1.50英镑(1.50£)**用于20个装的包装.可选组件,但非常方便用于连接不同的组件.(for pack of 20. An optional component, but comes very handy for connecting different components.)
- 一个午餐盒.是的,您是对的,我用一个午餐盒装了机器人的身体.由于无法使用3D打印机来制作自定义主体,因此选择易于切割且同时又不太重的东西.比方说(A lunch box. Yes, you are right, I used a lunch box for the robot’s body. Did not have access to 3D printer to craft custom body, so the choice went for something easy to cut and not so heavy at the same time. Let’s say)2.00英镑(2.00£).(.)
- 最后,一些电线,电阻器,用于状态指示的几个LED,用于打开和关闭事物的几个开关按钮,一些螺母和螺栓等.从其他项目中获得的所有这些足够,(Finally, some wires, resistors, few LEDs for status indication, few switch buttons to turn things on and off, some nuts and bolts, etc. Had enough of all these from other projects, but lets say another)10.00英镑(10.00£)(应该绰绰有余).((should be more than enough).) 总而言之(All together it comes to)191.00英镑(191.00£).为了安全起见,以防万一某些事情被遗忘或只是有一些备用预算,让我们计划一下(. To get it safe, in case something was forgotten or simply have some spare budget, lets plan about)**200英镑(200£)**基于Raspberry Pi的机器人.(for a Raspberry Pi based robot.) 听起来可能并不便宜.但是,要使最终价格降低几乎没有什么可做的.最昂贵的组件是带轮电动机.好吧,你必须接受这一点.试图节省下来并得到更便宜的东西,最终可能会导致价格上涨,这很明显,机器人无法真正移动.在电子元件或电池上节省很多钱也很困难.(It may not sound very cheap. But there is little to do to get the final price lower. The most expensive components are motors with wheels. Well, you have to accept this. Trying to save on them and getting something cheaper may result in increased price in the end, when it gets clear the robot can not really move. Saving much on electronic components or batteries may be tough as well.) 另一种选择是使用一些现成的机器人套件.确实可以节省时间.但对我而言,它也剥夺了乐趣和创造力.无论如何,即使没有包括所有电子组件,许多套件实际上还是更昂贵.(Another option would be to use some ready made robotics kits. It really does save time. But as for me, it takes away fun and creativity as well. Anyway, many of the kits are more expensive actually, even without all electronic components included.)
一起构建(Building it all together)
一旦所有组件都准备就绪,就可以将它们放到一个正常工作的机器人中了.为了控制电动机,使用了一个简单的L293D芯片,该芯片可以独立控制多达两个电动机.芯片本身只能打开/关闭电动机并控制其旋转方向.将其1,2EN和3,4EN引脚(引脚1和9,请参见L293D数据表)连接至脉冲调制模块(PWM),也可以控制电动机的速度.但是,Raspberry Pi仅具有一个硬件PWM,因此无法控制两个电动机的速度(除非使用软件PWM,这将在后面提到).(Once all components are at hand, it is time put them all together into a working robot. To control motors a simple L293D chip is used, which allows controlling up to two motors independently. The chip itself can only turn motors on/off and control direction of their rotation. Connecting its 1,2EN and 3,4EN pins (pins 1 and 9, see L293D data sheet) to a pulse modulation module (PWM) also allows controlling speed of motors. However, Raspberry Pi has only one hardware PWM, so controlling speed of both motors is not available (unless software PWM is used, which is to be mentioned later).)
注意(Note):有关L293D的快速介绍,其接线和简单控制请看本教程:(: for a quick introduction to L293D, its wiring and simple control have a look at this tutorial:) 使用Python与Raspberry Pi一起控制直流电机(Controlling DC Motors Using Python With a Raspberry Pi) .(.)
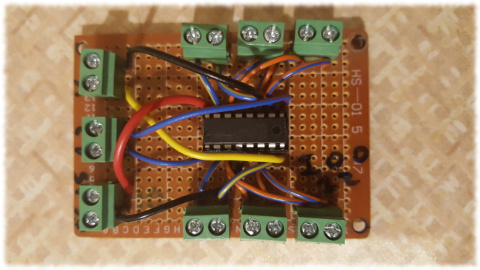
为了使连接更容易,最好在单个电路板上放置较小的组件.例如,如下图所示,我将L293D芯片放置在其自己的分线板上,该分线板具有用于连接电机,电源和Raspberry Pi的引脚的单独的接线端子.这样,所有的焊接都只集中在这些小板上,而其余的连接则通过将电线拧到一侧的接线盒中,然后再连接到Raspberry Pi的引脚上来完成.(To make things easier to connect, it is preferred to put smaller components on individual circuit boards. For example, as the picture below shows, I put the L293D chip on its own breakout board, which has individual terminal blocks for connecting motors, power supply and Raspberry Pi’s pins. This way all the soldering is concentrated only on these little boards, while the rest of connections are done by screwing a wire into a terminal block on one side and attaching to Raspberry Pi’s pin on the other side.)
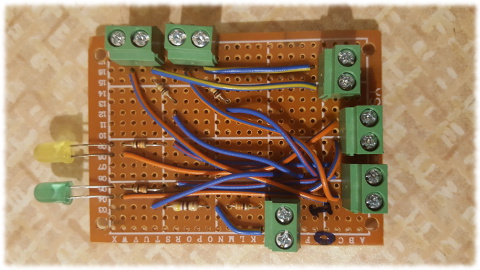
第二个分支板上装有2个LED(用于显示运行时间和连接状态)和用于连接两个开关按钮的接线盒(计划用于与机器人进行某些交互).所有必需的电阻器也都在那.仅缺少与Raspberry Pi和组件的连接.虽然LED和开关对于最终结果确实是可选的,但该板也可用于连接HC-SR04超声波传感器(分压器和接线盒的下部两个电阻).(The second breakout board holds 2 LEDs (used to show run time and connectivity status) and terminal block for connecting two switch buttons (planned to be used for some interaction with the robot). All required resistors are there as well; only connectivity to Raspberry Pi and components is missing. While LEDs and switches are really optional for the final result, this board is also used for connecting to HC-SR04 ultrasonic sensor (the lower two resistors for voltage divider and a terminal block).)
注意(Note):有关接线和使用HC-SR04传感器的更多信息,请查看本教程:(: for more information about wiring and using HC-SR04 sensor have a look this tutorial:) HC-SR04超声波传感器与Raspberry Pi接口(Interfacing HC-SR04 Ultrasonic Sensor with Raspberry Pi) .(.)
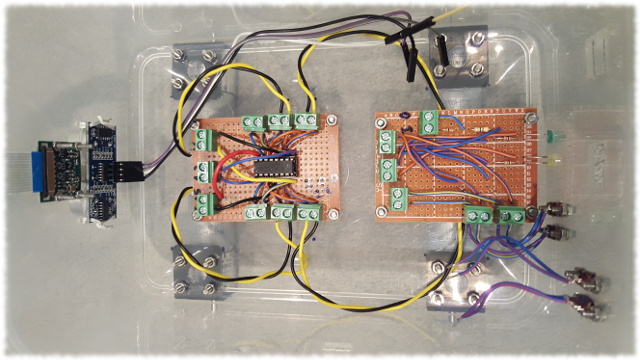
有了上面的两个分组讨论板,是时候将它们与其他一些组件一起包装到我们的便当盒中了-这完成了机器人的第一层.一些接线端子已经连接到电机和开关,而其他接线端子则等待添加第二层,以容纳Raspberry Pi.(Having the two breakout boards above, its time to pack them into our lunch box together with some other components - this completes the first layer of the robot. Some of the terminal blocks already get connected to motors and switches, while the others wait for adding the second layer holding a Raspberry Pi.)注意(Note):目前有两个额外的开关处于松动状态.这些将用于打开/关闭机器人并为电动机提供电源(在大多数软件调试过程中并不需要电动机,因此使它们独立非常方便).(: there are two extra switches which are set loose for now. Those are to be used to switch the robot on/off and to provide power supply to motors (motors are not really needed during most of the software debugging, so making them independent is quite handy).)
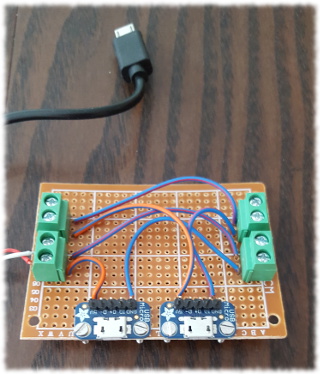
组件的第二层装有Raspberry Pi和另一个小的分线板,用于从微型USB插座获取电源并将其引导到电子组件(通过开关将其全部打开/关闭).最初计划使用相同的便携式充电器电池(确实提供两个输出)为Raspberry Pi和电机供电,因此,分线板上有两个USB连接器.但是,后来决定使用一盒AA电池为电动机单独供电,因此,分线板通过额外的接线盒得到了扩展.(The second layer of the assembly holds a Raspberry Pi and another small breakout board, which is used to get power supply from micro USB sockets and direct it to electronic components (through switches to get it all on/off). Initially it was planned to power both Raspberry Pi and motors using the same portable charger battery (which does provide two outputs), hence there are two USB connector on the breakout board. However, later it was decided to power motors separately with a pack of AA batteries and so the breakout board got a bit extended with an extra terminal block.)
现在,添加最终组件和主要组件Raspberry Pi,使组装完成约99%.这是我们弹出PiRex引擎盖时的外观.(Now, adding the final and the main component, Raspberry Pi, completes the assembly to about 99%. Here is the way it looks if we pop the hood of the PiRex.)

最后,添加电池和Wi-Fi模块,使其准备就绪.好吧,只要一切都正确连接并且软件在那里.(Finally, adding batteries and a Wi-Fi module, makes it ready for action. Well, provided everything is connected right and the software is there.)
连接组件(Connecting components)
尽管完全习惯使用哪个GPIO引脚将不同的组件连接到Raspberry Pi(可以为此配置以下讨论的软件),但以下是我在构建PiRex机器人时使用的引脚.仅供参考.(Although it is completely customary which GPIO pins to use for connecting different components to Raspberry Pi (the software discussed below can be configured for this), below is the pin out I’ve used while building the PiRex robot. Just as a reference.)
| 2个开关按钮的电源(Power supply for 2 switch buttons) | 3.3v(3.3v) | 1个(1) | 2(2) | 5伏(5v) | HC-SR04电源(VCC)(HC-SR04 Power supply (VCC)) |
|---|---|---|---|---|---|
| GPIO 2(GPIO 2) | 3 | 4 | 5v | L293D芯片电源(VCC1,针16)(L293D chip power supply (VCC1, pin 16)) | |
| GPIO 3(GPIO 3) | 5 | 6 | GND | LED和开关按钮的接地(Ground for LEDs and switch buttons) | |
| 运行时间状态指示灯(运行软件)(Run time status LED (running software)) | GPIO 4(GPIO 4) | 7 | 8 | GPIO 14(GPIO 14) | |
| L293D接地(引脚4,5,12,13)(L293D ground (pins 4, 5, 12, 13)) | GND | 9 | 10 | GPIO 15(GPIO 15) | |
| 连接状态指示灯(Connectivity status LED) | GPIO 17(GPIO 17) | 11 | 12 | GPIO 18(GPIO 18) | 启用左电机(1,2EN,引脚1)(Enable left motors (1,2EN, pin 1)) |
| 来自开关按钮1的信号(Signal from switch button 1) | GPIO 27(GPIO 27) | 13 | 14 | GND | HC-SR04地面(HC-SR04 ground) |
| 来自开关按钮2的信号(Signal from switch button 2) | GPIO 22(GPIO 22) | 15 | 16 | GPIO 23(GPIO 23) | 左电机输入1(引脚2)(Left motors input 1 (pin 2)) |
| 3.3v | 17 | 18 | GPIO 24(GPIO 24) | 左电机输入2(引脚7)(Left motors input 2 (pin 7)) | |
| GPIO 10(GPIO 10) | 19 | 20 | GND | ||
| GPIO 9(GPIO 9) | 21 | 22 | GPIO 25(GPIO 25) | HC-SR04扳机(HC-SR04 trigger) | |
| GPIO 11(GPIO 11) | 23 | 24 | GPIO 8(GPIO 8) | ||
| GND | 25 | 26 | GPIO 7(GPIO 7) | ||
| GPIO 0(GPIO 0) | 27 | 28 | GPIO 1(GPIO 1) | ||
| 右电机输入1(针15)(Right motors input 1 (pin 15)) | GPIO 5(GPIO 5) | 29 | 30 | GND | |
| 右侧电机输入2(引脚10)(Right motors input 2 (pin 10)) | GPIO 6(GPIO 6) | 31 | 32 | GPIO 12(GPIO 12) | |
| 启用右电动机(3,4EN,针9)(Enable right motors (3,4EN, pin 9)) | GPIO 13(GPIO 13) | 33 | 34 | GND | |
| GPIO 19(GPIO 19) | 35 | 36 | GPIO 16(GPIO 16) | ||
| HC-SR04回声,通过分压器(HC-SR04 echo, through voltage divider) | GPIO 26(GPIO 26) | 37 | 38 | GPIO 20(GPIO 20) | |
| GND | 39 | 40 | GPIO 21(GPIO 21) |
这就是构建机器人并将不同的组件连接在一起的全部内容.有了L293D驱动器芯片和HC-SR04超声波传感器的数据表,并遵循了一些教程,就不难弄清楚哪些引脚在哪里,然后才能在测试应用中首先使某些东西工作.(This is all about building the robot and connecting different components together. Having L293D driver chip’s and HC-SR04 ultrasonic sensor’s data sheets and following some tutorials, it should not be hard to figure out which pins go where and to get something working in a test application first.)
软件(Software)
PiRex机器人一侧运行的软件主要基于(The software running on the PiRex bot’s side is heavily based on the) cam2web(cam2web) 代码库.实际上,大约95%的代码是从那里获取的.原因是cam2web提供了该项目所需的大部分繁重的基础结构-从相机,基于Web的嵌入式Web服务器获取图像(code base. In fact, about 95% of the code is taken from there. The reason for this is that cam2web provides most of the heavy infrastructure needed for this project - image acquisition from camera, embedded web server based on) 猫鼬(mongoose) 库,将图像作为MJPEG流进行流传输,允许通过REST API查询/配置对象的基础结构类,等等.(library, streaming images as MJPEG stream, infrastructure classes allowing to query/configure objects through REST API, etc.)
如果我们看一下PiRex代码的核心类图,那么我们会发现只有两个类被添加到了项目中(当然还有一些胶合代码).这解释了为什么cam2web确实是迈向构建该机器人项目的第一步.(If we have a look at the core class diagram of the PiRex code, then we’ll find that only two classes were added to the project (plus some glue code of course). This explains why cam2web was really the first big step towards building this robotics project.)

让我们快速概述一下cam2web项目的功能.(Let’s do a quick overview of what we’ve got from the cam2web project.)
的(The) XWebServer 类基于以下内容实现嵌入式Web服务器(class implements an embedded web server based on) 猫鼬(mongoose) 库API.它允许注册实现对象的集合(library API. It allows registering collection of objects implementing) IWebRequestHandler 接口,可提供对特定请求的某些响应.例如,(interface, which provide some response to a particular request. For example, the) XVideoSourceToWeb 类接受任意视频源(实现(class accepts an arbitrary video source (a class implementing) IVideoSource 界面并通过(interface and producing new images via a) IVideoSourceListener 回调接口),并提供两个请求处理程序-一个将图像作为MJPEG流传输,另一个将图像作为单个JPEG快照提供.(call back interface) and provides two request handlers - one, which streams images as MJPEG stream, and another, which provides images as single JPEG snapshots.)
的(The) XEmbeddedContentHandler 类允许从嵌入式资源提供静态内容. cam2web项目随附一个(class allows serving static content from embedded resources. The cam2web project comes with a)**web2h(web2h)**工具,它可以将某些类型的文件(Web资源)转换为C头文件.这样,所有必需的Web内容都可以直接嵌入最终的可执行文件中,从而使其独立于任何外部文件.(tool, which allows converting certain types of files (web resources) into C header files. This way all required web content can be embedded directly into the final executable making it independent of any external files.)
最后,(Finally, the) XObjectInformationRequestHandler 和(and) XObjectConfigurationRequestHandler 类通过REST API提供对对象实现的只读访问(classes provide either read-only access through REST API to objects implementing) IObjectInformation 接口,或对实现对象的读写访问(interface, or read-write access to objects implementing) IObjectConfiguration 接口.例如,有关PiRex版本和功能的信息是通过只读界面提供的,而摄像头的设置可以更改,因此可以通过(interface. For example, information about PiRex version and capabilities is provided through read-only interface, while camera’a settings can be changes and so exposed through) IObjectConfiguration 接口.(interface.)
为了演示上述类的用法,下面是一个小代码段,该代码段配置Web服务器以流式处理Raspberry Pi的相机,允许通过REST API更改其设置,查询有关设备的某些信息并提供一些静态嵌入式内容.所有这些都来自cam2web项目,并且非常易于使用.那么为什么不重用呢?(To demonstrate the use of the above mentioned classes, here is a small code snippet, which configures a web server to stream Raspberry Pi’s camera, allow changing its setting via REST API, query some information about the device and serve some static embedded content. This all came from the cam2web project and it is really easy in use. So why not to reuse?)
XWebServer               server;
XVideoSourceToWeb        video2web;
shared_ptr<XRaspiCamera> camera = XRaspiCamera::Create( );

// subscribe XVideoSourceToWeb object for video frame events
camera->SetListener( video2web.VideoSourceListener( ) );

// add JPEG and MJPEG handlers to the web server
server.AddHandler( video2web.CreateJpegHandler( "/camera/jpeg" ) ).
       AddHandler( video2web.CreateMjpegHandler( "/camera/mjpeg", 30 ) );

// allow changing camera's setting using REST
shared_ptr<IObjectConfigurator> cameraConfig = make_shared<xraspicameraconfig>( camera );

server.AddHandler( make_shared<XObjectConfigurationRequestHandler>(
                   "/camera/config", cameraConfig ) );

// allow querying some read only information through REST
PropertyMap versionInfo;

versionInfo.insert( PropertyMap::value_type( "product", "pirexbot" ) );
versionInfo.insert( PropertyMap::value_type( "version", "1.0.0" ) );
versionInfo.insert( PropertyMap::value_type( "platform", "RaspberryPi" ) );

server.AddHandler( make_shared<XObjectInformationRequestHandler>(
                   "/version", make_shared<XObjectInformationMap>( versionInfo ) ) );

// add some static embedded content
server.AddHandler( make_shared<XEmbeddedContentHandler>( "/", &web_index_html ) ).
       AddHandler( make_shared<XEmbeddedContentHandler>( "index.html", &web_index_html ) ).
       AddHandler( make_shared<XEmbeddedContentHandler>( "styles.css", &web_styles_css ) );
       // ...

// start the camera and the web server
camera->Start( );
server.Start( );
</xraspicameraconfig>
上面的代码不是对cam2web功能的完整演示.例如,它没有显示如何配置访问权限-每个人都可以访问哪个请求处理程序,只有已知用户可以访问哪个请求处理程序.可以从描述的原始手法中找到(The code above is not a complete demonstration of the cam2web’s features. For example, it does not show how to configure access rights - which request handlers can be accessed by everyone and which can be accessed only by known users. That can be found either from the original artucle describing) cam2web(cam2web) 项目或深入研究提供的源代码.(project or diving into the provided source code.)
控制马达(Controlling motors)
用L293D芯片控制电机真的很容易,并且有(Controlling motors with a L293D chip is really easy and there are) 大量的教程(plenty of tutorials) 关于这个话题.它们大多数是基于Python的,但是将它们转换为C代码确实很简单.为了使电动机运动,我们要做的就是设置(on this topic. Most of them are Python based, but it is really trivial to translate those to C code. To get motors moving, all we need to do is to set)**启用(Enable)**固定到高,然后设置(pin to High and then set)**输入1(Input1)**固定到高电平(pin to High while)**输入2(Input2)**固定为低.要更改旋转方向,需要交换输入引脚-设置(pin to Low. To change direction of rotation it is required to swap input pins - set)**Inpun1(Inpun1)**固定为低(pin to Low while)**输入2(Input2)**固定到Hight.如果我们想停止一切-只需设置(pin to Hight. And if we want to stop it all - just set)**启用(Enable)**固定回低.(pin back to Low.) 要从C应用程序操纵Raspberry Pi的引脚,请执行以下操作:(To manipulate Raspberry Pi’s pins from C application the) 接线Pi(Wiring Pi) 可以使用库.它确实预装了正式的Raspbian映像.这是一个如何使电动机运动的快速示例.(library can be used. It does come pre-installed with an official Raspbian image. Here is a quick sample how to get motors moving.)
#include <wiringPi.h>

// configure pins
pinMode( BOT_PIN_MOTOR_LEFT_INPUT1, OUTPUT );
pinMode( BOT_PIN_MOTOR_LEFT_INPUT2, OUTPUT );
pinMode( BOT_PIN_MOTOR_LEFT_ENABLE, OUTPUT );

// move motors "forward"
digitalWrite( BOT_PIN_MOTOR_LEFT_INPUT1, HIGH );
digitalWrite( BOT_PIN_MOTOR_LEFT_INPUT2, LOW );
digitalWrite( BOT_PIN_MOTOR_LEFT_ENABLE, HIGH );

// move motors opposite direction
digitalWrite( BOT_PIN_MOTOR_LEFT_INPUT1, LOW );
digitalWrite( BOT_PIN_MOTOR_LEFT_INPUT2, HIGH );
digitalWrite( BOT_PIN_MOTOR_LEFT_ENABLE, HIGH );

// stop motors
digitalWrite( BOT_PIN_MOTOR_LEFT_INPUT1, LOW );
digitalWrite( BOT_PIN_MOTOR_LEFT_INPUT2, LOW );
digitalWrite( BOT_PIN_MOTOR_LEFT_ENABLE, LOW );
上面的代码允许控制电动机的旋转方向,但不能控制速度.要进行速度控制,需要连接(The code above allows controlling direction of motors' rotation, but not the speed. To get speed control, it is required to connect)**启用(Enable)**固定到(pin to a)**脉宽调制(PWM)**在Raspberry Pi上启用了引脚.问题在于Pi仅具有一个硬件PWM,因此无法通过硬件支持来控制左右电机的速度.作为替代解决方案,可以使用软件PWM,可以在任何Raspberry Pi的GPIO引脚上启用它.下面的代码演示了基于软件PWM的速度控制.(enabled pin on Raspberry Pi. The problem is that Pi has only one hardware PWM and so controlling speed of both left and right motors cannot be done with hardware support. As an alternative solution a software PWM can be used, which can be enabled on any of the Raspberry Pi’s GPIO pins. The code below demonstrates the speed control based on software PWM.)
// configure pins
pinMode( BOT_PIN_MOTOR_LEFT_INPUT1, OUTPUT );
pinMode( BOT_PIN_MOTOR_LEFT_INPUT2, OUTPUT );
softPwmCreate( BOT_PIN_MOTOR_LEFT_ENABLE, 0, 100 );

// rotate motor at half the speed
digitalWrite( BOT_PIN_MOTOR_LEFT_INPUT1, HIGH );
digitalWrite( BOT_PIN_MOTOR_LEFT_INPUT2, LOW );
softPwmWrite( BOT_PIN_MOTOR_LEFT_ENABLE, 50 );

// full speed
softPwmWrite( BOT_PIN_MOTOR_LEFT_ENABLE, 100 );

// stop the motor
softPwmWrite( BOT_PIN_MOTOR_LEFT_ENABLE, 0 );
尽管软件PWM确实可以控制电动机的速度,但它不如硬件PWM高效.接线Pi库为配置的每个软件PWM创建一个后台线程,该线程会频繁更新所选GPIO引脚的状态.结果,它增加了CPU负载,进而使电池放电更快.但是,软件PWM不仅会影响系统性能,还会受到系统PWM的影响.如果由于处理其他计算而导致CPU负载过高,则软件PWM线程可能没有机会在平滑速度控制所需的时间间隔内更新GPIO状态.由于这些问题,PiRex配置中默认禁用电动机的速度控制.(Although software PWM does allow controlling speed of motors, it is not as efficient as hardware PWM. The Wiring Pi library creates a background thread for each software PWM configured, which does frequent updates to the state of selected GPIO pin. As a result it increases CPU load, which in turn discharges battery quicker. However, software PWM not only affects system performance, but also can be affected by it. If CPU load gets high due to handling other computations, the software PWM’s thread may not get a chance to update GPIO state at the time intervals required for smooth speed control. Because of the these issues, motors' speed control is disabled by default in PiRex configuration.)
测量到障碍物的距离(Measuring distance to obstacles)
使用HC-SR04超声波传感器进行距离测量也是一项非常容易的任务.作为一种非常流行的传感器,它在许多业余项目中都得到了广泛使用,因此(Distance measurements with HC-SR04 ultrasonic sensor is a very easy task to do as well. Being an extremely popular sensor, it is used a lot in many hobby projects and so finding) 教程(tutorial) 关于它并不难.传感器的想法很简单.它发出超声波,该超声波从障碍物反射并返回到传感器.因此,仅需要测量在发出声波并检测其返回之后所花费的时间.由于已知音速,因此计算到障碍物的距离变得微不足道.(about it is not hard. The idea of the sensor is quite simple. It emits an ultrasound wave, which gets reflected from an obstacle and comes back to the sensor. And so it is simply required to measure the time taken after emitting the sound wave and detecting its return. Since speed of sound is known, calculating distance to an obstacle becomes trivial.) HC-SR04不会持续发出声波.相反,需要告诉它何时发射一个,然后等到传感器反射回来.两个GPIO引脚用于与传感器交互.的(HC-SR04 does not emit sound waves constantly. Instead, it needs to be told when to emit one and then wait till the sensor gets reflection back. Two GPIO pins are used for interaction with the sensors. The)**触发(Trigger)**引脚用于告知传感器何时发送声波-必须在短时间内将其设置为高电平,然后再设置回低电平.的(pin is used to tell sensor when to send a sound wave - it must be set to High for a short period of time and then set back to Low. The)**回声(Echo)**引脚然后用于检测声波何时发送以及何时返回.触发测量后,(pin is then used to detect when sound wave was sent and when it came back. After the measurement was triggered, the)**回声(Echo)**引脚在发送波形时变为高电平,而在返回时返回至低电平.将所有内容放入代码中可能看起来像这样:(pin goes High on sending the wave and gets back to Low on its return. Putting this all into the code may looks something like this:)
uint32_t start, stop; // time in microseconds

// trigger measurement round
digitalWrite( BOT_PIN_ULTRASONIC_TRIGGER, HIGH );
delayMicroseconds( 10 );
digitalWrite( BOT_PIN_ULTRASONIC_TRIGGER, LOW );

// wait for the echo wave start
start = micros( );
while ( digitalRead( BOT_PIN_ULTRASONIC_ECHO ) == LOW )
{
    start = micros( );
}

// wait for the echo wave stop
stop = micros( );
while ( digitalRead( BOT_PIN_ULTRASONIC_ECHO ) == HIGH )
{
    stop = micros( );
}

// calculate the distance to an obstacle (cm)
float lastDistance = (float) ( stop - start ) / 58.2f;
上面的示例代码代表了稍微简化的版本,但给出了想法.为了改善代码,当回波未按预期的时间间隔开始/停止时,需要处理可能的超时.(The above example code represents slightly simplified version, but gives the idea. To improve the code, it is required to handle possible timeouts, when an echo wave did not start/stop at expected time interval.)
配置PiRex软件(Configuring the PiRex software)
尽管上面提供了参考GPIO布局(Raspberry Pi的引脚连接到该引脚),但是使用PiRex软件不必一定是这种方式.最低要求是,机器人应具有摄像头和基于L293D的电机驱动器.但是,所有连接的方式并不重要.可以配置它.超声波传感器也是如此-它是可选组件,因此可能根本没有安装.(Although the reference GPIO layout was provided above (which Raspberry Pi’s pins connected to what), it does not have to be that way for using PiRex software. As a minimum requirement, it is expected the robot to have camera and the L293D based motor driver. However, the way it is all connected does not really matter. It can be configured instead. Same about the ultrasonic sensor – it is an optional component and so may not be attached at all.)
为了自定义构建,有(In order to customize the build, there is the) BotConfig.h 头文件.它确实包含(header file. It does contain number of) #define’s 允许指定将哪个Raspberry Pi的引脚用于哪个目的.只需更改它以反映您的设置,即可开始使用.(allowing to specify which Raspberry Pi’s pins are used for which purpose. Simply change that to reflect your setup and you are ready to go.)
建立和运行(Building and running)
构建PiRex代码就像运行一样简单(Building the PiRex code is as easy as running) make 命令.必须记住的唯一事情是,发布版本将所有Web资源直接嵌入到可执行文件中,以便始终可以提供默认Web UI,而无需依赖任何其他文件.这意味着(command. The only thing which must be kept in mind is that release build embeds all web resources directly into the executable, so that default web UI could be always provided without relying on any extra files. This means that the) web2h 必须先构建该工具-该工具用于将一些常见的Web文件转换为头文件中定义的C结构.(tool must be build first - the tool is used to translate some common web files into C structures defined in header files.)
从项目的根文件夹运行以下命令,将在以下位置生成所需的可执行文件(Running bellow commands from the project’s root folder, will produce the required executables in)构建/发布/bin(build/release/bin).(.)
pushd .
cd src/tools/web2h/
make
popd

pushd .
cd src/app/
make
popd
注意(Note):必须安装libjpeg开发库才能使PiRex构建成功(默认情况下可能未安装):(: libjpeg development library must be installed for PiRex build to succeed (which may not be installed by default):)
sudo apt-get install libjpeg-dev
构建完成后,即可运行PiRex软件.这意味着只要硬件部分也已完成并且配置反映了实际GPIO引脚的连接,机器人就可以采取行动了.(Once the build completes, the PiRex software is ready to run. This means the robot is ready for action, provided the hardware part is also done and the configuration reflects the actual GPIO pins' connections.) 注意(Note):是命令行选项的数量,可用于更改默认的摄像机分辨率,要监听的Web端口,身份验证设置等.所有这些选项均从cam2web项目继承.只需使用(: the are number of command line options, which can be used to change default camera resolution, web port to listen on, authentication settings, etc. All of those were inherited from the cam2web project. Just run the application with the)**-?(-?)**键以查看可用配置选项列表.(key to see the list of available configuration options.)
网页界面(Web interface)
如前所述,PiRex应用程序带有内置的Web UI.这意味着,一旦应用程序运行,开始控制机器人所需要做的就是在您选择的Web浏览器中键入IP address:port并进行连接.(As it was already mentioned, the PiRex application comes with a built-in web UI. This means that once application is running, all you need to start controlling your robot is to type IP address:port into a web browser of your choice and get connected to it.)

默认视图仅显示机器人摄像机的当前视图.但是,“控制"选项卡允许控制机器人的运动并获得距离测量值,而"摄像机"选项卡允许更改不同的摄像机设置.(The default view simply shows current view from the robot’s camera. However, the “Control” tab allows controlling the robot’s movement and getting distance measurements, while the “Camera” tab allows changing different camera’s settings.) 的(The) 的GitHub(GitHub) 存储库提供了默认Web UI的源代码,因此,如果需要进行任何更改-都已存在.只是不要忘记重建应用程序.另一种方法是将所有必需的Web内容放入一个单独的文件夹,然后告诉PiRex应用程序从那里提供静态Web内容(使用(repository provides the source code of the default web UI, so if anything needs changing - it is all there. Just don’t forget to rebuild the application. Another approach would be to get all required web content into a separate folder and then tell PiRex application to serve static web content from there (using the)**-web:folder_name(-web:folder_name)**选项).这样可以在将最终内容嵌入可执行文件之前更快地调试Web UI部件.(option). This would make it quicker to debug the web UI part before embedding final content into the executable.)注意(Note):在调试模式下构建会自动用Web内容填充文件夹,并且应用程序将从那里提供服务.(: building in debug mode automatically populates the folder with web content and application is serving it from there.)
.NET客户端应用程序(.NET client application)
尽管可以从Web浏览器直接控制PiRex机器人,而无需在客户端使用任何额外的软件,但在某些情况下,专用应用程序可能更适合完成任务.例如,我发现通过单击UI按钮来操纵机器人并不能提供最佳控制,因此不允许轻易地执行某些技巧.取而代之的是,使用游戏手柄设备并用单个轴控制左/右电机可以更好地控制机器人,从而可以在不同的运动模式之间更快地进行切换.另一个示例是对来自机器人相机的视频使用某些图像处理和/或计算机视觉算法.专用的客户端应用程序可能更适合许多此类任务,而浏览器环境的实现可能要复杂得多(如果可能的话).(Although the PiRex robot can be controlled directly from a web browser, which requires no extra software on the client side, there are cases when a dedicated application may fit better the task. For example, I found that manipulating robot by clicking UI buttons does not give the best control and as a result does not allow performing some of the tricks easily. Instead, using a game pad device and controlling left/right motors with individual axes gives much better control of the robot, allowing to switch faster between different movement patterns. Another example would be to use some image processing and/or computer vision algorithms on the video coming from robot’s camera. A dedicated client application may fit better many of such task, while a browser environment can get much more complicated (if possible at all) implementing them.)

为了在控制PiRex机器人方面提供额外的灵活性,还提供了.NET客户端应用程序,该应用程序允许查看机器人的摄像机并通过公开的REST API操纵机器人.为了演示其他控制方式,它支持游戏手柄设备,从而使机器人的操作变得更加敏捷.(To provide extra flexibility in controlling the PiRex robot, a .NET client application is provided as well, which allows viewing robot’s camera and manipulate the robot by means of exposed REST API. To demonstrate alternative way of control, it supports game pad devices, so that robot’s manipulations become much more agile.) 将.NET客户端与任何可用的计算机视觉SDK结合使用,可能会将机器人变成许多有趣的应用程序的开发平台.它既可以用于一些有趣的游戏,以寻找隐藏在现实世界环境中的物体,也可以用于一些检查任务,在这些任务中,较小的机器人可以更好地适应杂乱无章的环境,并具有有限的移动空间.(Combining the .NET client with any of the available computer vision SDKs, may turn the robot into a development platform for many interesting applications. It can be used either for some fun games aimed for finding objects hidden in real world environment, or for some inspections tasks where smaller robots fit better the cluttered environment with limited amount of space to move around.)
与其他应用程序接口-REST API(Interfacing with other applications - REST API)
正如上述应用程序所暗示的那样,PiRex机器人提供了用于与其他应用程序接口的API,因此可以开发本机客户端并提供更高级的机器人控制或添加其他功能,例如计算机视觉.(As the above described application suggests, the PiRex bot provides API for interfacing with other applications, so that a native client could be developed and provide more advanced robot control or add extra features, like computer vision, for example.) 首先是将视频流从机器人中移出,以MJPEG流的形式提供.它不能提供最佳的压缩效果-只是单个JPEG的流.但是,它实现起来非常简单,因此受到各种应用程序的支持.访问MJPEG流的URL格式为:(The first thing is to get video stream out of the robot, which is provided in the form of MJPEG stream. It does not provide the best compression - just a stream of individual JPEGs. However, it is very simple to implement and so supported by great variety of applications. The URL format to access MJPEG stream is:) http://ip:port/camera/mjpeg(http://ip:port/camera/mjpeg) 如果需要单个图像,则下一个URL提供最新的相机快照:(In the case an individual image is required, the next URL provides the latest camera snapshot:) http://ip:port/camera/jpeg(http://ip:port/camera/jpeg) 所有其他URL提供关于机械手的一些信息(版本,状态,配置),这些信息在执行HTTP GET请求时以JSON格式提供,或者可用于控制机械手-使用JSON格式命令的HTTP PUT请求.(All the other URLs provide either some information about a robot (version, state, configuration), which is provided in JSON format when performing HTTP GET request, or can be used to control the robot - HTTP PUT request with JSON formatted command.)
获取版本信息(Getting version information)
要获取有关PiRex机器人软件版本的信息,(To get information about version of the PiRex bot’s software, the)**http://ip:port/version(http://ip:port/version)**可以使用URL,该URL以以下格式提供信息:(URL can be used, which provides information in the format below:)
{
  "status":"OK",
  "config":
  {
    "platform":"RaspberryPi",
    "product":"pirexbot",
    "version":"1.0.0"
  }
}
获取功能和标题(Getting capabilities and title)
要确定PiRex机器人是否配备了距离测量传感器或允许对电动机进行速度控制,请(To find if PiRex bot is equipped with distance measurement sensor or allows speed control of motors, the)**http://ip:port/info(http://ip:port/info)**使用URL.它还报告bot的标题,可以将其指定为受支持的命令行选项之一.(URL is used. It also reports bot’s title, which can be specified as one of the supported command line options.)
{
  "status":"OK",
  "config":
  {
    "device":"PiRex Bot",
    "providesDistance":"true",
    "providesSpeedControl":"false",
    "title":"My Home Robot"
  }
}
测距(Distance measurement)
为了查询PiRex机器人执行的距离测量,(For querying distance measurements performed by PiRex robot, the)**http://ip:port/distance(http://ip:port/distance)**使用URL.它提供以厘米为单位的最新测量值,以及最近5次测量得到的中值.(URL is used. It provides as the most recent measurement in centimetres, as the median value taken from the last 5 measurements.)
{
  "status":"OK",
  "config":
  {
    "lastDistance":"128.95",
    "medianDistance":"127.25"
  }
}
控制马达(Controlling motors)
对于电机控制,(For motors control, the)**http://ip:port/motors/config(http://ip:port/motors/config)**使用URL.如果发送了GET请求,则回复仅包含电动机的当前状态.不过,这没有多大用处,因为在大多数情况下,除非告知电动机运动,否则电动机都是静止的.(URL is used. If GET request is sent, then the reply simply contains current state of the motors. This is not of much use though, since most of the time motors are stationary unless told to move.)
{
  "status":"OK",
  "config":
  {
    "leftPower":"0",
    "rightPower":"0"
  }
}
但是,发送PUT请求是告诉机器人移动所需要的.这是通过一个简单的JSON字符串完成的,该字符串告诉[-100,100]范围内的两个电动机的功率.在未启用速度控制的情况下,只有三个可能的值:100-向前旋转,0-不能移动,-100-向后旋转(尽管机器人也可以接受中间值,但将其设为阈值).如果启用了速度控制,则速度值可以是上述范围内的任何值.(Sending a PUT request, however, is what’s needed for telling robot to move. This is done with a simple JSON string, which tells power of both motors in the [-100, 100] range. In the case speed control is not enabled, there are only three possible values: 100 - rotate forward, 0 - don’t move, -100 - rotate backward (although the robot will accept intermediate values as well, but threshold them). In the case if speed control is enabled, the speed value can be anything from the mentioned range.) 例如,以下命令使机械手顺时针旋转(向右旋转).(For example, the command below makes robot to rotate clockwise (rotate right).)
{
  "leftPower":"100",
  "rightPower":"-100"
}
相机配置(Camera configuration)
可以使用发送到设备的GET请求来获取PiRex机器人摄像机的当前配置.(Retrieving current configuration of PiRex robot’s camera can be done using GET request sent to the)**http://ip:port/camera/config(http://ip:port/camera/config)**URL,列出所有可用属性的当前值:(URL, which lists current values of all available properties:)
{
  "status":"OK",
  "config":
  {
    "awb":"Auto",
    "brightness":"63",
    "contrast":"41",
    "effect":"None",
    "expmeteringmode":"Average",
    "expmode":"Night",
    "hflip":"1",
    "saturation":"16",
    "sharpness":"100",
    "vflip":"1",
    "videostabilisation":"0"
   }
}
同样,要更改任何属性,必须将POST请求发送到同一URL,并提供一个或多个要设置的配置值.例如,以下是同时更改亮度和对比度的命令:(Again, for changing any of the properties, a POST request must be sent to the same URL, providing one or more configuration values to set. For example, below is the command for changing both brightness and contrast:)
{
  "brightness":"50",
  "contrast":"15"
}
相机资讯(Camera information)
要获取有关机器人摄像头的某些信息(例如其当前分辨率,(To get some of the information about the robot’s camera, like its current resolution, the)**http://ip:port/camera/info(http://ip:port/camera/info)**URL可用.(URL is available.)
{
  "status":"OK",
  "config":
  {
    "device":"RaspberryPi Camera",
    "height":"480",
    "title":"Front Camera",
    "width":"640"
  }
}
获取相机属性的描述(Getting description of camera properties)
最后,可以使用来查询所有受支持摄像机的配置属性的描述.(Finally, it is possible to query description of all supported camera’s configuration properties by using the)**http://ip:port/camera/properties(http://ip:port/camera/properties)**网址.该API继承自(URL. This API is inherited from the) cam2web(cam2web) 真正有意义的项目,因为该项目支持许多平台和相机API.但是,对于PiRex而言,它的用处很小-目前仅支持一种相机类型.(project, where it does make sense, since that projects supports number of platforms and camera APIs. However, for PiRex it is of little use really - only one camera type is supported for now.)
结论(Conclusion)
现在是时候结束了.回顾一下让PiRex运转的过程,从软件开发的角度以及从硬件装配的角度来看,这都是非常有趣的经历.从焊接单个小组件到将所有组件组装在一起并确保它确实有效,构建所有组件都非常有趣.是的,它经过了几次改建-更换了烧毁的电动机驱动器,以安装新的更强大的电动机,找到松动的连接等等.但是最终,看到它的进步和改进,真是太好了.(It is time to wrap it up. Looking back at what was done to get the PiRex going, I would say it was really interesting experience as from the software development point of view, as from the hardware assembly. It was fun building it all, starting from soldering individual small components, to getting it all together and making sure it really does work. Yes, it was rebuilt couple of times - to replace a burned motor driver, to fit new more powerful motors, to find loose connection, etc. But at the end of the day it was nice seeing it progressing and improving.) 目标是否达到?当然可以.这些天来,机器人是在合理的预算范围内用传统的电子组件制造的.由于所有组件都是使用较小的单个组件构建的,而不是使用具有一体功能的专用机器人控制器,因此更换/升级组件要容易得多.它也可以很好地进行维修-如果电动机驱动器被烧毁,我们只需要更换一块成本很小的小芯片,而不是更换整个机器人控制器.(Was the target goal achieved? Sure, it was. The robot was built within the reasonable budget out of conventional electronic components these days. Since it is all built using smaller individual components rather than specialized robotics controller having all in one, it is much easier to replace/upgrade things. Which works well in repairing things as well – if motor driver got burned, we just need to replace a small chip which costs little, instead of replacing the entire robotics controller.) 至于开发的软件,它也运行得很好.通过调用公开的REST API,可以从Web浏览器UI或专用应用程序控制PiRex机器人.提供了一个参考.NET客户端应用程序,以演示如何与机器人交互以及如何借助游戏手柄设备实现更敏捷的控件.(As for the developed software it worked quite good as well. The PiRex robot can be controlled either from a web browser UI or from a dedicated application by calling the exposed REST API. A reference .NET client application is provided to demonstrate how to interface with the robot and how to implement a more agile control with the help of game pad device.) 有什么事情可以做的不同吗?如果预算允许,可以使用更高级的电机驱动器,例如(Are there any things which could have been done different? If budget allows, a more advanced motor driver could be used, like) 雷博格(ThunderBorg) ,例如,它提供了开箱即用的速度控制.或者,替代解决方案可能是添加Arduino Nano,该产品带来了足够的硬件PWM引脚以通过L293D电机驱动器实现速度控制.这个选项实际上听起来更有趣,因为Arduino板不仅带来了额外的数字IO引脚,而且带来了模拟输入引脚,与不同的传感器接口非常有用.(, for example, which provides speed control out of the box. Or, an alternative solution could be adding Arduino Nano, which brings enough hardware PWM pins to implement speed control with the L293D motor driver. This option sounds actually more interesting, since an Arduino board brings not only extra digital IO pins, but analog input pins as well, which can be of great use interfacing with different sensors.) 无论如何,当前形状的PiRex软件确实很容易重用和扩展.所提供的嵌入式服务器和其他基础架构允许轻松插入新的REST处理程序,然后在需要时与其他硬件组件进行交互.(Anyway, the PiRex software in its current shape is really easy to reuse and extend. The provided embedded server and the rest of infrastructure allows plugging new REST handlers easily, which then interact with additional hardware components, if needed.)
后项目(An after project)
接下来可能是什么?好的,一旦机器人建成并达到预期的功能,它就可以用作许多不同项目的平台.特别是将其与某些图像处理和计算机视觉应用程序结合使用时.下面是一个这样的项目的快速演示-用PiRex机器人搜索字形.一组方形二进制字形隐藏在某些环境中,通过远程控制机器人,可以找到它们的全部目标.我必须说,和孩子们一起玩真是太有趣了!(What could be next? Well, once a robot is built and functions as expected, it could be used as a platform for many different projects. Especially when combining it all with some image processing and computer vision applications. Below is a quick demo of one such projects – hunting glyphs with a PiRex robot. A set of square binary glyphs is hidden in some environment and the target it to find them all by controlling the robot remotely. I must say it was a great fun playing it with kids!) 好吧,我相信可以实施更多伟大的想法.只要有创造力就可以继续前进.玩得开心!(Well, I am sure many more great ideas can be implemented. Just be creative and keep going. Have fun!)
许可
本文以及所有相关的源代码和文件均已获得The Code Project Open License (CPOL)的许可。
C++ Raspberry hardware Dev 新闻 翻译