[译]C#中的三层前馈神经网络,带有图形显示
By robot-v1.0
本文链接 https://www.kyfws.com/ai/a-3-layer-feed-forward-neural-net-in-csharp-with-g-zh/
版权声明 本博客所有文章除特别声明外,均采用 BY-NC-SA 许可协议。转载请注明出处!
- 17 分钟阅读 - 8289 个词 阅读量 0C#中的三层前馈神经网络,带有图形显示(译文)
原文地址:https://www.codeproject.com/Articles/5272136/A-3-Layer-Feed-Forward-Neural-Net-In-Csharp-with-G
原文作者:Gary.Miller.WPF
译文由本站 robot-v1.0 翻译
前言
MNIST Digit recognition in C#
C#中的MNIST数字识别
C# implementation of a simple classification problem (recognizing digits from the MNIST dataset). Working through exercises like this one can provide detailed insight into how gradient descent is implemented using back propagation. These insights will prove valuable when designing solutions in specialized libraries such as TensorFlow.
一个简单分类问题的C#实现(从MNIST数据集中识别数字).通过这样的练习,可以深入了解如何使用反向传播实现梯度下降.当在TensorFlow等专业库中设计解决方案时,这些见解将被证明是有价值的.
介绍(Introduction)
此基本图像分类程序是使用众所周知的MNIST数据集进行数字识别的示例.这是用于机器学习的" hello world"程序.目的是提供一个示例,程序员可以编写代码并逐步调试,以深入了解反向传播的实际工作原理. TensorFlow之类的框架通过利用GPU的功能来解决更复杂的处理器密集型问题,但是当新手不知所措时,他可能会成为"泄漏抽象",以弄清楚为什么他的网络无法产生预期的效果结果.揭开这个主题的神秘面纱,并证明不需要特殊的硬件,语言或软件库即可实现针对简单问题的机器学习算法,这可能会很有用.(This basic image classification program is an example of digit recognition using the well-known MNIST data set. This is the “hello world” program for machine learning. The purpose is to provide an example which programmers can code and step through to gain hands-on insight into how back propagation really works. Frameworks such as TensorFlow enable the solution of more complex, processor-intensive problems by harnessing the power of the GPU, but can become a “leaky abstraction” when the novice is at a loss to figure out why his network isn’t producing the expected results. It may be useful to demystify this subject and demonstrate that no special hardware, languages, or software libraries are needed to implement machine learning algorithms for simple problems.)
背景(Background)
这里是一些有用文章的链接,这些文章提供了神经网络的理论框架:(Here are links to some useful articles which provide a theoretical framework for neural networks:)
- http://neuralnetworksanddeeplearning.com/chap1.html(http://neuralnetworksanddeeplearning.com/chap1.html)
- https://ml4a.github.io/ml4a/neural_networks/(https://ml4a.github.io/ml4a/neural_networks/)
- https://web.archive.org/web/20150317210621/https://www4.rgu.ac.uk/files/chapter3%20-%20bp.pdf(https://web.archive.org/web/20150317210621/https://www4.rgu.ac.uk/files/chapter3%20-%20bp.pdf) 这是我们打算构建的神经网络的示意图:(Here is a schematic diagram of the neural net we intend to build:)

我们正在制作一个具有一层隐藏层的前馈神经网络.我们的网络将在输入层中包含784个像元,每个像素用于一个28x28黑白数字图像.隐藏层中的单元数是可变的.输出层将包含10个像元,每个数字0-9对应一个.该输出层有时称为单热向量.训练目标是,为了成功进行推理,与正确数字相对应的单元格将包含接近1的值,而其余单元格则包含接近零的值.(We are making a feed-forward neural net with one hidden layer. Our network will have 784 cells in the input layer, one for each pixel of a 28x28 black and white digit image. The number of cells in the hidden layer is variable. The output layer will contain 10 cells, one for each digit 0-9. This output layer is sometimes called a one-hot vector. The training goal is that for a successful inference, the cell corresponding to the correct digit will contain a value close to 1, while the rest of the cells contain a value close to zero.)
使用程序(Using the Program)
您可以使用随附的zip文件中的代码在Visual Studio中构建解决方案.该示例是Winforms桌面程序.(You can build the solution in Visual Studio using the code in the accompanying zip file. The example is a Winforms desktop program.)
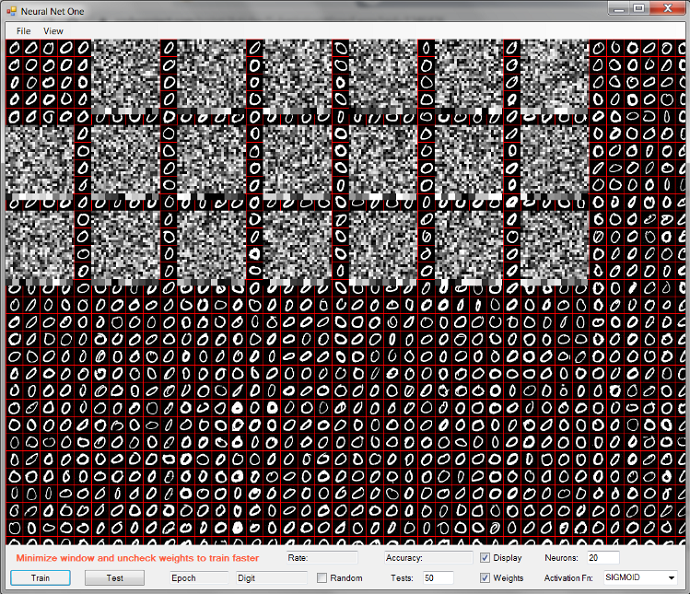
显示屏显示MNIST训练数字的图像,上面覆盖着隐藏层神经元的表示.到输入层的每个神经元连接的权重表示为灰度像素.这些连接对应于每个手写数字图像中的像素数.它们被初始化为随机值,这就是为什么它们看起来像静态的.每个块底部的灰色正方形行代表每个隐藏层神经元与10个输出单元中的每一个之间的连接的权重值.(The display shows an image of the MNIST training digits, overlaid with a representation of the hidden layer neurons. The weights of each neuronal connection to the input layer are represented as grayscale pixels. These connections correspond to the number of pixels in each handwritten digit image. They are initialized to random values, which is why they look like static. The row of grey squares at the bottom of each block represent the weight values of the connections between each hidden layer neuron and each of the 10 output cells.)
您可以通过运行一些测试来验证此随机加权网络没有预测价值.单击测试按钮,使其运行几秒钟,然后再次单击以停止.每个数字的结果表示正确预测的分数.值1.0表示所有设置都是正确的,而值0.0表示没有设置正确.该显示表明该网络的猜测很少是正确的.如果您进行了更长的测试系列,则值将更加统一,并且每个数字接近0.1,这近似于随机几率(十分之一).(You can verify that this random weighted network has no predictive value by running some tests. Click the test button and let it run for a few seconds, then click it again to stop. The results for each digit indicate the fraction of correct predictions. A value of 1.0 would mean all were correct, while a value of 0.0 would mean none were correct. This display shows that very few of the network’s guesses were correct. If you ran a longer series of tests, the values would be more uniform and closer to 0.1 for each digit, which would approximate random chance (1 out of 10).)

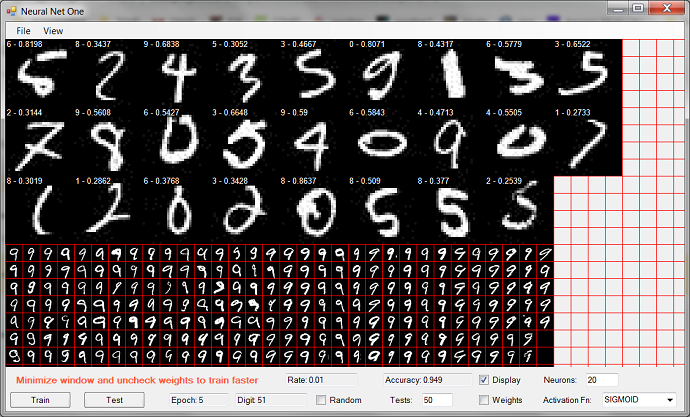
在测试过程中,程序将显示每个错误猜中的数字图像.每张图片顶部的标题显示了网络的最佳猜测,后跟一个实数,表示网络对该答案的信心程度.此处显示的最后一位数字是5.网络认为它是2,置信度为0.2539(这意味着0.2539是输出层阵列中的最大值).(During the test procedure, the program displays each wrongly guessed digit image. The captions at the top of each image show the network’s best guess, followed by a real number representing the degree of confidence the network had for this answer. The last digit shown here is a 5. The network thought it was a 2, with a confidence level of 0.2539 (this means 0.2539 was the largest value in the output layer array).)
要训练网络,请点击(To train the network, click the)培养(Train)按钮.在每一轮推理和反向传播发生时,显示将在数字图像之间循环. Digit计数器代表数字0-9的训练回合,并且训练集中的所有数字均已完成时,Epoch计数器将递增.由于要更新图形显示,因此进度将非常缓慢(由于程序正在构建内部数据结构,因此第一个10位数字将特别慢).要使训练更快,请取消单击(button. The display will cycle through the digit images as each round of inference and back propagation takes place. The Digit counter represents a training round of digits 0-9 and the Epoch counter is incremented when all the digits in the training set have been completed. Progress will be quite slow due to the work of updating the graphical display (the first set of 10 digits will be especially slow because the program is building internal data structures). To make the training go much faster, unclick the)显示(Display)和(and)重物(Weights)复选框,并最小化程序UI.(check boxes, and minimize the program UI.)
自动监视准确性(每50位左右运行一次测试),并在底部显示定期结果.在几秒钟内,甚至在第一个纪元完成之前,准确度将达到80%甚至更高,大约需要一分钟.经过几个时代之后,显示可能看起来像这样:(The accuracy is automatically monitored (a round of tests is run every 50 digits or so), and periodic results displayed at the bottom. Within a few seconds, accuracy will rise to 80 percent and higher before even the first epoch is completed, which takes around a minute. After a few epochs have gone by, the display may look something like this:)

这里有几件事值得注意.我们已经完成了7个纪元,或者说是通过训练数字完成了7次旅行(每个集合包含5000多个数字).我们停止了对纪元7的数字集439的训练(这是第八个纪元,因为它们从0开始编号).估计的准确性已提高到0.9451,或约94%.这基于测试0-9的50位数字集.如果您增加(A few things are worth noting here. We have completed 7 epochs, or 7 trips through the training digits (each set contains over 5000 digits). We halted the training on digit set 439 of epoch 7 (which is the eighth epoch since they are numbered from 0). The estimated accuracy has improved to 0.9451, or about 94 percent. This is based on testing 50 digit sets of 0-9. If you increase the value in the) Tests 字段并运行更长的测试,准确性可能会上升或下降.权重显示不再是静态的,并且开始显示特征性的神秘漩涡和污迹,这些漩涡和污迹代表了隐藏层如何对数字图像进行分类的最佳思想.(field and run a longer test, the accuracy may go up or down. The weight display is no longer static and has begun to show the characteristic mysterious swirls and smudges that represent the hidden layer’s best idea of how to classify the digit images.)
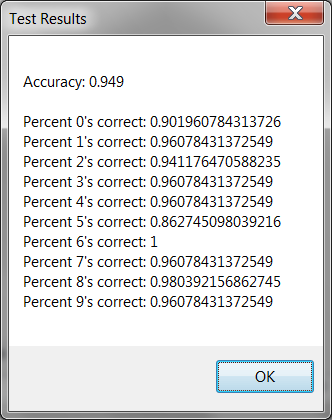
如果您通过点击再次针对测试数据集运行测试(If you run a test against the test dataset again by clicking the)测试(Test)按钮,结果现在看起来好多了.在测试通过期间,该程序使所有的6正确无误,其中96%的正确,3\4\7和9,以及98%的8.法孚的表现很差,只有86%.(button, the results now look much better. During this testing pass, the program got all the sixes correct, 96 percent of ones, threes, fours, sevens and nines, and 98 percent of eights. Fives had a very poor showing at only 86 percent.)
图像处理(Image Processing)
MNIST(The MNIST) dataset 可以在线使用各种格式,但是我选择使用训练集的jpeg图像.图像文件包含在解决方案zip文件中.他们居住在(is available online in various formats, but I chose to work with jpeg images of the training sets. The image files are included with the solution zip file. They reside in)前馈/合并/调试(FeedForward/bin/Debug).程序读取这些图像并提取像素信息.这是将像素值复制到字节数组的代码段.位图数据被锁定,并且InteropServices用于访问非托管代码.这是获取每个像素值的最有效,最快捷的方法.(. The program reads these images and extracts the pixel information. Here is the snippet that copies the pixel values to a byte array. The bitmap data is locked and InteropServices are used to access unmanaged code. This is the most efficient and speedy way to get to each pixel value.)
//
// DigitImage.cs
//
        public static byte[] ByteArrayFromImage(Bitmap bmp)
        {
            Rectangle rect = new Rectangle(0, 0, bmp.Width, bmp.Height);
            BitmapData data = bmp.LockBits(rect, ImageLockMode.ReadOnly, bmp.PixelFormat);
            IntPtr ptr = data.Scan0;

            int numBytes = data.Stride * bmp.Height;
            byte[] image_bytes = new byte[numBytes];

            System.Runtime.InteropServices.Marshal.Copy(ptr, image_bytes, 0, numBytes);

            bmp.UnlockBits(data);

            return image_bytes;
        }
从那里开始,信息被安排成结构,使其有可能随机访问训练和测试数据集的每个图像中的每个像素.每个原始图像都显示成网格排列的数千个数字.由于各个数字的尺寸一致,因此可以隔离每个数字并将其存储在(From there, the information is arranged into structures that make it possibly to randomly access each pixel in each image of the training and test data sets. Each original image shows thousands of digits arranged in a grid. Since the individual digits have consistent dimensions, it is possible to isolate each digit and store it in an instance of the) DigitImage 类.数字像素存储为字节数组列表,这些字节数组代表每个单独数字的扫描线.这是在(class. The digit pixels are stored as a list of byte arrays which represent the scan lines for each individual digit. This is done in the) DigitImages 类库.(class library.)
namespace digitImages
{
    public class DigitImage
    {
        public static int digitWidth = 28;
        public static int nTypes = 10;

        static Random random = new Random(DateTime.Now.Millisecond + DateTime.Now.Second);

        public static DigitImage[] trainingImages = new DigitImage[10];
        public static DigitImage[] testImages = new DigitImage[10];

        public Bitmap image = null;
        public byte[] imageBytes;

        List<byte[]> pixelRows = null;

.

.

.

        public static void loadPixelRows(int Expected, bool testing)
        {
            if (testing)
            {
                byte[] imageBytes = DigitImage.testImages[Expected].imageBytes;

                Bitmap image = DigitImage.testImages[Expected].image;

                if (DigitImage.testImages[Expected].pixelRows == null)
                {
                    DigitImage.testImages[Expected].pixelRows = new List<byte[]>();

                    for (int i = 0; i < image.Height; i++)
                    {
                        int index = i * image.Width;
                        byte[] rowBytes = new byte[image.Width];
                        for (int w = 0; w < image.Width; w++)
                        {
                            rowBytes[w] = imageBytes[index + w];
                        }
                        DigitImage.testImages[Expected].pixelRows.Add(rowBytes);
                    }
                }
            }
            else
            {
                byte[] imageBytes = DigitImage.trainingImages[Expected].imageBytes;

                Bitmap image = DigitImage.trainingImages[Expected].image;

                if (DigitImage.trainingImages[Expected].pixelRows == null)
                {
                    DigitImage.trainingImages[Expected].pixelRows = new List<byte[]>();

                    for (int i = 0; i < image.Height; i++)
                    {
                        int index = i * image.Width;
                        byte[] rowBytes = new byte[image.Width];
                        for (int w = 0; w < image.Width; w++)
                        {
                            rowBytes[w] = imageBytes[index + w];
                        }
                        DigitImage.trainingImages[Expected].pixelRows.Add(rowBytes);
                    }
                }
            }
        }
主要形式(The Main Form)
主窗体使用非闪烁面板绘制重量显示.(The main form uses a non-flicker panel to draw the weight display.)
public class MyPanel : System.Windows.Forms.Panel
    {
        // non-flicker drawing panel
        public MyPanel()
        {
            this.SetStyle(
                System.Windows.Forms.ControlStyles.UserPaint |
                System.Windows.Forms.ControlStyles.AllPaintingInWmPaint |
                System.Windows.Forms.ControlStyles.OptimizedDoubleBuffer,
                true);
        }
    }
这是程序如何将784输入的灰度表示绘制为隐藏层权重,以及将10个隐藏层绘制为输出层权重的方式:(Here is how the program draws the grayscale depiction of the 784 input to hidden layer weights, and the 10 hidden layer to output layer weights:)
        private void rangeOfHiddenWeights(out double MIN, out double MAX)
        {
            List<double> all = new List<double>();

            for (int N = 0; N < NeuralNetFeedForward.hiddenLayer.nNeurons; N++)
            {
                foreach (double d in NeuralNetFeedForward.hiddenLayer.neurons[N].weights)
                {
                    all.Add(d);
                }
            }

            all.Sort();

            MIN = all[0];
            MAX = all[all.Count - 1];
        }

        private void drawWeights(Graphics ee, HiddenLayer hidLayer)
        {
            int weightPixelWidth = 4;

            int W = (digitImages.DigitImage.digitWidth * (weightPixelWidth + 1));
            int H = (digitImages.DigitImage.digitWidth * (weightPixelWidth));
            int wid = H / 10;

            int yOffset = 0;
            int xOffset = 0;

            bool drawRanges = false;

            double mind = 0;
            double maxd = 0;
            rangeOfHiddenWeights(out mind, out maxd);
            double range = maxd - mind;

            Bitmap bmp = new Bitmap(W, H + wid);
            Graphics e = Graphics.FromImage(bmp);

            for (int N = 0; N < hidLayer.nNeurons; N++)
            {
                double[] weights = hidLayer.neurons[N].weights;

                // draw hidden to output neuron weights for this hidden neuron
                double maxout = double.MinValue; // max weight of last hidden layer
                                                 // to output layer
                double minout = double.MaxValue; // min weight of last hidden layer
                                                 // to output layer
                for (int output = 0;
                     output < NeuralNetFeedForward.outputLayer.nNeurons; output++)
                {
                    if (N < NeuralNetFeedForward.outputLayer.neurons[output].weights.Length)
                    {
                        double Weight =
                               NeuralNetFeedForward.outputLayer.neurons[output].weights[N];

                        if (Weight > maxout)
                        {
                            maxout = Weight;
                        }
                        if (Weight < minout)
                        {
                            minout = Weight;
                        }

                        double Mind =
                           NeuralNetFeedForward.outputLayer.neurons[output].weights.Min();
                        double Maxd =
                           NeuralNetFeedForward.outputLayer.neurons[output].weights.Max();
                        double Range = Maxd - Mind;
                        double R = ((Weight - Mind) * 255.0) / Range;
                        int r = Math.Min(255, Math.Max(0, (int)R));
                        Color color = Color.FromArgb(r, r, r);

                        int X = (wid * output);
                        int Y = H;
                        e.FillRectangle(new SolidBrush(color), X, Y, wid, wid);
                    }
                    else
                    {
                        maxout = 0;
                        minout = 0;
                    }
                }

                // draw the input to hidden layer weights for this neuron
                for (int column = 0; column < digitImages.DigitImage.digitWidth; column++)
                {
                    for (int row = 0; row < digitImages.DigitImage.digitWidth; row++)
                    {
                        double weight = weights[(digitImages.DigitImage.digitWidth * row) +
                                        column];
                        double R = ((weight - mind) * 255.0) / range;
                        int r = Math.Min(255, Math.Max(0, (int)R));

                        int x = column * weightPixelWidth;
                        int y = row * weightPixelWidth;

                        int r2 = r;

                        if (hidLayer.neurons[N].isDropped)
                        {
                            r2 = Math.Min(255, r + 50);
                        }

                        Color color = Color.FromArgb(r, r2, r);

                        e.FillRectangle(new SolidBrush(color), x, y,
                                        weightPixelWidth, weightPixelWidth);
                    }
                }

                xOffset += W;
                if (xOffset + W >= this.ClientRectangle.Width)
                {
                    xOffset = 0;
                    yOffset += W;
                }

                ee.DrawImage(bmp, new Point(xOffset, yOffset));
            }
        }
输入层(Input Layer)
输入层非常简单(为清晰起见,省略了一些有关实现辍学的实验代码).它具有一项功能,该功能将输入层设置为要分类的数字的表示形式.这里要注意的是,来自灰度图像的0-255字节信息被压缩为0到1之间的实数.(The input layer is very simple (some experimental code about implementing dropouts has been omitted for clarity). It has one function, which sets the input layer to the representation of the digit to be classified. The thing to note here is that the 0-255 byte information from the grayscale image is squashed into a real number between 0 and 1.)
using System;
using System.Collections.Generic;
using System.Linq;
using System.Text;

namespace NeuralNetFeedForward
{
    class InputLayer
    {
        public double[] inputs;

        public void setInputs(byte[] newInputs)
        {
            inputs = new double[newInputs.Length];

            for (int i = 0; i < newInputs.Length; i++)
            {
                // squash input
                inputs[i] = (double)newInputs[i] / 255.0;
            }
        }
    }
}
隐藏层(Hidden Layer)
隐藏层同样非常简单.它有两个功能,(The hidden layer is similarly very simple. It has two functions,) activate (推论)和((inference) and) backPropagate (学习).((learning).)
    class HiddenLayer
    {
        // public static int nNeurons = 15; // original
        public int nNeurons = 30;

        public HiddenNeuron[] neurons;

        public NeuralNetFeedForward network;

        public HiddenLayer(int N, NeuralNetFeedForward NETWORK)
        {
            network = NETWORK;

            nNeurons = N;

            neurons = new HiddenNeuron[nNeurons];

            for (int i = 0; i < neurons.Length; i++)
            {
                neurons[i] = new HiddenNeuron(i, this);
            }
        }

        public void backPropagate()
        {
            foreach (HiddenNeuron n in neurons)
            {
                n.backPropagate();
            }
        }

        public void activate()
        {
            foreach (HiddenNeuron n in neurons)
            {
                n.activate();
            }
        }
    }
}
隐藏层神经元的类.为了清楚起见,一些关于辍学的实验代码已被省略.只有三个功能:(Class for the hidden layer neuron. Some experimental code about dropouts has been omitted for clarity. There are only three functions:) activate ,(,) backPropagate 和(, and) initWeights ,将权重初始化为随机值.请注意,在向后传递时,必须根据该神经元对该错误的贡献来计算每个输出的误差.由于输出层权重在向后传递时发生变化,因此必须保存先前的正向传递权重并用于计算误差.这里的另一个难题是程序允许使用四个不同的激活功能.稍后再详细介绍.(, which initializes the weights to random values. Note that on the backward pass, the error for each output must be calculated according to this neuron’s contribution to that error. Since the output layer weights change on the backward pass, the previous forward pass weights must be saved and used to calculate the error. Another wrinkle here is that the program allows the use of four different activation functions. More on this later.)
class HiddenNeuron
{
    public int index = 0;

    public double ERROR = 0;

    public double[] weights =
      new double[digitImages.DigitImage.digitWidth * digitImages.DigitImage.digitWidth];
    public double[] oldWeights =
      new double[digitImages.DigitImage.digitWidth * digitImages.DigitImage.digitWidth];

    public double sum = 0.0;
    public double sigmoidOfSum = 0.0;

    public HiddenLayer layer;

    public HiddenNeuron(int INDEX, HiddenLayer LAYER)
    {
        layer = LAYER;

        index = INDEX;

        initWeights();
    }

    public void initWeights()
    {
        weights = new double[digitImages.DigitImage.digitWidth *
                  digitImages.DigitImage.digitWidth];

        for (int y = 0; y < weights.Length; y++)
        {
            weights[y] = NeuralNetFeedForward.randomWeight();
        }
    }

    public void activate()
    {
        sum = 0.0;

        for (int y = 0; y < weights.Length; y++)
        {
            sum += NeuralNetFeedForward.inputLayer.inputs[y] * weights[y];
        }

        sigmoidOfSum = squashFunctions.Utils.squash(sum);
    }

    public void backPropagate()
    {
        // see example:
        // https://web.archive.org/web/20150317210621/https://www4.rgu.ac.uk/files/chapter3%20-%20bp.pdf

        double sumError = 0.0;

        foreach (OutputNeuron o in NeuralNetFeedForward.outputLayer.neurons)
        {
            sumError += (
                o.ERROR
                * o.oldWeights[index]);
        }

        ERROR = squashFunctions.Utils.derivative(sigmoidOfSum) * sumError;

        for (int w = 0; w < weights.Length; w++)
        {
            weights[w] += (ERROR * NeuralNetFeedForward.inputLayer.inputs[w]) *
                           layer.network.learningRate;
        }
    }
}
输出层(Output Layer)
输出层和神经元的非常简单的代码.请注意,输出层神经元的数量始终为10.这与对数字进行分类时可能的答案0-9的数量相对应.如前所述,在反向传播期间,有必要在调整权重之前保留先前(旧)权重的副本,因此可以将它们用于中间(隐藏)层的错误计算中.与隐藏层一样,权重被初始化为随机值.(The very simple code for the output layer and neuron. Note that the number of output layer neurons is always 10. This corresponds to the number of possible answers 0-9 when classifying a digit. As previously mentioned, during back propagation, it is necessary to preserve a copy of the previous (old) weights before adjusting the weights, so they can be used in the error calculation for the middle (hidden) layer. As in the hidden layer, weights are initialized to random values.)
class OutputLayer
{
    public NeuralNetFeedForward network;

    public HiddenLayer hiddenLayer;

    public int nNeurons = 10;

    public OutputNeuron[] neurons;

    public OutputLayer(HiddenLayer h, NeuralNetFeedForward NETWORK)
    {
        network = NETWORK;

        hiddenLayer = h;

        neurons = new OutputNeuron[nNeurons];

        for (int i = 0; i < nNeurons; i++)
        {
            neurons[i] = new OutputNeuron(this);
        }
    }

    public void activate()
    {
        foreach (OutputNeuron n in neurons)
        {
            n.activate();
        }
    }

    public void backPropagate()
    {
        foreach (OutputNeuron n in neurons)
        {
            n.backPropagate();
        }
    }
}

class OutputNeuron
{
    public OutputLayer outputLayer;

    public double sum = 0.0;
    public double sigmoidOfSum = 0.0;
    public double ERROR = 0.0;

    public double [] weights;
    public double[] oldWeights;

    public double expectedValue = 0.0;

    public OutputNeuron(OutputLayer oL)
    {
        outputLayer = oL;
        weights = new double[outputLayer.hiddenLayer.nNeurons];
        oldWeights = new double[outputLayer.hiddenLayer.nNeurons];
        initWeights();
    }

    public void activate()
    {
        sum = 0.0;

        for (int y = 0; y < weights.Length; y++)
        {
            sum += outputLayer.hiddenLayer.neurons[y].sigmoidOfSum * weights[y];
        }

        sigmoidOfSum = squashFunctions.Utils.squash(sum);
    }

    public void calculateError()
    {
        ERROR = squashFunctions.Utils.derivative(sigmoidOfSum) *
                (expectedValue - sigmoidOfSum);
    }

    public void backPropagate()
    {
        // see example:
        // https://web.archive.org/web/20150317210621/https://www4.rgu.ac.uk/files/chapter3%20-%20bp.pdf

        calculateError();

        int i = 0;
        foreach (HiddenNeuron n in outputLayer.hiddenLayer.neurons)
        {
            oldWeights[i] = weights[i]; // to be used for hidden layer back propagation
            weights[i] += (ERROR * n.sigmoidOfSum) * outputLayer.network.learningRate;
            i++;
        }
    }

    public void initWeights()
    {
        for (int y = 0; y < weights.Length; y++)
        {
            weights[y] = NeuralNetFeedForward.randomWeight();
        }
    }
}
网络(The Network)
实现网络的类.为了清楚起见,省略了一些有关将权重保存到文件,动态降低学习率和其他非必要功能的代码.重要功能是(Class that implements the network. Some code about saving weights to files, dynamically reducing the learning rate and other non-essential functions has been omitted for clarity. Important functions are) train() ,(,) testInference() ,(,) setExpected() 和(, and) answer() .注意(. Note that) setExpected() 通过设置与所需答案对应的输出神经元的值来工作(works by setting the value of the output neuron corresponding to the desired answer to) 1 ,以及所有其他输出神经元(, and all the other output neurons to) 0 .这种编码信息的方法有时称为"单热向量".同样,(. This method of encoding information is sometimes called a “one-hot vector”. Similarly,) answer() 通过找到具有最高值的输出神经元来工作.理想情况下,该值应接近1,其他所有值都应接近0.这是训练目标,通过该目标可以计算错误并通过网络向后传播.的(works by finding the output neuron with the highest value. Ideally, this value would be close to 1 and all the others would be close to 0. This is the training goal against which errors are calculated and back-propagated through the network. The) train() 函数只是调用(function simply calls) setExpected() 建立目标,然后打电话(to establish a goal, then calls) activate() 和(and) backPropagate() 尝试进行推断并根据计算出的误差调整层权重.的(to attempt an inference and adjust the layer weights based on the error that was calculated. The) activate() 和(and) backPropagate() 函数仅调用中间层和输出层的相应函数.(functions simply call the corresponding functions for the middle layer and output layer.)
class NeuralNetFeedForward
{
    // settings
    public enum ActivationType { SIGMOID, TANH, RELU, LEAKYRELU };
    public ActivationType activationType = ActivationType.LEAKYRELU;
    public double learningRate = 0.01;

    public List<inferenceError> errors = new List<inferenceError>();

    public static int expected;

    public static Random rand = new Random(DateTime.Now.Millisecond);

    public static InputLayer inputLayer;
    public static HiddenLayer hiddenLayer;
    public static OutputLayer outputLayer;

    public int nFirstHiddenLayerNeurons = 30;

    public void setExpected(int EXPECTED)
    {
        expected = EXPECTED;

        for (int i = 0; i < NeuralNetFeedForward.outputLayer.neurons.Length; i++)
        {
            if (i == EXPECTED)
            {
                NeuralNetFeedForward.outputLayer.neurons[i].expectedValue = 1.0;
            }
            else
            {
                NeuralNetFeedForward.outputLayer.neurons[i].expectedValue = 0.0;
            }
        }
    }

    public void create()
    {
        inputLayer = new InputLayer();
        hiddenLayer = new HiddenLayer(nFirstHiddenLayerNeurons, this);
        outputLayer = new OutputLayer(hiddenLayer, this);
    }

    public NeuralNetFeedForward(int NNeurons)
    {
        nFirstHiddenLayerNeurons = NNeurons;

        create();
    }

    public NeuralNetFeedForward()
    {
        create();
    }

    public static double dotProduct(double[] a, double[] b)
    {
        double result = 0.0;

        for (int i = 0; i < a.Length; i++)
        {
            result += a[i] * b[i];
        }

        return result;
    }

    public static double randomWeight()
    {
        double span = 50000;
        int spanInt = (int)span;

        double magnitude = 10.0;

        return ((double)(NeuralNetFeedForward.rand.Next(0, spanInt * 2) - spanInt)) /
                        (span * magnitude);
    }

    public bool testInference(int EXPECTED, out int guessed, out double confidence)
    {
        setExpected(EXPECTED);

        activate();

        guessed = answer(out confidence);

        return (guessed == EXPECTED);
    }

    public void train(int nIterations, int EXPECTED)
    {
        setExpected(EXPECTED);

        for (int n = 0; n < nIterations; n++)
        {
            activate();
            backPropagate();
        }
    }

    public void activate()
    {
        hiddenLayer.activate();
        outputLayer.activate();
    }

    public void backPropagate()
    {
        outputLayer.backPropagate();
        hiddenLayer.backPropagate();
    }

    public int answer(out double confidence)
    {
        confidence = 0.0;
        double max = 0;

        int result = -1;

        for (int n = 0; n < NeuralNetFeedForward.outputLayer.nNeurons; n++)
        {
            double s = NeuralNetFeedForward.outputLayer.neurons[n].sigmoidOfSum;

            if (s > max)
            {
                confidence = s;
                result = n;

                max = s;
            }
        }

        return result;
    }
}
实用工具(Utilities)
您可以选择四个激活函数来运行该程序:S型,双曲正切,线性校正和"漏泄"线性校正.的(You can run this program with a choice of four activation functions: sigmoid, hyperbolic tangent, rectified linear, and “leaky” rectified linear. The) Utils 中的课程(class in the) squashFunctions 类库包含这四个激活函数的实现,以及在反向传播中使用的它们对应的派生类.(class library contains the implementations of these four activation functions, along with their corresponding derivatives which are used in back propagation.)
public class Utils
{
    public enum ActivationType { SIGMOID, TANH, RELU, LEAKYRELU };
    public static ActivationType activationType = ActivationType.LEAKYRELU;

    public static double squash(double x)
    {
        if (activationType == ActivationType.TANH)
        {
            return hyTan(x);
        }
        else if (activationType == ActivationType.RELU)
        {
            return Math.Max(x, 0);
        }
        else if (activationType == ActivationType.LEAKYRELU)
        {
            if (x >= 0)
            {
                return x;
            }
            else
            {
                return x * 0.15;
            }
        }
        else
        {
            return sigmoid(x);
        }
    }

    public static double derivative(double x)
    {
        if (activationType == ActivationType.TANH)
        {
            return derivativeOfTanHofX(x);
        }
        else if (activationType == ActivationType.RELU)
        {
            return x > 0 ? 1 : 0;
        }
        else if (activationType == ActivationType.LEAKYRELU)
        {
            return x >= 0 ? 1 : 0.15;
        }
        else
        {
            return derivativeOfSigmoidOfX(x);
        }
    }

    public static double sigmoid(double x)
    {
        double s = 1.0 / (1.0 + Math.Exp(-x));

        return s;
    }

    public static double derivativeOfSigmoid(double x)
    {
        double s = sigmoid(x);

        double sPrime = s * (1.0 - s);

        return sPrime;
    }

    public static double derivativeOfSigmoidOfX(double sigMoidOfX)
    {
        double sPrime = sigMoidOfX * (1.0 - sigMoidOfX);

        return sPrime;
    }

    public static double hyTan(double x)
    {
        double result = Math.Tanh(x);

        return result;
    }

    public static double derivativeOfTanH(double x)
    {
        double h = hyTan(x);
        return derivativeOfTanHofX(h);
    }

    public static double derivativeOfTanHofX(double tanHofX)
    {
        return 1.0 - (tanHofX * tanHofX);
    }

    public static double dotProduct(double[] a, double[] b)
    {
        double result = 0.0;

        for (int i = 0; i < a.Length; i++)
        {
            result += a[i] * b[i];
        }

        return result;
    }
}
改进空间(Room for Improvement)
仅需几分钟的培训,该网络即可达到大约95%的准确性.这足以证明这一概念,但实际上并不是一个很好的实际结果.有几种可能的方法可以提高准确性.(With only a few minutes of training, this network can achieve roughly 95% accuracy. This is sufficient to prove the concept, but it’s not really a very good practical result. There are a few possible ways in which the accuracy might be improved.)
首先,您可以尝试改变隐藏神经元的数量.包含的代码默认情况下使用20个神经元,但是可以增加或减少此数目(硬编码至少10个隐藏层神经元,但是您可以根据需要更改此数目).此外,您可以通过从用户界面的下拉菜单中选择一个来尝试不同的激活功能.某些激活函数(例如RELU)通常趋于收敛更快,但可能会经历爆炸性的梯度,而另一些可能会经受消失的梯度.(First, you can experiment with varying the number of hidden neurons. The included code uses 20 neurons by default, but this number can be increased or reduced (a minimum of 10 hidden layer neurons is hard-coded in, but you can change this if you like). Also, you can experiment with trying different activation functions by choosing one from the dropdown on the UI. Some activation functions such as RELU usually tend to converge faster but may be subject to exploding gradients, while others may be subject to vanishing gradients.)
您训练的每个网络都会得出不同的权重,因为权重是使用随机值初始化的.使用梯度下降训练神经网络受到解决进入"局部最小值"的问题的困扰,因此缺少更好的解决方案.如果您想得到很好的训练结果,则可以使用(Each network you train will come out with different weights, because the weights are initialized with random values. Training of neural nets using gradient descent is subject to the problem of settling into “local minima” and thereby missing a better possible solution. If you come up with a good training result, you can use the commands on the)文件(File)菜单以保存该重量配置并稍后再读回.(menu to save that weight configuration and read it back in later.)
通过旋转代码,可以获得更好的结果.一种可能的改进是随机辍学.在这种方法中,中间层的一些神经元被随机省略.我已经包含了一些用于实现随机辍学的代码,但是该代码是实验性的,尚未经过全面测试. UI上不提供此选项,但是通过浏览代码可以进一步进行研究.(By twiddling the code, better results may be achieved. One possible improvement is random dropouts. In this method, some of the neurons in the middle layer are randomly omitted. I have included some code for implementing random dropouts, but the code is experimental and not fully tested. This option is not available from the UI, but by fooling around with the code, you can investigate further.)
尚未经过充分测试的另一个代码皱纹正在动态降低学习速度.我已经在代码中添加了一些挂钩,以减少达到一定次数的尝试后的学习速度.它的实现相当粗略,该功能目前已关闭.应该有可能根据当前的准确性水平而不是受训练的数字数目来触发学习率的降低.(Another code wrinkle that’s not fully tested is dynamically reducing the learning rate. I have included some hooks in the code to reduce the learning rate after a certain number of trials have been reached. It’s rather crudely implemented, and the feature is turned off right now. It should be possible to trigger reductions in the learning rate based upon the current level of accuracy, rather than by the number of digits trained.)
还应注意,可能会过度训练网络.更长的培训时间并不总是更好.您可以通过用户界面提前停止培训,但是应该可以通过更改代码以根据定期测试了解到的当前估计准确性来触发提前停止.(It should also be noted that it’s possible to overtrain a network. Longer training times are not always better. You can halt training early through the user interface, but it should be possible by altering the code to trigger early halts based upon the current estimated accuracy learned by periodic testing.)
最后,MNIST数据的一个特殊性是培训数据集数字是由邮政员工绘制的,而测试数据集数字是由小学生绘制的,因此测试和培训数据之间的质量存在显着差异.通过合并两个数据集,然后将它们任意分为训练数据和测试数据,可能会获得更好的结果.一种方法是将偶数位示例用作训练数据,将奇数位示例用作测试数据.这样可以确保您拥有截然不同的训练数据和测试数据,同时减少了两组质量之间的偶然差异.我已经使用"交错"功能实现了类似的功能,该功能尚未经过全面测试.这在UI中不可用,但是如果您浏览代码,则可以启用它.(Finally, a peculiarity of the MNIST data is that the training data set digits were drawn by postal employees, and the test data set digits were drawn by school children, so there is a notable difference in quality between the test and training data. Better results might be achieved by pooling the two data sets and then arbitrarily dividing them into training data and test data. One way to do this would be to use the even-numbered digit examples as training data and the odd-number digit examples as test data. This insures that you have distinct training data and test data, while reducing accidental differences between the quality of the two sets. I have implemented something like this with the “interleave” feature, which is not fully tested. This is not available in the UI, but if you look through the code, you can enable it.)
历史(History)
- 26(26)日(th)2020年6月:初始版本(June, 2020: Initial version)
- 15(15)日(th)2020年9月:更新(September, 2020: Update)
许可
本文以及所有相关的源代码和文件均已获得The Code Project Open License (CPOL)的许可。
C# machine-learning artificial-intelligence neural-nets WinForms.Net AI 新闻 翻译