远程控制LED/气象站/消息显示(第1部分-Raspberry Pi)(译文)
By robot-v1.0
本文链接 https://www.kyfws.com/pi/remote-controlled-led-weather-station-message-disp-zh/
版权声明 本博客所有文章除特别声明外,均采用 BY-NC-SA 许可协议。转载请注明出处!
- 8 分钟阅读 - 3793 个词 阅读量 0远程控制LED/气象站/消息显示(第1部分-Raspberry Pi)(译文)
原文地址:https://www.codeproject.com/Articles/1162831/Remote-controlled-LED-Weather-Station-Message-Disp
原文作者:Andrew Lai
译文由本站 robot-v1.0 翻译
前言
A small project to give my son a great surprise
一个使我儿子大惊喜的小项目
介绍(Introduction)
我经常与Raspberry Pi和电子产品打交道,而我4岁的儿子偶尔会来到我的办公桌上,通过将它们贴在面包板上来玩红色,黄色和绿色的LED.他称它们为"交通灯",所以我对自己想,为什么不为他建造一些在圣诞节做的东西!(I have been playing with Raspberry Pis and electronics a lot and my 4 year old son has occasionally come to my desk to play with the red, yellow and green LEDs by sticking them on breadboards. He called them “traffic lights”, so I thought to myself, why not build something for him which does that for Christmas!) 这是我已经决定的设备功能:(Here are the features of the device which I have decided:)
- 移动应用程序控制的交通信号灯,可以模拟交通信号灯/行人信号灯的序列,也可以手动打开/关闭(A mobile App controlled traffic light which can simulate the traffic light / pedestrian light sequences and can also be manually turned on/off)
- 一些实用的功能,例如显示20个字符x 4行的屏幕:(Some practical features like a 20 characters x 4 rows screen which displays:)
- 日期和时间(Date and time)
- 温湿度(Temperature and humidity)
- 由应用程序控制的消息(2行x 20个字符)(A message which is controlled by the app (2 lines x 20 characters))
本教程旨在介绍以下技术:(This tutorial aims to cover the following technologies:)
- 使用python和flask的简单Pi HTTP服务器(Simple Pi HTTP server using python and flask)
- 在Pi中运行的Superlight sqlite数据库(Superlight sqlite database running in Pi)
- 使用DHT22传感器使用Raspberry Pi读取温度和湿度.细节(Reading temperature and humidity with Raspberry Pi using DHT22 sensor. Details) 这里(here) .(.)
- 使用带有i2C接口的廉价20x4 LCD显示器.细节(Using a cheap 20x4 LCD display with i2C interface. Details) 这里(here) .(.)
- 使用Xamarin构建一个简单的移动应用程序,它将命令发送到Pi HTTP服务器.我要用(Building a simple mobile app using Xamarin which send commands to the Pi HTTP server. I am going to use) Xamarin形式(Xamarin Forms) ,这是一个非常方便的跨平台(iOS/Android/Windows移动版)框架.(, which is a very handy cross platform (iOS/Android/Windows mobile) framework.)
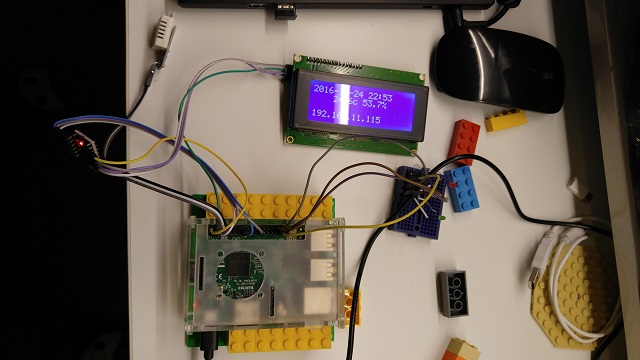
这是乐高和应用程序完美包装的最终结果.(Here’s the end result wrapped nicely with lego and the app.)

电路原理图(Circuit Diagram)
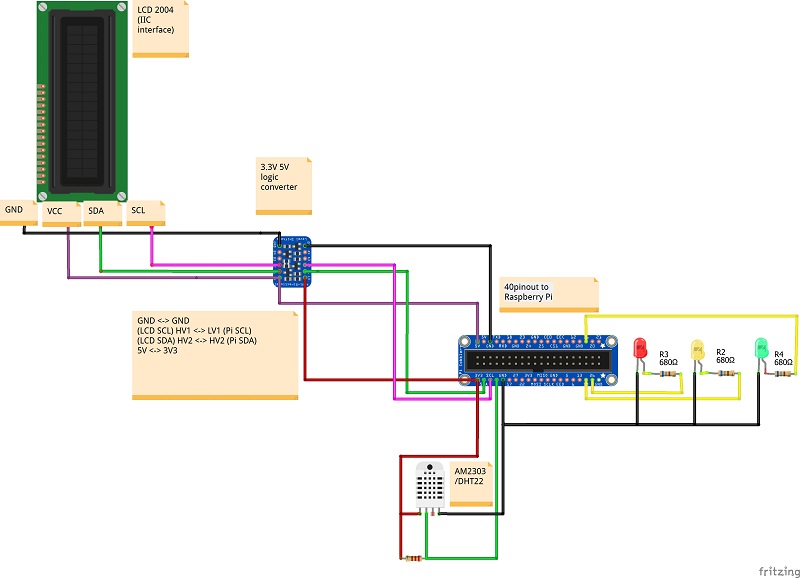
由于20x04 LCD需要5V,而Raspberry Pi可接受3.3V作为数字输入,因此需要3.3V/5V逻辑转换器.(Since the 20x04 LCD needs 5V and Raspberry Pi accept 3.3V as digital input, a 3.3V / 5V logic converter is needed.) 一个大版本是(A large version is) 这里(here) .(.)
使用代码(Using the Code)
已经开发了2种在Raspberry pi中运行的过程.(2 processes have been developed to run in the Raspberry pi.)
-
weather.py(weather.py)-这是一个有限循环:(- which is a finite loop which:)
- 获取并显示温度和湿度并将其保存到数据库(fetches and displays temperature and humidity and saves them to database)
- 在LCD上显示日期和时间(displays date and time on LCD)
- 启动时显示IP地址,因此应用程序可以轻松找到它(displays IP address when it boots up, so the app can easily find it)
-
天气www.py(weatherwww.py)-一个烧瓶python应用程序,它:(- a flask python app which:)
- 侦听天气请求命令,从数据库中读取并返回(listens to weather request commands, read from database and returns them)
- 收听交通信号灯控制命令(listens to traffic light control commands)
- 收听消息显示命令并将其显示在LCD上(listens to message display command and displays them on LCD)
假设代码将从(Let’s assume the code will be run from)/home/pi/天气(/home/pi/weather).(.)
运行weather.py(Running weather.py)
让我们开始(Lets start with)weather.py(weather.py),需要安装一些先决条件.(, there are a few prerequisites to be installed.) 该代码假定您在Raspberry Pi上运行Raspbian Wheezy或更高版本.(The code assume you are running Raspbian Wheezy or above on your Raspberry Pi.) 较旧的版本可能需要手动安装python gpio库.(Older version might require a manual installation of python gpio library.)
sudo apt-get install python-dev python-rpi.gpio
-
Adafruit_DHT-用于读取温度和湿度的库.在Raspberry Pi中运行以下命令以安装该库.完整的细节可以找到(- library for reading temperature and humidity. Run below in Raspberry Pi to install the library. Full details can be found) 这里(here) .(.) -
安装(Install)
sqlite3-sqlite是一个非常轻量的基于文件的SQL数据库.(- sqlite is a very light weight, file based SQL database.)创建数据库文件和表.(Create the database file and table.) 在sqlite提示符下,创建表:(In sqlite prompt, create the table:) -
安装I2C 2004显示所需的工具(或遵循(Install tools needed for I2C 2004 display (or follow) 这里(here) 有关详细说明):(for detail instructions):)启用i2C:(Enable i2C:)
-
选择"高级选项".(Select “Advanced Options”.)
-
选择" I2C".(Select “I2C”.)
-
选择"是".(Select “Yes”.) 安装实用程序:(Install Utilities:)
sudo apt-get update
sudo apt-get install -y python-smbus i2c-tools
重启:(Reboot:)
sudo reboot
按照示意图连接i2C 2004显示器.通过运行以下命令查找其地址.就我而言(Connect up the i2C 2004 display by following the schematic diagram. Find the address of it by running the following command. For my case, I got)0x27(0x27).(.)
sudo i2cdetect -y 1
编辑(Edit)**lcd_i2c.py(lcd_i2c.py)**反映您得到的地址:(to reflect the address you get:)
#for 2004
I2C_ADDR = 0x27
在此阶段,运行的所有先决条件(At this stage, all prerequisites for running)**weather.py(weather.py)**现在应该准备好了.尝试在下面运行((should now be ready. Try to run below () sudo 是必需的(is required for) gpio 访问).(access).)
sudo python weather.py
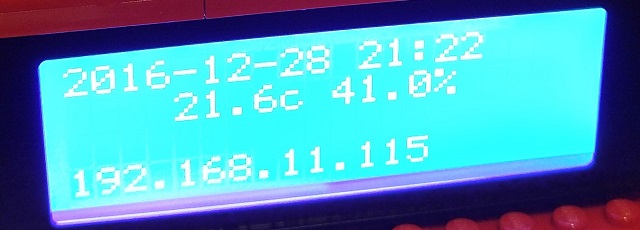
如果一切顺利,您应该在2004 LCD上看到类似下面的内容,其中显示了日期时间,温度,湿度和IP地址(3(If all goes well, you should see something similar to below in the 2004 LCD, showing the datetime, temperature, humidity and ip address (3)rd(rd)行将显示(row will show the) eth0 和4(and 4)日(th)行将显示(row will show) wlan0 ).().)
运行天气www.py(Running weatherwww.py)
**天气www.py(weatherwww.py)**是Flask Web应用程序. Flask是一个python框架,可让您轻松快速地编写以python编写的网络服务/动态网页.一种(is a flask web application. Flask is a python framework which allows you to write webservices / dynamic webpages written in python easily and quickly. A) 快速开始(quickstart) 指南可用.(guide is available.) 要安装flask,运行命令的最快方法如下.您也可以在(To install flask, the quickest way to run command as below. You can also run it under) 虚拟环境(virtualenv) .(.)
sudo pip install Flask
跑起来(To run up)**天气www.py(weatherwww.py)**内置烧瓶网络服务器下的webapp,运行以下命令:(webapp under the built-in flask webserver, run below:)
cd /home/pi/weather
export FLASK_APP=weatherwww.py
flask run --host=0.0.0.0
运行上面的命令后,应该说类似以下内容:(After running the above, It should say something like:)

使用浏览器测试烧瓶是否(Using a browser, test if the flask) webapp 正在工作(用您的Pi的IP地址替换192.168.11.115).(is working (replace 192.168.11.115 with IP address of your Pi).)
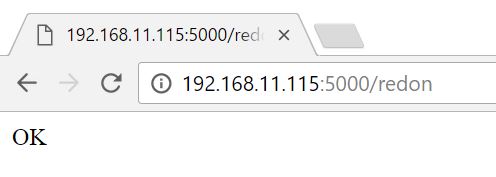
如果返回"确定",则表示该Web应用已启动并正在运行.如果所有电子设备均已连接,则红色LED也应点亮.(If it returns “OK”, it means the webapp is up and running. The red LED should also be turned on if the electronics are all connected up.) 设置的最后一步是通过调用Run脚本添加到rc.local中来自动启动两个进程(我在zip中包含RunWeather和RunWeatherWWW)(The last step of the setup is to autostart the two processes by adding to rc.local by calling the Run scripts (I have included RunWeather and RunWeatherWWW in the zip))
<code>sudo nano /etc/rc.local</code>
兴趣点(Points of Interest)
代码的快速说明-weather.py(Quick Explanation of the Code - weather.py)
启动时,它将获取温度和湿度并插入数据库中:(When starts up, it fetches the temperature and humidity and inserts into database:)
humidity, temperature = Adafruit_DHT.read_retry(sensor, 4)
InsertWeather(temperature,humidity)
然后尝试获取IP并将其显示在屏幕上(因为我们想让该设备无头运行):(Then attempts to fetch and display the IP on the screen (since we want to run this device headless):)
lanip = GetLANIP().strip()
wanip = GetWLANIP().strip()

retry=0

while((not lanip) and (not wanip)) and retry<5:
    time.sleep(2)
    lanip = GetLANIP().strip()
    wanip = GetWLANIP().strip()
    retry = retry + 1

lcd_i2c.lcd_string(lanip,LCD_LINE_3)
lcd_i2c.lcd_string(wanip,LCD_LINE_4)
然后它将进入一个无限循环,该循环不断获取天气(每10分钟)并刷新显示的时间(大约每30秒一次,具体取决于获取天气的时间).(It will then enter an infinite loop, which continuously fetches the weather (every 10mins) and refreshes the time on display (around every 30 seconds depending on how long it takes to fetch the weather).)
代码快速说明-weatherwww.py(Quick Explanation of the Code - weatherwww.py)
在flask中,每个URL都映射到一个方法.例如:(In flask, each URL is mapped to a method. For example:)
@app.route('/redon')
def redon():
    GPIO.output(GPIO_RED,True)
    return 'OK'
也有一些运行时间稍长的方法,例如这种方法.由于我们使用的是内置的单线程烧瓶Web容器,因此当上一个仍在运行时,它将接受任何新请求.为了改善这一点,我们可以考虑将其更改为异步运行,以启动一个新线程并立即返回响应.但是,这有点棘手,因为较新的请求将需要取消以前运行的请求.(There are also some slightly long running methods like this one. Since we are using the built in single threaded flask web container, it will accept any new request when the previous one is still running. To improve this, we can consider changing this to run async starting a new thread and returning response immediately. However, this gets a little trickly as newer requests will need to cancel previously running request.)
@app.route('/blinkyellow')
def blinkyellow():
    allledoff()
    GPIO.output(GPIO_YELLOW,True)
    time.sleep(1)
    GPIO.output(GPIO_YELLOW,False)
    time.sleep(1)
    GPIO.output(GPIO_YELLOW,True)
    time.sleep(1)
    GPIO.output(GPIO_YELLOW,False)
    time.sleep(1)
    GPIO.output(GPIO_YELLOW,True)
    time.sleep(1)
    GPIO.output(GPIO_YELLOW,False)
    return 'OK'
您也可以尝试其他网址,例如在LCD上显示消息,例如:(You may also try other url such as displaying the message on lcd like:)
http://192.168.11.115:5000/display?line3=hello&line4=how are you?
在(In) 第2部分(part 2) ,我将讨论用于远程控制此设备的Xamarin移动应用程序.(, I will be talking about the Xamarin mobile app for remote controlling this device.)
许可
本文以及所有相关的源代码和文件均已获得The Code Project Open License (CPOL)的许可。
Python C# Raspberry .NET IoT Xamarin 新闻 翻译